Tag Archives: M.2

Upgrading my new HP 14-bp060sa

As the company I was working for, Sanmina, has decided to move all the Software Development to Colorado, US, and closing the offices in Bishopstown, Cork, Ireland I found myself with the need to get a new laptop. At work I was using two Dell laptops, one very powerful and heavy equipped with an Intel Xeon processor and 32 GB of RAM. The other a lightweight one that I updated to 32 GB of RAM.

I had an accident around 8 months ago, that got my spine damaged, and so I cannot carry much weight.

My personal laptops at home, in Ireland are a 15″ with 16 GB of RAM, too heavy, and an Acer 11,6″ with 8GB of RAM and SSD (I upgraded it), but unfortunately the screen crashed. I still use it through the HDMI port. My main computer is a tower with a Core i7, 64GB of RAM and a Samsung NVMe SSD drive. And few Raspberrys Pi 4 and 3 :)

I was thinking about what ultra-lightweight laptop to buy, but I wanted to buy it in Barcelona, as I wanted a Catalan keyboard (the layout with the broken ç and accents). I tried by Amazon.es but I have problems to have shipped the Catalan keyboard layout laptops to my address in Ireland.

I was trying to find the best laptop for me.

While I was investigating I found out that none of the laptops in the market were convincing me.

The ones in around 1Kg, which was my initial target, were too big, and lack a proper full size HDMI port and Gigabit Ethernet. Honestly, some models get the HDMI or the Ethernet from an USB 3.1, through an adapter, or have mini-HDMI, many lack the Gigabit port, which is very annoying. Also most of the models come with 8GB of RAM only and were impossible to upgrade. I enrolled my best friend in my quest, in the research, and had the same conclusions.

I don’t want to have to carry adapters with me to just plug to a monitor or projector. I don’t even want to carry the power charger. I want a laptop that can work with me for a complete day, a full work session, without needing to recharge.

So while this investigation was going on, I decided to buy a cheap laptop with a good trade off of weight and cost, in order to be able to work on the coffee. I needed it for writing documents in Google Docs, creating microservices architectures, programming in Java and PHP, and writing articles in my blog. I also decided that this would be my only laptop with Windows, as honestly I missed playing Star Craft 2, and my attempts with Wine and Linux did not success.

Not also, for playing games :) , there are tools that are only available for Windows or for Mac Os X and Windows, like: POSTMAN, Kitematic for managing dockers visually, vSphere…

(Please note, as I reviewed the article I realized that POSTMAN is available for Linux too)

Please note: although I use mainly Linux everywhere (Ubuntu, CentOS, and RedHat mainly) and I contribute to Open Source projects, I do have Windows machines.

I created my Start up in 2004, and I still have Windows Servers, physical machines in a Data Center in Barcelona, and I still have VMs and Instances in Public Clouds with Windows Servers. Also I programmed some tools using Visual Studio and Visual Basic .NET, ASP.NET and C#, but when I needed to do this I found more convenient spawn an instance in Amazon or Azure and pay for its use.

When I created my Start up I offered my infrastructure as a way to get funding too, and I offered VMs with VMWare. I found that having my Mail Servers in VMs was much more convenient for Backups, cloning, to scale up, to avoid disruption and for Disaster and Recovery.

I wanted a cheap laptop that will not make feel bad if transporting it in a daily basis gets a hit and breaks, or that if it rains (and this happens more than often in Ireland) and it breaks is not super-hurtful, or even if it gets stolen. Yes, I’m from a big city, like is Barcelona, Catalonia, and thieves are a real problem. I travel, so I want a laptop decent enough that I can take to travel, and for going for a coffee, coding anything, and I feel comfortable enough that if something happens to it is not the end of the world.

Cork is not a big city, so the options were reduced. I found a laptop that meets my needs.

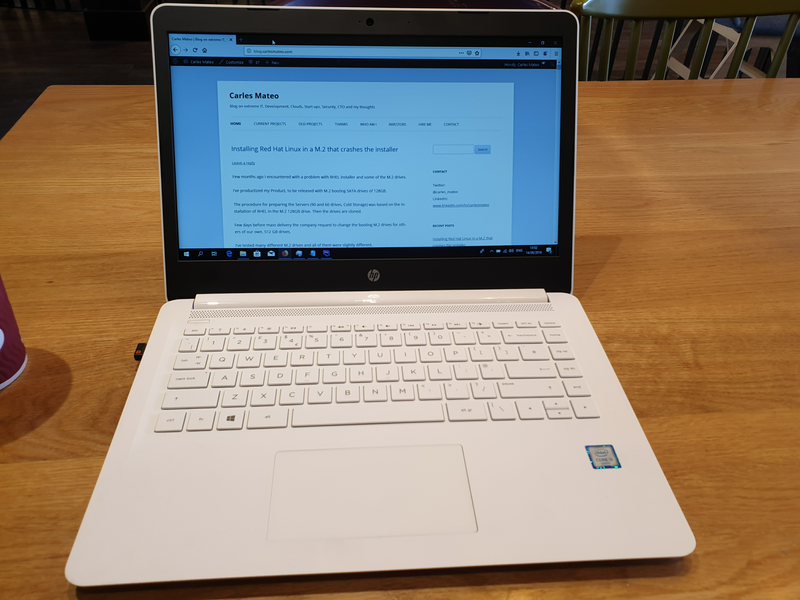
I got a HP s14-bp060sa for 439€.

It is equipped with a Intel® Core™ i3-6006U (2 GHz, 3 MB cache, 2 cores) , a 500GB SATA HDD, and 4 GB of DDR4 RAM.

The information on HP webpage is really scarce, but checking other pages I was able to see that the motherboard has 2 memory banks, accepting a max of 16GB of RAM.

I saw that there was an slot, unclear if supporting NVMe SSD drives, but supporting M.2 SSD for sure.

So I bought in Amazon 2x8GB and a M.2 500GB drive.

Since I was 5 years old I’ve been upgrading and assembling by myself all the computers. And this is something that I want to keep doing. It keeps me sharp, knowing the new ports, CPUs, and motherboard architectures, and keeps me in contact with the Hardware. All my life I’ve thought that specializing Software Engineers and Systems Engineers, like if computers were something separate, is a mistake, so I push myself to stay up to date of the news in all the fields.

I removed the spinning 500 GB SATA HDD, cause it’s slow and it consumes a lot of energy. With the M.2 SSD the battery last forever.

The interesting part is how I cloned the drive from the Spinning HDD to the new M.2.

I did:

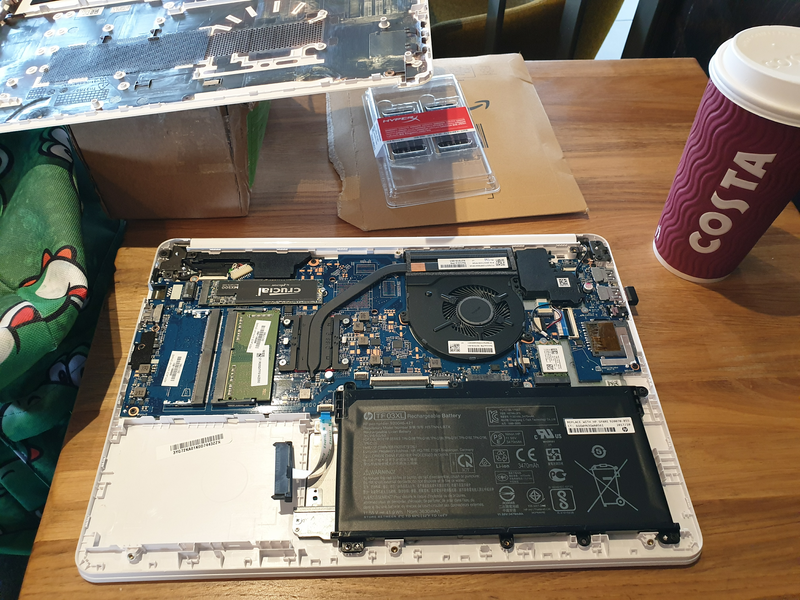
  • Open the computer (see pics below) and Insert the new drive M.2
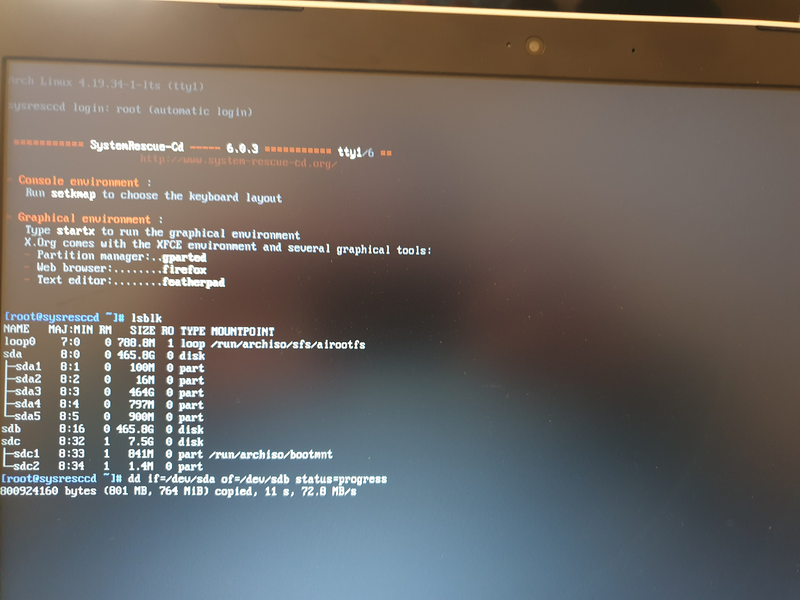
  • Boot with an USB Linux Rescue distribution (to do that I had to enable Legacy Boot on BIOS and boot with the USB)
  • Use lsblk command to identify the HDD drive, it was easy as it was the one with partitions
  • dd from if=/dev/sda to of=/dev/sdb with status=progress to see live status and speed (around 70MB/s) and estimated time to complete.
  • Please note that the new drive should be bigger or at least have the same number of bytes to avoid problems with the last partition.
  • I removed the HDD drive, this reduces the weight of my laptop by 100 grams
  • Disable Legacy Boot, and boot the computer. Windows started perfectly :)
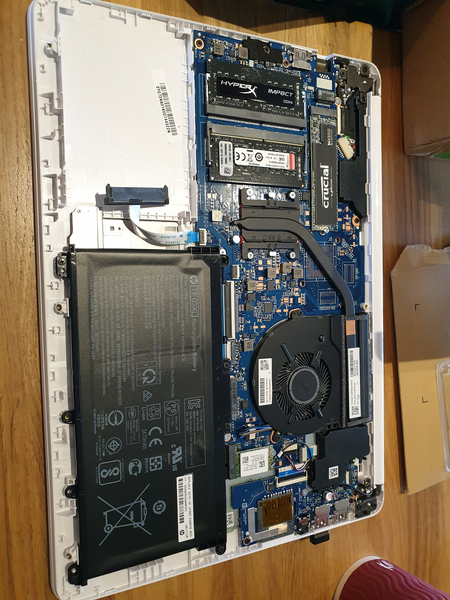
I found so few information about this model, that I wanted to share the pictures with the Community. Here are the pictures of the upgrade process.
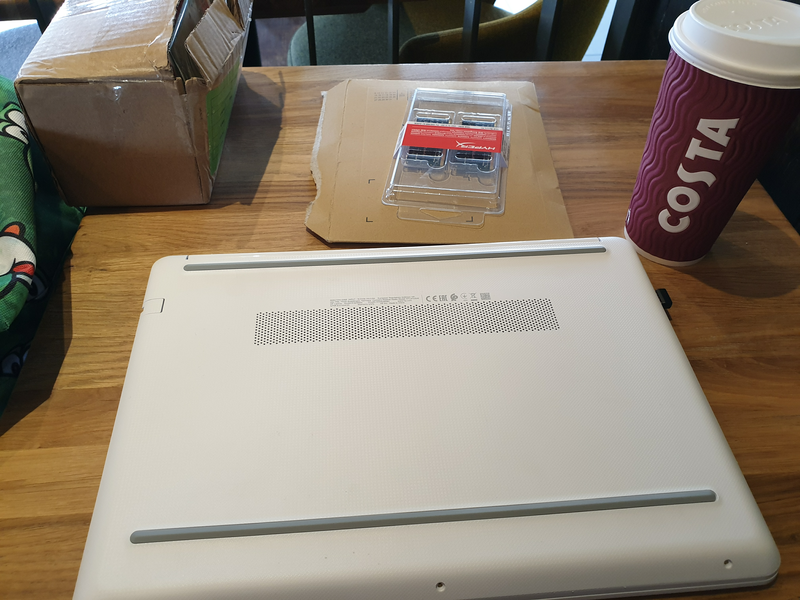
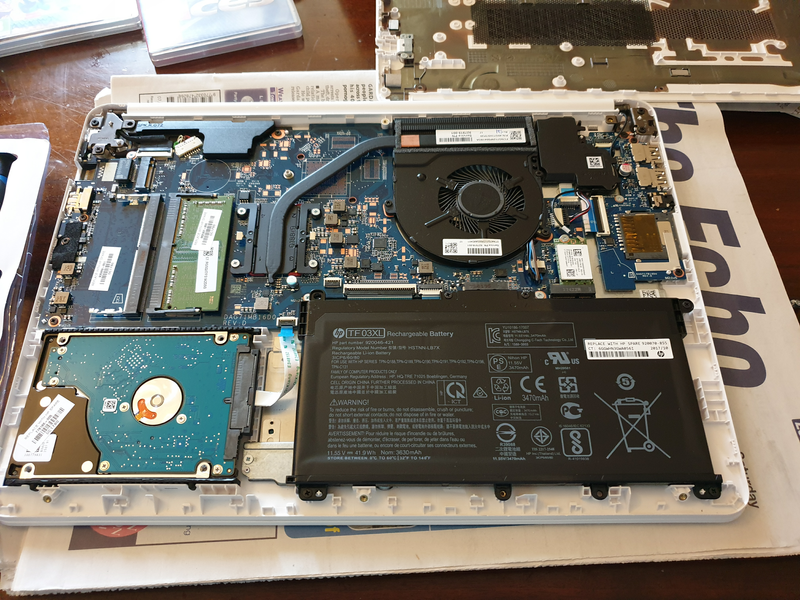
Here you can see the Crucial M.2 SSD installed and the Spinning HDD removed. Yes, I did in a coffee :)
Final step, installing the 2x8GB RAM memory modules

Installing Red Hat Linux in a M.2 that crashes the installer

Few months ago I encountered with a problem with RHEL installer and some of the M.2 drives.

I’ve productized my Product, to be released with M.2 booting SATA drives of 128GB.

The procedure for preparing the Servers (90 and 60 drives, Cold Storage) was based on the installation of RHEL in the M.2 128GB drive. Then the drives are cloned.

Few days before mass delivery the company request to change the booting M.2 drives for others of our own, 512 GB drives.

I’ve tested many different M.2 drives and all of them were slightly different.

Those 512 GB M.2 drives had one problem… Red Hat installer was failing with a python error.

We were running out of time, so I decided to clone directly from the 128GB M.2 working card, with everything installed, to the 512 GB card. Doing that is so easy as booting with a Rescue Linux USB disk, and then doing a dd from the 128GB drive to the 512GB drive.

Booting with a live USB system is important, as Filesystem should not be mounted to prevent corruption when cloning.

Then, the next operation would be booting the 512 GB drive and instructing Linux to claim the additional space.

Here is the procedure for doing it (note, the OS installed in the M.2 was CentOS in this case):

Determine the device that needs to be operated on (this will usually be the boot drive); in this example it is /dev/sdae

# df -h 
Filesystem                             Size  Used Avail Use% Mounted on
/dev/mapper/centos_4602c-root           50G  2.4G   47G   1% /
devtmpfs                                16G     0   16G   0% /dev
tmpfs                                   16G     0   16G   0% /dev/shm
tmpfs                                   16G  395M   16G   3% /run
tmpfs                                   16G     0   16G   0% /sys/fs/cgroup
/dev/sdae1                            1014M  146M  869M  15% /boot
/dev/mapper/centos_4602c-home           57G   33M   57G   1% /home
tmpfs                                  3.2G     0  3.2G   0% /run/user/0
logs                                    68G  7.4M   68G   1% /logs
mysql                                  481G  128K  481G   1% /mysql
N58-C3-D16-P3-S1                       491T  334G  490T   1% /N58-C3-D16-P3-S1

Extend the OS partition using Parted

# parted /dev/sdae
print
resizepart PART_NUMBER END
quit

Where:

  • PART_NUMBER: Is the partition number obtained from the “print” command
  • END: This is the end of the drive; for example, for a 50GB drive, enter 50000

Examining the LVM Partitions

The centos_4602c-root LVM partition is the one we want to extend.

# lsblk /dev/sdae
NAME                          MAJ:MIN RM   SIZE RO TYPE MOUNTPOINT
sdae                           65:224  0   477G  0 disk 
├─sdae1                        65:225  0     1G  0 part /boot
└─sdae2                        65:226  0 475.9G  0 part 
  ├─centos_4602c-root         253:0    0    50G  0 lvm  /
  ├─centos_4602c-swap         253:1    0  11.9G  0 lvm  [SWAP]
  └─centos_4602c-home         253:2    0  56.3G  0 lvm  /home

Using LVM Commands

The following commands will:

  • Display the LVM volumes on the system
  • Resize a volume (device)
  • Re-display the updated LVM volumes
  • Extend the desired LVM partition (lvextend command)
# pvdisplay
  /dev/sdbm: open failed: No medium found
  /dev/sdbn: open failed: No medium found
  /dev/sdbj: open failed: No medium found
  /dev/sdbk: open failed: No medium found
  /dev/sdbl: open failed: No medium found
  --- Physical volume ---
  PV Name               /dev/sdae2
  VG Name               centos_4602c
  PV Size               118.24 GiB / not usable 3.00 MiB
  Allocatable           yes (but full)
  PE Size               4.00 MiB
  Total PE              30269
  Free PE               0
  Allocated PE          30269
  PV UUID               yvHO6t-cYHM-CCCm-2hOO-mJWf-6NUI-zgxzwc
# pvresize /dev/sdae2
  /dev/sdbm: open failed: No medium found
  /dev/sdbn: open failed: No medium found
  /dev/sdbj: open failed: No medium found
  /dev/sdbk: open failed: No medium found
  /dev/sdbl: open failed: No medium found
  Physical volume "/dev/sdae2" changed
  1 physical volume(s) resized or updated / 0 physical volume(s) not resized
# pvdisplay
  /dev/sdbm: open failed: No medium found
  /dev/sdbn: open failed: No medium found
  /dev/sdbj: open failed: No medium found
  /dev/sdbk: open failed: No medium found
  /dev/sdbl: open failed: No medium found
  --- Physical volume ---
  PV Name               /dev/sdae2
  VG Name               centos_4602c
  PV Size               <475.84 GiB / not usable 3.25 MiB
  Allocatable           yes 
  PE Size               4.00 MiB
  Total PE              121813
  Free PE               91544
  Allocated PE          30269
  PV UUID               yvHO6t-cYHM-CCCm-2hOO-mJWf-6NUI-zgxzwc
# vgdisplay
  --- Volume group ---
  VG Name               centos_4602c
  System ID             
  Format                lvm2
  Metadata Areas        2
  Metadata Sequence No  6
  VG Access             read/write
  VG Status             resizable
  MAX LV                0
  Cur LV                3
  Open LV               3
  Max PV                0
  Cur PV                2
  Act PV                2
  VG Size               <475.93 GiB
  PE Size               4.00 MiB
  Total PE              121838
  Alloc PE / Size       30269 / <118.24 GiB
  Free  PE / Size       91569 / 357.69 GiB
  VG UUID               ORcp2t-ntwQ-CNSX-NeXL-Udd9-htt9-kLfvRc
# lvextend -l +91569 /dev/centos_4602c/root 
  Size of logical volume centos_4602c/root changed from 50.00 GiB (12800 extents) to <407.69 GiB (104369 extents).
  Logical volume centos_4602c/root successfully resized.

Extend the xfs file system to use the extended space

The xfs file system for the root partition will need to be extended to use the extra space; this is done using the xfs_grow command as shown below.

# xfs_growfs /dev/centos_4602c/root  
meta-data=/dev/mapper/centos_4602c-root isize=512    agcount=4, agsize=3276800 blks
         =                       sectsz=512   attr=2, projid32bit=1          =                       crc=1        finobt=0 spinodes=0 data     =                       bsize=4096   blocks=13107200, imaxpct=25 
         =                       sunit=0      swidth=0 blks 
naming   =version 2              bsize=4096   ascii-ci=0 ftype=1 log      =internal               bsize=4096   blocks=6400, version=2          =                       sectsz=512   sunit=0 blks, lazy-count=1 
realtime =none                   extsz=4096   blocks=0, rtextents=0
data blocks changed from 13107200 to 106873856 

Verify the results

Note that the c-root LVM partition is now 408GB.

# df -h 
Filesystem                             Size  Used Avail Use% Mounted on
/dev/mapper/centos_4602c-root          408G  2.4G  406G   1% /
devtmpfs                                16G     0   16G   0% /dev
tmpfs                                   16G     0   16G   0% /dev/shm
tmpfs                                   16G  395M   16G   3% /run
tmpfs                                   16G     0   16G   0% /sys/fs/cgroup
/dev/sdae1                            1014M  146M  869M  15% /boot
/dev/mapper/centos_4602c-home           57G   33M   57G   1% /home
tmpfs                                  3.2G     0  3.2G   0% /run/user/0
logs                                    68G  7.4M   68G   1% /logs
mysql                                  481G  128K  481G   1% /mysql
N58-C3-D16-P3-S1                       491T  334G  490T   1% /N58-C3-D16-P3-S1

So now we are able to clone directly from one 512GB to another.

You may be interested to take a look to the commands:

growpart
resize2fs
xfs_growfs (from xfsprogs package)

If you want to do this in an instance in Amazon, here is a very good documentation.