Last Updated: 2026-07-10 07:24 CEST
Some tricks for programmers that don’t know how to use AI tools, advice, pointing errors, best solutions…
Chatbot or agents or API’s?
A Chat bot is a program to which you can ask questions in a text box, and it answers.
For example ChatGPT or Perplexity. You can ask them for pieces of cod, then receive a text output with fragments of code, that you can copy and paste to your code base.
Agents, in the other hand, have access to your code, and can create new files or modify the existing ones. Agents are normally integrated into IDE’s (Integrated Development Environment) and when you ask them for new code or a bug fix, they can plan or directly execute the changes in the folder structure that your IDE has permission. They can also run commands in the terminal. You can choose to authorise each of them manually, or to allow the agent to launch some or all terminal commands without having to request permission.
Planning is interesting cause you can review what to do, before it starts making changes, and the agent has the opportunity to ask you relevant questions.
API’s in the other hand, allow your programs to ask to the AI Model in real time, normally with prompts, and receive output in text format, or files. For example, you can ask the API of a Model to write a song about a login bug in production, or you can ask the API of a Model to generate an MP3 with voice (text to speech) to read a page of your website for a visitor.
General knowledge with AI and Code
The first thing to know is that the AI makes errors. They can make silly errors, like a missing + to concatenate strings in a varnish .vcl file or a random character like | (pipe) between use imports in PHP or bigger bugs, difficult to spot bugs (like attempting to store a Doctrine Immutable Time to a mysql Datetime after a customer purchases, causing an error during the payment process) or security bugs. My advice is to not blindly trust the code generated by IA and to review it as much as possible.
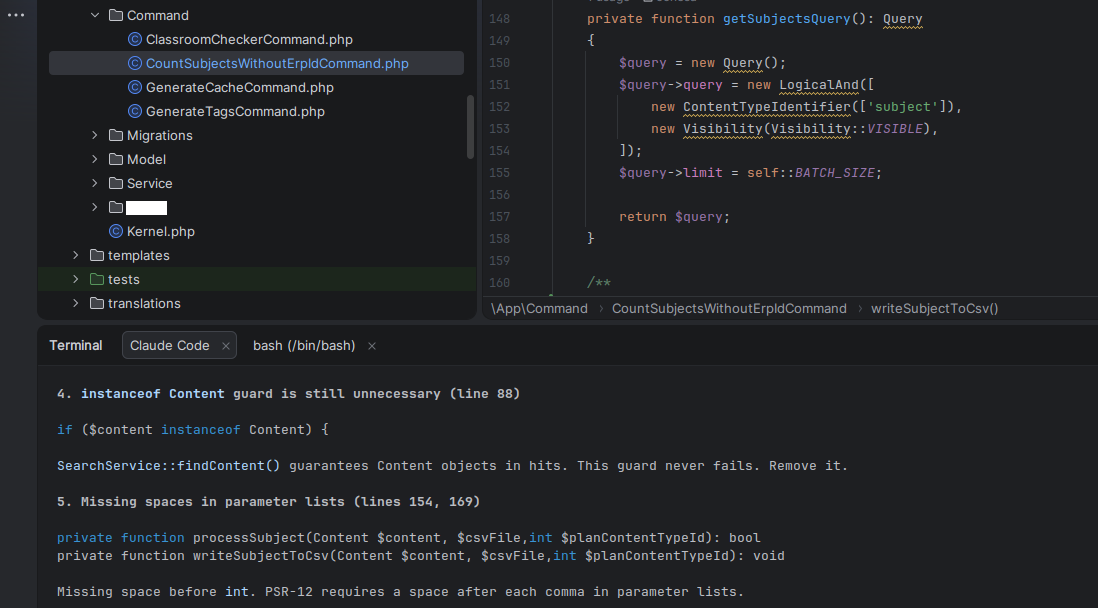
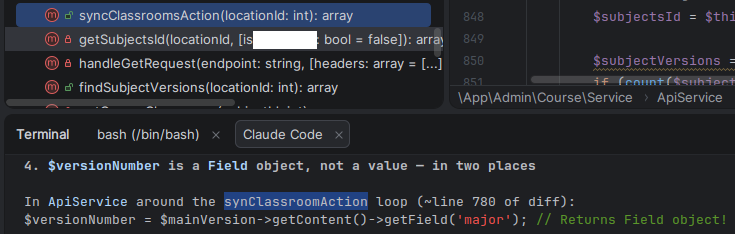
What the AI does very well, and it’s a great help, is to Review your Code. This is really helpful. Ask it to Review your Code before committing, or ask to review a colleague’s branch.
I git pull a branch and I use a prompt like this for Claude or Junie: “Do a code review for the new code in this branch respect main. Do not review files not committed“.
This way I don’t ask for a full Review of all the Code in the project, which is costly in tokens. I just ask for the new changes in this branch respect main. So normally, few tens of files. Quick and cheap.
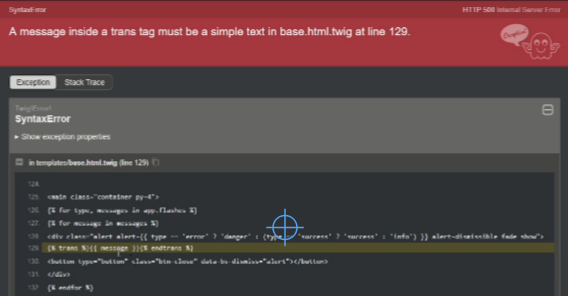
AI it’s also very useful to determine the cause of an error. Just paste the error message, the error from the logs, or an screenshot and it’ll probably figure out what is wrong.
To be successful creating an application you have to provide detailed requirements. The most detailed, the better. The specs.
AI are very good assembling SQL queries. You can ask the AI to do SQL Queries: SELECT’s, INSERT’s, ALTER’s…
You can also ask for queries for specific CMS. Nowadays most AI’s are trained with the development documentation of CMS and Frameworks, so they know how to do stuff.
AI is terrible for Infrastructure. Do not give it the control of your Infrastructure, cause AI is not a clever human. It lacks common sense. If AI believes that the best way to update the infrastructure is to destroy your Production databases and redeploy them, it will do it. Even if you told it not do it. It may even delete the backups. The AI’s don’t obey always. Some times they forget the instructions that you give them.
For my new projects I always create a file named docs/promptia.md with the instructions to the AI, no matter if it’s Claude, Gemini, Junie, or another. I detail all the specs and requirements. This way I can reproduce the project again from the scratch.
There is a kind of standard AGENTS.md file, but Claude does not follow this.
Most AI use tokens as a measure of usage, to limit your usage. Is not exactly like this, but approximately one token equals one word in English. A word may take two tokens, and this may be less optimal in other languages. If you run out of tokens you cannot use the AI until you have more tokens again. Most of the subscriptions renew the tokens available monthly, weekly or daily. In some subscriptions you can pay for extra usage.
In most solutions you can choose to Plan before Executing, so to see what the AI agent will do. You can also use Ask to ask for questions about the code without modifying.
The context is the information that the agent has in memory about your project. The biggest the context is, the more tokens it will need, and the bigger probability that the AI will make errors or forget things.
The best engineer I know, working with huge code bases, limit the Claude context to a 200K window max, unless there is a specific analysis task for which they want to allow more. Otherwise the agent can spend a lot of time compacting. (Claude blog post: 1M context is now generally available for Opus 4.6 and Sonnet 4.6)
If you have to use AI, I recommend paying a subscription, as the degree of privacy of the information submitted is superior. I cannot recommend you to use local models for programming as my experience few months ago has been very disappointing.
For security reasons I don’t recommend you installing plugins in the IDE’s, or skills in Claude (unless you read all of them and you know what you’re doing).
When you launch a project with a prompt, and it created everything you wanted, this is called one shot. Currently there are a lot of conversation talking about loops, iterating until everything works, and the ongoing tokens expenditure that this comports.
Take in count that the AI models have been trained with all the available code from the world. Don’t feel small and overwhelmed if it produces good code or does things in interesting ways that you never contemplated. This is normal, you should not compare yourself to something with all the public knowledge of coding. But you’re the one that judges if the code and the architecture that the AI produced is good or bad, and you’re the one that will decide if the code produced by the AI is useful for you, and you should review the code, as AI produces errors.
At the beginning you will find AI coding very powerful, but as you use it, you’ll experience errors and problems, and see that the context gets exhausted with small web projects. So if you work with large code bases it may not be as helpful as it is to create PoC’s.
Claude Code
In my opinion Claude Code from Anthropic is the best IA tool, currently, to assist you in the generation and review of code.
Claude Code is an IDE available for Windows and Mac, for Linux as today you have to use the terminal application (which is quite powerful nonetheless).
Normally you will plan what you want to do, and then execute.
As using the better models consume more credits, a strategy that I learnt from my best friend was to plan with the best model available, and execute with one that is not so token consuming:
/model opusplan
If you use Linux, you can use Claude from PHPStorm or PyCharm, in the integrated terminal. You’ve to install the plugin. Follow the instructions from Claude’s web site. The integration with PHPStorm is very good.
From Claude in Linux (Terminal) you can also paste images. Just copy them to the clipboard and paste them. You can also drag and drop to the Claude Terminal.
![See how I pasted an image, and Claude references it as [Image #2] as it is the second one that I pasted](https://blog.carlesmateo.com/wp-content/uploads/2026/05/image-1.png)
When I create new application, I always create a file named docs/prompt.md where I detail all the requirements for the new application. Then I ask Clause to create the application based on this file.
When there is a Database involved, I always ask Claude to document the Schema in a document inside the /docs folder named docs/schema.md.
You can type /model to select the model you want to use (some are more expensive than others, normally depending on how good they are).
You can navigate through the chat history of your requests by pressing the up or down keys in your keyboard (like in MySQL or Bash for example)
You can select if you want to work with the branch master, or another, or you want to work with Worktrees, which is very practical.
If you hit slash (/) and then hit the up arrow a few time you can see the chat.
/clear to start a new session and free the context. You can later come back to your old session.
/model to change the AI model using. Some are more clever, some consume more tokens. You can also change the effort. More effort provides better results, but also higher token consumption.
/status allows you to see the config and change it with useful menus
/codereview will Code Review your branch versus master
/usage to see what are your current level of usages, limits, resets
/btw to launch another question while Claude is working on the main tasks.
You can press Esc key to cancel an ongoing operation.
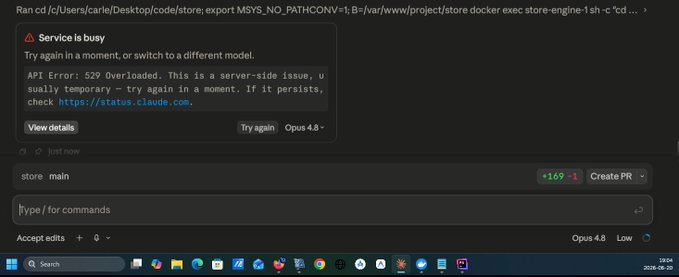
Sometimes you may find that the model ran out of capacity or has problems. In this case, I switched from Opus 4.8 to Sonnet 4.6 and I was able to complete the task.
If you want to refer to a specific file, type @ and start typing the name of the file and then select the name of the file from the list. This way Claude will know that you refer to that exactly file.
If you create a file named CLAUDE.md in the root of your project, it will be read at the start of the session and things will be done.
For example I have this in several of my projects which helps me to know what build version is running in Production:
# Feature: Update BUILD_NUMBER on each request to Claude

The .env file has a variable named BUILD_NUMBER, with a date dot and a number. The first part is the date, in format YYYY-MM-DD. The number after the dot is the number of builds that have been created that day. Starting by 1.

Each time that a change is requested, update the variable BUILD_NUMBER in the .env file to reflect the date of the change and the number of build for that day.

For example, if I requested 4 changes to Claude, it will have this value BUILD_NUMBER="2026-06-28.4". And in the next change requested to Claude in the same day, it will be increased to BUILD_NUMBER="2026-06-28.5"
You can create CLAUDE.md files globally, for all your projects, and also for specific subfolders.
If you use Linux and PHPStorm you can use the Anthropic’s plugin. It opens Claude in a terminal and then you have pretty decent integration. For instance, you can click on the files marked as links in the terminal, and it opens it on the appropriate line in the IDE.
Take in count that many times Claude models make a mistake indicating the line number where the problem is. As it indicates the context of the error and the surrounding lines, you can locate the error anyway. But be aware not to trust the line numbers indicated.
Another trick is that when you see 2. Allow once, in the terminal, or in the GUI application (Windows), it means you can just press the 2 key to apply Allow once.
If you use the Terminal application, be careful not to click on the same line of the answer (for example from the plugin, to gain focus to the terminal subwindow), as it will consider answering yes to the question asked in that whole line.
Videos:
- My very first time installing Claude Code and running it, in Windows: https://www.youtube.com/watch?v=XF6VCi-cvOM
- Before and after refactoring my simple old web with Claude Code: https://www.youtube.com/watch?v=HtTJb0zSMa4
- Creating a Book Store with Claude series:
- Claude AI hands on creating a Book Store and fixing errors. Use PHPStorm, Docker, Docker Desktop, MySQL and Windows as host, and Ubuntu 26.04 in the containers: https://www.youtube.com/watch?v=Uilx7OjikTc
- Claude Coding, Debugging, fixing errors in a Book Store with Sonnet 4.6 Low – Part 2: https://youtu.be/Qw3JlAPJHu0
- Claude Coding, creating a Book Store with Sonnet 4.6 Low – Part 3: https://youtu.be/c6TmdjPNVlo
- Creating a Book Store with Claude Code and Sonnet 4.6 effort low – part 4: https://www.youtube.com/watch?v=wm6QY_XPzC8
- Example of Claude on Sonnet 4.6 effort Low catching and fixing a bug: https://youtu.be/0BhR6u0C7GM
- Creating a Book Store with Claude Code and Opus 4.7 High – part 5: https://www.youtube.com/watch?v=Q6V29nlxRXE
- Claude Fable 5: Creating a Book Store – part 6 – Browsable Subcategories: https://youtu.be/GNRi-gDCgzY
- Creating a Book Store with Claude Fable 5 High Effort – part 7 – Browsable Categories: https://youtu.be/fMbmicFNW6I
- Creating a Book Store with Claude Fable 5 efforts High and Low – part 8 – Book ownership: https://youtu.be/9deRNfaADtU
- Creating a Book Store wit Claude Fable 5 effort Low – part 9 – new section My purchased books, linkable category in the breadcrumb, and SQL INSERT for two new Subcategories : https://youtu.be/MDZLpyGQaIQ
- Creating a Book Store with Claude Fable 5 (now unavailable) effort Low – part 10 – Add a Youtube video: https://youtu.be/CZH4vL9wJCk
- Cloning GPT 5.5 UFO Tank Shooter demo Javascript game with Claude: https://youtu.be/NBXG54E8amw
Perplexity
I use it for general questions about Internet, as it presents all the sources and I like that.
I use also for questions about code, as a chat.
I pay 20€ per month approx.
ChatGPT
The most known chat. From Open AI. It hallucinates a lot. I don’t use it.
GPT 5.5
The new version of the programming agent from Open AI.
I don’t use it.
JetBrains Junie
JetBrains has their own AI agent that integrates in their IDE PHPStorm.
My company pays a $20 USD/month subscription.
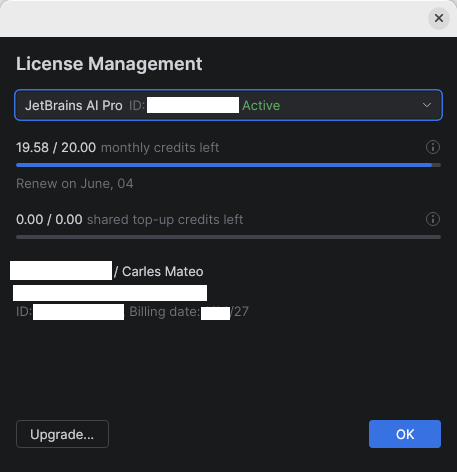
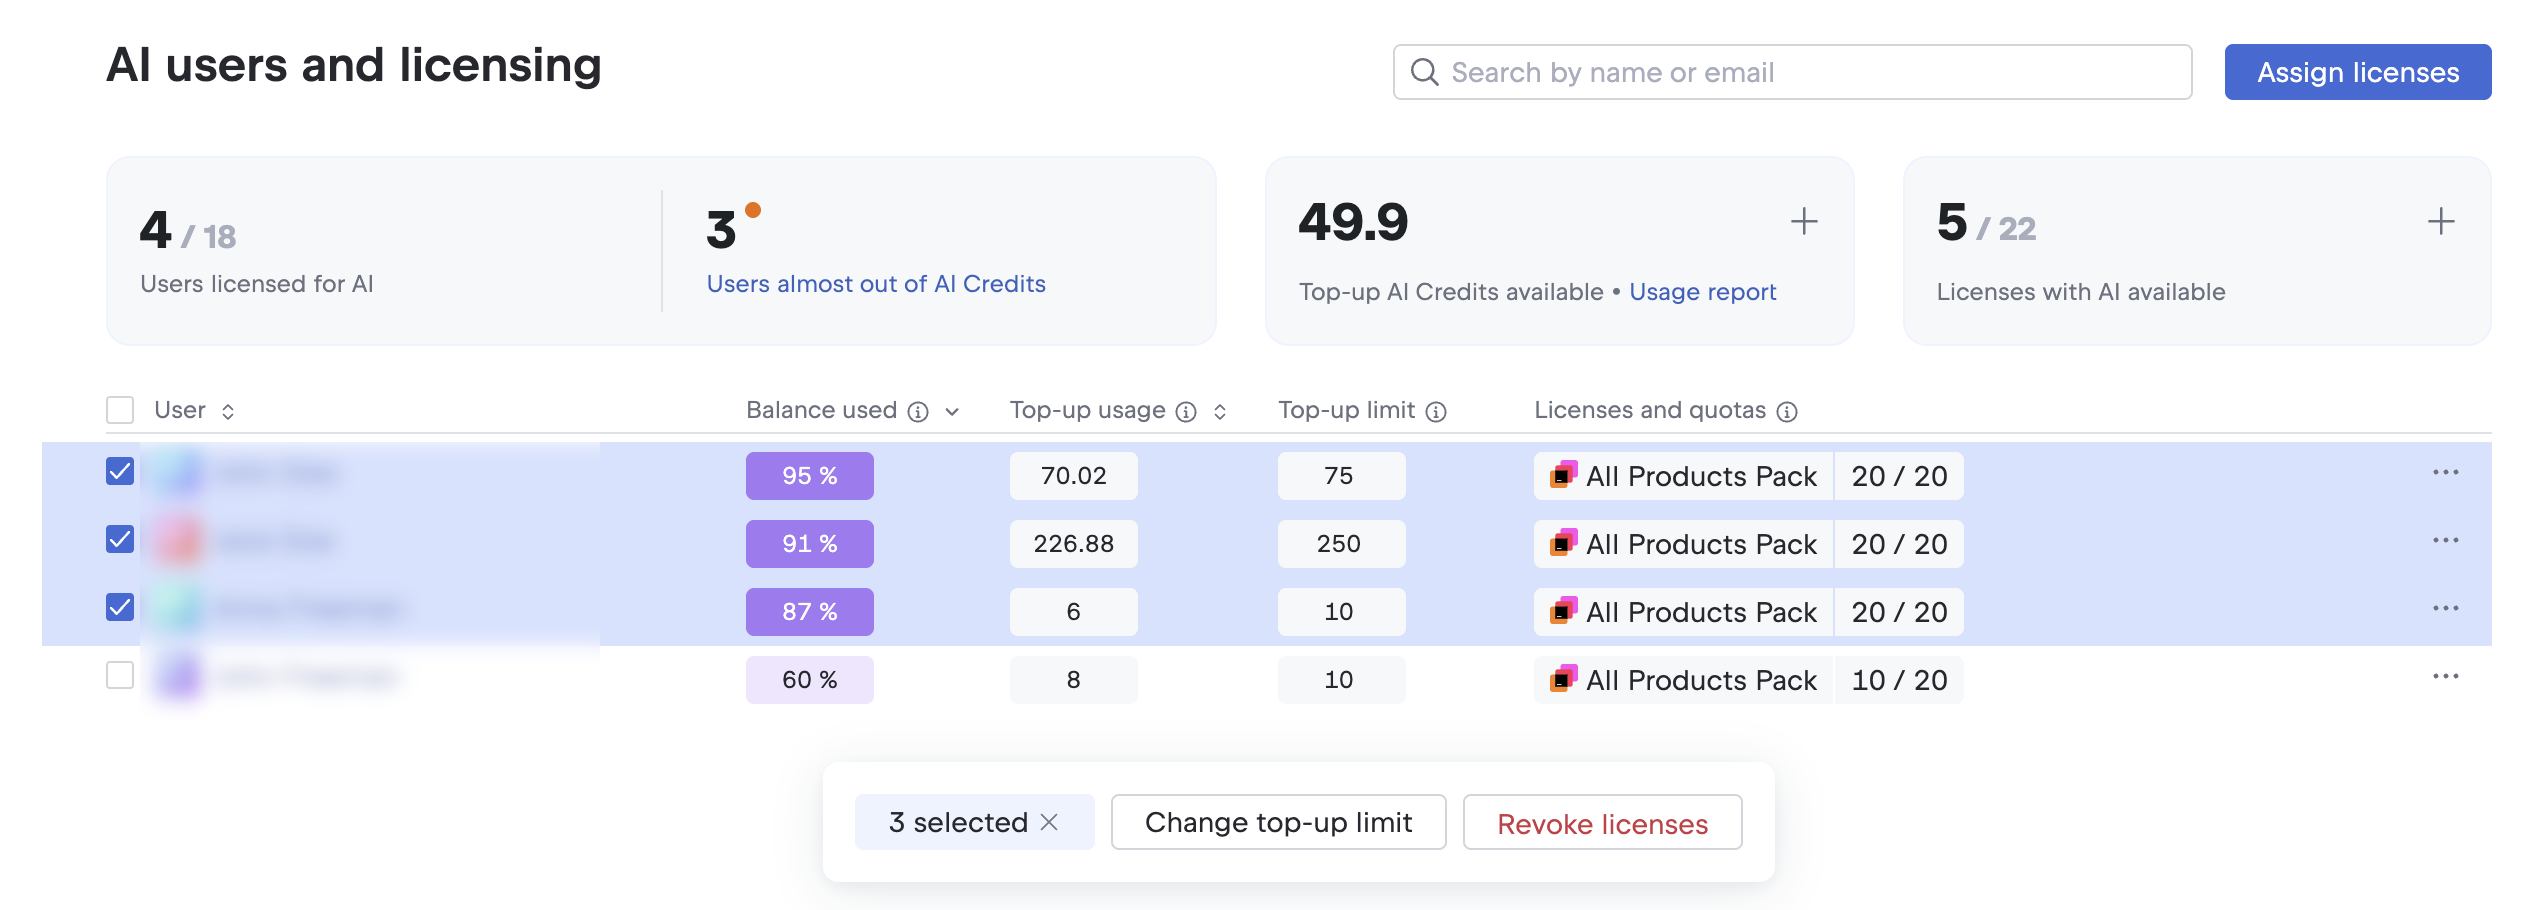
Instead of tokens they use credits and this subscription provides 20.00 credits per month. In my opinion they get exhausted too fast.
Using Junie I saw it was getting confused with the dates. Not knowing when it’s today, and thinking that software already released (like Ubuntu 26.04) was not released yet (even if we were in May).
Videos:
- Using AI Junie agent to create a project from zero: https://www.youtube.com/watch?v=pYhGaafRquw
Google Antigravity 2
Google split Antigravity, which was an all-in-one IDE, in several tools. A CLI, vibe coding tool, API, IDE…
The agentic tool. It is very similar to other vibe coding IA tools.
It is oriented to talking to the agent.
I preferred when we had the IDE and the agentic part together in Google Antigravity.
You can still install the Antigravity IDE as a separate tool.
Videos:
- Super fast introduction to Google Antigravity 2 vibe coding – May 2026: https://youtu.be/XqcbFT51f4M
Google Antigravity
Antigravity was an IDE with support for Gemini IA agents integrated, and others.
As of 2026-05-20 Google presented Antigravity 2, which separates the IDE and the agentic tool.
It offers a great amount of usage of different models for free, however lately I see that their server are saturated often, and it’s impossible to use it for free.
As an IDE has the basic functions, integration with github, and can be a good alternative to PHPStorm if you don’t want to pay for the IDE.
It supports many languages, not just PHP like Python, Java… You can also create binaries.
Videos:
- Windows development: Docker Desktop + docker-compose.yml + multiple containers + Ubuntu 26.04 + Symfony 7.4 + Antigravity + PHPStorm: https://www.youtube.com/watch?v=IkKEu1vI6bQ
- Vibe coding with Antigravity, real time adding new features to a web Symfony 7 project: https://www.youtube.com/watch?v=oe_aY2wN_eQ
- Generant una petita aplicació en go amb Gemini Flash amb Antigravity. Primer CLI i després GUI [ca]: https://youtu.be/bmLsbN0FF-A
- Antigravity de Google amb la IA Claude Sonnet 4.5 per a crear un aplicació GUI en Python en minuts que cerca arxius log al disc dur [ca]: https://www.youtube.com/watch?v=2hcnySeVAgo
Android Studio
Android Studio is for creating Android APPs. It’s free and bring incorporated Google Gemini IA for free with some limits obviously.
I created several applications for free with Android Studio and Gemini.
Videos:
- Crear un clon del Tetris en Android amb vibe coding de manera gratuïta [ca]: https://www.youtube.com/watch?v=f__uox8a9sc
Github Copilot
It makes sense if your organization works with github, has the repos in there, and creates the issues in there, with good descriptions.
Then you can ask copilot to work on several issues, as if it was a member of your team. It will work in parallel. And you’ll receive an email when the task is completed, with a PR (Pull Request).
As I was not using Github at work, the usefulness was a bit limited for me.
Codex
The coding agent from OpenAI (ChatGPT).
Only available for MacOs and Windows. Not for Linux.
Cursor
Cursor is an IDE that talks to the AI from different providers.
I don’t use it.
Ollama
Ollama is an Open Source software that allows you to run AI Models locally very easily.
You can run locally Open Source Models, and there are many, and run them for free.
If your computer has a GPU or enhancenments for running locally AI, you can use the Models at decent speeds locally, and for free.
The usability depends on the Model you choose.
You can download many of them, ranging from less than 1GB to several GBs each, depending on how big are they capacities.
I ran Ollama locally, in Linux, with a laptop without AI acceleration and a GPU integrated on the CPU and it was unusable, but I’ve seen recent videos with amazing results.
I made a video with NotebookLM from theses contents: