Tag Archives: RHEL

Installing Red Hat Linux in a M.2 that crashes the installer

Few months ago I encountered with a problem with RHEL installer and some of the M.2 drives.

I’ve productized my Product, to be released with M.2 booting SATA drives of 128GB.

The procedure for preparing the Servers (90 and 60 drives, Cold Storage) was based on the installation of RHEL in the M.2 128GB drive. Then the drives are cloned.

Few days before mass delivery the company request to change the booting M.2 drives for others of our own, 512 GB drives.

I’ve tested many different M.2 drives and all of them were slightly different.

Those 512 GB M.2 drives had one problem… Red Hat installer was failing with a python error.

We were running out of time, so I decided to clone directly from the 128GB M.2 working card, with everything installed, to the 512 GB card. Doing that is so easy as booting with a Rescue Linux USB disk, and then doing a dd from the 128GB drive to the 512GB drive.

Booting with a live USB system is important, as Filesystem should not be mounted to prevent corruption when cloning.

Then, the next operation would be booting the 512 GB drive and instructing Linux to claim the additional space.

Here is the procedure for doing it (note, the OS installed in the M.2 was CentOS in this case):

Determine the device that needs to be operated on (this will usually be the boot drive); in this example it is /dev/sdae

# df -h 
Filesystem                             Size  Used Avail Use% Mounted on
/dev/mapper/centos_4602c-root           50G  2.4G   47G   1% /
devtmpfs                                16G     0   16G   0% /dev
tmpfs                                   16G     0   16G   0% /dev/shm
tmpfs                                   16G  395M   16G   3% /run
tmpfs                                   16G     0   16G   0% /sys/fs/cgroup
/dev/sdae1                            1014M  146M  869M  15% /boot
/dev/mapper/centos_4602c-home           57G   33M   57G   1% /home
tmpfs                                  3.2G     0  3.2G   0% /run/user/0
logs                                    68G  7.4M   68G   1% /logs
mysql                                  481G  128K  481G   1% /mysql
N58-C3-D16-P3-S1                       491T  334G  490T   1% /N58-C3-D16-P3-S1

Extend the OS partition using Parted

# parted /dev/sdae
print
resizepart PART_NUMBER END
quit

Where:

  • PART_NUMBER: Is the partition number obtained from the “print” command
  • END: This is the end of the drive; for example, for a 50GB drive, enter 50000

Examining the LVM Partitions

The centos_4602c-root LVM partition is the one we want to extend.

# lsblk /dev/sdae
NAME                          MAJ:MIN RM   SIZE RO TYPE MOUNTPOINT
sdae                           65:224  0   477G  0 disk 
├─sdae1                        65:225  0     1G  0 part /boot
└─sdae2                        65:226  0 475.9G  0 part 
  ├─centos_4602c-root         253:0    0    50G  0 lvm  /
  ├─centos_4602c-swap         253:1    0  11.9G  0 lvm  [SWAP]
  └─centos_4602c-home         253:2    0  56.3G  0 lvm  /home

Using LVM Commands

The following commands will:

  • Display the LVM volumes on the system
  • Resize a volume (device)
  • Re-display the updated LVM volumes
  • Extend the desired LVM partition (lvextend command)
# pvdisplay
  /dev/sdbm: open failed: No medium found
  /dev/sdbn: open failed: No medium found
  /dev/sdbj: open failed: No medium found
  /dev/sdbk: open failed: No medium found
  /dev/sdbl: open failed: No medium found
  --- Physical volume ---
  PV Name               /dev/sdae2
  VG Name               centos_4602c
  PV Size               118.24 GiB / not usable 3.00 MiB
  Allocatable           yes (but full)
  PE Size               4.00 MiB
  Total PE              30269
  Free PE               0
  Allocated PE          30269
  PV UUID               yvHO6t-cYHM-CCCm-2hOO-mJWf-6NUI-zgxzwc
# pvresize /dev/sdae2
  /dev/sdbm: open failed: No medium found
  /dev/sdbn: open failed: No medium found
  /dev/sdbj: open failed: No medium found
  /dev/sdbk: open failed: No medium found
  /dev/sdbl: open failed: No medium found
  Physical volume "/dev/sdae2" changed
  1 physical volume(s) resized or updated / 0 physical volume(s) not resized
# pvdisplay
  /dev/sdbm: open failed: No medium found
  /dev/sdbn: open failed: No medium found
  /dev/sdbj: open failed: No medium found
  /dev/sdbk: open failed: No medium found
  /dev/sdbl: open failed: No medium found
  --- Physical volume ---
  PV Name               /dev/sdae2
  VG Name               centos_4602c
  PV Size               <475.84 GiB / not usable 3.25 MiB
  Allocatable           yes 
  PE Size               4.00 MiB
  Total PE              121813
  Free PE               91544
  Allocated PE          30269
  PV UUID               yvHO6t-cYHM-CCCm-2hOO-mJWf-6NUI-zgxzwc
# vgdisplay
  --- Volume group ---
  VG Name               centos_4602c
  System ID             
  Format                lvm2
  Metadata Areas        2
  Metadata Sequence No  6
  VG Access             read/write
  VG Status             resizable
  MAX LV                0
  Cur LV                3
  Open LV               3
  Max PV                0
  Cur PV                2
  Act PV                2
  VG Size               <475.93 GiB
  PE Size               4.00 MiB
  Total PE              121838
  Alloc PE / Size       30269 / <118.24 GiB
  Free  PE / Size       91569 / 357.69 GiB
  VG UUID               ORcp2t-ntwQ-CNSX-NeXL-Udd9-htt9-kLfvRc
# lvextend -l +91569 /dev/centos_4602c/root 
  Size of logical volume centos_4602c/root changed from 50.00 GiB (12800 extents) to <407.69 GiB (104369 extents).
  Logical volume centos_4602c/root successfully resized.

Extend the xfs file system to use the extended space

The xfs file system for the root partition will need to be extended to use the extra space; this is done using the xfs_grow command as shown below.

# xfs_growfs /dev/centos_4602c/root  
meta-data=/dev/mapper/centos_4602c-root isize=512    agcount=4, agsize=3276800 blks
         =                       sectsz=512   attr=2, projid32bit=1          =                       crc=1        finobt=0 spinodes=0 data     =                       bsize=4096   blocks=13107200, imaxpct=25 
         =                       sunit=0      swidth=0 blks 
naming   =version 2              bsize=4096   ascii-ci=0 ftype=1 log      =internal               bsize=4096   blocks=6400, version=2          =                       sectsz=512   sunit=0 blks, lazy-count=1 
realtime =none                   extsz=4096   blocks=0, rtextents=0
data blocks changed from 13107200 to 106873856 

Verify the results

Note that the c-root LVM partition is now 408GB.

# df -h 
Filesystem                             Size  Used Avail Use% Mounted on
/dev/mapper/centos_4602c-root          408G  2.4G  406G   1% /
devtmpfs                                16G     0   16G   0% /dev
tmpfs                                   16G     0   16G   0% /dev/shm
tmpfs                                   16G  395M   16G   3% /run
tmpfs                                   16G     0   16G   0% /sys/fs/cgroup
/dev/sdae1                            1014M  146M  869M  15% /boot
/dev/mapper/centos_4602c-home           57G   33M   57G   1% /home
tmpfs                                  3.2G     0  3.2G   0% /run/user/0
logs                                    68G  7.4M   68G   1% /logs
mysql                                  481G  128K  481G   1% /mysql
N58-C3-D16-P3-S1                       491T  334G  490T   1% /N58-C3-D16-P3-S1

So now we are able to clone directly from one 512GB to another.

You may be interested to take a look to the commands:

growpart
resize2fs
xfs_growfs (from xfsprogs package)

If you want to do this in an instance in Amazon, here is a very good documentation.
Creating a VM for compiling ZFS with RHEL6.10

As you know I created the DRAID project, based in ZFS.

One of our customers wanted a special custom version for their RHEL6.10 installation with a custom Kernel.

This post describes how to compile and install ZFS 7.x for RHEL6.

First create a VM with RHEL6.10. Myself I used Virtual Box on Ubuntu.

If you need to install a Custom Kernel matching the destination Servers, do it.

Download the source code from ZFS for Linux.

install the following packages which are required by zfs compiler:

sudo yum groupinstall "Development Tools"
sudo yum install autoconf automake libtool wget libtirpc-devel rpm-build
sudo yum install zlib-devel libuuid-devel libattr-devel libblkid-devel libselinux-devel libudev-devel
sudo yum install parted lsscsi ksh openssl-devel elfutils-libelf-develsudo yum install kernel-devel-$(uname -r)

Steps to compile the code:

1- Make sure  the zfs file exists under zfs/contrib/initramfs/scripts/local-top/

if not exists, create a file called zfs  under zfs/contrib/initramfs/scripts/local-top/  and add the following to that file:

#!/bin/sh
PREREQ=”mdadm mdrun multipath”

prereqs()
{
       echo “$PREREQ”
}

case $1 in
# get pre-requisites
prereqs)
       prereqs
       exit 0
       ;;
esac


#
# Helper functions
#
message()
{
       if [ -x /bin/plymouth ] && plymouth –ping; then
               plymouth message –text=”$@”
       else
               echo “$@” >&2
       fi
       return 0
}

udev_settle()
{
       # Wait for udev to be ready, see https://launchpad.net/bugs/85640
       if [ -x /sbin/udevadm ]; then
               /sbin/udevadm settle –timeout=30
       elif [ -x /sbin/udevsettle ]; then
               /sbin/udevsettle –timeout=30
       fi
       return 0
}


activate_vg()
{
       # Sanity checks
       if [ ! -x /sbin/lvm ]; then
               [ “$quiet” != “y” ] && message “lvm is not available”
               return 1
       fi

       # Detect and activate available volume groups
       /sbin/lvm vgscan
       /sbin/lvm vgchange -a y –sysinit
       return $?
}

udev_settle
activate_vg

exit 0

make the created zfs file executable:

chmod +x  zfs/contrib/initramfs/scripts/local-top/zfs

2-  inside  draid-zfs-2019-05-09 folder, execute the following commands:execute Auto generate script:

./autogen.sh

execute configuration script:

./configure

Please note we use this specific configuration for bettter results:

./configure –disable-pyzfs –with-spec=redhat

create rpms:

make rpm

remove all test rpms:

rm zfs-test*.rpm

3- install all created rpms

yum install *x86_64* -y

4- verify that zfs is been installed

zfs

this command will display zfs help. 

Another interesting trick I instructed my Team to do is to add a version number to zfs, with a parameter -v or –version.

So if you want to do the same, you have to edit:

zfs/cmd/zfs/zfs_main.c

Under:

cmdname = argv[1];

In my code is line 7926, then add:

/* DRAIDTEAM - added new command to display zfs version*/
if ((strcmp(cmdname, "-v") == 0) || (strcmp(cmdname, "--version") == 0)) {
    (void) fprintf(stdout, "0.7.0_DRAID-1.2.9.08021755\n");
    return (0);
}

You can check the Kernel Module info by using modinfo zfs, but I found it handy to allow to just do:

zfs -v

Solving a persistent MD Array problem in RHEL7.4 (Dual Port SAS drives)

Ok, so I lend one of my Servers to two of my colleagues in The States, that required to prepare some test for a customer. I always try to be nice and to stimulate sales across the organizations I help, so if they need a Server for a PoC and demo to a customer, they know they can count on me.

It is important to remark that the Servers I was using had two motherboards, with their CPU and RAM, and Dual Port SAS drives. We had those Servers so we can implement High Availability. The Dual Port SAS allow two different computers or IO controllers to access the same drive at the same time.

I work with Declustered RAID, DRAID, and ZFS.

The Server was a 4U90, so a 4U Server with 90 SAS3 spinning drives and 4 SSD. Drives are Dual Ported, and two Controllers (motherboard + CPU + RAM) have access simultaneously to the drives for HA.

After their tests my colleagues, returned me the Server, and I needed to use it and my surprise was when I tried to provision with ZFS and I encountered problems. Not much in the logs. Please note I was using only one node (or controller), and the other was not in use but they ask me to keep the OS and the data (in 2xMD drive). I shutdown the node A after the Engineers in San Jose powered the Server off, so only my node was working.

I checked:

cat /proc/mdstat

And that was the thing 8 MD Arrays where there.

[root@4u90-B ~]# cat /proc/mdstat 
Personalities : 
md2 : inactive sdba1[9](S) sdag1[7](S) sdaf1[3](S)
11720629248 blocks super 1.2

md1 : inactive sdax1[7](S) sdad1[5](S) sdac1[1](S) sdae1[9](S)
12056071168 blocks super 1.2

md0 : inactive sdat1[1](S) sdav1[9](S) sdau1[5](S) sdab1[7](S) sdaa1[3](S)
19534382080 blocks super 1.2

md4 : inactive sdbf1[9](S) sdbe1[5](S) sdbd1[1](S) sdal1[7](S) sdak1[3](S)
19534382080 blocks super 1.2

md5 : inactive sdam1[1](S) sdan1[5](S) sdao1[9](S)
11720629248 blocks super 1.2

md8 : inactive sdcq1[7](S) sdz1[2](S)
7813752832 blocks super 1.2

md7 : inactive sdbm1[7](S) sdar1[1](S) sdy1[9](S) sdx1[5](S)
15627505664 blocks super 1.2

md3 : inactive sdaj1[9](S) sdai1[5](S) sdah1[1](S)
11720629248 blocks super 1.2

md6 : inactive sdaq1[7](S) sdap1[3](S) sdr1[8](S) sdp1[0](S)
15627505664 blocks super 1.2

Ok. So I stop the Arrays

mdadm --stop /dev/md127

And then I zero the superblock:

mdadm --zero-superblock /dev/sdb1

After doing this for all I try to provision and… surprise! does not work. /dev/md127 has respawned like in the old times from Doom video game.

I check the mdmonitor service and even disable it.

systemctl disable mdmonitor

I repeat the process.

And /dev/md127 appears again, using another device.

At this point, just in case, I check the other controller, which should be powered off.

Ok, it was on. With different Ip, so it was not answering to ping, but I still had access to BMC//IPMI. After confirming with my colleagues that I can shutdown that node (they did not turn it on apparently) I launch the poweroff command, and repeat, same!.

I see that the poweroff command on the second Controller is doing a reboot, not poweroff. Is a Firmware issue I find. So I access to the Linux from the management tool and I launch the halt command that makes it not respond to the ping anymore.

I repeat the process, and still the ghost md array appears there, and blocks me from doing my zpool create.

The /etc/mdadm.conf file did not exist (by default is not created).

I try a more aggressive approach:

DRIVES=`cat /proc/partitions | grep 3907018584 | awk '{ print $4; }'`

for DRIVE in $DRIVES; do echo "Trying /dev/${DRIVE}1"; mdadm --examine /dev/${DRIVE}1; done

Ok. And destruction time:

for DRIVE in $DRIVES; do echo "Trying /dev/${DRIVE}"; wipefs -a -f /dev/${DRIVE}; done

for DRIVE in $DRIVES; do echo "Trying /dev/${DRIVE}1"; mdadm --zero-superblock /dev/${DRIVE}1; done

Apparently the system is clean, but still I cannot provision, and /dev/md127 respawns and reappears all the time.

After googling and not finding anything about this problem, and my colleagues no having clue about what is causing this, I just proceed with a simple solution, as I need the Server for my company completing the tests in the next 24 hours.

So I create the file /etc/mdadm.conf with this content:

[root@draid-08 ~]# cat /etc/mdadm.conf 
AUTO -all

After that I rebooted the Server and I saw the infamous /dev/md127 is not there and I’m able to provision.

I share the solution as it may help other people.

The most straightforward procedure would had been reinstalling clean the OS, but this operation is very slow when simulating a Virtual CD remotely, so it was worth fixing that as OS level, as I save one day delaying my work.

Troubleshooting upgrading and loading a ZFS module in RHEL7.4

I illustrate this troubleshooting as it will be useful for some of you.

I requested to one of the members of my Team to compile and to install ZFS 7.9 to some of the Servers loaded with drives, that were running ZFS 7.4 older version.

Those systems were running RHEL7.4.

The compilation and install was fine, however the module was not able to load.

My Team member reported that: when trying to run “modprobe zfs“. It was giving the error:

modprobe: ERROR: could not insert 'zfs': Invalid argument

Also when trying to use a zpool command it gives the error:

Failed to initialize the libzfs library

That was only failing in one of the Servers, but not in the others.

My Engineer ran dmesg and found:

zfs: `' invalid for parameter `metaslab_debug_unload

He though it was a compilation error, but I knew that metaslab_debug_unload is an option parameter that you can set in /etc/zfs.conf

So I ran:

 modprobe -v zfs

And that confirmed my suspicious, so I edited /etc/zfs.conf and commented the parameter and tried again. And it failed.

As I run modprobe -v zfs (verbose) it was returning me the verbose info, and so I saw that it was still trying to load those parameters so I knew it was reading those parameters from some file.
I could have grep all the files in the filesystem looking for the parameter failing in the verbose or find all the files in the system named zfs.conf. To me it looked inefficient as it would be slow and may not bring any result (as I didn’t know how exactly my team member had compiled the code), however I expected to get the result. But what if I found 5 or 7 zfs.conf files?. Slow.
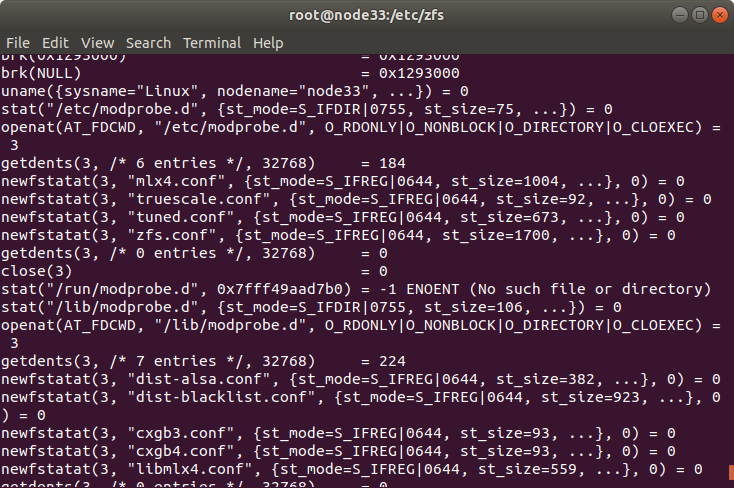
I used strace. It was not installed but the RHEL license was active so I simple did:

yum install strace

strace stands for System Trace and so it records all the System Calls that the programs do.
That’s a pro trick that will accompany you all your career.

So I did:

strace modprobe zfs

I did not use -v in here cause all the verbose would had been logged as a System Call and made more difficult my search.
I got the output of all the System Calls and I just had to look for which files were being read.

Then I found that zfs.conf under /etc/modprobe.d/zfs.conf
That was the one being read. So I commented the line and tried modprobe zfs and it worked perfectly. :)