You have installed eZ Launchpad, and you can execute the binary ez from your home folder or other paths, however when you execute it from a project folder you cloned with git (with its .platform.app.yaml file) ez returns to prompt without any error message.
The exit code is 255, but even if you strace the process you don’t find the exact problem.
Inside your project you run ez without any argument in a clean install of Ubuntu 24.04 LTS with PHP 8.3, or with PHP 8.4, without xDebug, without opcache, without memory limit… nothing works with no visible error message in the logs or in the error output. However if you run it outside the project folder, it works, and it displays the typical help messages.
I reproduced this behavior on several Ubuntu computers. The fix I found is to execute ez with PHP 8.1
You can install PHP8.1 from ondrej repository, then you can update alternates to execute PHP 8.1 by default in your system, or you create the project by invoking ez with PHP 8.1 explicitly with:
php8.1 ~/ez create
This will kickstart the creation of your ez project based on Docker containers.
This is a mechanism I invented and I’ve been using for decades, to migrate or clone my Linux Desktops to other physical servers.
This script is focused on doing the job for Ubuntu but I was doing this already 30 years ago, for X Window as I was responsible of the Linux platform of a ISP (Internet Service Provider). So, it is compatible with any Linux Desktop or Server.
It has the advantage that is a very lightweight backup. You don’t need to backup /etc or /var as long as you install a new OS and restore the folders that you did backup. You can backup and restore Wine (Windows Emulator) programs completely and to/from VMs and Instances as well.
It’s based on user/s rather than machine.
And it does backup using the Timestamp, so you keep all the different version, modified over time. You can fusion the backups in the same folder if you prefer avoiding time versions and keep only the latest backup. If that’s your case, then replace s_PATH_BACKUP_NOW=”${s_PATH_BACKUP}${s_DATETIME}/” by s_PATH_BACKUP_NOW=”${s_PATH_BACKUP}” for instance. You can also add a folder for machine if you prefer it, for example if you use the same userid across several Desktops/Servers.
I offer you a much simplified version of my scripts, but they can highly serve your needs.
#!/usr/bin/env bash

# Author: Carles Mateo
# Last Update: 2022-10-23 10:48 Irish Time

# User we want to backup data for
s_USER="carles"
# Target PATH for the Backups
s_PATH_BACKUP="/home/${s_USER}/Desktop/Bck/"

s_DATE=$(date +"%Y-%m-%d")
s_DATETIME=$(date +"%Y-%m-%d-%H-%M-%S")

s_PATH_BACKUP_NOW="${s_PATH_BACKUP}${s_DATETIME}/"

echo "Creating path $s_PATH_BACKUP and $s_PATH_BACKUP_NOW"
mkdir $s_PATH_BACKUP
mkdir $s_PATH_BACKUP_NOW

s_PATH_KEY="/home/${s_USER}/Desktop/keys/2007-01-07-cloud23.pem"
s_DOCKER_IMG_JENKINS_EXPORT=${s_DATE}-jenkins-base.tar
s_DOCKER_IMG_JENKINS_BLUEOCEAN2_EXPORT=${s_DATE}-jenkins-blueocean2.tar
s_PGP_FILE=${s_DATETIME}-pgp.zip

# Version the PGP files
echo "Compressing the PGP files as ${s_PGP_FILE}"
zip -r ${s_PATH_BACKUP_NOW}${s_PGP_FILE} /home/${s_USER}/Desktop/PGP/*

# Copy to BCK folder, or ZFS or to an external drive Locally as defined in: s_PATH_BACKUP_NOW
echo "Copying Data to ${s_PATH_BACKUP_NOW}/Data"
rsync -a --exclude={} --acls --xattrs --owner --group --times --stats --human-readable --progress -z "/home/${s_USER}/Desktop/data/" "${s_PATH_BACKUP_NOW}data/"
rsync -a --exclude={'Desktop','Downloads','.local/share/Trash/','.local/lib/python2.7/','.local/lib/python3.6/','.local/lib/python3.8/','.local/lib/python3.10/','.cache/JetBrains/'} --acls --xattrs --owner --group --times --stats --human-readable --progress -z "/home/${s_USER}/" "${s_PATH_BACKUP_NOW}home/${s_USER}/"
rsync -a --exclude={} --acls --xattrs --owner --group --times --stats --human-readable --progress -z "/home/${s_USER}/Desktop/code/" "${s_PATH_BACKUP_NOW}code/"


echo "Showing backup dir ${s_PATH_BACKUP_NOW}"
ls -hal ${s_PATH_BACKUP_NOW}

df -h /
See how I exclude certain folders like the Desktop or Downloads with –exclude.
It relies on the very useful rsync program. It also relies on zip to compress entire folders (PGP Keys on the example).
If you use the second part, to compress Docker Images (Jenkins in this example), you will run it as sudo and you will need also gzip.
There is a final part, if you want to backup to a remote Server/s using ssh:
# continuation... to copy to a remote Server.

s_PATH_REMOTE="bck7@cloubbck11.carlesmateo.com:/Bck/Desktop/${s_USER}/data/"

# Copy to the other Server
rsync -e "ssh -i $s_PATH_KEY" -a --exclude={} --acls --xattrs --owner --group --times --stats --human-readable --progress -z "/home/${s_USER}/Desktop/data/" ${s_PATH_REMOTE}
I recommend you to use the same methodology in all your Desktops, like for example, having a data/ folder in the Desktop for each user.
You can use Erasure Code to split the Backups in blocks and store a piece in different Cloud Providers.
Also you can store your Backups long-term, with services like Amazon Glacier.
Other ideas are storing certain files in git and in Hadoop HDFS.
If you want you can CRC your files before copying to another device or server.
In the middle of pandemic, with all commerce’s closed and no access to better cameras or equipment, I demonstrated the plug-in architecture that I created and I added to my CTOP.py Open Source Python Monitoring tool in a global conference for all IT in ABK (Activision Blizzard King).
I was so proud.
For that I cloned ctop into a Raspberry Pi 4 with Ubuntu LTS and had that motherboard which is a Christmas Tree LED attached to the GPIO.
As the CPU load on the Raspberry was low, the LED’s were green, and a voice (recorded and provided by an Irish friend) was played “The System is Healthy”.
Then I added load to the CPU and the LED’s changed.
And I added more load to the CPU and the LED’s turned to Red and and human voice “CPU load is too high”.
Voice is only played after a change in the state and with a cool down of a minute, to prevent flapping situations to keep the program chatting like a parrot :)
I should have shaved myself, but you know, it was a savage pandemic.
Also a manager from Blizzard DM me and told me that the touch pad being emerged was due to the battery swallowing and that it could explode, so I requested a replacement. Then I explained to other colleagues with the same symptom, and to others with no problems so they are not at risk if the same happened to them.
WFH made things that would be quickly detected in the offices by others (like the touchpad emerging) go unnoticed.
if you are looking for source code, it is in the CTOP’s gitlab repository. However it’s advanced Python plugin architecture code.
If you just look for a sample of how to power on the LED’s in different colors, and the tricks for solving any problem you may encounter, then look at it here:
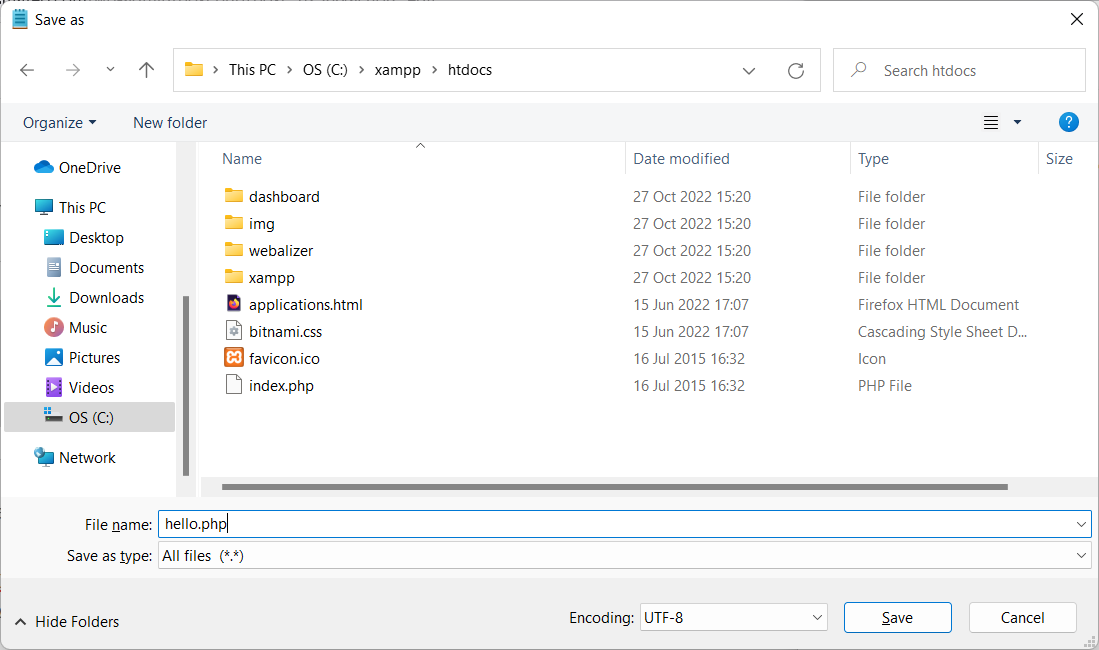
FROM ubuntu:20.04
MAINTAINER Carles Mateo
ARG DEBIAN_FRONTEND=noninteractive
# This will make sure printing in the Screen when running in detached mode
ENV PYTHONUNBUFFERED=1
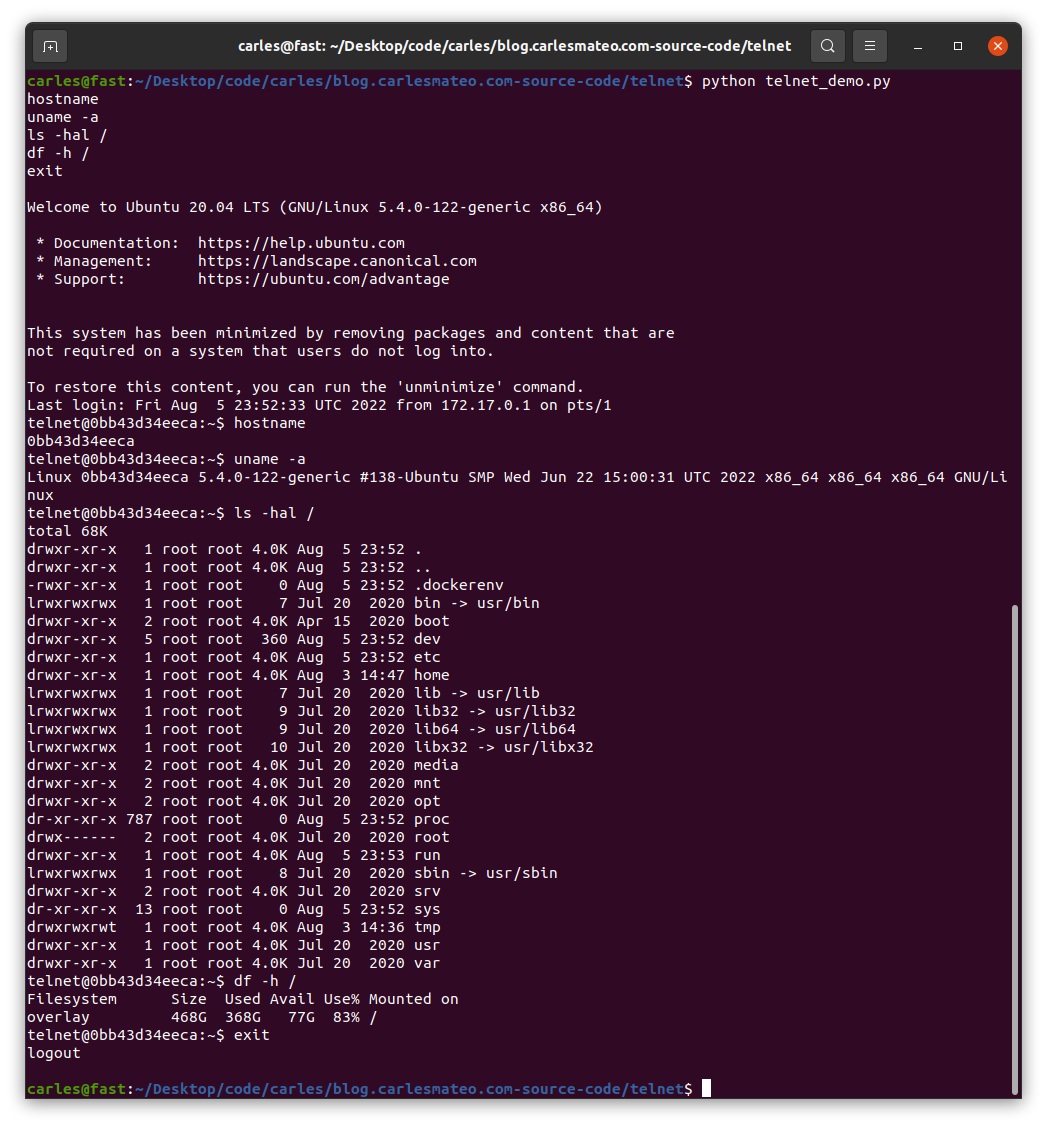
RUN apt-get update -y && apt install -y sudo telnetd vim systemctl && apt-get clean
RUN adduser -gecos --disabled-password --shell /bin/bash telnet
RUN echo "telnet:telnet" | chpasswd
EXPOSE 23
CMD systemctl start inetd; while [ true ]; do sleep 60; done
You can see that I use chpasswd command to change the password for the user telnet and set it to telnet. That deals with the complexity of setting the encrypted password.
File: build_docker.sh
#!/bin/bash

s_DOCKER_IMAGE_NAME="ubuntu_telnet"

echo "We will build the Docker Image and name it: ${s_DOCKER_IMAGE_NAME}"
echo "After, we will be able to run a Docker Container based on it."

printf "Removing old image %s\n" "${s_DOCKER_IMAGE_NAME}"
sudo docker rm "${s_DOCKER_IMAGE_NAME}"

printf "Creating Docker Image %s\n" "${s_DOCKER_IMAGE_NAME}"
sudo docker build -t ${s_DOCKER_IMAGE_NAME} .
# If you don't want to use cache this is your line
# sudo docker build -t ${s_DOCKER_IMAGE_NAME} . --no-cache

i_EXIT_CODE=$?
if [ $i_EXIT_CODE -ne 0 ]; then
    printf "Error. Exit code %s\n" ${i_EXIT_CODE}
    exit
fi

echo "Ready to run ${s_DOCKER_IMAGE_NAME} Docker Container"
echo "To run in type: sudo docker run -it -p 23:23 --name ${s_DOCKER_IMAGE_NAME} ${s_DOCKER_IMAGE_NAME}"
When you run sudo ./build_docker.sh the image will be built. Then run it with:
sudo docker run -it -p 23:23 --name ubuntu_telnet ubuntu_telnet
If you get an error indicating that the port is in use, then your computer has already a process listening on the port 23, use another.
You will be able to stop the Container by pressing CTRL + C
import ipaddress


def check_ip(s_ip_or_net):
    b_valid = True
    try:
        # The IP Addresses are expected to be passed without / even if it's /32 it would fail
        # If it uses / so, the CIDR notation, check it as a Network, even if it's /32
        if "/" in s_ip_or_net:
            o_net = ipaddress.ip_network(s_ip_or_net)
        else:
            o_ip = ipaddress.ip_address(s_ip_or_net)

    except ValueError:
        b_valid = False

    return b_valid


if __name__ == "__main__":
    a_ips = ["127.0.0.2.4",
             "127.0.0.0",
             "192.168.0.0",
             "192.168.0.1",
             "192.168.0.1 ",
             "192.168.0. 1",
             "192.168.0.1/32",
             "192.168.0.1 /32",
             "192.168.0.0/32",
             "192.0.2.0/255.255.255.0",
             "0.0.0.0/31",
             "0.0.0.0/32",
             "0.0.0.0/33",
             "1.2.3.4",
             "1.2.3.4/24",
             "1.2.3.0/24"]

    for s_ip in a_ips:
        b_success = check_ip(s_ip)
        if b_success is True:
            print(f"The IP Address or Network {s_ip} is valid")
        else:
            print(f"The IP Address or Network {s_ip} is not valid")
And the output is like this:
The IP Address or Network 127.0.0.2.4 is not valid
The IP Address or Network 127.0.0.0 is valid
The IP Address or Network 192.168.0.0 is valid
The IP Address or Network 192.168.0.1 is valid
The IP Address or Network 192.168.0.1  is not valid
The IP Address or Network 192.168.0. 1 is not valid
The IP Address or Network 192.168.0.1/32 is valid
The IP Address or Network 192.168.0.1 /32 is not valid
The IP Address or Network 192.168.0.0/32 is valid
The IP Address or Network 192.0.2.0/255.255.255.0 is valid
The IP Address or Network 0.0.0.0/31 is valid
The IP Address or Network 0.0.0.0/32 is valid
The IP Address or Network 0.0.0.0/33 is not valid
The IP Address or Network 1.2.3.4 is valid
The IP Address or Network 1.2.3.4/24 is not valid
The IP Address or Network 1.2.3.0/24 is valid
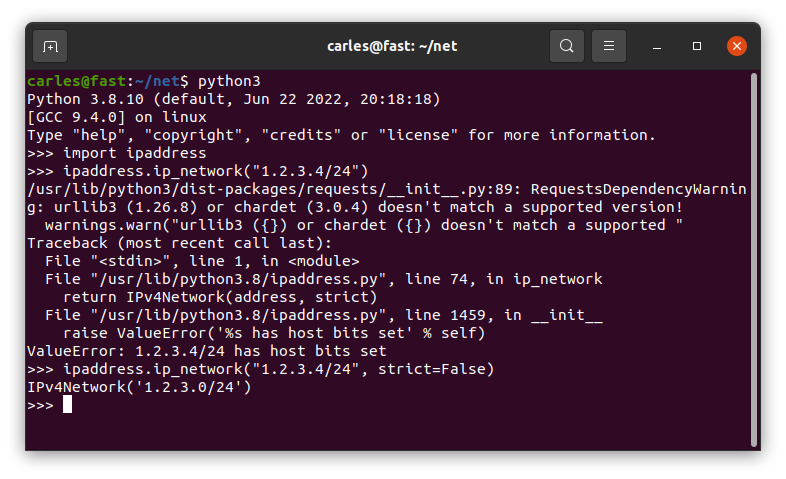
As you can read in the code comments, ipaddress.ip_address() will not validate an IP Address with the CIDR notation, even if it’s /32.
You should strip the /32 or use ipaddress.ip_network() instead.
As you can see 1.2.3.4/24 is returned as not valid.
You can pass the parameter strict=False and it will be returned as valid.
So, you may have your Android phone full and you don’t know where the space is.
You may have tried Apps for Android but none shows the information in the detail you would like. Linux to the rescue.
First of all you need a cable able to transfer Data. It is a cable that will be connected to your computer, normally with an USB 3.0 cable and to your smartphone, normally with USB-C.
Sometimes phone’s connectors are dirty and don’t allow a stable connection. Your connections should allow a stable connection, otherwise the connection will be interrupted in the middle.
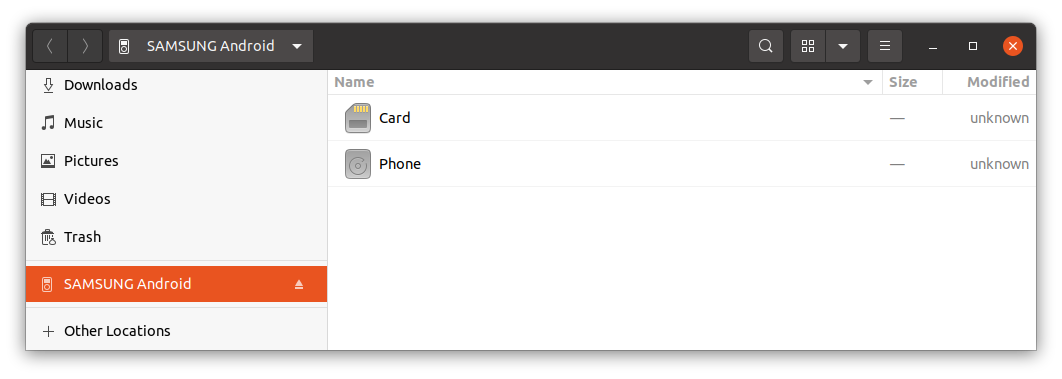
Once you connect the Android smartphone to the computer, unlock the phone and authorize the data connection.
You’ll see that your computer recognizes the phone:
Open the terminal and enter this directory:
cd /run/user/1000/gvfs/
Here you will see your device and the name is very evident.
The usual is to have just one device listed, but if you had several Android devices attached you may want to query first, in order to identify it.
The Android devices use a protocol named Media Transfer Protocol (MTP) when connecting to the USB port, and that’s different on the typical way to access the USB port.
usb-devices | grep "Manufacturer=" -B 3
Run this command to see all the devices connected to the USB.
You may see Manufacturer=SAMSUNG or Manufacturer=OnePlus etc…
The information returned will allow you to identify your device in /run/user/1000/gvfs/
You may get different type of outputs, but if you get:
You can enter the Phone internal storage or the SD Card storage directory:
cd Phone
To see how the space is distributed nicely I recommend you to use the program ncdu if you don’t have you can install it with:
sudo apt install ncdu
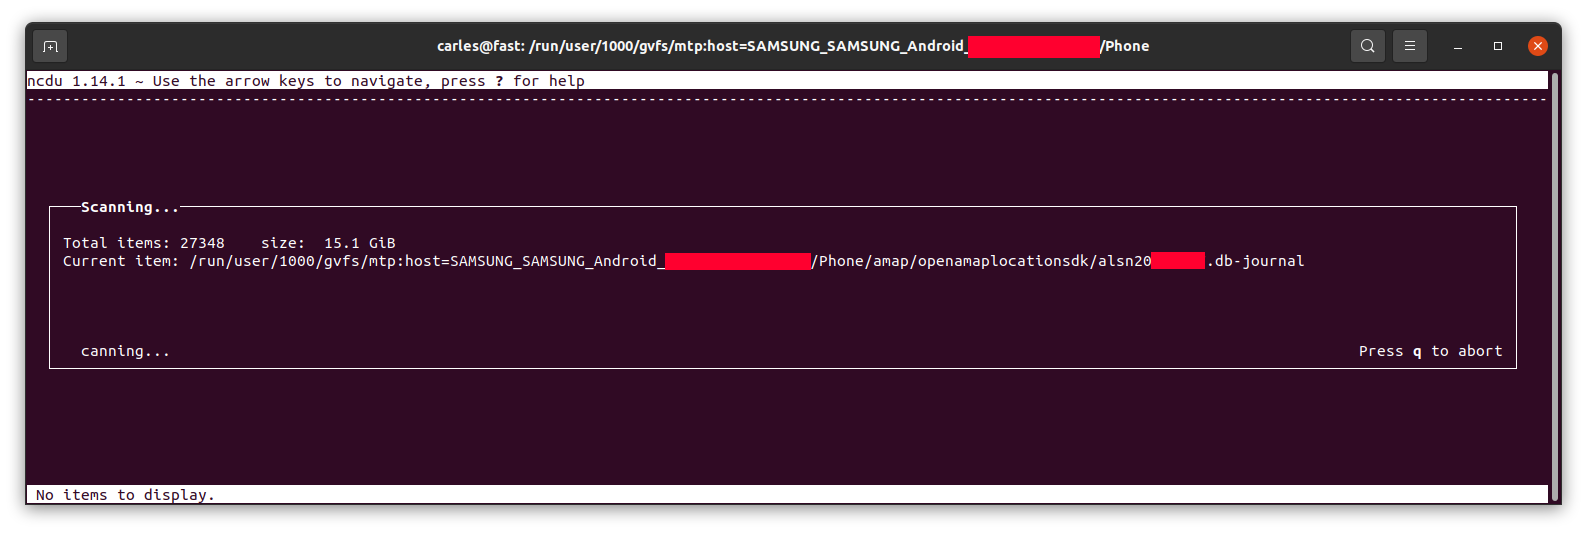
Then run ncdu:
ncdu
It will calculate the space…
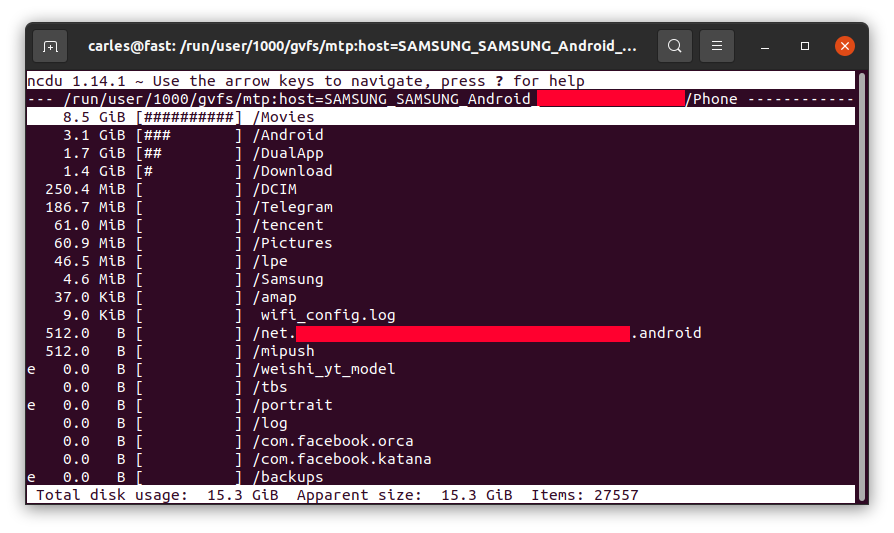
… and let you know, sorted from more to less, and will allow you to browse the sub-directories with the keyboard arrow keys and enter to get major clarity.
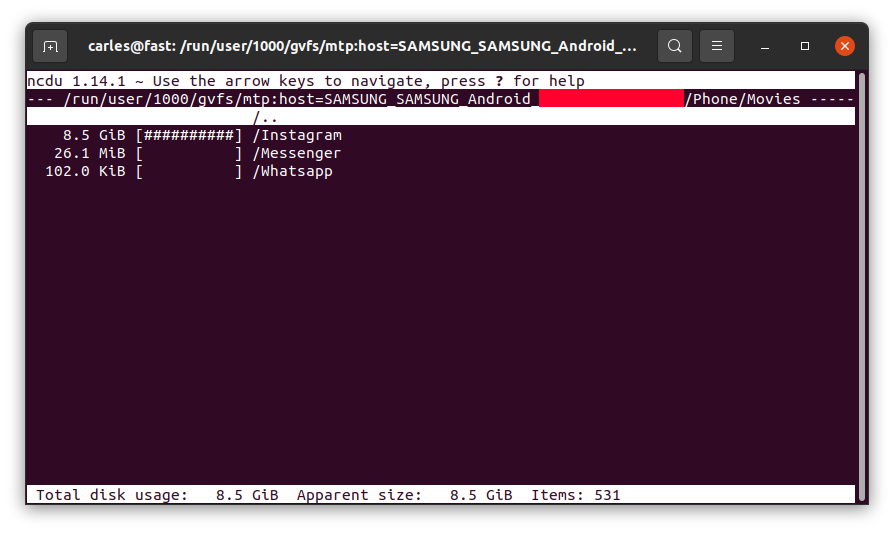
For example, in my case I saw 8.5 GB in the folder Movies on the phone, where I didn’t download any movie, so I checked.
I entered inside by pressing Enter:
So Instagram App was keeping a copy all the videos I uploaded, in total 8.5 GB of my Phone’s space and never releasing them!.
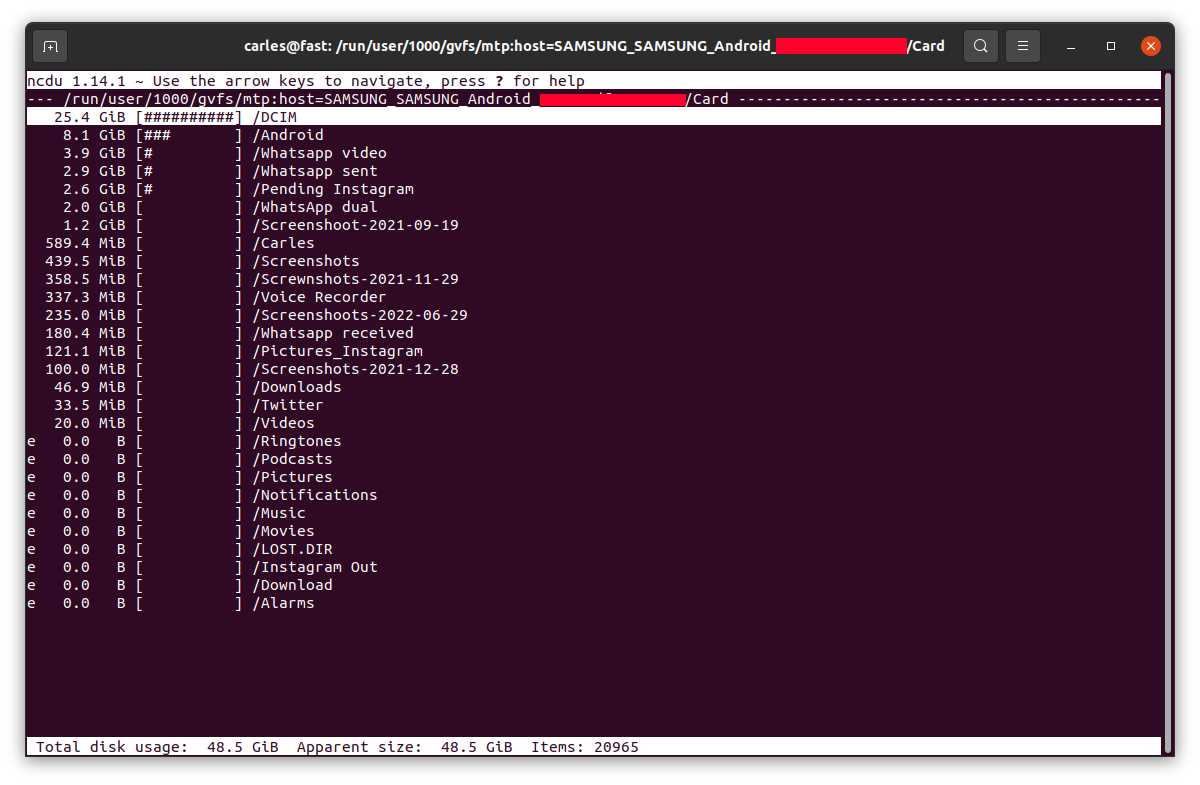
Example for the SD card, where the usage was as expected:
For all my friends and followers, I started to translate my radio space “El nou món digital” (in Catalan) to English “The New Digital World”. I cover Science, Technology, Entertainment and Video games.
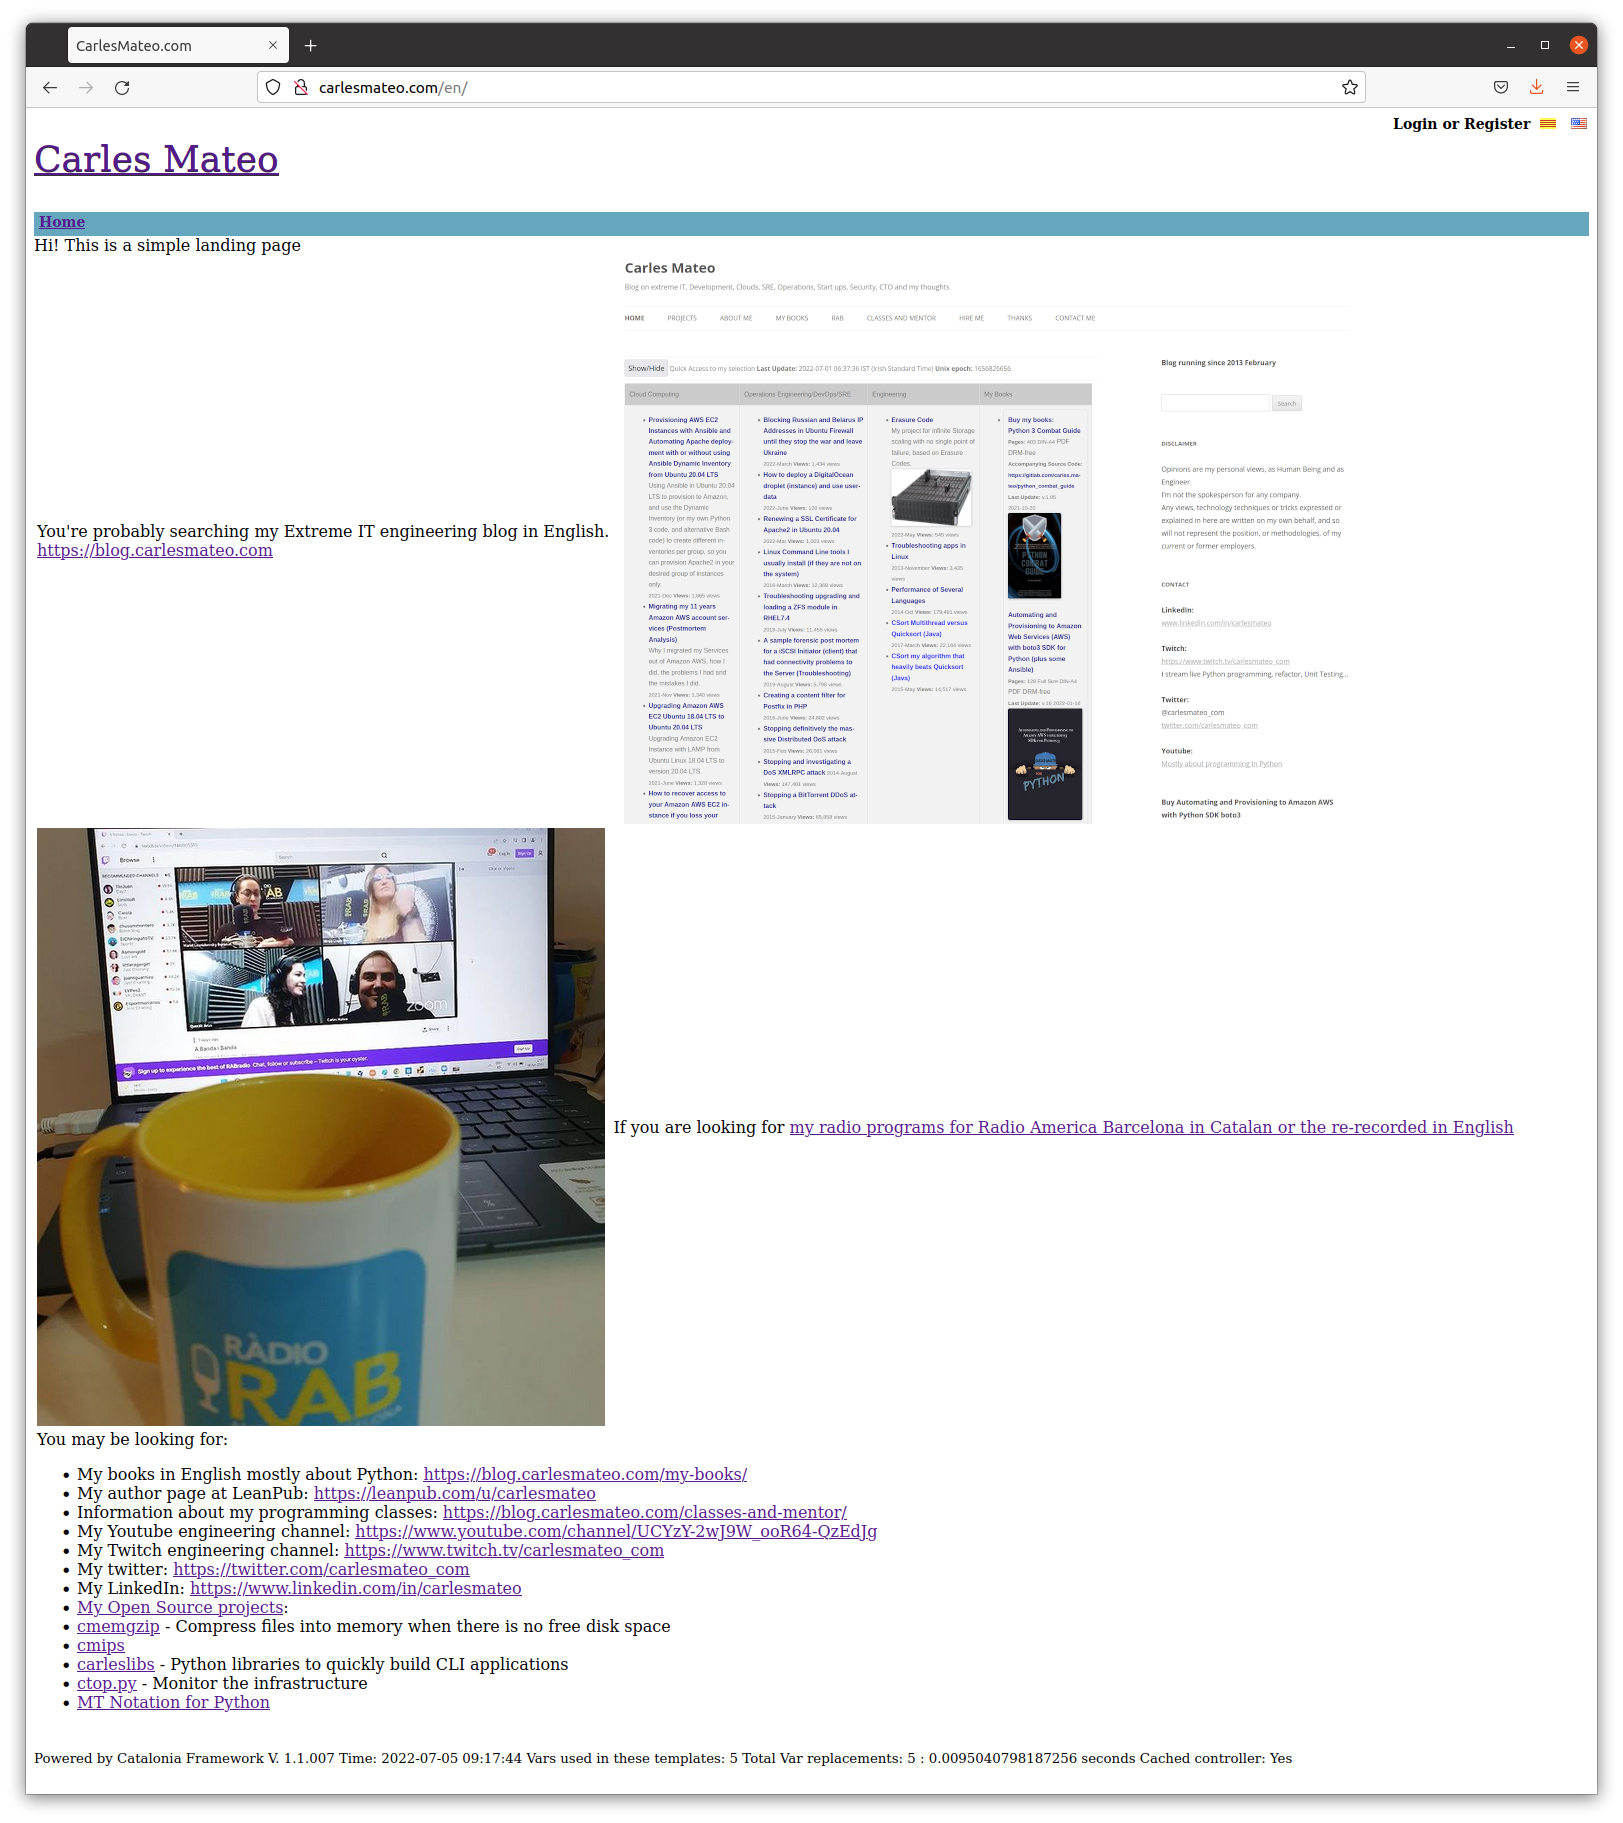
I decided to create a Jenkins Pipeline to deploy any updates to this pages and I updated it a bit at least to provide the most common information searched.
Don’t expect anything fancy at Front End level. :)
Cloud
I created a video about how to provision a Ubuntu Droplet in Digital Ocean.
It’s just for beginners, or if you used other CSP’s and you wonder how Digital Ocean user interface is.
It is really easy, to be honest. Amazon AWS should learn from them.
I also created another about how to provision using User Data Cloud Init feature:
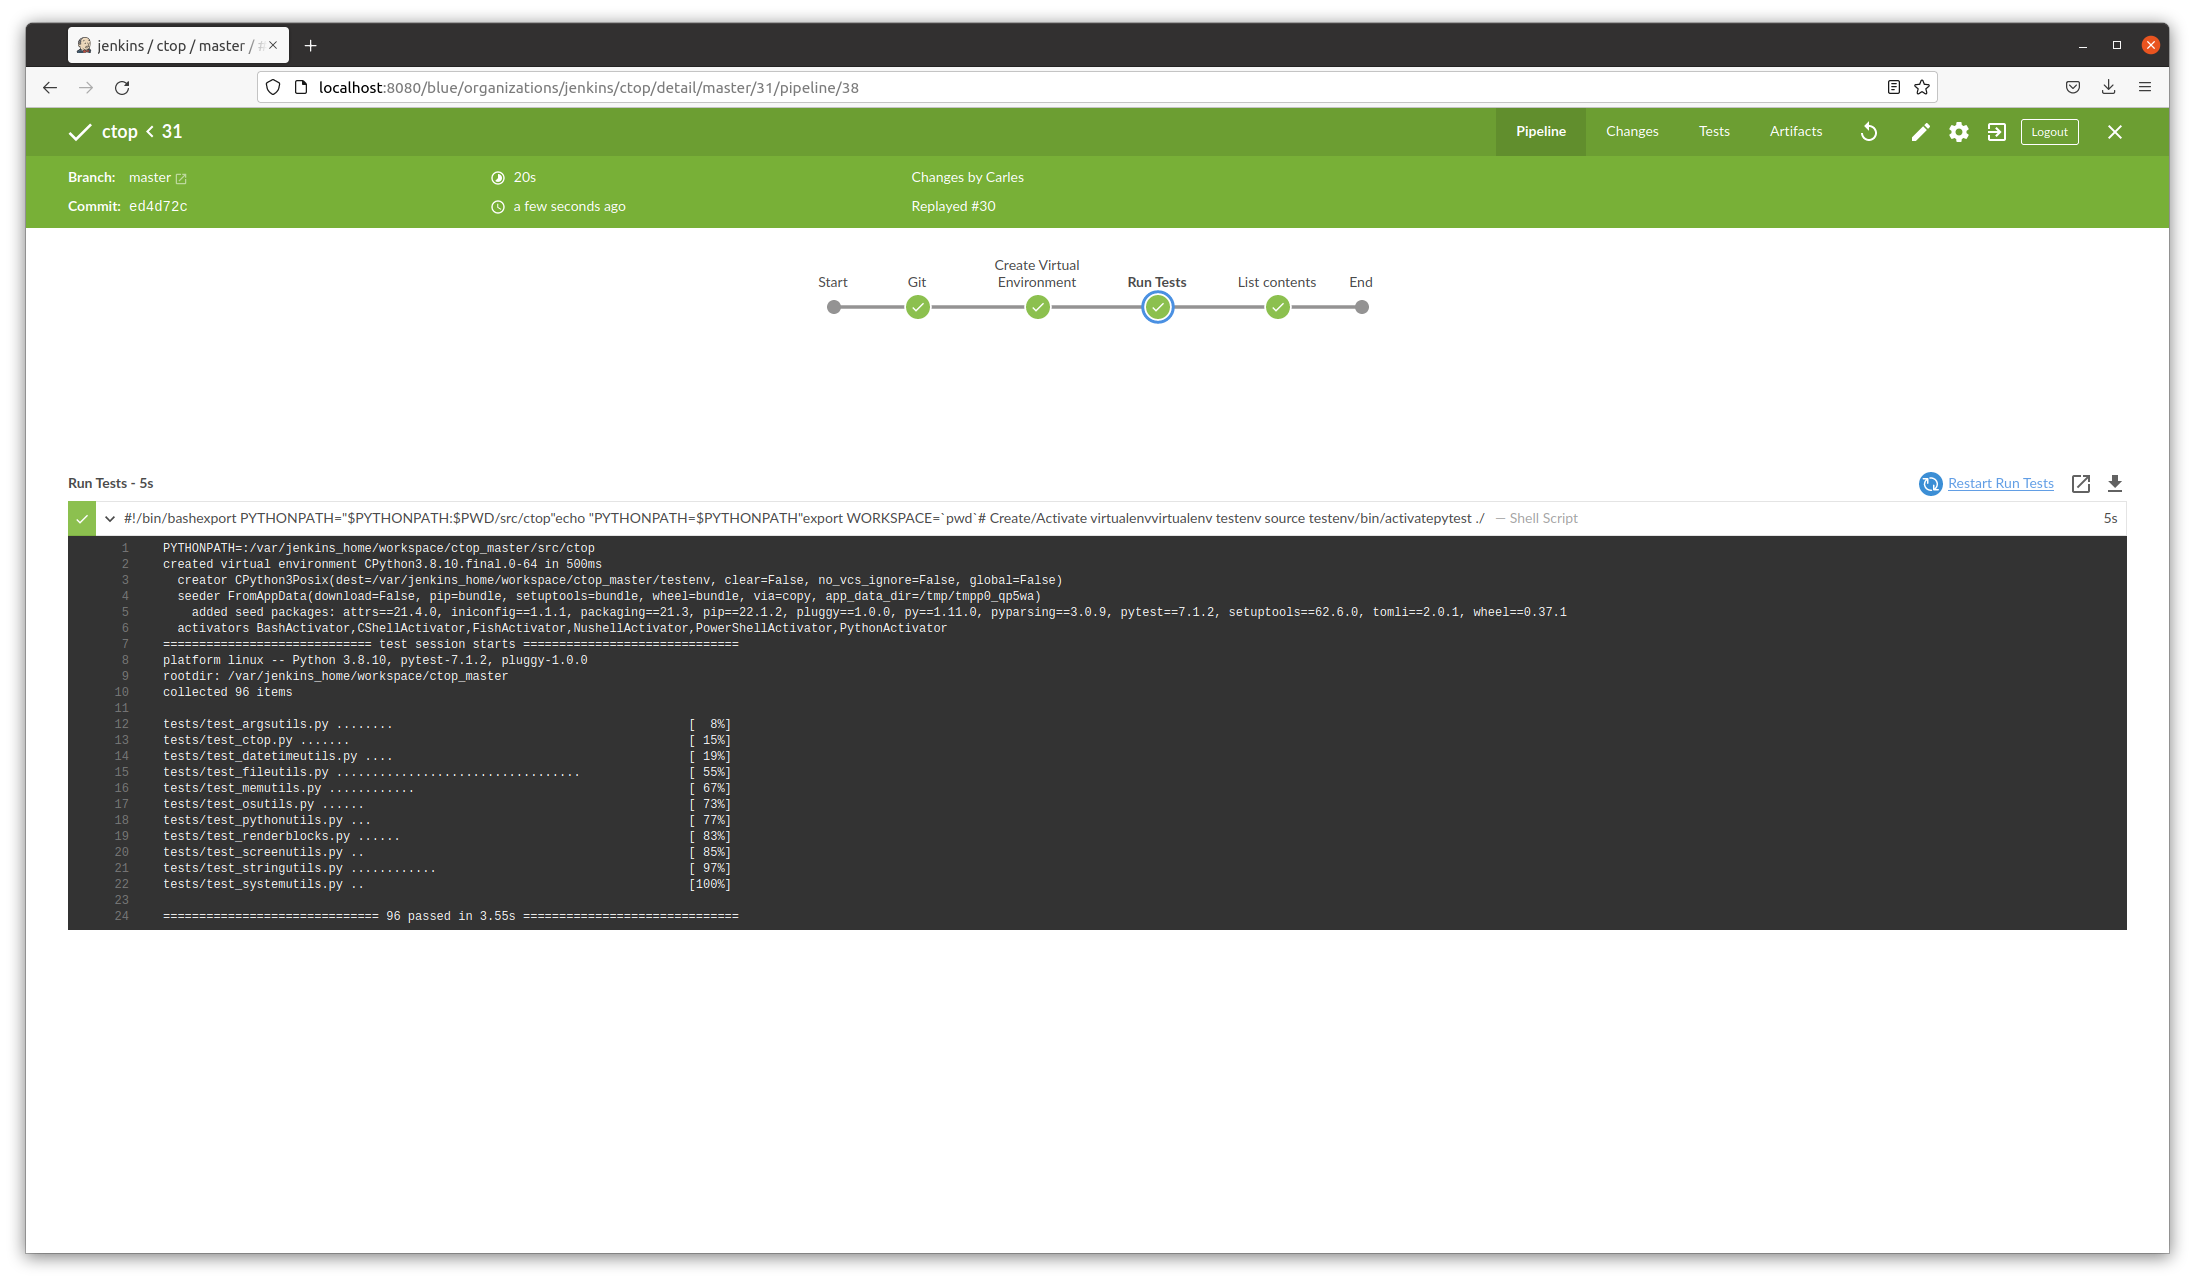
This version fixes few bugs, and adds better Unit Testing Code Coverage, and is integrated with jenkins (provides Jenkinsfile and a Dockerfile ready to automate the testing pipeline)
Sudo ku solver, Sudoku solver in Python, and Engineering solving problem approach
I’ve created this video explaining my experience writing a program to solve two impossible, very annoying Sudokus. :)
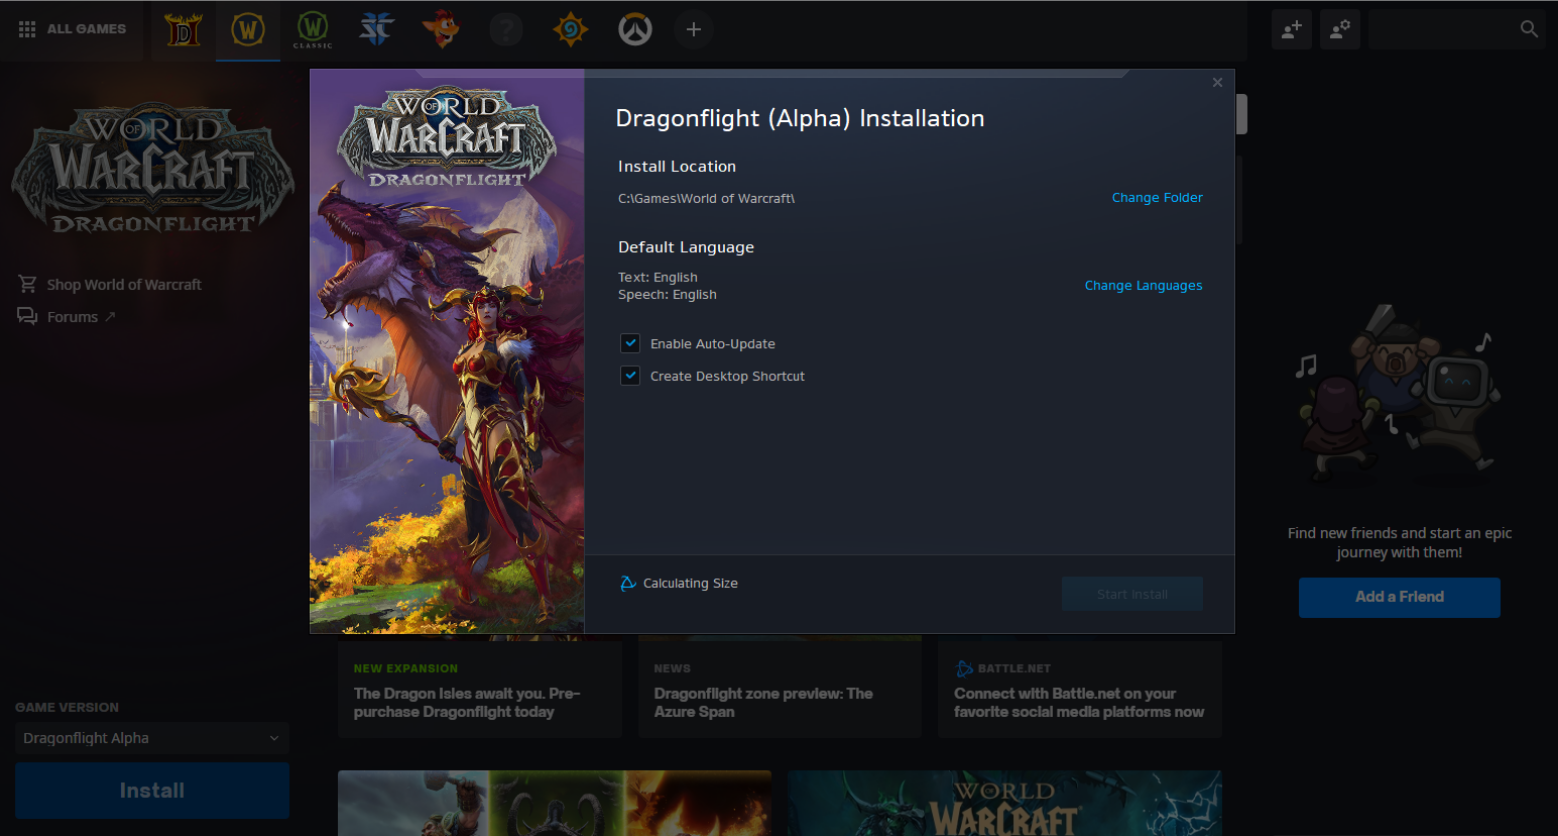
We have released World of Warcraft Dragonflight Alpha.
In the sync meetings I lead with Wow SRE and product Team I was informed that streaming would be open. Myself I was granted to stream over twitch, but so far I didn’t want to stream video games in my engineering channels. It’s different kind of audiences IMO. Let me know if you would like to get video game streams in my streaming channels.
Lich King
Humor
If you have been in a madness of Servers of a Cluster getting irresponsible and having to cold reboot them from remote hands iDracs or similar, you know why my friends sent me this image :D
One interesting aspect is that I cover how the messages are delivered as byte sequence. I show this by sending Unicode characters
Files in the project
Dockerfile
FROM ubuntu:20.04

MAINTAINER Carles Mateo

ARG DEBIAN_FRONTEND=noninteractive

# This will make sure printing in the Screen when running in dettached mode
ENV PYTHONUNBUFFERED=1

ARG PATH_RABBIT_INSTALL=/tmp/rabbit_install/

ARG PATH_RABBIT_APP_PYTHON=/opt/rabbit_python/

RUN mkdir $PATH_RABBIT_INSTALL

COPY cloudsmith.sh $PATH_RABBIT_INSTALL

RUN chmod +x ${PATH_RABBIT_INSTALL}cloudsmith.sh

RUN apt-get update -y && apt install -y sudo python3 python3-pip mc htop less strace zip gzip lynx && apt-get clean

RUN ${PATH_RABBIT_INSTALL}cloudsmith.sh

RUN service rabbitmq-server start

RUN mkdir $PATH_RABBIT_APP_PYTHON

COPY requirements.txt $PATH_RABBIT_APP_PYTHON

WORKDIR $PATH_RABBIT_APP_PYTHON

RUN pwd

RUN pip install -r requirements.txt

COPY *.py $PATH_RABBIT_APP_PYTHON

COPY loop_send_get_messages.sh $PATH_RABBIT_APP_PYTHON

RUN chmod +x loop_send_get_messages.sh

CMD ./loop_send_get_messages.sh
cloudsmith.sh
#!/usr/bin/sh
# From: https://www.rabbitmq.com/install-debian.html#apt-cloudsmith

sudo apt-get update -y && apt-get install curl gnupg apt-transport-https -y

## Team RabbitMQ's main signing key
curl -1sLf "https://keys.openpgp.org/vks/v1/by-fingerprint/0A9AF2115F4687BD29803A206B73A36E6026DFCA" | sudo gpg --dearmor | sudo tee /usr/share/keyrings/com.rabbitmq.team.gpg > /dev/null
## Cloudsmith: modern Erlang repository
curl -1sLf https://dl.cloudsmith.io/public/rabbitmq/rabbitmq-erlang/gpg.E495BB49CC4BBE5B.key | sudo gpg --dearmor | sudo tee /usr/share/keyrings/io.cloudsmith.rabbitmq.E495BB49CC4BBE5B.gpg > /dev/null
## Cloudsmith: RabbitMQ repository
curl -1sLf https://dl.cloudsmith.io/public/rabbitmq/rabbitmq-server/gpg.9F4587F226208342.key | sudo gpg --dearmor | sudo tee /usr/share/keyrings/io.cloudsmith.rabbitmq.9F4587F226208342.gpg > /dev/null

## Add apt repositories maintained by Team RabbitMQ
sudo tee /etc/apt/sources.list.d/rabbitmq.list <<EOF
## Provides modern Erlang/OTP releases
##
deb [signed-by=/usr/share/keyrings/io.cloudsmith.rabbitmq.E495BB49CC4BBE5B.gpg] https://dl.cloudsmith.io/public/rabbitmq/rabbitmq-erlang/deb/ubuntu bionic main
deb-src [signed-by=/usr/share/keyrings/io.cloudsmith.rabbitmq.E495BB49CC4BBE5B.gpg] https://dl.cloudsmith.io/public/rabbitmq/rabbitmq-erlang/deb/ubuntu bionic main

## Provides RabbitMQ
##
deb [signed-by=/usr/share/keyrings/io.cloudsmith.rabbitmq.9F4587F226208342.gpg] https://dl.cloudsmith.io/public/rabbitmq/rabbitmq-server/deb/ubuntu bionic main
deb-src [signed-by=/usr/share/keyrings/io.cloudsmith.rabbitmq.9F4587F226208342.gpg] https://dl.cloudsmith.io/public/rabbitmq/rabbitmq-server/deb/ubuntu bionic main
EOF

## Update package indices
sudo apt-get update -y

## Install Erlang packages
sudo apt-get install -y erlang-base \
                        erlang-asn1 erlang-crypto erlang-eldap erlang-ftp erlang-inets \
                        erlang-mnesia erlang-os-mon erlang-parsetools erlang-public-key \
                        erlang-runtime-tools erlang-snmp erlang-ssl \
                        erlang-syntax-tools erlang-tftp erlang-tools erlang-xmerl

## Install rabbitmq-server and its dependencies
sudo apt-get install rabbitmq-server -y --fix-missing
build_docker.sh
#!/bin/bash

s_DOCKER_IMAGE_NAME="rabbitmq"

echo "We will build the Docker Image and name it: ${s_DOCKER_IMAGE_NAME}"
echo "After, we will be able to run a Docker Container based on it."

printf "Removing old image %s\n" "${s_DOCKER_IMAGE_NAME}"
sudo docker rm "${s_DOCKER_IMAGE_NAME}"

printf "Creating Docker Image %s\n" "${s_DOCKER_IMAGE_NAME}"
sudo docker build -t ${s_DOCKER_IMAGE_NAME} . --no-cache

i_EXIT_CODE=$?
if [ $i_EXIT_CODE -ne 0 ]; then
    printf "Error. Exit code %s\n" ${i_EXIT_CODE}
    exit
fi

echo "Ready to run ${s_DOCKER_IMAGE_NAME} Docker Container"
echo "To run in type: sudo docker run -it --name ${s_DOCKER_IMAGE_NAME} ${s_DOCKER_IMAGE_NAME}"
echo "or just use run_in_docker.sh"
requirements.txt
pika
loop_send_get_messages.sh
#!/bin/bash

echo "Starting RabbitMQ"
service rabbitmq-server start

echo "Launching consumer in background which will be listening and executing the callback function"
python3 rabbitmq_getfrom.py &

while true; do

    i_MESSAGES=$(( RANDOM % 10 ))

    echo "Sending $i_MESSAGES messages"
    for i_MESSAGE in $(seq 1 $i_MESSAGES); do
        python3 rabbitmq_sendto.py
    done

    echo "Sleeping 5 seconds"
    sleep 5

done

echo "Exiting loop"
A quick video, of 3 minutes, that shows you how it works.
If you don’t have pandas installed you’ll have to install it and lxml, otherwise you’ll get an error:
  File "/home/carles/Desktop/code/carles/blog.carlesmateo.com-source-code/venv/lib/python3.8/site-packages/pandas/io/html.py", line 872, in _parser_dispatch
    raise ImportError("lxml not found, please install it")
ImportError: lxml not found, please install it
You can install both from PyCharm or from command line with:
pip install pandas
pip install lxml
And here the source code:
import pandas as pd


if __name__ == "__main__":

    # Do not truncate the data when printing
    pd.set_option('display.max_colwidth', None)
    # Do not truncate due to length of all the columns
    pd.set_option('display.max_columns', None)
    pd.set_option('display.max_rows', None)
    pd.set_option('display.width', 2000)
    # pd.set_option('display.float_format', '{:20,.2f}'.format)

    o_pd_my_movies = pd.read_html("https://blog.carlesmateo.com/movies-i-saw/")
    print(len(o_pd_my_movies))

    print(o_pd_my_movies[0])