I was contributing already but since the 2th of May I started my radio space, also streamed in Twitch, google Podcast, Apple, Spotify… in Radio America Barcelona.
My space is named The New Digital World (“el nou món digital”) and I talk about tech news, technology, videogames and handy tricks.
This content is in Catalan language only, so I added to the blog as ending in [CA]
New Projects: Erasure Code
For my university thesis I’ve been creating an Erasure Coding solution that allows to encode and distribute the files seamlessly across an universe of Servers in different cloud providers, balancing the disk space used, super easy to use, and resilient to disaster and recovery.
I created my project, named Erasure Code www.erasurecode.com as Open Source, so all size of companies will be able to benefit from this technology, only available to multinationals until now.
I hope this will help tons of companies and startup, hopefully scientific startups, to save costs and focus more in their business and to make a better world.
Explanations about redefining reserved keywords like print or exit as a variable.
Style modification to add lines over the line number and over the Footnote.
My health
My health is improving.
Thanks to my self discipline, following a good diet, taking the medicines… I’ve seen an spectacular improvement since I was sent urgently to he hospital with risk for my life.
I’ve very grateful that amazing doctors care of me.
I had some ups and downs and downs while pushing to finish my final project for the HDip in Computer Science Cloud Computing, but I managed to complete everything on time.
I had to travel to visit amazing specialists, and had to pay the expensive treatments, however everything worked and my health has improved drastically. I am very happy to count with additional source of income, like the teaching programming and my technical books, which helped me to be able to deal with all these sorts of unexpected expenses. I appreciate every single sale of my books, as it made me feel useful and appreciated when I was a bit low, and the nice details some of the readers had. Thanks.
Firewall
I’ve keep blocking in the Firewall any IP and that network coming to the blog from Russia and Belarus. I’ve blocked millions of IP Addresses so far.
I’ve also blocked the traffic coming from CSP when I detect an attack and the IP belongs to them. Most of the attacks were coming from Digital Ocean, after your-server.de and hetzer.de and finally Amazon. Curiously some attacks came from IPs from Microsoft.
I’ve blocked all these ranges of IPs, hundreds of thousands.
Despite blocking all these IPs from CSPs, the number of visitors keeps growing.
At the end my blog is for Engineers and for people, I don’t have interest in bots, and I don’t get any revenue from ads (I never added ads) so I’m perfectly happy with having less visitors, but being humans that find help in the blog.
I’m Catalan. In 1936 the fascist military leaded by franco raised in arms against the elected government of the Spanish Republic. The Italian and nazi German fascist in power bombed the Catalan population. Hundreds of thousands of innocent citizens were assassinated and millions of Catalan and Spaniards had to exile. The sons of those that were ruling with the dictator have been insisting in naming it a “civil war”, but it was the military lead by a fascist, revolting against the legitimate Republic and ending a democracy.
The dictatorship lasted until 1975, when the dictator died in the bed. The effects of the repression never abandoned Catalonia, and nowadays in Catalonia people is still detained by the Spanish police for talking the Catalan language in front of them, and our Parliament decisions are cancelled by the Spanish courts, for example to force the exit of a President of Catalonia that they didn’t like, or to force the Catalan schools to teach 25% of the time in Spanish attacking the Catalan teaching system.
During WW2 millions of Jews were mass murdered, also people from all the nations were assassinated.
Russian population suffered a lot also fighting the nazis.
Now we have to see how Russia’s army is invading Ukraine and murdering innocent citizens.
That’s horrible.
I know Engineers from Ukraine. Those guys were doing great building wealthy based on knowledge and working well for companies across the world. Now these people are being killed or Engineers, amongst all the brave population, are arming themselves to fight the invasion. Shells destroy beautiful cities and population are starving, and young soldiers from both sides will never be seen again by their mothers.
Let music play in solidarity with Ukraine. First is a Catalan group. Second is a famous Irish band in this epic song dedicated to the brave International Brigades, volunteers that fought the fascism in Spain and in Catalonia trying to make a better world.
The Blog
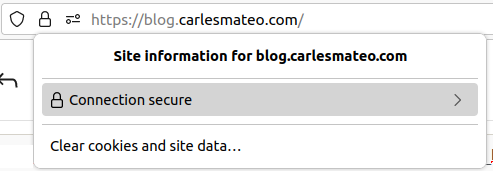
I’ve updated the SSL Certificate. The previous one I bought was issued for two years, and I renewed as it was due to expire.
Honestly, my ego was flattered. It is a lot of reputation.
Although in the past I got an offer from another monstrously big editorial to publish world wide my book Python 3 Combat Guide and I also rejected, and an offer from a digital learning platform to create an interactive course from this same book.
I’ve rejected it again this time.
If you are curious, this is what I answered to them:
Hi XXXX,

I'm well, thank you. I hope you are doing well too.

Thanks for taking the time to explain your conditions to me.

I feel flattered by your editorial thinking about me. I respect your brand, as I mentioned, as I own several of your titles.

However, I have to refuse your offer.

Is not the first time an editor has offered to publish one or more of my books. For all over the world, with much higher economic expectations.

I'll tell you why I love being at LeanPub:

1- I own the rights. All of them.
2- I can publish updates, and my readers get them for free. As I add new materials, the value is maximized for my readers.
3- I get 80% of the royalties.
4- If a reader is not happy, they can return the book for 60 days.
5- I can create vouchers and give a discount to certain readers, or give for free to people that are poor and are trying to get a career in Engineering.

The community of readers are very honest, and I only got 2 returns. One of them I think was from an editorial that purchased the book, evaluated it, and they contacted me to publish it, and after I rejected they applied for the refund.

I teach classes, and I charge 125 EUR per hour. I can make much more by my side than the one time payment you offer. The compensation for the video seems really obsolete.

Also, I could be using Amazon self publishing, which also brings bigger margins than you.

So many thanks for your offer. I thought about it because of the reputation, but I already have a reputation. I've thousands of visits to my tech blog, and because of the higher royalties, even if I sell less books through LeanPub it is much more rewarding.

Thanks again and have a lovely day and rest of the week.


Best,
Carles
The provisioning in Amazon AWS through their SDK is a book I’m particularly proud, as it empowers the developers so much. And I provide source code so they can go from zero to hero, in a moment. Amazon should provide a project sample as I do, not difficult to follow documentation.
Teaching / Mentoring
As I was requested, I’ve been offering advice and having virtual coffees with some people that recently started their journey to become Software Engineers and wanted some guidance and advice.
It has been great seeing people putting passion and studying hard to make a better future for themselves and for their families.
I’ll probably add to the blog more contents for beginners, although it will continue being a blog dedicated to extreme IT, and to super cool Engineering skills and troubleshooting.
For my regular students I have a discord space where we can talk and they can meet new friends studying or working in Engineering.
Free Resources
This github link provides many free books in multiple languages:
Zoom can zoom the view. So if they are sharing their screen, and font is too small, you can give a relax to your eyes by using Zoom’s zoom feature. It is located in View.
My health
After being in the hospital in December 2021, with risk for my life, and after my incredible recuperation, I’ve got the good news that I don’t need anymore 2 of the 3 medicines I was taking in a daily basis. It looks well through a completely recovery thanks to my discipline, doing sport every day several times, and the fantastic Catalan doctors that are supporting me so well.
Since they found what was failing in me, and after the emergency treatments I started to sleep really well. All night. That’s a privilege that I didn’t have for long long time.
Humor
Sad but true history. How many super talented Engineers have been hired and then they were given a shitty laptop/workstation super slow? That happened to me when I was hired by Volkswagen IT: gedas. I was creating projects for very big companies and I calculated that I was wasting 2 hours of my time compiling. The computer did not had enough RAM and was using swap.
from urllib import request
from bs4 import BeautifulSoup

s_url = "https://blog.carlesmateo.com/movies-i-saw/"
s_html = request.urlopen(s_url).read().decode('utf8')

o_soup = BeautifulSoup(s_html, 'html.parser')
o_title = o_soup.find('title')

print(o_title.string) # Prints the tag string content

# Another possible way
if o_soup.title is not None:
    s_title = o_soup.title.string
else:
    s_title = o_title.title
print(s_title)
I’m not talking about the wonderful things, like how big can the Integers be, but about the bizarre things that may ruin your day.
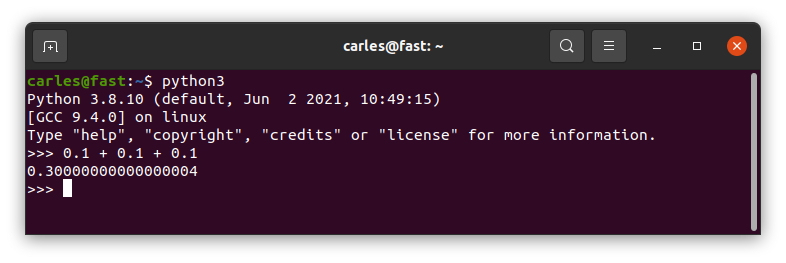
What sums 0.1 + 0.1 + 0.1 in Python?
0.3?
Wrong answer.
A bit of humor
Well, to be honest the computer was wrong. They way programming languages handle the Floats tend to be less than ideal.
Floats
Maybe you know JavaScript and its famous NaN (Not a number).
You are probably sure that Python is much more exact than that…
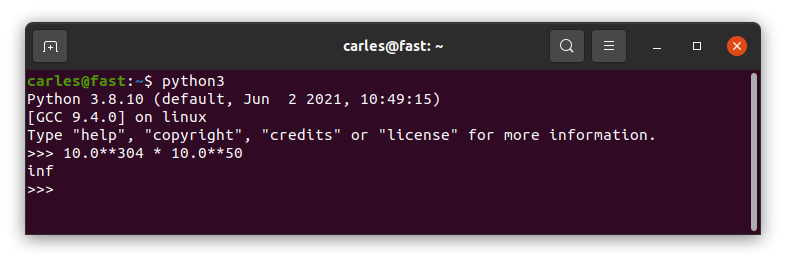
…well, until you do a big operation with Floats, like:
10.0**304 * 10.0**50
and
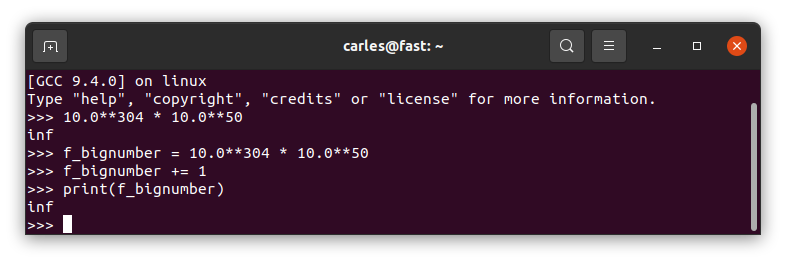
It returns infinite
I see your infinite and I add one :)
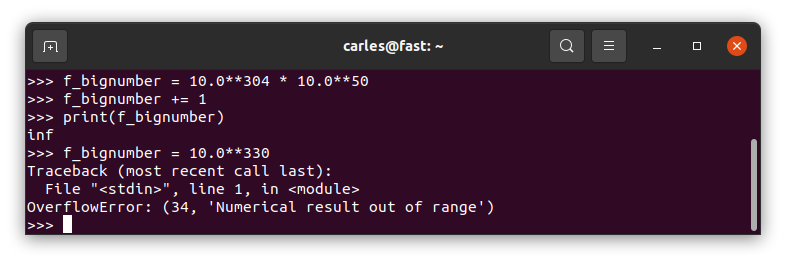
However If we try to define a number too big directly it will return OverflowError:
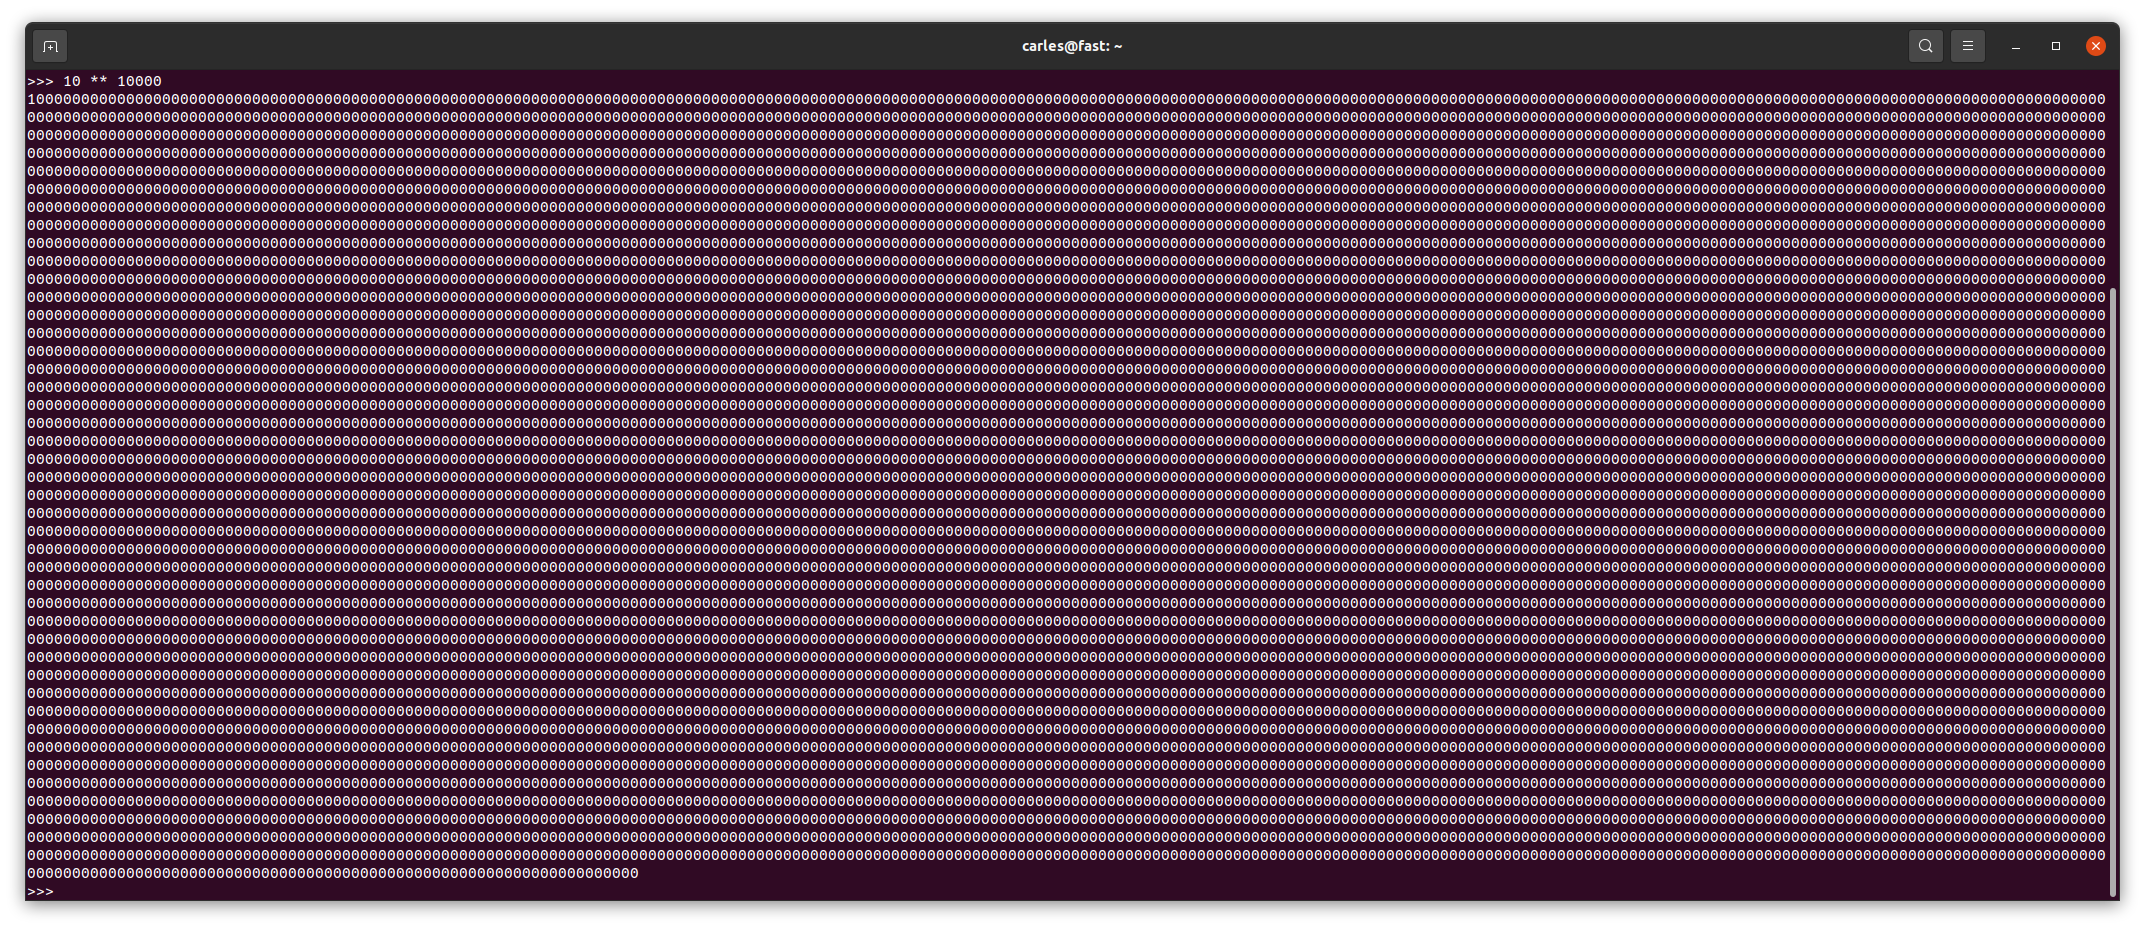
Please note Integers are handled in a much more robust cooler way:
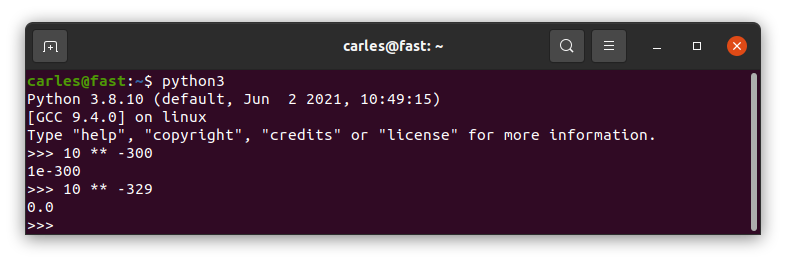
Negative floats
Ok. What happens if we define a number with a negative power, like 10 ** -300 ?
And if we go somewhere a bit more far? Like 10 ** -329
It returns 0.0
Ups!
I mention in my books why is better to work with Integers, and in fact most of the eCommerces, banks and APIs work with Integers. For example, if the amount in USD 10.00 they send multiplied by 100, so they will send 1000. All the actor know that they have to divide by 2.
Breaking the language innocently
I mentioned always that I use the MT Notation, the prefix notation I invented, inspired by the Hungarian Notation and by an amazing C++ programmer I worked with in Volkswagen and in la caixa (now caixabank), that passed away many years ago.
Well, that system of prefixes will name a variable with a prefix for its type.
It’s very useful and also prevents the next weird thing from Python.
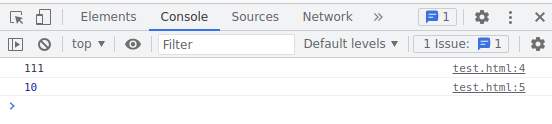
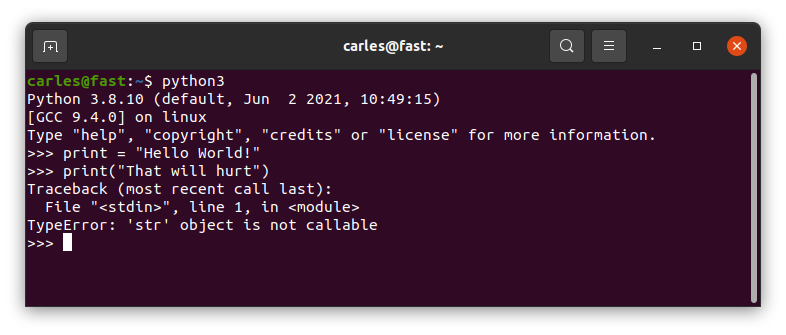
Imagine a Junior wants to print a String and they put in a variable. And unfortunately they call this variable print. Well…
print = "Hello World!"
print("That will hurt")
Observe the output of this and try not to scream:
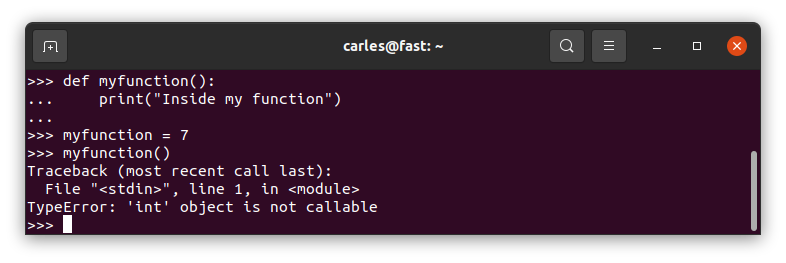
Variables and Functions named equally
Well, most of languages are able to differentiate a function, with its parenthesis, from a variable.
The way Python does it hurts my coder heart:
Another good reason to use MT Notation for the variables, and for taking seriously doing Unit Testing and giving a chance to using getters and setters and class Constructor for implementing limits and sanitation.
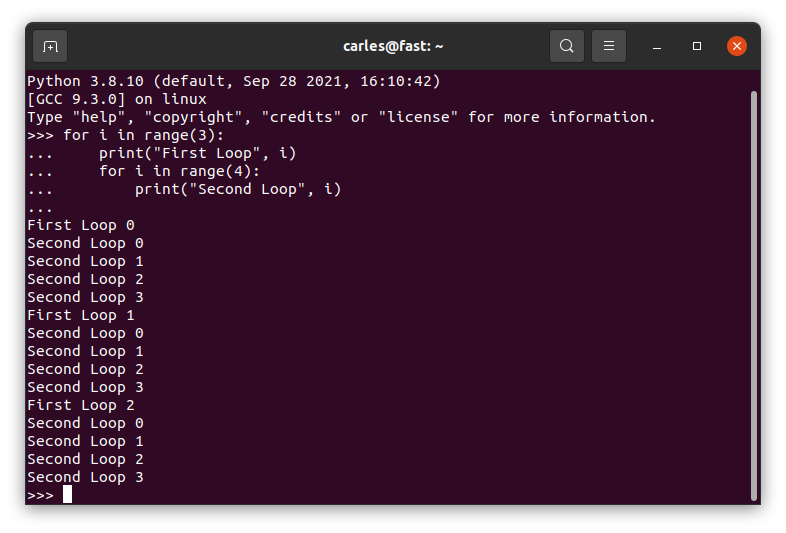
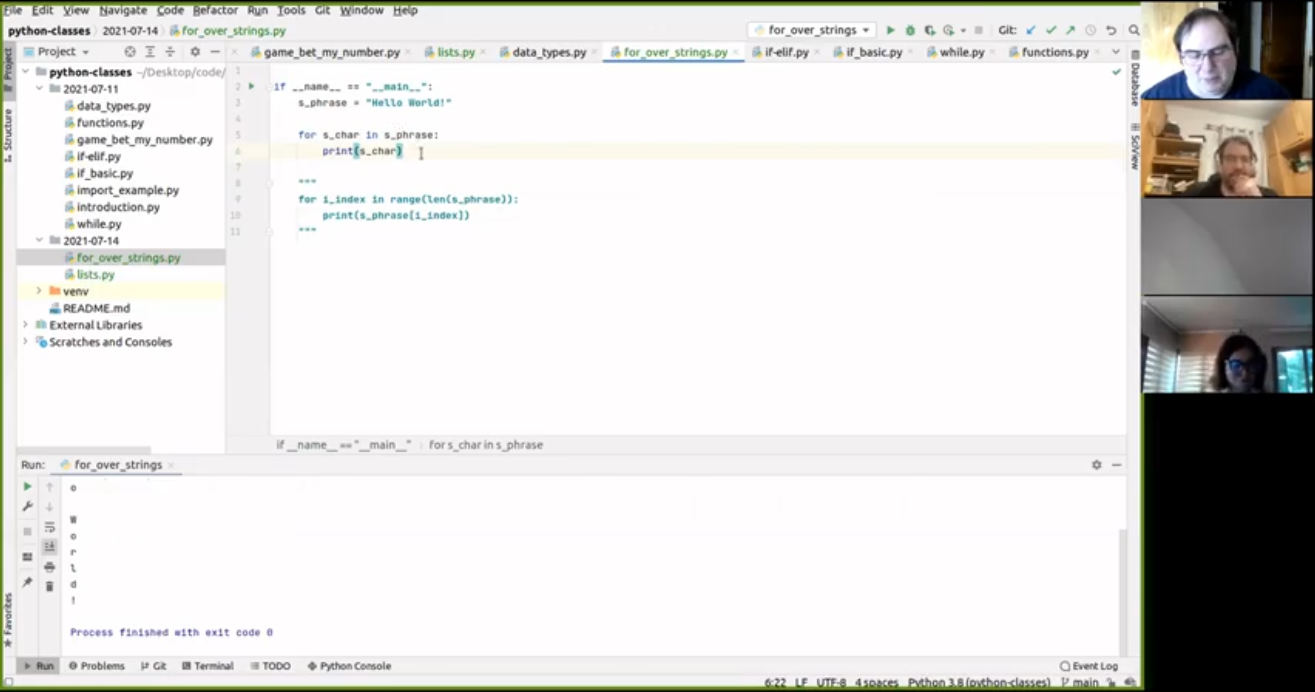
Nested Loops
This will work in Python, it doesn’t work in other languages (but please never do it).
for i in range(3):
    print("First Loop", i)
    for i in range(4):
        print("Second Loop", i)
The code will not crash by overwriting i used in the first loop, but the new i will mask the first variable.
And please, name variables properly.
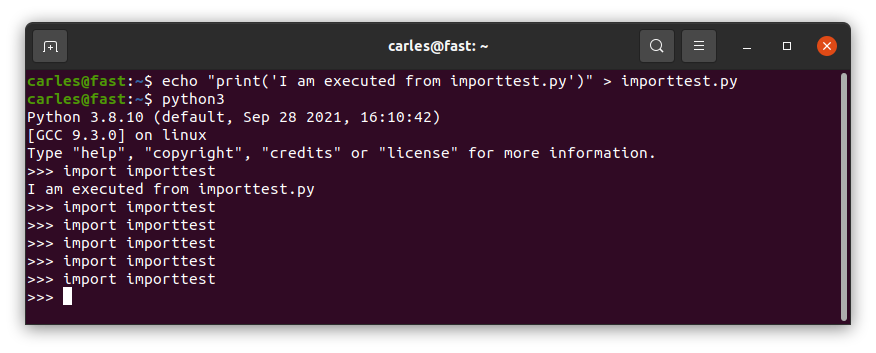
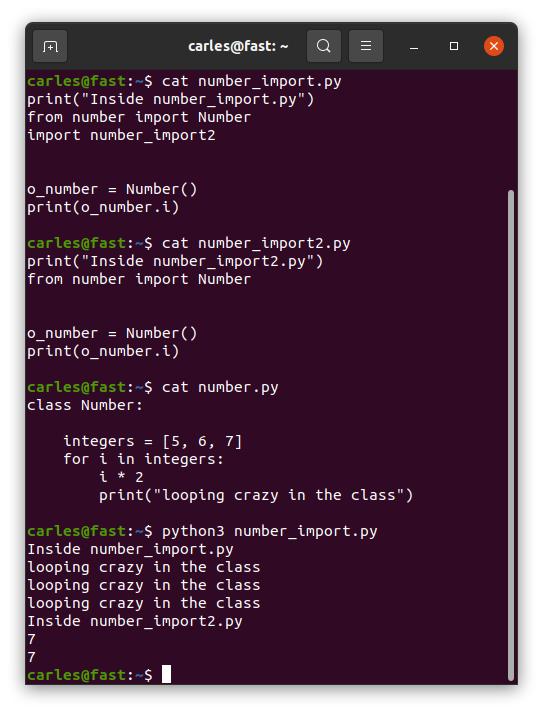
Import… once?
Imports are imported only once. Even if different files imported do import the same file.
So don’t have code in the middle of them, outside functions/classes, unless you’re really know what you’re doing.
Define functions first, and execute code after if __name__ == “__main__”:
Take a look at this code:
def first_function():
    print("Inside first function")
    second_function()

first_function()

def second_function():
    print("Inside second function")
Well, this will crash as Python executes the code from top to bottom, and when it gets to first_function() it will attempt to call second_function() which has not been read by Python yet. This example will throw an error.
You’ll get an error like:
Inside first function
Traceback (most recent call last):
  File "/home/carles/Desktop/code/carles/python_combat_guide/src/structure_dont_do_this.py", line 14, in <module>
    first_function()
  File "/home/carles/Desktop/code/carles/python_combat_guide/src/structure_dont_do_this.py", line 12, in first_function
    second_function()
NameError: name 'second_function' is not defined

Process finished with exit code 1
Add your code at the bottom always, under:
if __name__ == "__main__":
    first_function()
The code inside this if will only be executed if you directly call this code as main file, but will not be executed if you import this file from another one.
You don’t have this problem with classes in Python, as they are defined first, completely read, and then you instantiate or use them. To avoid messing and creating bugs, have the imports always on the top of your file.
…Ellipsis
Today is Halloween and one of my colleagues asked me help to improve his Automation project.
I found something weird in his code.
He had something like that.
class Router:

    def router_get_info(self):
        ...

    def get_help_command(self):
        return "help"
So I asked why you use … (dot dot dot) on that empty method?.
He told me that when he don’t want to implement code he just put that.
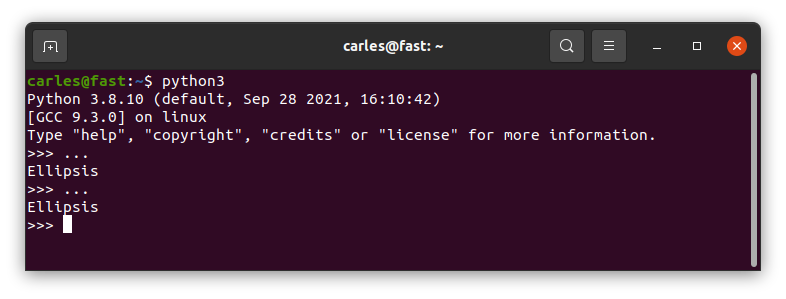
Well, dot dot dot is Ellipsis.
And what is Ellipsis?.
Ellipsis is an object that may appear in slice notation.
In Python all the methods, functions, if, while …. require to have an instruction at least.
So the instruction my colleague was looking for is pass.
Just a variable?
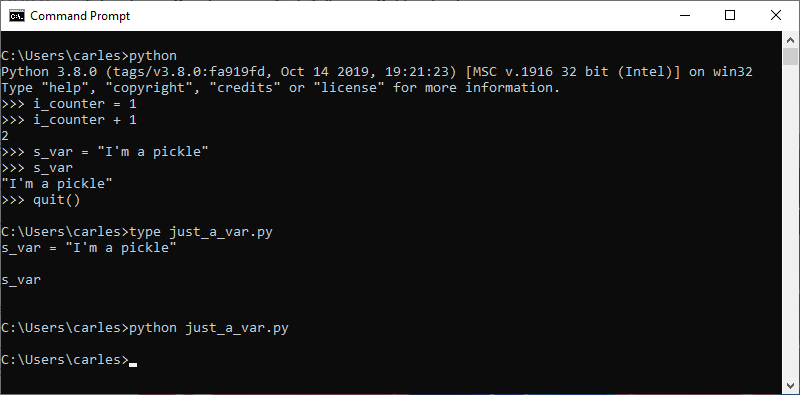
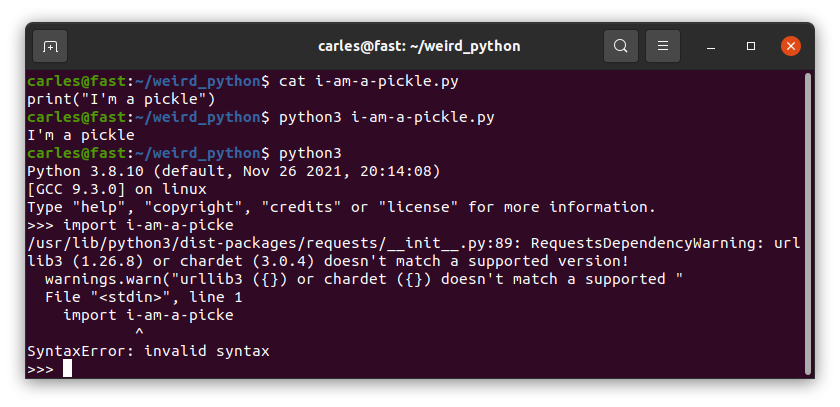
In Python you can have just a var, without anything else, like no operation with it, no call, nothing.
This makes it easy to commit an error and not detecting it.
As you see we can have just s_var variable in a line, which is a String, and this does not raises an error.
If we do from python interpreter interactively, it will print the String “I’m a pickle” (famous phrase from Rick and Morty).
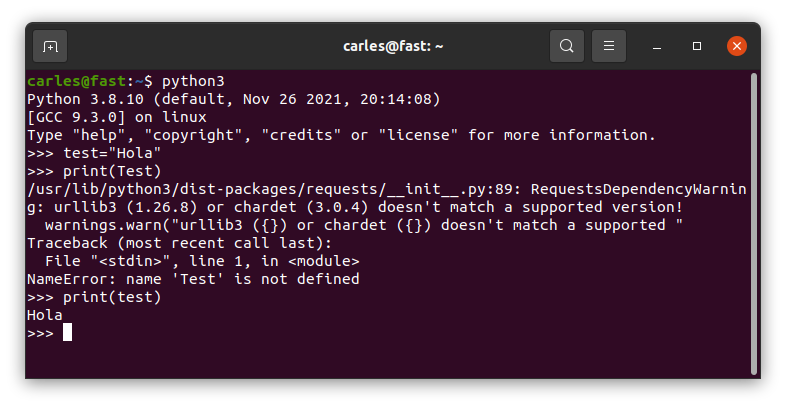
Variables are case sensitive
So you can define true false none … as they are different from True False None
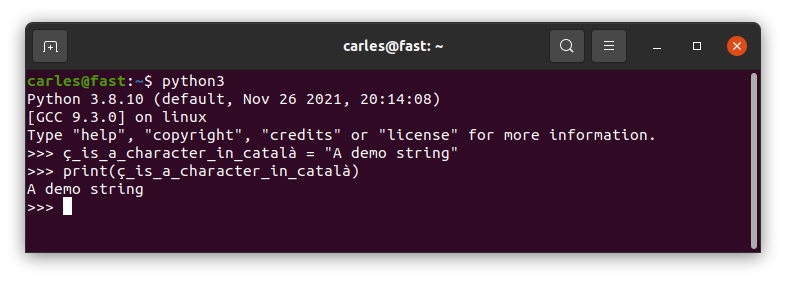
Variables in Unicode
Python3 accepts variables in Unicode.
I would completely discourage you to use variables with accents or other characters different from a-z 0-9 and _
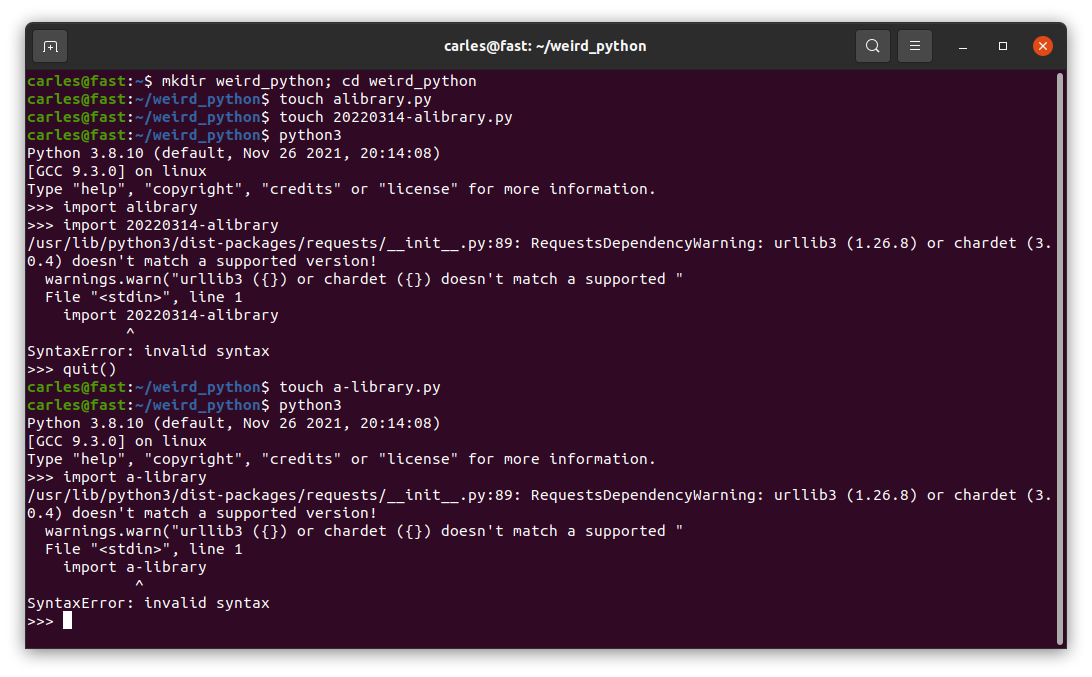
Python files with these names yes, but kaboom if you import them
So you can create Python files with dash or beginning with numbers, like 20220314_programming_class.py and execute them, but you cannot import them.
RYYFTK RODRIGUEZ,LEELA,FRY, FUTURAMA, 1999
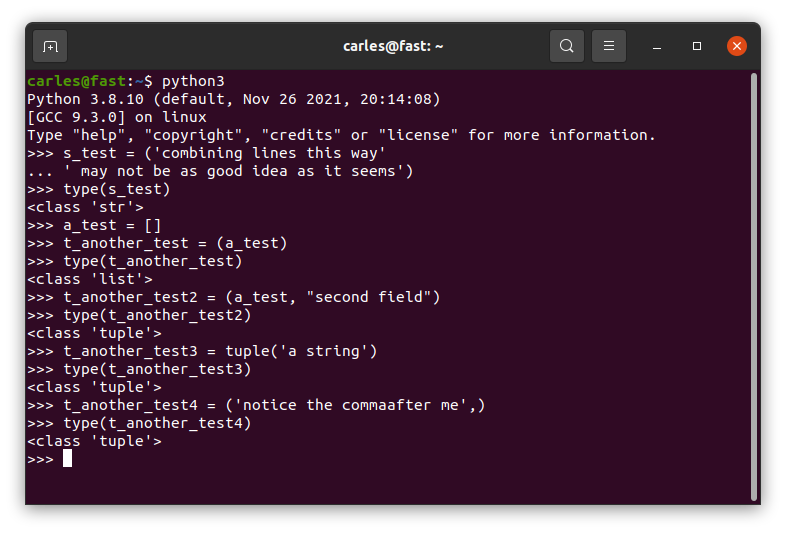
A Tuple of a String is not a Tuple, it’s a String
This can be very messy and confusing. Normally you define a tuple with parenthesis, although you can use tuple() too.
Parenthesis are the way we normally build tuples. But if we do:
print(type('this is a String'))
You get that this is a String, I mean
<class 'str'>
If you want to get a tuple of a String you can add a comma after the first String, which is weird. You can also do tuple("this is a String")
I think the definition of a tuple should be consistent and idempotent, no matter if you use one or more parameters. Probably as parenthesis are used for other tasks, like invoking functions or methods, or separating arithmetic operations, that reuse of the signs () for multiple purposes is what caused a different behavior depending on if there is one or more parameters the mayhem IMO.
See some example cases.
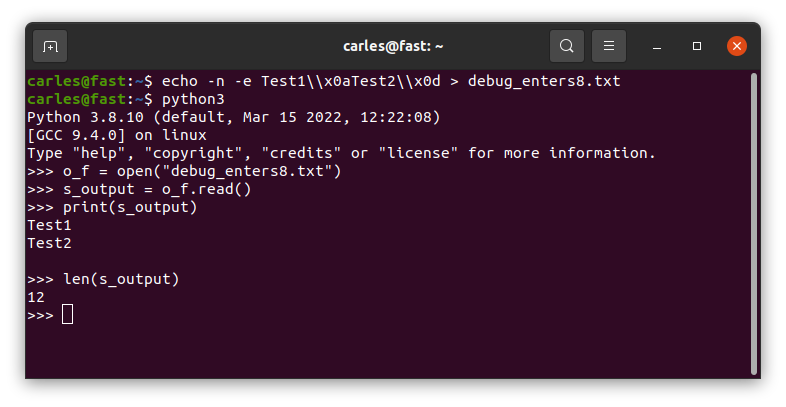
Python simplifies the jump of line \n platform independent and some times it’s messy
If you come from a C background you will expect text file in different platforms: Linux, Mac OS X (changes from old to new versions), Windows… to be represented different. In some cases this is an ASCii code 10 (LF), in others 13 (CR), and in other two characters: 13 and immediately after 10.
Python simplifies the Enter character by naming it \n like in C.
So, platform independent, whenever you read a text file you will get \n for any ASCii 10 [LF] or 13 [CR]. [CR] will be converted to [10] in Linux.
If you read a file in a Linux system, where enters are represented by 10, which was generated in a Windows system, so it has [CR][LF] instead of [LF] at the end of each line, you’ll get a \n too, but two times.
And if you do len(“\n”) to know the len of that String, this returns 1 in all the platform.
To read the [LF] and [CR] (represented by \r) you need to open the file as binary. By default Python opens the files as text.
You can check this by writting [LF] and [CR] in Linux and see how Python seamlessly reads the file as it was [LF].
A file generated by Windows will get \n\n:
Random code when the class is imported
In a procedural file, the code that is outside a function, will be executed when it is imported. But if this file is imported again it will not be re-executed.
Things are more messy if you import a class file. Inside the body of the class, in the space you would reserve for static variables definition, you can have random code. And this code will be only executed on the first import, not on subsequent.
Disclaimer: the pictures from Futurama are from their respective owners.
v.0.29 and v.0.28 Python 3 Simple Exercises for Beginners Added a new section Games, with a first game “Guess my number”
Provided a solution for the recipe Exercise 3: Create a function that will ask a user for a number from Keyboard input, and return the result, only when the value is between the accepted ranges.
Added two new questions to the Quiz section.
Fixed a docstring in Recipes Exercise 4, referring to a String return value which it was an Integer.
Added an exercise for retrieving a JSON with your public Ip
Added a new exercise for converting bytes to kilobytes with two decimal positions.
Added a new exercise / recipe to SSH to a Server with Username and Password and execute a command, using the Paramiko library.
Added a new exercise / recipe to SSH to a Server with Username and Password and execute a command using Paramiko library. I added two examples executing commands uptime and df -h /
Show an alternative way to run Flask apps.
Added new interesting packages.
As long as covid is active I plan to keep the minimum price of each of my books at the minimum accepted by LeanPub which is USD $5.
I also enable bundles and enable LeanPub to make punctual discounts to make them even more affordable to humble pockets.
I’m going to teach an initiation to programming class, a live Zoom session of 1 hour, plus 15 minutes for questions, for Free. It will be a very basic starting class for absolute beginners.
It will be performed at a time around 19:00 Irish time, wich is 11:00 AM in Irivine, CA time, to maximize the opportunities for people to assist.
If you would like to join, write me an email:
There are not many spots available, but if there is no room for you this time I may contact you for the next time.
This version adds class StringUtils, and a set of methods to perform different useful tasks with Strings, like converting a number to the biggest unit with sense, like a large number of bytes to PB, a smaller one to TB, or GB, MB, KB, justifying strings to the right or to the left, and cap the number of chars to a specified one, etc…
I have many libraries that I’ve been building across the years, and I’m liberating them as Open Source, as soon as I have time to make sure that are compatible with Python 3.5 or superior (and with Python 2.6 when possible), and I have time to add a decent Unit Testing Code Coverage.
I try to release libraries that have no other dependencies. After that I’ll start releasing my libs that have dependencies, like to work with MySQL, SQLite, web scrapping, etc…
After Docker Image flask_app is built, you can run a Docker Container based on it with:
sudo docker run -d -p 5000:5000 --name flask_app flask_app
After you’re done, in order to stop the Container type:
sudo docker stop flask_app
Here is the source code of the Python file flask_app.py:
#
# flask_app.py
#
# Author: Carles Mateo
# Creation Date: 2020-05-10 20:50 GMT+1
# Description: A simple Flask Web Application
# Part of the samples of https://leanpub.com/pythoncombatguide
# More source code for the book at https://gitlab.com/carles.mateo/python_combat_guide
#
from flask import Flask
import datetime
def get_datetime(b_milliseconds=False):
"""
Return the datetime with miliseconds in format YYYY-MM-DD HH:MM:SS.xxxxx
or without milliseconds as YYYY-MM-DD HH:MM:SS
"""
if b_milliseconds is True:
s_now = str(datetime.datetime.now())
else:
s_now = str(datetime.datetime.now().strftime("%Y-%m-%d %H:%M:%S"))
return s_now
app = Flask(__name__)
# Those variables will keep their value as long as Flask is running
i_votes_r2d2 = 0
i_votes_bb8 = 0
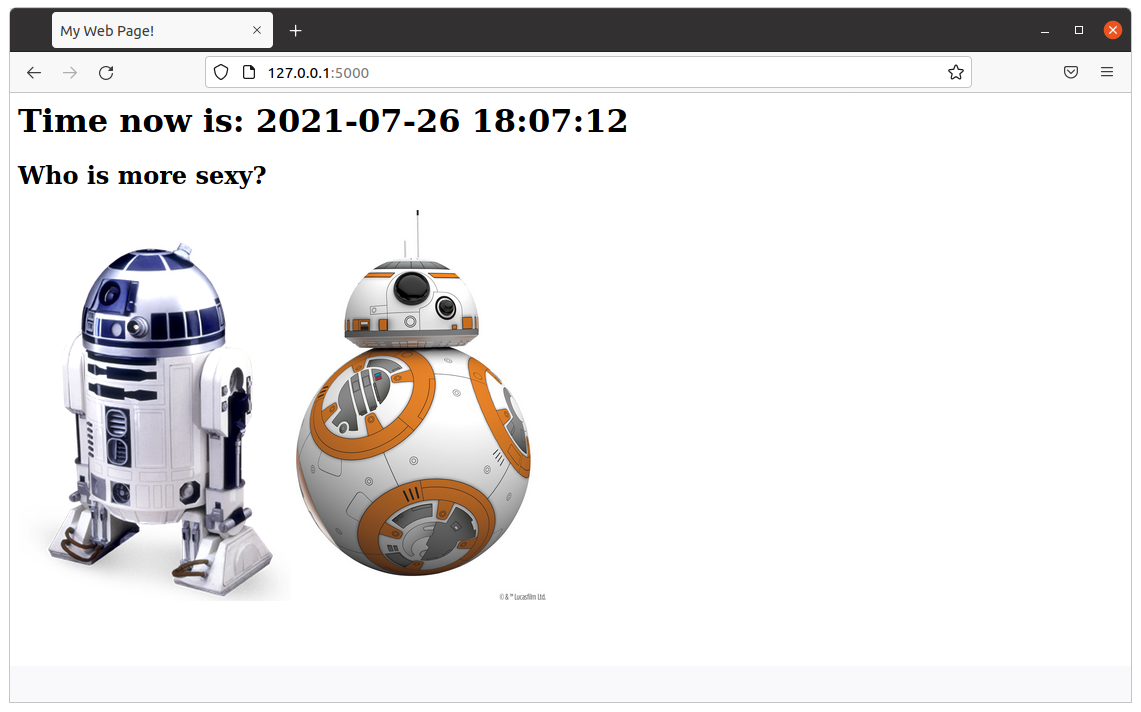
@app.route('/')
def page_root():
s_page = "<html>"
s_page += "<title>My Web Page!</title>"
s_page += "<body>"
s_page += "<h1>Time now is: " + get_datetime() + "</h1>"
s_page += """<h2>Who is more sexy?</h2>
<a href="r2d2"><img src="static/r2d2.png"></a> <a href="bb8"><img width="250" src="static/bb8.jpg"></a>"""
s_page += "</body>"
s_page += "</html>"
return s_page
@app.route('/bb8')
def page_bb8():
global i_votes_bb8
i_votes_bb8 = i_votes_bb8 + 1
s_page = "<html>"
s_page += "<title>My Web Page!</title>"
s_page += "<body>"
s_page += "<h1>Time now is: " + get_datetime() + "</h1>"
s_page += """<h2>BB8 Is more sexy!</h2>
<img width="250" src="static/bb8.jpg">"""
s_page += "<p>I have: " + str(i_votes_bb8) + "</p>"
s_page += "</body>"
s_page += "</html>"
return s_page
@app.route('/r2d2')
def page_r2d2():
global i_votes_r2d2
i_votes_r2d2 = i_votes_r2d2 + 1
s_page = "<html>"
s_page += "<title>My Web Page!</title>"
s_page += "<body>"
s_page += "<h1>Time now is: " + get_datetime() + "</h1>"
s_page += """<h2>R2D2 Is more sexy!</h2>
<img src="static/r2d2.png">"""
s_page += "<p>I have: " + str(i_votes_r2d2) + "</p>"
s_page += "</body>"
s_page += "</html>"
return s_page
if __name__ == "__main__":
app.run(host="0.0.0.0", port=5000, debug=True)
As always, the naming of the variables is based on MT Notation.
The Dockerfile is very straightforward:
FROM ubuntu:20.04

MAINTAINER Carles Mateo

ARG DEBIAN_FRONTEND=noninteractive

RUN apt update && \
    apt install -y vim python3-pip &&  pip3 install pytest && \
    apt-get clean

ENV PYTHON_COMBAT_GUIDE /var/python_combat_guide

RUN mkdir -p $PYTHON_COMBAT_GUIDE

COPY ./ $PYTHON_COMBAT_GUIDE

ENV PYTHONPATH "${PYTHONPATH}:$PYTHON_COMBAT_GUIDE/src/:$PYTHON_COMBAT_GUIDE/src/lib"

RUN pip3 install -r $PYTHON_COMBAT_GUIDE/requirements.txt

# This is important so when executing python3 -m current directory will be added to Syspath
# Is not necessary, as we added to PYTHONPATH
#WORKDIR $PYTHON_COMBAT_GUIDE/src/lib

EXPOSE 5000

# Launch our Flask Application
CMD ["/usr/bin/python3", "/var/python_combat_guide/src/flask_app.py"]
I’ve released v. 0.99 of carleslibs package This package includes utilities for:
Files and Directories handling
Date/Time retrieval
Python version detection
You can install it with:
pip install carleslibs
The minimum requirement declared is Python 3.6, although they work with Python 3.5 and Python 2.7, as I want to drop support for no longer supported versions.
If you are enrolled with Linux Academy, I recommend you this Python course: Python 3 Scripting for System Administrators https://linuxacademy.com/cp/modules/view/id/168 Does not cover OOP, but it does a bit of Unit Testing, and talks a lot about PIP and Virtual Environments.
However we are going to run everything from a Docker Container so the only thing you need is to have installed Docker.
If you prefer to install MySql in your computer (or Virtual Box instance) directly, skip the Docker steps.
Dockerfile
The Dockerfile is the file that Docker uses to build the Docker Container.
Ours is like that:
FROM ubuntu:20.04

MAINTAINER Carles Mateo

ARG DEBIAN_FRONTEND=noninteractive

RUN apt update && apt install -y python3 pip mysql-server vim mc wget curl && apt-get clean

RUN pip install mysql-connector-python

EXPOSE 3306

ENV FOLDER_PROJECT /var/mysql_carles

RUN mkdir -p $FOLDER_PROJECT

COPY docker_run_mysql.sh $FOLDER_PROJECT
COPY start.sql $FOLDER_PROJECT
COPY src $FOLDER_PROJECT

RUN chmod +x /var/mysql_carles/docker_run_mysql.sh

CMD ["/var/mysql_carles/docker_run_mysql.sh"]
The first line defines that we are going to use Ubuntu 20.04 (it’s a LTS version).
We install all the apt packages in a single line, as Docker works in layers, and what is used as disk space in the previous layer is not deleted even if we delete the files, so we want to run apt update, install all the packages, and clean the temporal files in one single step.
I also install some useful tools like: vim, mc, less, wget and curl.
We expose to outside the port 3306, in case you want to run the Python code from your computer, but having the MySql in the Container.
The last line executes a script that starts the MySql service, creates the table, the user, and add two rows and runs an infinite loop so the Docker does not finish.
build_docker.sh
build_docker.sh is a Bash script that builds the Docker Image for you very easily.
It stops the container and removes the previous image, so your hard drive does not fill with Docker images if you do modifications.
It checks for errors building and it also remembers you how to run and debug the Docker Container.
#!/bin/bash

# Execute with sudo

s_DOCKER_IMAGE_NAME="blog_carlesmateo_com_mysql"

printf "Stopping old image %s\n" "${s_DOCKER_IMAGE_NAME}"
sudo docker stop "${s_DOCKER_IMAGE_NAME}"

printf "Removing old image %s\n" "${s_DOCKER_IMAGE_NAME}"
sudo docker rm "${s_DOCKER_IMAGE_NAME}"

printf "Creating Docker Image %s\n" "${s_DOCKER_IMAGE_NAME}"
sudo docker build -t ${s_DOCKER_IMAGE_NAME} . --no-cache

i_EXIT_CODE=$?
if [ $i_EXIT_CODE -ne 0 ]; then
    printf "Error. Exit code %s\n" ${i_EXIT_CODE}
    exit
fi

echo "Ready to run ${s_DOCKER_IMAGE_NAME} Docker Container"
echo "To run type: sudo docker run -d -p 3306:3306 --name ${s_DOCKER_IMAGE_NAME} ${s_DOCKER_IMAGE_NAME}"
echo "or just use run_in_docker.sh"
echo
echo "Debug running Docker:"
echo "docker exec -it ${s_DOCKER_IMAGE_NAME} /bin/bash"
echo
docker_run.sh
I also provide a script named docker_run.sh that runs your Container easily, exposing the MySql port.
#!/bin/bash

# Execute with sudo

s_DOCKER_IMAGE_NAME="blog_carlesmateo_com_mysql"

docker run -d -p 3306:3306 --name ${s_DOCKER_IMAGE_NAME} ${s_DOCKER_IMAGE_NAME}

echo "Showing running Instances"
docker ps
As you saw before I named the image after blog_carlesmateo_com_mysql.
I did that so basically I wanted to make sure that the name was unique, as the build_docker.sh deletes an image named like the name I choose, I didn’t want to use a generic name like “mysql” that may lead to you to delete the Docker Image inadvertently.
docker_run_mysql.sh
This script will run when the Docker Container is launched for the first time:
#!/bin/bash

# Allow to be queried from outside
sed -i '31 s/bind-address/#bind-address/' /etc/mysql/mysql.conf.d/mysqld.cnf

service mysql start

# Create a Database, a user with password, and permissions
cd /var/mysql_carles
mysql -u root < start.sql

while [ true ]; do sleep 60; done
With sed command we modify the line 31 of the the MySQL config file so we can connect from Outside the Docker Instance (bind-address: 127.0.0.1)
As you can see it executes the SQL contained in the file start.sql as root and we start MySql.
Please note: Our MySql installation has not set a password for root. It is only for Development purposes.
start.sql
The SQL file that will be ran inside our Docker Container.
CREATE DATABASE carles_database;

CREATE USER 'python'@'localhost' IDENTIFIED BY 'blog.carlesmateo.com-db-password';
CREATE USER 'python'@'%' IDENTIFIED BY 'blog.carlesmateo.com-db-password';
GRANT ALL PRIVILEGES ON carles_database.* TO 'python'@'localhost';
GRANT ALL PRIVILEGES ON carles_database.* TO 'python'@'%';

USE carles_database;

CREATE TABLE car_queue (
    i_id_car int,
    s_model_code varchar(25),
    s_color_code varchar(25),
    s_extras varchar(100),
    i_right_side int,
    s_city_to_ship varchar(25)
);

INSERT INTO car_queue (i_id_car, s_model_code, s_color_code, s_extras, i_right_side, s_city_to_ship) VALUES (1, "GOLF2021", "BLUE7", "COND_AIR, GPS, MULTIMEDIA_V3", 0, "Barcelona");
INSERT INTO car_queue (i_id_car, s_model_code, s_color_code, s_extras, i_right_side, s_city_to_ship) VALUES (2, "GOLF2021_PLUGIN_HYBRID", "BLUEMETAL_5", "COND_AIR, GPS, MULTIMEDIA_V3, SECURITY_V5", 1, "Cork");
As you can see it creates the user “python” with the password ‘blog.carlesmateo.com-db-password’ for access local and remote (%).
It also creates a Database named carles_database and grants all the permissions to the user “python”, for local and remote.
This is the user we will use to authenticate from out Python code.
Then we switch to use the carles_database and we create the car_queue table.
We insert two rows, as an example.
select_values_example.py
Finally the Python code that will query the Database.
import mysql.connector

if __name__ == "__main__":
    o_conn = mysql.connector.connect(user='python', password='blog.carlesmateo.com-db-password', database='carles_database')
    o_cursor = o_conn.cursor()

    s_query = "SELECT * FROM car_queue"

    o_cursor.execute(s_query)

    for a_row in o_cursor:
        print(a_row)

    o_cursor.close()
    o_conn.close()
Nothing special, we open a connection to the MySql and perform a query, and parse the cursor as rows/lists.
Please note: Error control is disabled so you may see any exception.
Executing the Container
First step is to build the Container.
From the directory where you cloned the project, execute:
sudo ./build_docker.sh
Then run the Docker Container:
sudo ./docker_run.sh
The script also performs a docker ps command, so you can see that it’s running.
Then change to the directory where I installed the sample files:
cd /var/mysql_carles
And execute the Python 3 example:
python3 select_values_example.py
Tying together MySql and a Python Menu with Object Oriented Programming
In order to tie all together, and specially to give a consistent view to my students, to avoid showing only pieces but a complete program, and to show a bit of Objects Oriented in action I developed a small program which simulates the handling of a production queue for Volkswagen.
MySQL Library
First I created a library to handle MySQL operations.
lib/mysqllib.py
import mysql.connector


class MySql():

    def __init__(self, s_user, s_password, s_database, s_host="127.0.0.1", i_port=3306):
        self.s_user = s_user
        self.s_password = s_password
        self.s_database = s_database
        self.s_host = s_host
        self.i_port = i_port

        o_conn = mysql.connector.connect(host=s_host, port=i_port, user=s_user, password=s_password, database=s_database)
        self.o_conn = o_conn

    def query(self, s_query):
        a_rows = []

        o_cursor = self.o_conn.cursor()

        o_cursor.execute(s_query)

        for a_row in o_cursor:
            a_rows.append(a_row)

        o_cursor.close()

        return a_rows

    def insert(self, s_query):

        o_cursor = self.o_conn.cursor()

        o_cursor.execute(s_query)
        i_inserted_row_count = o_cursor.rowcount

        # Make sure data is committed to the database
        self.o_conn.commit()

        return i_inserted_row_count

    def delete(self, s_query):

        o_cursor = self.o_conn.cursor()

        o_cursor.execute(s_query)
        i_deleted_row_count = o_cursor.rowcount

        # Make sure data is committed to the database
        self.o_conn.commit()

        return i_deleted_row_count


    def close(self):

        self.o_conn.close()
Basically when this class is instantiated, a new connection to the MySQL specified in the Constructor is established.
We have a method query() to send SELECT queries.
We have a insert method, to send INSERT, UPDATE queries that returns the number of rows affected.
This method ensures to perform a commit to make sure changes persist.
We have a delete method, to send DELETE Sql queries that returns the number of rows deleted.
We have a close method which closes the MySql connection.
A Data Object: CarDO
Then I’ve defined a class, to deal with Data and interactions of the cars.
Initially I was going to have a CarDO Object without any logic. Only with Data.
In OOP the variables of the Instance are called Properties, and the functions Methods.
Then I decided to add some logic, so I can show what’s the typical use of the objects.
So I will use CarDO as Data Object, but also to do few functions like printing the info of a Car.
Queue Manager
Finally the main program.
We also use Object Oriented Programming, and we use Dependency Injection to inject the MySQL Instance. That’s very practical to do Unit Testing.
from lib.mysqllib import MySql
from do.cardo import CarDO


class QueueManager():

    def __init__(self, o_mysql):
        self.o_mysql = o_mysql

    def exit(self):
        exit(0)

    def main_menu(self):
        while True:
            print("Main Menu")
            print("=========")
            print("")
            print("1. Add new car to queue")
            print("2. List all cars to queue")
            print("3. View car by Id")
            print("4. Delete car from queue by Id")
            print("")
            print("0. Exit")
            print("")

            s_option = input("Choose your option:")
            if s_option == "1":
                self.add_new_car()
            if s_option == "2":
                self.see_all_cars()
            if s_option == "3":
                self.see_car_by_id()
            if s_option == "4":
                self.delete_by_id()

            if s_option == "0":
                self.exit()

    def get_all_cars(self):
        s_query = "SELECT * FROM car_queue"

        a_rows = self.o_mysql.query(s_query)
        a_o_cars = []

        for a_row in a_rows:
            i_id_car = a_row[0]
            s_model_code = a_row[1]
            s_color_code = a_row[2]
            s_extras = a_row[3]
            i_right_side = a_row[4]
            s_city_to_ship = a_row[5]

            o_car = CarDO(i_id_car=i_id_car, s_model_code=s_model_code, s_color_code=s_color_code, s_extras=s_extras, i_right_side=i_right_side, s_city_to_ship=s_city_to_ship)
            a_o_cars.append(o_car)

        return a_o_cars

    def get_car_by_id(self, i_id_car):
        b_success = False
        o_car = None

        s_query = "SELECT * FROM car_queue WHERE i_id_car=" + str(i_id_car)

        a_rows = self.o_mysql.query(s_query)

        if len(a_rows) == 0:
            # False, None
            return b_success, o_car

        i_id_car = a_rows[0][0]
        s_model_code = a_rows[0][1]
        s_color_code = a_rows[0][2]
        s_extras = a_rows[0][3]
        i_right_side = a_rows[0][4]
        s_city_to_ship = a_rows[0][5]

        o_car = CarDO(i_id_car=i_id_car, s_model_code=s_model_code, s_color_code=s_color_code, s_extras=s_extras, i_right_side=i_right_side, s_city_to_ship=s_city_to_ship)
        b_success = True

        return b_success, o_car

    def replace_apostrophe(self, s_text):
        return s_text.replace("'", "´")

    def insert_car(self, o_car):

        s_sql = """INSERT INTO car_queue
                                (i_id_car, s_model_code, s_color_code, s_extras, i_right_side, s_city_to_ship)
                         VALUES
                                (""" + str(o_car.get_i_id_car()) + ", '" + o_car.get_s_model_code() + "', '" + o_car.get_s_color_code() + "', '" + o_car.get_s_extras() + "', " + str(o_car.get_i_right_side()) + ", '" + o_car.get_s_city_to_ship() + "');"

        i_inserted_row_count = self.o_mysql.insert(s_sql)

        if i_inserted_row_count > 0:
            print("Inserted", i_inserted_row_count, " row/s")
            b_success = True
        else:
            print("It was impossible to insert the row")
            b_success = False

        return b_success

    def add_new_car(self):
        print("Add new car")
        print("===========")

        while True:
            s_id_car = input("Enter new ID: ")
            if s_id_car == "":
                print("A numeric Id is needed")
                continue

            i_id_car = int(s_id_car)

            if i_id_car < 1:
                continue

            # Check if that id existed already
            b_success, o_car = self.get_car_by_id(i_id_car=i_id_car)
            if b_success is False:
                # Does not exist
                break

            print("Sorry, this Id already exists")

        s_model_code = input("Enter Model Code:")
        s_color_code = input("Enter Color Code:")
        s_extras = input("Enter extras comma separated:")
        s_right_side = input("Enter R for Right side driven:")
        if s_right_side.upper() == "R":
            i_right_side = 1
        else:
            i_right_side = 0
        s_city_to_ship = input("Enter the city to ship the car:")

        # Sanitize SQL replacing apostrophe
        s_model_code = self.replace_apostrophe(s_model_code)
        s_color_code = self.replace_apostrophe(s_color_code)
        s_extras = self.replace_apostrophe(s_extras)
        s_city_to_ship = self.replace_apostrophe(s_city_to_ship)

        o_car = CarDO(i_id_car=i_id_car, s_model_code=s_model_code, s_color_code=s_color_code, s_extras=s_extras, i_right_side=i_right_side, s_city_to_ship=s_city_to_ship)
        b_success = self.insert_car(o_car)

    def see_all_cars(self):
        print("")

        a_o_cars = self.get_all_cars()

        if len(a_o_cars) > 0:
            print(a_o_cars[0].get_car_header_for_list())
        else:
            print("No cars in queue")
            print("")
            return

        for o_car in a_o_cars:
            print(o_car.get_car_info_for_list())

        print("")

    def see_car_by_id(self, i_id_car=0):
        if i_id_car == 0:
            s_id = input("Car Id:")
            i_id_car = int(s_id)

        s_id_car = str(i_id_car)

        b_success, o_car = self.get_car_by_id(i_id_car=i_id_car)
        if b_success is False:
            print("Error, car id: " + s_id_car + " not located.")
            return False

        print("")
        o_car.print_car_info()
        print("")

        return True

    def delete_by_id(self):

        s_id = input("Enter Id of car to delete:")
        i_id_car = int(s_id)

        if i_id_car == 0:
            print("Invalid Id")
            return

        # reuse see_car_by_id
        b_found = self.see_car_by_id(i_id_car=i_id_car)
        if b_found is False:
            return

        s_delete = input("Are you sure you want to DELETE. Type Y to delete: ")
        if s_delete.upper() == "Y":
            s_sql = "DELETE FROM car_queue WHERE i_id_car=" + str(i_id_car)
            i_num = self.o_mysql.delete(s_sql)

            print(i_num, " Rows deleted")

            # if b_success is True:
            #     print("Car deleted successfully from the queue")


if __name__ == "__main__":

    try:

        o_mysql = MySql(s_user="python", s_password="blog.carlesmateo.com-db-password", s_database="carles_database", s_host="127.0.0.1", i_port=3306)

        o_queue_manager = QueueManager(o_mysql=o_mysql)
        o_queue_manager.main_menu()
    except KeyboardInterrupt:
        print("Detected CTRL + C. Exiting")
This program talks to MySQL, that we have started in a Docker previously.
We have access from inside the Docker Container, or from outside.
The idea of this simple program is to use a library for dealing with MySql, and objects for dealing with the Cars. The class CarDO contributes to the render of its data in the screen.
To enter inside the Docker once you have generated it and is running, do:
Google Instances’ Performance I’ve updated the CMIPS score for the latest Google instances vs last Amazon’s I tried and baremetals.
I’ve updated my book Python Combat Guide, version 0.99 has already 365 pages DIN-A4.
This is the changelog for latest version:
v. 0.99
 A whole new chapter showing sorting in Python and lambdas. (.sort() and sorted() package First)

 I show writing lambdas for Sorting, and also what makes them crash.

 Explained why Lambdas are not recommended unless you use for working with data, like for sorting or filtering out, and unless you know what you are doing. They are difficult to Debug.

 Explained about PEP8 tool to validate style.

 Explaining why we define Instance variables in the Constructor.

 Provided more samples for Flask Applications.

 Fixed code sample https://gitlab.com/carles.mateo/python_combat_guide/-/blob/master/src/keywords.py as the editor removed the white line spaces.

 Added more books to the bibliography

 I explain the importance of running Unit Testing as both root and as regular users.

 Explain how to run as regular user inside a Docker Container.

 Explained requirements.txt file. And how integrates PyCharm to create venv/ Virtual Environment.

 Also how it is used in Dockerfile to make sure all the dependencies are satisfied in the Docker Container.
I’ve seen an increment in pirate attacks that potentially causes lost of lives.
In Ireland that ransomware leave KO the hospital. Some of my older friends that require blood analysis cannot do in their hospital because is completely out of business. Their systems are down due to the ransomware. If you miss that, two newspaper articles: