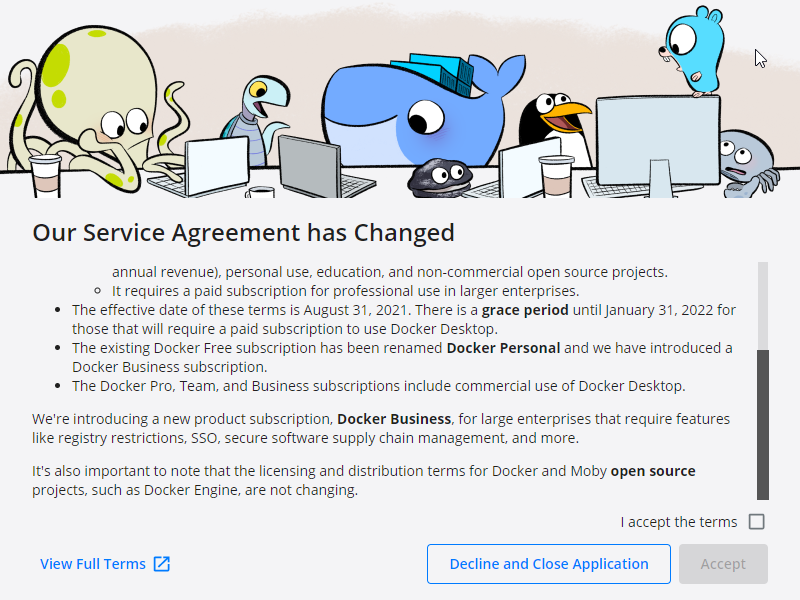
The change of license of Docker Desktop for Windows has been a low punch, a dirty one.
Many big companies use Windows as for the laptops and workstations, we like it or not.
You can setup a Linux development computer or Virtual Machine, you may argue, but things are not as easier.
Big companies have Software licenses assigned to corporation machines, so you may not use your Pycharm license in a Linux VM.
You may no use Docker Desktop either, if your company did not license it.
And finally you may need to have access to internal resources, like Artifactory, or Servers where access is granted via ACL, so only you, from your Development machine can access it. So you have to be able to run Docker locally.
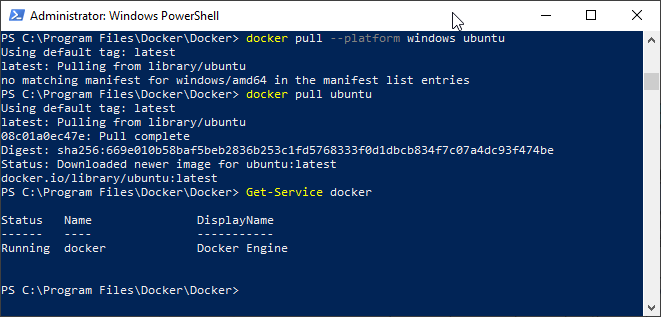
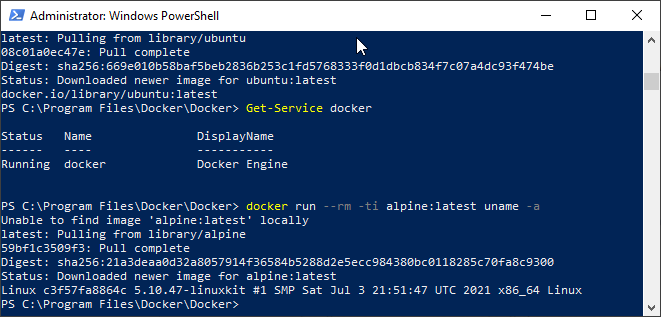
After Docker introduced this changed of license I was using VirtualBox with NAT attached to the VPN Virtual Ethernet, and I port forwarded to be able to SSH, deploy, test, etc… from outside to my Linux VM, and it was working for a while, until with the last VirtualBox update and some Windows updates where pushed to my Windows box and my VirtualBox VMs stopped booting most of the times and having random problems.
I configured a new Linux VM in a Development Server, and I opened Docker API so my Pycharm’s workstation was able to deploy there and I was able to test. But the Dev Ip’s do not have access to the same Test Servers I need my Python Automation projects to reach (and quickly I used 50 GB of space), so I tried WSL. I like Pycharm I didn’t want to switch to VStudio Code because of their good Docker extensions, in any case I could not run my code locally with venv cause some of the packages where not available for Windows, so I needed Linux to run the Unit Testing and see the Code Coverage, run the code, etc…
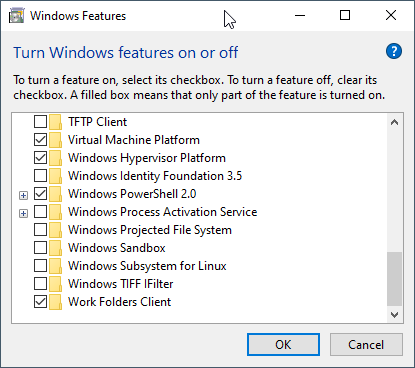
I tried Hyper-V, tried with NAT External, but it was incompatible with my VPN.
Note: WSL can be used, but I wanted to use Docker Engine, not docker in WSL.
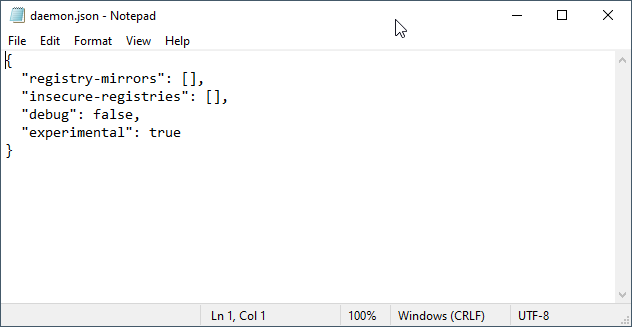
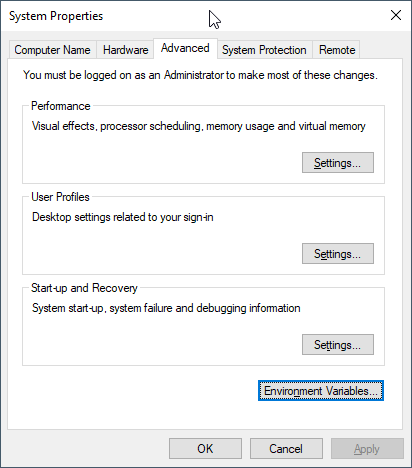
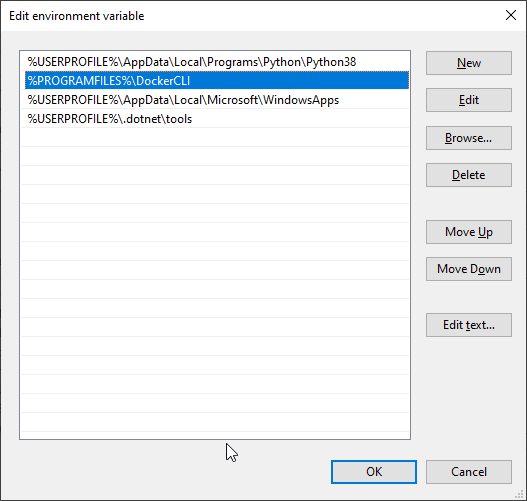
Installing Docker Command line binaries
The first thing I checked was the Docker downloads page.
It has been 9 years since I created the blog, and some articles have old content that still get many visitors. To make sure they get the clear picture and not obsolete information, all the articles of the taxonomy POST, will include the Date and Time when the article was first published.
I also removed the annoying link “Leave a comment” on top. I think it influences some people to leave comments before actually having read the article.
It is still possible to add comments, but they are on the bottom of the page. I believe it makes more sense this way. This is the way.
Technically that involved modifying the files of my template:
functions.php
content.php
My Books
Automating and Provisioning to Amazon AWS using boto3 Amazon’s SDK for Python 3
It’s 128 pages in Full size DIN-A4 DRM-Free, and comes with a link to code samples of a real project CLI Menu based.
Docker Combat Guide
I have updated my book Docker Combat Guide and I added a completely new section, including source code, to work with Docker’s Python SDK.
I show the Docker SDK by showing the code of an actual CLI program I wrote in Python 3.
Here you can see a video that demonstrates how I launched a project with three Docker Containers via Docker compose. The Containers have Python, Flask webserver, and redis as bridge between the two Python Containers.
All the source code are downloadable with the book.
Watch at 1080p at Full Screen for better experience
My Classes
In January I resumed the coding classes. I have new students, and few spots free in my agenda, as some of my students graduated and others have been hired as Software Developers. I can not be more proud. :)
Free Training
Symfony is one of the most popular PHP Frameworks.
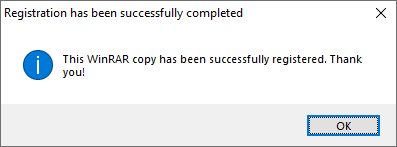
Before leaving 2021, I registered WinRAR for Windows.
WinRAR is a compressing Software that has been with us for 19 years.
I’m pretty sure I registered it in the past, but these holidays I was out only with two Window laptops and I had to do some work for the university and WinRAR came it handy, so I decided to register it again.
I create Software and Books, and I earn my life with this, so it makes a lot of sense to pay others for their good work crafting Software.
Books I Purchased
I bought this book and by the moment is really good. I wanted to buy some updated books as all my Linux books have some years already. Also I keep my skills sharp by reading reading reading.
Hardware I purchased
So I bought a cheap car power inverter.
The ones I saw in Amazon were €120+ and they were not very good rated, so I opted to buy a cheap one in the supermarket and keep it on the car just in case one day I need it. (My new Asus Zenbook laptop has 18 hours of autonomy and I don’t charge it for days, but you never know)
For those that don’t know, a power inverter allows you to get a 220V (120V in US) plug, from the connection of the lighter from your car. Also you can get the energy from an external car battery. This comes in really handy to charge the laptop, cameras, your drone… if you are in the nature and you don’t have any plug near.
I bought one years ago to power up Raspberry Pi’s when I was doing Research for a project I was studying to launch.
Fun
Many friends are using Starlink as a substitute of fiber for their rural homes, and they are super happy with it.
One of them send me a very fun article.
It is in Italian, but you can google translate it.
Anyways you can get the idea of what’s going on in the picture :)
So tell me… so your speed with Starlink drops 80% in winter uh… aha…
Random news about Software
I tried the voice recognition in Slack huddle, and it works pretty well. Also Zoom has this feature and they are great. Specially when you are in a group call, or in a class.
My health
I was experimenting some problems, so I scheduled an appointment to get blood analysis and to be checked. Just in case.
TL;TR I could have died.
The doctors saw my analysis and sent me to the hospital urgently, where they found something that was going to be lethal. For hours they were checking me and doing several more analysis and tests to discard false positives, etc… and they precisely found the issue and provided urgent treatment and confirmed that I could have died at any moment.
Basically I dodged a bullet.
I was doing certain healthy things that helped me in a situation that could have been deadly or extremely dangerous to my health.
With the treatment and my strict discipline, I reverted the situation really quick and now I have more health and more energy than before. I feel rejuvenated.
I’m feeling lucky that with my work, the classes, the books I wrote, etc… I didn’t have to worry about the expensive medicines, the transport, etc… It was a bad moment, during Christmas, with so many people on holidays, pharmacies and GPs closed, so I had to spend more time looking for, traveling, and to pay more than it would had been strictly necessary. Despite all the time I used to my health, I managed to finish my university duties on time, and I didn’t miss my duties at work after the hospital, neither I had to cancel any programming classes or mentoring sessions. Nobody out of my closest circle knew what was going on, with the exception of my boss, which I kept informed in real time, just in case there was any problem, as I didn’t want to let down the company and have my duties at work to be unattended if something major happened.
I was not afraid to die. Unfortunately I’ve lost very significant people since I was a child. Relatives, very appreciated bosses and colleagues which I considered my friends, and great friends of different circles. Illnesses, accidents, and a friend of mine committed suicide years ago, and some of my partners attempted it (before we know each other). When you see people that are so good leaving, this brings a sadness that cannot be explained with words. I have had a tough life.
We have a limited time, and he have freedom to make choices. Some people choose to be miserable, to mistreat others, to lie, to cheat, to be unfaithful, to lack ethic and integrity. Those are their choices. Their wasted time will not come back.
Some of my friends are doctors. I admire them. They save lives and improve the quality of life of people with health problems.
I like being an Engineer cause I can create things, I can build instead of destroy, I can help to improve the world, and I can help users to have a good time and to avoid the frustration of services being down. I chose to do a positive work. So many times I’ve been offered much bigger salaries to do something I didn’t like, or by companies that I don’t admire, and I refused. Cause I wanted to make a better world. I know many people don’t think like that, and they only take take take. They are even unable to understand my choices, even to believe that I’m like that. But it’s enough that I know what I’m doing, and that it makes sense for me, and that I know that I’m doing well. And then, one day, you realize, that doing well, being fair and nice even if other people stabbed you in the back, you got to know fantastic people like you, and people that adore you and love to have you in their life, in their companies… So I’m really fortunate. To all the good-hearted people around, that give without expect anything in return, that try to make the world a better place, thank you.
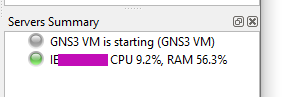
So here I explain how to solve a problem that was happening to a friend.
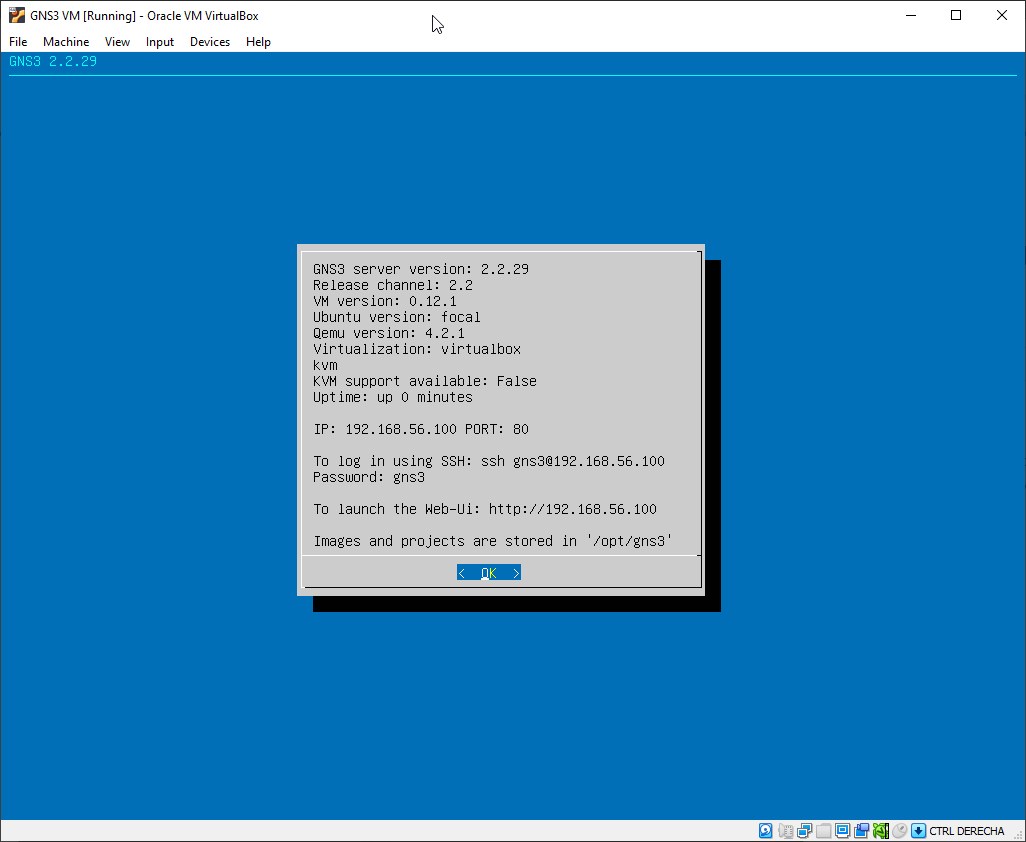
He uses GNS3 for the university, and after installing the latest version, which in this case is 2.2.29, it stopped working.
He had it configured to use the local Server and VirtualBox in Windows 10.
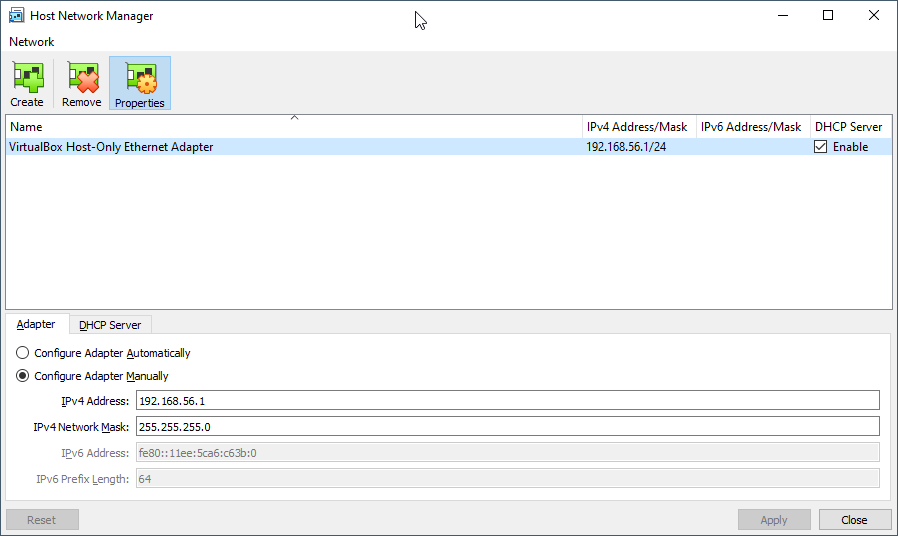
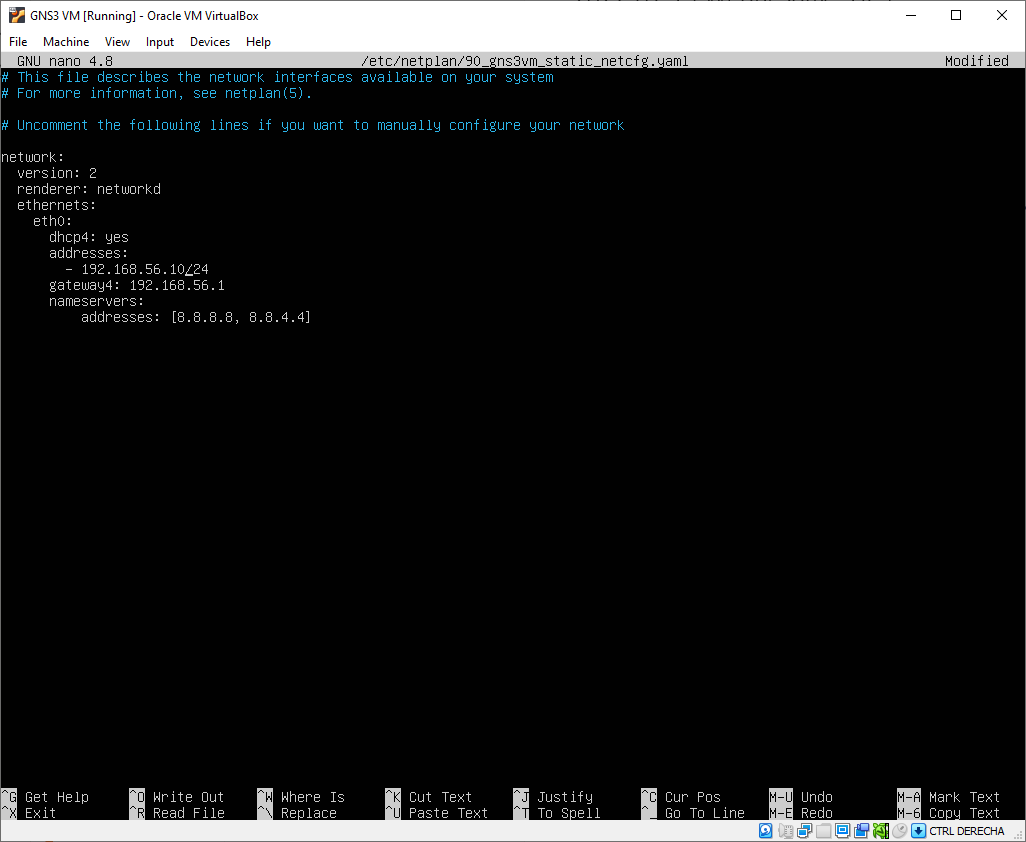
The first thing to check and to fix is the Ip address for Host Only.
If you use Linux or Mac, only certain Ip ranges can be used, or you’ll have to edit a config file inside /etc/vbox
So the first thing is to set an Ip Address in VirtualBox VM that will make you worry free.
So start VirtualBox VM directly, and when the VM boots, use the text menu application to Configure to a valid Ip from the range defined for Host Only.
You can check this in VirtualBox in File > Host Network Manager
In my initial test I picket this Ip for the VM:
192.168.56.100
But using 192.168.56.100 can bring problems as the default DHCP Server is defined with this Ip, so I switched to:
192.168.56.10
Press CTRL + X to save and exit.
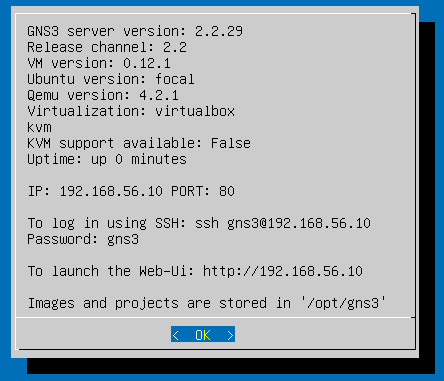
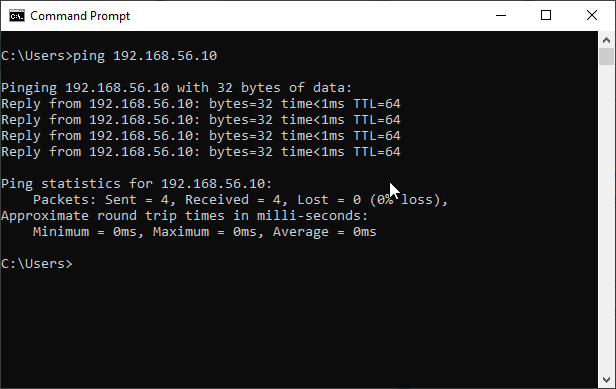
The VM will reboot automatically. Wait until it has booted and ping 192.168.56.10 from the Command Prompt.
Now, open a Windows Command Prompt or a Linux/Mac Terminal in you computer and ping the Ip:
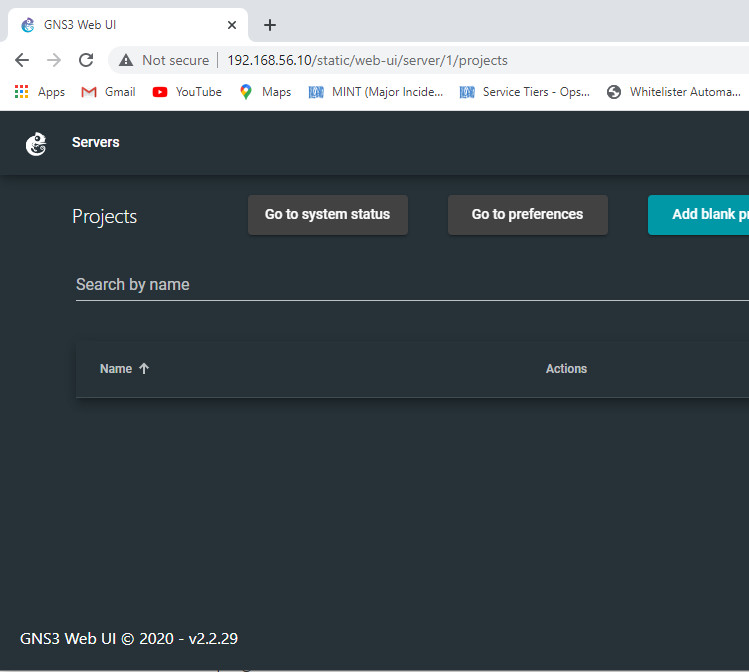
You should also be able to see the web interface going to:
http://192.168.56.10
If it works then power off the VM, as we will start it automatically when running GNS3 main program (not from VirtualBox).
Now launch GNS3 program. Wait 30 seconds until it initializes and go to Edit > Preferences
Make sure you have the configuration like this:
Pay special attention to the Port for the GNS3 VM.
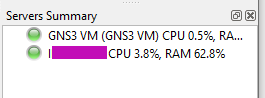
It seems like the main problem of my friend was that he was using a previous version, and he updated, and the settings from the previous version were kept. In his previous version he had configured the port 3080, but the new GNS 3 Server version 2.2.29 in the VM was using port 80, as you saw in my previous screenshots. So GNS3 was unable to connect to the VM.
After fixing this, restart GNS3, stop the VM if was not automatically stopped, and start GNS3 again.
After one minute approx connecting, you’ll see it working fine.
Equitas Health helps thousands of HIV-positive in Ohio, Dayton and Columbus.
Thousands more are reached with our prevention, testing, and other services. We are excited about embracing our expanded mission as a strategic step to further that legacy and its reach by providing care for all – with a focus on a safe and open space and highest quality healthcare for the LGBTQ community and others who are medically underserved.
I did my donation following a post by Terra Field, a former colleague at Blizzard and later leading Netflix’s Trans *ERG, but I didn’t see that she organized a gofund campaign, so I donated again :)
As I saw that there is a lack of clarity in the articles about this theme.
I also provided two alternatives ways, one pure Python3 and the other Bash based (grep awk tr)
Books
The books I publish in LeanPub have two prices, the suggested price, which is the price I consider the right price for the book, and the minimum price, which is the minimum price I authorized a reader can pay to have it.
You can buy it for the minimum price. You know better than anyone your economy.
So when a reader buys one of my books for the suggested price, instead of the minimum price, it’s really showing how they appreciate may work.
So thanks for all the support and appreciation you show!. :)
One of the motives I chose Leanpub platform is because I think is fair. No DRM, no BS. And the reader can ask for a refund within 45 days if they don’t like the book. It also makes very happy seeing that I don’t have any refunds. I appreciate it as a token of the usefulness of my work. Thanks. :)
Updates to Docker Combat File book (v.16 2021-11-24)
I added a nice trick to reverse engineering the original Dockerfile from a running Image.
I also added another typical copy and paste error into the Troubleshoot section.
Automating and Provisioning Amazon AWS (EC2, EBS, S3, CloudWatch) with boto3 (Amazon’s SDK for Python 3) and Python 3 book
I’m writing a book about how to automate your Amazon AWS tasks using Amazon’s AWS Python 3 SDK boto3, provisioning new instances, stopping, starting, creating volumes, creating/deleting buckets in S3, uploading/downloading files from S3…
It is currently 20% completed. With 43 pages it shows EC2 section already.
I’ve working in carleslibs v.1.0.3. I added MenuUtils class, which allows to assemble menus super quickly, that execute the code referenced in the menu array. Ideal for building CLI applications very fast.
I also added KeyboardUtils class, which allows to ask the user for String within certain lengths allowing or not spaces and/or underscores, and ask user for Integer values within a certain min and max, having 0 for go back.
The plan is to release the new version of carleslibs as soon as I’ve tested it properly.
sudo apt install python2 python3 python3-pip
# Install boto for Python 2 for Ansible (alternative way if pip install boto doesn't work for you)
python2 -m pip install boto
# Install Ansible
sudo apt install ansible
If you want to use Dynamic Inventory
So you can use the Python 2 ec2.py and ec2.ini files, adding them as to the /etc/ansible with mask +x, to use the Dynamic Inventory.
Then use the calls inside the shell script, or assuming that the previous file was named credentiasl.sh use source credentials.sh
ec2.py is written in Python 2, so probably will fail for you as it is invoked by python and your default interpreter will be Python 3.
So edit the first line of /etc/ansible/ec2.py and add:
#!/bin/env python2
Once credentials.sh is sourced, then you can just invoke ec2.py to get the list of your Instances in a JSON format dumped by ec2.py
/etc/ansible/ec2.py --list
You can get that JSON file and load it and get the information you need, filtering by group.
You can call:
/etc/ansible/ec2.py --list > instances.json
Or you can run a Python program that escapes to shell and executes ec2.py –list and loads the Output as a JSON file.
I use my carleslibs here to escape to shell using my class SubProcessUtils. You can install them, they are Open Source, or you can code manually if you prefer importing subprocess Python library and catching the stdout, stderr.
import json
from carleslibs import SubProcessUtils

if __name__ == "__main__":
    s_command = "/etc/ansible/ec2.py"

    o_subprocess = SubProcessUtils()
    i_error_code, s_output, s_error = o_subprocess.execute_command_for_output(s_command, b_shell=True, b_convert_to_ascii=True, b_convert_to_utf8=False)
    if i_error_code != 0:
        print("Error escaping to shell!", i_error_code)
        print(s_error)
        exit(1)

    json = json.loads(s_output)

    d_hosts = json["_meta"]["hostvars"]

    for s_host in d_hosts:
        # You'll get a ip/hostnamename in s_host which is the key
        # You have to check for groups and the value for the key Name, in order to get the Name of the group
        # As an exercise, print(d_hosts[s_host]) and look for:
        # @TODO: Capture the s_group_name
        # @TODO: Capture the s_addres
        if s_group_name == "yourgroup":
             # This filters only the instances with your group name, as you want to create an inventory file just for them
             # That's because you don't want to launch the playbook for all the instances, but for those in your group name in the inventory file.
             a_hostnames.append(s_address)

    # After this you can parse you list a_hostnames and generate an inventory file yourinventoryfile
    # The [ec2hosts] in your inventory file must match the hosts section in your yaml files
    # You'll execute your playbook with:
    # ansible-playbook -i yourinventoryfile youryamlfile.yaml
So an example of a yaml to install Apache2 in Ubuntu 20.04 LTS spawned instances , let’s call it install_apache2.yaml would be:
---
- name: Update web servers
  hosts: ec2hosts
  remote_user: ubuntu

  tasks:
  - name: Ensure Apache is at the latest version
    apt:
      name: apache2
      state: latest
      update_cache: yes
    become: yes
As you can see the section hosts: in the YAML playbook matches the [ec2hosts] in your inventory file.
You can choose to have your private key certificate .pem file in /etc/ansible/ansible.cfg or if you want to have different certificates per host, add them after the ip/address in your inventory file, like in this example:
The first method is to use add_host to print in the screen the properties form the ec2 Instances provisioned.
The trick is to escape to shell, executing ansible-playbook and capturing the output, then parsing the text looking for the ‘public_ip:’
This is the Python 3 code I created:
class AwesomeAnsible:

    def extract_public_ips_from_text(self, s_text=""):
        """
        Extracts the addresses returned by Ansible
        :param s_text:
        :return: Boolean for success, Array with the Ip's
        """

        b_found = False
        a_ips = []

        i_count = 0
        while True:
            i_count += 1
            if i_count > 20:
                print("Breaking look")
                break
            s_substr = "'public_ip': '"
            i_first_pos = s_text.find(s_substr)
            if i_first_pos > -1:
                s_text_sub = s_text[i_first_pos + len(s_substr):]
                # Find the ending delimiter
                i_second_pos = s_text_sub.find("'")
                if i_second_pos > -1:
                    b_found = True
                    s_ip = s_text_sub[0:i_second_pos]
                    a_ips.append(s_ip)
                    s_text_sub = s_text_sub[i_second_pos:]
                    s_text = s_text_sub
                    continue

            # No more Ip's
            break

        return b_found, a_ips
Then you’ll use with something like:
        # Catching the Ip's from the output
        b_success, a_ips = self.extract_public_ips_from_text(s_output)
        if b_success is True:
            print("Public Ips:")
            s_ips = ""
            for s_ip in a_ips:
                print(s_ip)
                s_ips = s_ips + self.get_ip_text_line_for_inventory(s_ip)
            print("Adding Ips to group1_inventory file")
            self.o_fileutils.append_to_file("group1_inventory", s_ips)
            print()
The get_ip_text_line_for_inventory_method() returns a line for the inventory file, with the ip and the key to use separated by a tab (\t):
    def get_ip_text_line_for_inventory(self, s_ip, s_key_path="ansible.pem"):
        """
        Returns the line to add to the inventory, with the Ip and the keypath
        """
        return s_ip + "\tansible_ssh_private_key_file=" + s_key_path + "\n"
Once you have the inventory file, like this below, you can execute the playbook for your group of hosts:
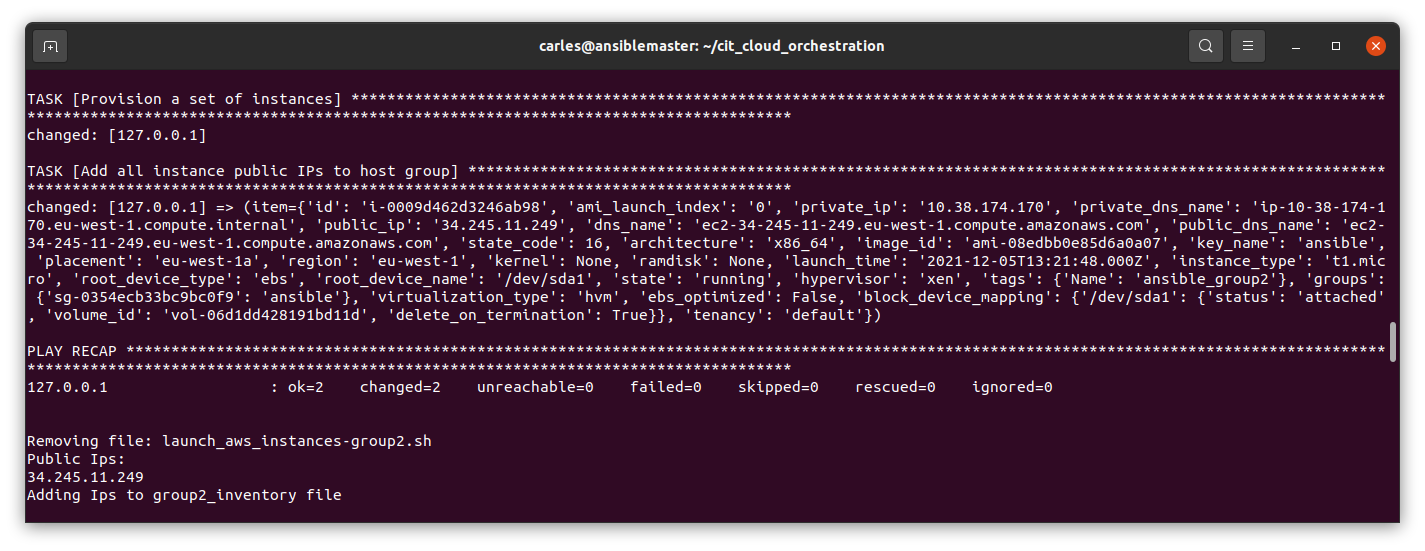
You can run this Bash Shell Script to get only the public ips when you provision to Amazon AWS EC2 the Instances from your group named group1 in this case:
I set again the credentials because as this Bash Shell Script is invoked from Python, there are not sourced.
The trick in here is that the launch_aws_instances-group1.yaml file has a task to add the hosts to Ansible’s in memory inventory, and to print the information.
That output is what I scrap from Python and then I use extract_public_ips_from_text() showed before.
So my launch_aws_instances-group1.yaml (which I generate from Python customizing the parameter) looks like this:
In this case I use t1.micro cause I provision to EC2-Classic and not to the default VPC, otherwise I would use t2.micro.
So I have a Security Group named ansible created in Amazon AWS EC2 console as EC2-Classic, and not as VPC.
In this Security group I opened the Inbound HTTP Port and the SSH port for the Ip from I’m provisioning, so Ansible can SSH using the Key ansible.pem
The Public Key has been created and named ansible as well (section key_name under ec2).
The Image used is Ubuntu 20.04 LTS (free tier) for the region eu-west-1 which is my wonderful Ireland.
For the variables (vars) I use the MT Notation, so the prefixes show exactly what we are expecting s_ for Strings i_ for Integers and I never have collisions with reserved names.
It is very important to use the count_tag and instance_tags with the name of the group, as the actions will be using that group name. Remember the idempotency.
The task with the add_host is the one that makes the information for the instances to be displayed, like in this screenshot.
Normally if we need to refresh a config in a Container we will spawn a new one, or we will access with sudo docker exec -it /bin/sh mycontainer for instance and force a reload, or we will have to restart the Container.
What if we want to be able to reload the config at any moment without restarting the process, or to trigger a process in our Container (like a dump or a flush) in another way than implementing an API?.
An unexplored way, for many, to communicate with your Container’s main process is to send Signals.
So basically I will show you how you can trap Signals within a Python process which is the main process for your Docker Container, and send them from your Hypervisor with the command:
sudo docker kill --signal=SIGUSR1
I choose to use SIGUSR1 as it is reserved for user defined Signals.
You can clone the project or get the source code from:
FROM ubuntu:20.04

MAINTAINER Carles Mateo

RUN apt update && apt install -y python3 python3-pip vim less && apt-get clean

# This will make sure printing in the Screen when running in dettached mode
ENV PYTHONUNBUFFERED=1

ENV DOCKERSIGNAL /var/dockersignal

RUN mkdir -p $DOCKERSIGNAL

COPY *.py $DOCKERSIGNAL

WORKDIR $DOCKERSIGNAL

# Again to enforce printing to the Screen when running dettached
CMD ["python3", "-u", "/var/dockersignal/dockersignal.py"]
The dockersignal.py file
# By Carles Mateo https://blog.carlesmateo.com

import signal
import time


def handler(signum, frame):
    print('Signal handler called with signal', signum)

    if signum == 10:
        # 10 is the equivalent to SIGUSR1 for most x86/ARM (not for Alpha/Sparc, MIPS, PARISC)
        print("Simulated action: Reload config")


if __name__ == "__main__":

    print("Waiting for a Signal")
    # Listed for this signal, so can listen for more
    signal.signal(signal.SIGUSR1, handler)

    while True:
        # Do Whatever
        time.sleep(1)
A shell file to build and run the Container like a pro
#!/bin/bash

DOCKER_CONTAINER_NAME="docker-signal"
DOCKER_IMAGE_NAME="docker-signal"

printf "Removing old Container %s\n" "${DOCKER_CONTAINER_NAME}"
sudo docker rm "${DOCKER_IMAGE_NAME}"

printf "Removing old Image %s\n" "${DOCKER_IMAGE_NAME}"
sudo docker image rm "${DOCKER_IMAGE_NAME}"

echo "Creating Docker Image"
sudo docker build -t ${DOCKER_IMAGE_NAME} . --no-cache

retVal=$?
if [ $retVal -ne 0 ]; then
    printf "Error. Exit code %s\n" ${retVal}
    exit
fi

echo "Running Docker Container ${DOCKER_CONTAINER_NAME} based in image ${DOCKER_IMAGE_NAME}"
sudo docker run --cpus="1.0" --name ${DOCKER_CONTAINER_NAME} ${DOCKER_IMAGE_NAME}
I had this idea after one my Python and Linux students with two laptops, a Mac OS X and a Windows one explained me that the Mac OS X is often taken by their daughters, and that the Windows 10 laptop has not enough memory to run PyCharm and Virtual Box fluently. She wanted to have a Linux VM to practice Linux, and do the Bash exercises.
So this article explains how to create a Ubuntu 20.04 LTS Docker Container, and execute a shell were you can practice Linux, Ubuntu, Bash, and you can use it to run Python, Apache, PHP, MySQL… as well, if you want.
You need to install Docker for Windows of for Mac:
Just pay attention to your type of processor: Mac with Intel chip or Mac with apple chip.
The first thing is to create the Dockerfile.
FROM ubuntu:20.04

MAINTAINER Carles Mateo

ARG DEBIAN_FRONTEND=noninteractive

RUN apt update && \
    apt install -y vim python3-pip &&  \
    apt install -y net-tools mc htop less strace zip gzip lynx && \
    pip3 install pytest && \
    apt-get clean

RUN echo "#!/bin/bash\nwhile [ true ]; do sleep 60; done" > /root/loop.sh; chmod +x /root/loop.sh

CMD ["/root/loop.sh"]
So basically the file named Dockerfile contains all the blueprints for our Docker Container to be created.
You see that I all the installs and clean ups in one single line. That’s because Docker generates a layer of virtual disk per each line in the Dockerfile. The layers are persistent, so even if in the next line we delete the temporary files, the space used will not be recovered.
You see also that I generate a Bash file with an infinite loop that sleeps 60 seconds each loop and save it as /root/loop.sh This is the file that later is called with CMD, so basically when the Container is created will execute this infinite loop. Basically we give to the Container a non ending task to prevent it from running, and exiting.
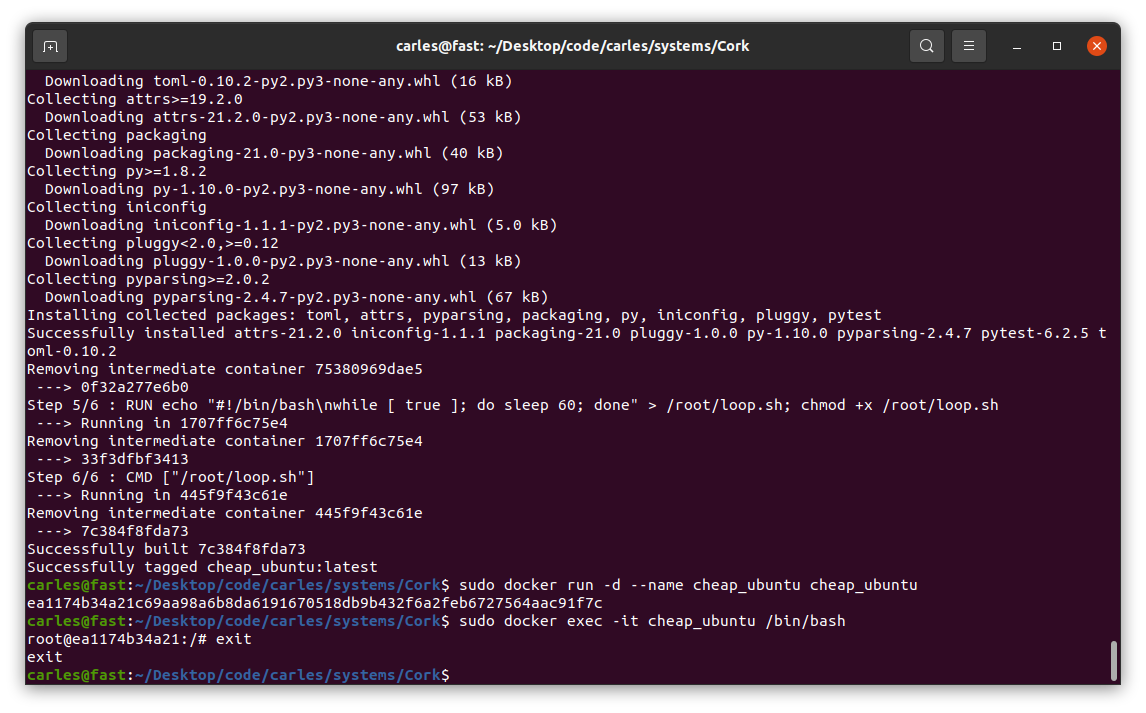
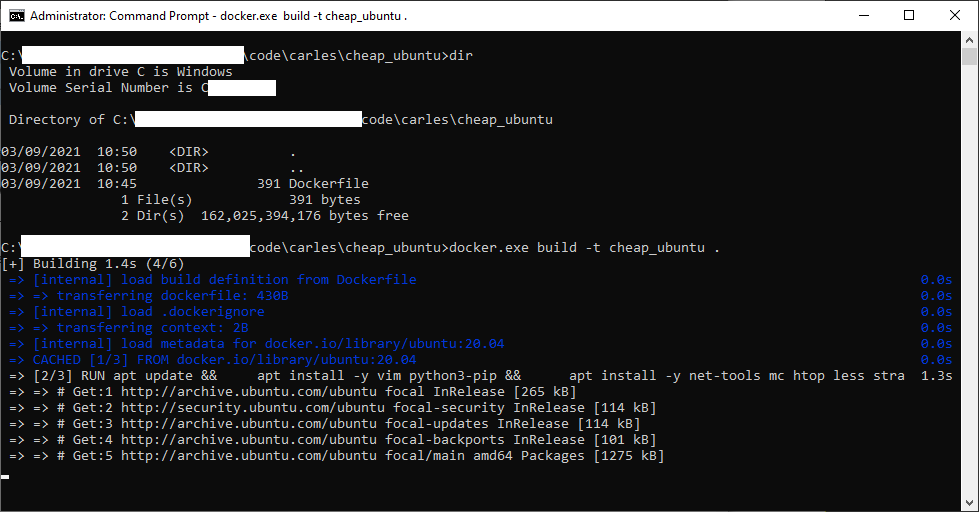
Now that you have the Dockerfile is time to build the Container.
For Mac open a terminal and type this command inside the directory where you have the Dockerfile file:
sudo docker build -t cheap_ubuntu .
I called the image cheap_ubuntu but you can set the name that you prefer.
For Windows 10 open a Command Prompt with Administrative rights and then change directory (cd) to the one that has your Dockerfile file.
docker.exe build -t cheap_ubuntu .
Image being built… (some data has been covered in white)
Now that you have the image built, you can create a Container based on it.
For Mac:
sudo docker run -d --name cheap_ubuntu cheap_ubuntu
For Windows (you can use docker.exe or just docker):
docker.exe run -d --name cheap_ubuntu cheap_ubuntu
Now you have Container named cheap_ubuntu based on the image cheap_ubuntu.
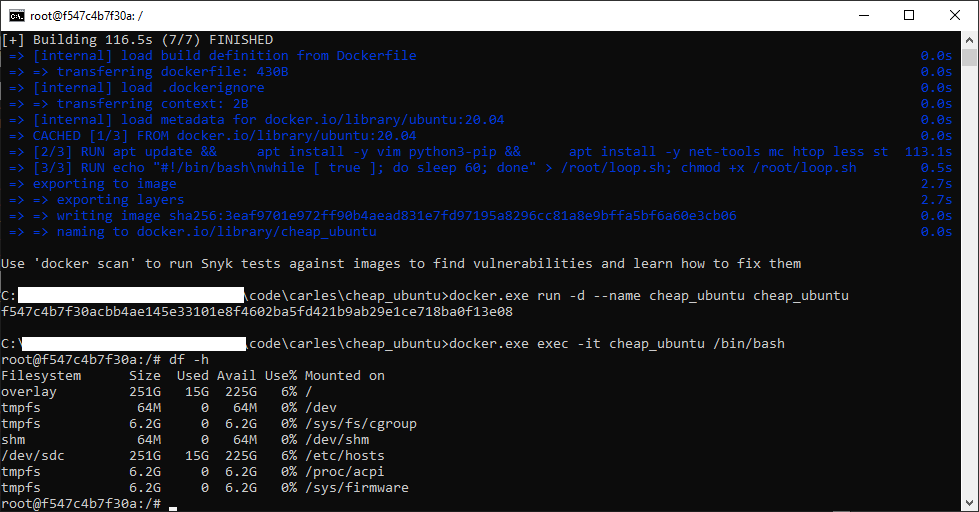
It’s time to execute an interactive shell and be able to play:
sudo docker exec -it cheap_ubuntu /bin/bash
For Windows:
docker.exe exec -it cheap_ubuntu /bin/bash
Our Ubuntu terminal inside Windows
Now you have an interactive shell, as root, to your cheap_ubuntu Ubuntu 20.04 LTS Container.
You’ll not be able to run the graphical interface, but you have a complete Ubuntu to learn to program in Bash and to use Linux from Command Line.
You will exit the interactive Bash session in the container with:
exit
If you want to stop the Container:
sudo docker stop cheap_ubuntu
Or for Windows:
docker.exe stop cheap_ubuntu
If you want to see what Containers are running do:
I’ve upgraded one of my AWS machines from Ubuntu 18.04 LTS to Ubuntu 20.04 LTS.
The process was really straightforward, basically run:
sudo apt update
sudp apt upgrade
Then Reboot in order to load the last kernel.
Then execute:
sudo do-release-upgrade
And ask two or three questions in different moments.
After, reboot, and that’s it.
All my Firewall rules, were kept, the services were restarted as they were available, or deferred to be executed when the service is reinstalled in case of dependencies (like for PHP, which was upgraded before Apache) and I’ve not found anything out of place, by the moment. The Kernels were special, with Amazon customization too.
I also recommend you to make sure to disable your Apache directory browsing, if you had like that, as new software install may have enabled it:
a2dismod autoindex
systemctl restart apache2
I always recommend, for Production, to run the Ubuntu LTS version.
I have read a lot of wrong recommendations about the use of Swap and Swappiness so I want to bring some light about it.
The first to say is that every project is different, so it is not possible to make a general rule. However in most of the cases we want systems to operate as fast and efficiently as possible.
So this suggestions try to covert 99% of the cases.
By default Linux will try to be as efficient as possible. So for example, it will use Free Memory to keep IO efficient by keeping in Memory cache and buffers.
That means that if you are using files often, Linux will keep that information cached in RAM.
The swappiness Kernel setting defines what tradeoff will take Linux between keeping buffers with Free Memory and using the available Swap Memory.
# sysctl vm.swappiness
vm.swappiness = 60
The default value is 60 and more or less means that when RAM memory gets to 60%, swap will start to be used.
And so we can find Servers with 256GB of RAM, that when they start to use more than 153 GB of RAM, they start to swap.
Let’s analyze the output of free -h:
carles@vbi78g:~/Desktop/Software/checkswap$ free -h
              total        used        free      shared  buff/cache   available
Mem:          2.9Gi       1.6Gi       148Mi        77Mi       1.2Gi       1.1Gi
Swap:         2.0Gi        27Mi       2.0Gi
So from this VM that has 2.9GB of RAM Memory, 1.6GB are used by applications.
The are 148MB that can immediately used by Applications, and there are 1.2GB in buffers/cache. Does that means that we can only use 148MB (plus swap)?. No, that mean that Linux tried to optimize io speed by keeping 1.2GB of RAM memory in buffers. But this is the best effort of Linux to have performance, for real applications will be also able to use 1.1GB that corresponds to the available field.
About swap, from 2GB, only 27MB have been used.
As vm.swappiness is set to 60, more RAM will be swapped out to swap, even if we have lots available.
As I said every case is different. If we are talking about a Desktop that has NVMe drives, the impact will be low. But if we are talking about a Server that is a hypervisor running VMs and has high usage on CPU and has the swap partition or the swap in a file, that could lead to huge problems. If there is a physical Server with a single spinning drive (or logical unit through RAID), and one partition is for Swap, and the other for mountpoints, and a process is heavily reading/writing to a partition mounted (an elastic search, or a telegraf, prometheus…), and the System tries to swap, then they will be competing for the magnetic head of disk, slowing down everything.
If you take a look on how the process of swapping memory pages from the memory to disk, you will understand that applications may need certain pages before being able to run, so in many cases we get to lock situations, that force everything to wait.
In my career I found Servers that temporarily stopped responding to ping. After a while ping came back, I was able to ssh and uptime showed that the Server did not reboot.
I troubleshooted that, and I saw a combination of high CPU usage spikes and Swap usage.
Using iostat and iotop I monitored what was speed of transference of only 1 MB/second!!.
I even did swapoff and it took one hour to free 4 GB swap partition!.
I also saw swap partition being in a spinning disk, and in another partition of the same spinning drive, having a swapfile. Magnetic spinning drives can only access one are of the drive at the same time, so that situation, using swap is very bad.
And I have seen situations were the swap or swapfile was mounted in a block device shared via network with the Server (like iSCSI or NFS), causing terrible performance when swapping.
So you have to adapt the strategy according to the project.
My preferred strategy for Compute Nodes and NoSQL Databases is to not use swap at all. In other cases, like MySQL Databases I may set swappiness to preferably to 1 or to 10.
The Linux kernel’s swappiness setting defines how aggressively the kernel will swap memory pages versus dropping pages from the page cache. A higher value increases swap aggressiveness, while a lower value tells the kernel to swap as little as possible to disk and favor RAM. The swappiness range is from 0 to 100, and most Linux distributions have swappiness set to 60 by default.
Couchbase Server is optimized with its managed cache to use RAM, and is capable of managing what should be in RAM and what shouldn’t be. Allowing the OS to have too much control over what memory pages are in RAM is likely to lower Couchbase Server’s performance. Therefore, it’s recommended that swappiness be set to the levels listed below.
Another theme, is when you log to a Server and you see all the Swap memory in use.
Linux may have moved the pages that were less used, and that may be Ok for some cases, for example a Cron Service that waits and runs every 24 hours. It is safe to swap that (as long as the swap IO is decent).
When Kernel Swaps it may generate locks.
But if we log to a Server and all the Swap is in use, how can we know that the Swap has been quiet there?.
Well, you can use iostat or iotop or you can:
cat /proc/vmstat
This file contains a lot of values related to Memory, we will focus on:
Paging refers to writing portions, termed pages, of a process’ memory to disk. Swapping, strictly speaking, refers to writing the entire process, not just part, to disk. In Linux, true swapping is exceedingly rare, but the terms paging and swapping often are used interchangeably.
page-out: The system’s free memory is less than a threshold “lotsfree” and unnused / least used pages are moved to the swap area. page-in: One process which is running requested for a page that is not in the current memory (page-fault), it’s pages are being brought back to memory. swap-out: System is thrashing and has deactivated a process and it’s memory pages are moved into the swap area. swap-in: A deactivated process is back to work and it’s pages are being brought into the memory.
Values from /proc/vmstat:
pgpgin, pgpgout – number of pages that are read from disk and written to memory, you usually don’t need to care that much about these numbers
pswpin, pswpout – you may want to track these numbers per time (via some monitoring like prometheus), if there are spikes it means system is heavily swapping and you have a problem.
In this actual example that means that since the start of the Server there has been 508992338 Page Swap In (with 4K memory pages this is 1,941 GB, so almost 2 TB transferred) and for Page Swat Out (with 4K memory pages this is 1,071 GB, so 1 TB of transferred). I’m talking about a Server that had a 4GB swap partition in a spinning disk and a 12 GB swapfile in another ext4 partition of the same spinning disk.
The 16 GB of swap were in use and iotop showed only two sources of IO, one being 2 VMs writing, another was a journaling process writing to the mountpoint where the swapfile was. That was an spinning drive (underlying hardware was raid, for simplicity I refer to one single drive. I checked that both spinning drives were healthy and fast). I saw small variations in the size of the Swap, so I decided to monitor the changes in pswpin and pswpout in /proc/vmstat to see how much was transferred from/to swap.
I saw then how many pages were being transferred!.
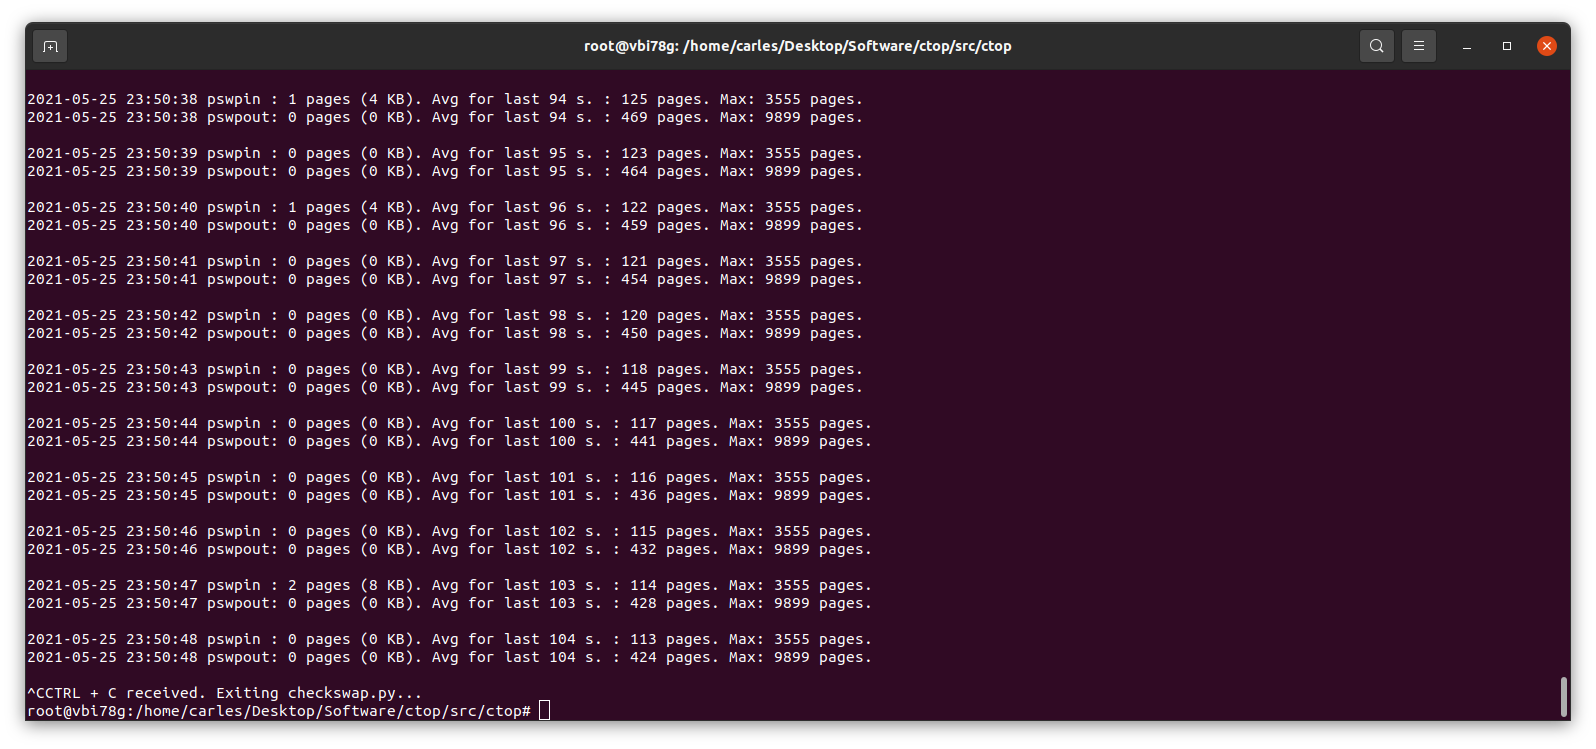
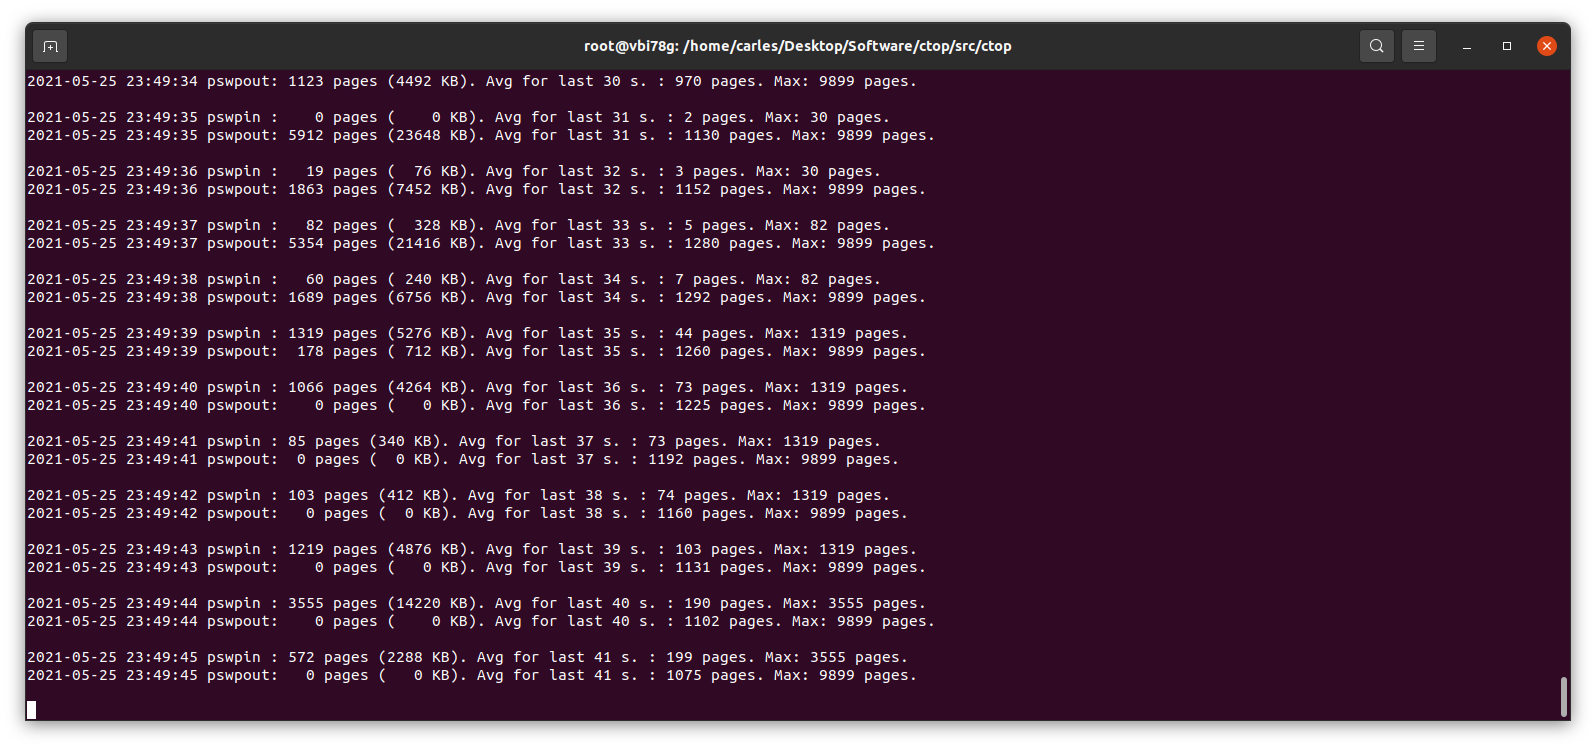
I wrote a small Python program to track those changes:
This little program works in Python 2 and Python 3, and will show the evolution of pswpin and pswpout in /proc/vmstat and will offer the average for last 5 minutes and keep the max value detected as well.
As those values show the page swaps since the start of the Server, my little program, makes the adjustments to show the Page Swaps per second.
A cheap way to reproduce collapse by using swap is using VirtualBox: install an Ubuntu 20.04 LTS in there, with 2 GB of less of memory, and one single core. Ping that VM from elsewhere.
Then you may run a little program like this in order to force it to swap:
#!/usr/bin/env python3
a_items = []
i_total = 0
# Add zeros if your VM has more memory
for i in range(0, 10000000):
    i_total = i_total + i
    a_items.append(i_total)
And checkswap will show you the spikes:
Many voices are discordant. Some say swappiness default value of 60 is good, as Linux will use the RAM memory to optimize the IO. In my experience, I’ve seen Hypervisors Servers running Virtual Machines that fit on the available physical RAM and were doing pure CPU calculations, no IO, and the Hypervisor was swapping just because it had swappiness to 60. Also having swap on spinning drives, mixing swap partition and swapfile, and that slowing down everything. In a case like that it would be much better not using Swap at all.
In most cases the price of Swapping to disk is much more higher than the advantage than a buffer for IO brings. And in the case of a swapfile, well, it’s also a file, so my suspect is that the swapfile is also buffered. Nothing I recommend, honestly.
My program https://gitlab.com/carles.mateo/checkswap may help you to demonstrate how much damage the swapping is doing in terms of IO. Combine it with iostat and iotop --only to see how much bandwidth is wasted writing and reading from/to swap.
You may run checkswap from a screen session and launch it with tee so results are logged. For example:
python3 checkswap.py | tee 2021-05-27-2107-checkswap.log
If you want to automatically add the datetime you can use:
python3 checkswap.py | tee `date +%Y-%m-%d-%H%M`-checkswap.log
Press CTRL + a and then d, in order to leave the screen session and return to regular Bash.
Type screen -r to resume your session if this was the only screen session running in background.
An interesting reflection from help Ubuntu:
The “diminishing returns” means that if you need more swap space than twice your RAM size, you’d better add more RAM as Hard Disk Drive (HDD) access is about 10³ slower then RAM access, so something that would take 1 second, suddenly takes more then 15 minutes! And still more then a minute on a fast Solid State Drive (SSD)…
Those are the programs that more or less, I use always in all my Linux workstations.
I use Ubuntu LTS. I like how they maintain the packages.
I like to run the same base version in my Desktops, like I have in the Servers. So if I have my Servers deployed with Ubuntu 20.04 LTS, then my Desktops will run with the same version. Is a way to get to better know the distribution, compatibilities, run faster than the problems, and an easy way to test things. If I have several deployments with several versions (so LTS not upgraded) I may run VMs with that version as Desktop or Server, to ensure compatibility. And obviously I use Docker and a lot of Command Line Tools, which I covered in another article.
Audacity sound recorder and editor
Charles Proxy
Chromium web browser
The Chrome Extension of LastPass for Teams
Filezilla
Firefox
GIMP
IntelliJ
LibreOffice
OpenShot Video Editor
PAC
Packet Tracer from Cisco
PHPStorm
PyCharm
Slack
Skype (usage going down in favor of Zoom and Slack)