So, you may have your Android phone full and you don’t know where the space is.
You may have tried Apps for Android but none shows the information in the detail you would like. Linux to the rescue.
First of all you need a cable able to transfer Data. It is a cable that will be connected to your computer, normally with an USB 3.0 cable and to your smartphone, normally with USB-C.
Sometimes phone’s connectors are dirty and don’t allow a stable connection. Your connections should allow a stable connection, otherwise the connection will be interrupted in the middle.
Once you connect the Android smartphone to the computer, unlock the phone and authorize the data connection.
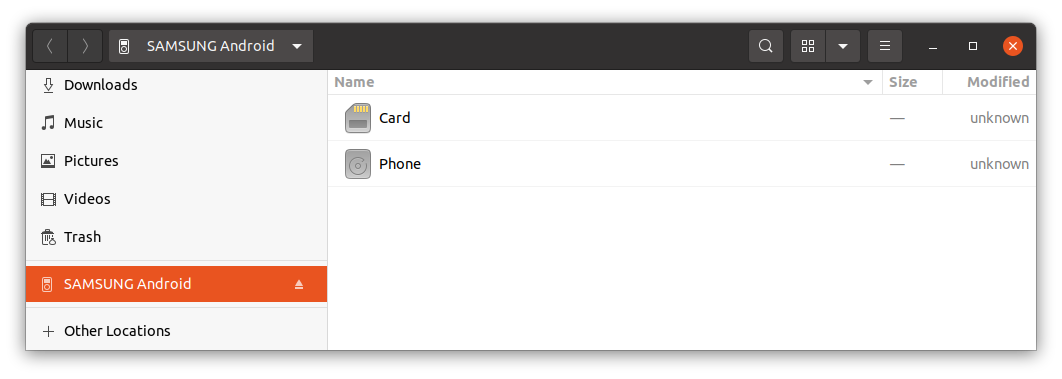
You’ll see that your computer recognizes the phone:
Open the terminal and enter this directory:
cd /run/user/1000/gvfs/
Here you will see your device and the name is very evident.
The usual is to have just one device listed, but if you had several Android devices attached you may want to query first, in order to identify it.
The Android devices use a protocol named Media Transfer Protocol (MTP) when connecting to the USB port, and that’s different on the typical way to access the USB port.
usb-devices | grep "Manufacturer=" -B 3
Run this command to see all the devices connected to the USB.
You may see Manufacturer=SAMSUNG or Manufacturer=OnePlus etc…
The information returned will allow you to identify your device in /run/user/1000/gvfs/
You may get different type of outputs, but if you get:
You can enter the Phone internal storage or the SD Card storage directory:
cd Phone
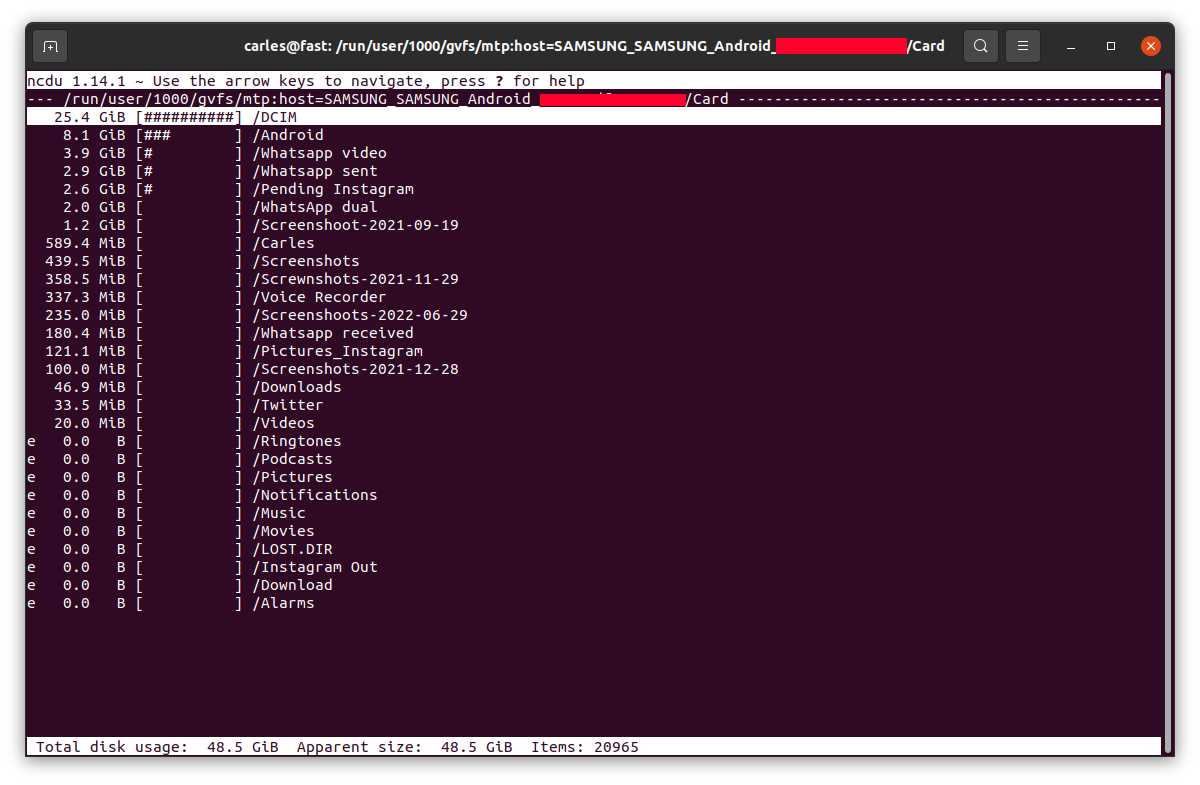
To see how the space is distributed nicely I recommend you to use the program ncdu if you don’t have you can install it with:
sudo apt install ncdu
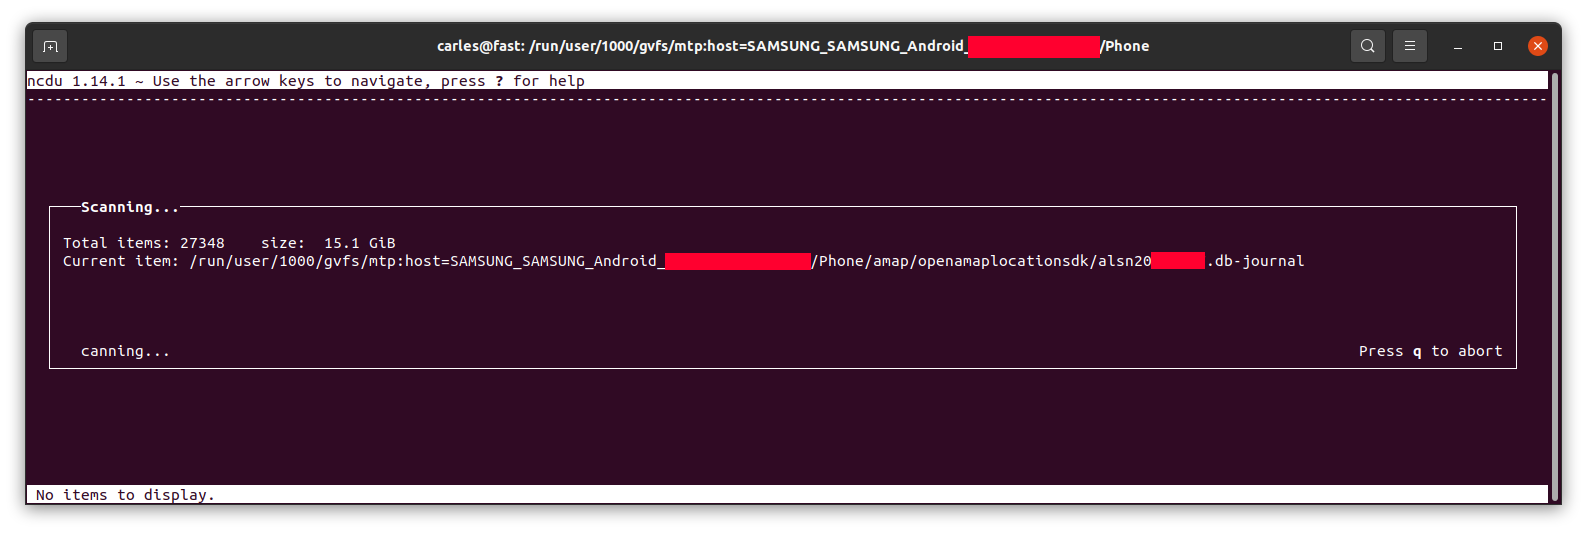
Then run ncdu:
ncdu
It will calculate the space…
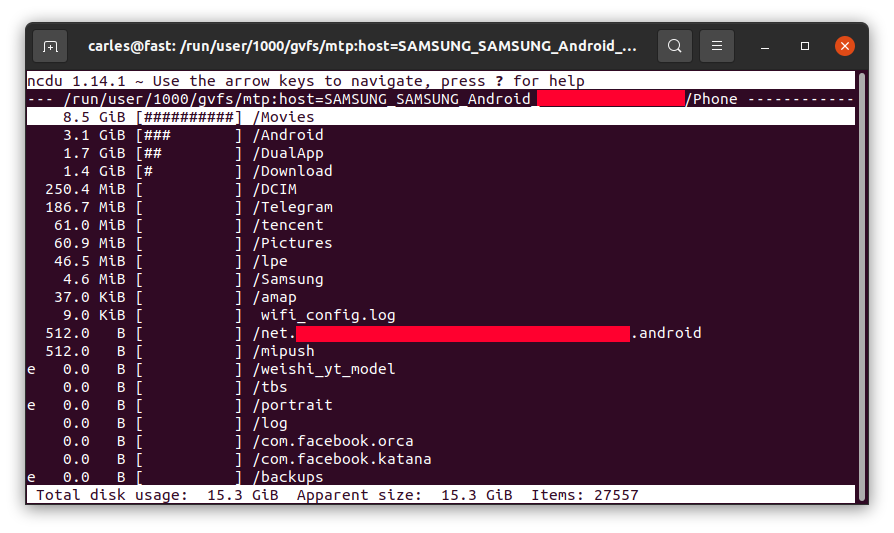
… and let you know, sorted from more to less, and will allow you to browse the sub-directories with the keyboard arrow keys and enter to get major clarity.
For example, in my case I saw 8.5 GB in the folder Movies on the phone, where I didn’t download any movie, so I checked.
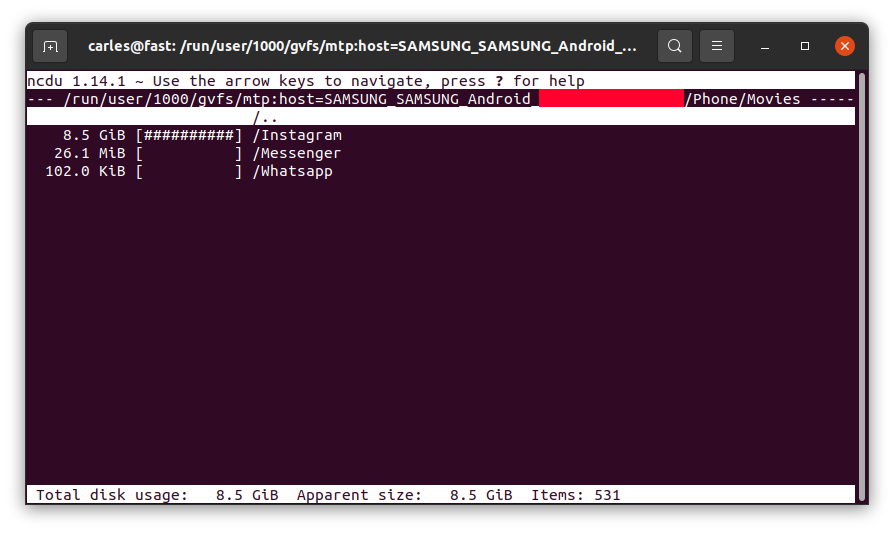
I entered inside by pressing Enter:
So Instagram App was keeping a copy all the videos I uploaded, in total 8.5 GB of my Phone’s space and never releasing them!.
Example for the SD card, where the usage was as expected:
sudo apt install python2 python3 python3-pip
# Install boto for Python 2 for Ansible (alternative way if pip install boto doesn't work for you)
python2 -m pip install boto
# Install Ansible
sudo apt install ansible
If you want to use Dynamic Inventory
So you can use the Python 2 ec2.py and ec2.ini files, adding them as to the /etc/ansible with mask +x, to use the Dynamic Inventory.
Then use the calls inside the shell script, or assuming that the previous file was named credentiasl.sh use source credentials.sh
ec2.py is written in Python 2, so probably will fail for you as it is invoked by python and your default interpreter will be Python 3.
So edit the first line of /etc/ansible/ec2.py and add:
#!/bin/env python2
Once credentials.sh is sourced, then you can just invoke ec2.py to get the list of your Instances in a JSON format dumped by ec2.py
/etc/ansible/ec2.py --list
You can get that JSON file and load it and get the information you need, filtering by group.
You can call:
/etc/ansible/ec2.py --list > instances.json
Or you can run a Python program that escapes to shell and executes ec2.py –list and loads the Output as a JSON file.
I use my carleslibs here to escape to shell using my class SubProcessUtils. You can install them, they are Open Source, or you can code manually if you prefer importing subprocess Python library and catching the stdout, stderr.
import json
from carleslibs import SubProcessUtils

if __name__ == "__main__":
    s_command = "/etc/ansible/ec2.py"

    o_subprocess = SubProcessUtils()
    i_error_code, s_output, s_error = o_subprocess.execute_command_for_output(s_command, b_shell=True, b_convert_to_ascii=True, b_convert_to_utf8=False)
    if i_error_code != 0:
        print("Error escaping to shell!", i_error_code)
        print(s_error)
        exit(1)

    json = json.loads(s_output)

    d_hosts = json["_meta"]["hostvars"]

    for s_host in d_hosts:
        # You'll get a ip/hostnamename in s_host which is the key
        # You have to check for groups and the value for the key Name, in order to get the Name of the group
        # As an exercise, print(d_hosts[s_host]) and look for:
        # @TODO: Capture the s_group_name
        # @TODO: Capture the s_addres
        if s_group_name == "yourgroup":
             # This filters only the instances with your group name, as you want to create an inventory file just for them
             # That's because you don't want to launch the playbook for all the instances, but for those in your group name in the inventory file.
             a_hostnames.append(s_address)

    # After this you can parse you list a_hostnames and generate an inventory file yourinventoryfile
    # The [ec2hosts] in your inventory file must match the hosts section in your yaml files
    # You'll execute your playbook with:
    # ansible-playbook -i yourinventoryfile youryamlfile.yaml
So an example of a yaml to install Apache2 in Ubuntu 20.04 LTS spawned instances , let’s call it install_apache2.yaml would be:
---
- name: Update web servers
  hosts: ec2hosts
  remote_user: ubuntu

  tasks:
  - name: Ensure Apache is at the latest version
    apt:
      name: apache2
      state: latest
      update_cache: yes
    become: yes
As you can see the section hosts: in the YAML playbook matches the [ec2hosts] in your inventory file.
You can choose to have your private key certificate .pem file in /etc/ansible/ansible.cfg or if you want to have different certificates per host, add them after the ip/address in your inventory file, like in this example:
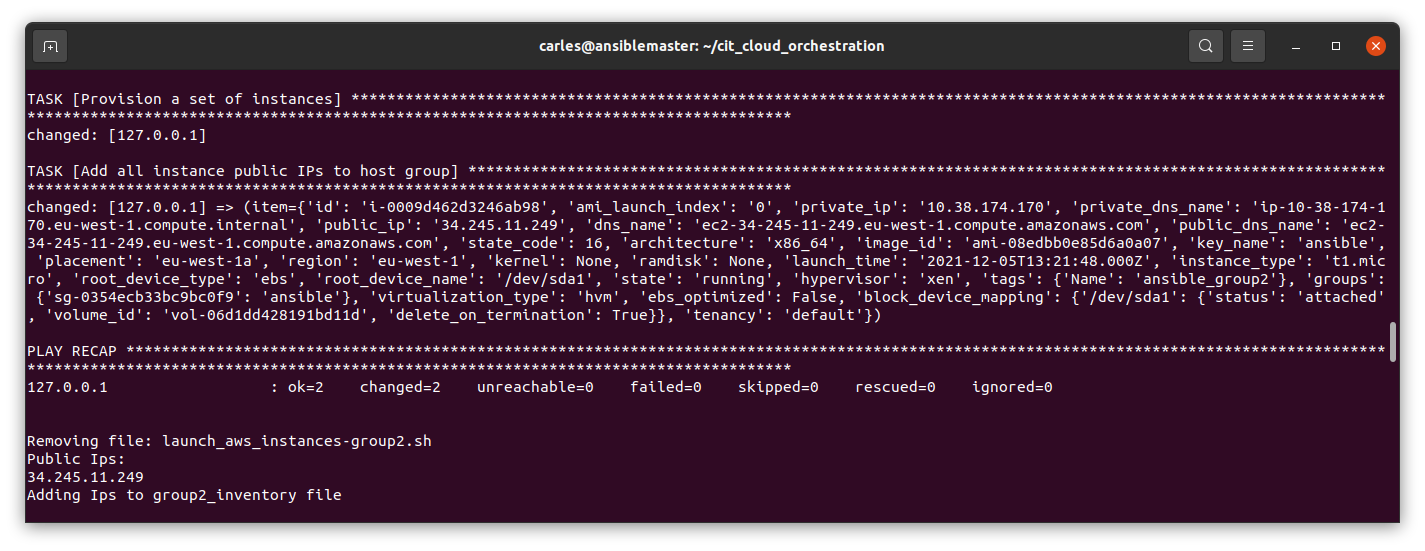
The first method is to use add_host to print in the screen the properties form the ec2 Instances provisioned.
The trick is to escape to shell, executing ansible-playbook and capturing the output, then parsing the text looking for the ‘public_ip:’
This is the Python 3 code I created:
class AwesomeAnsible:

    def extract_public_ips_from_text(self, s_text=""):
        """
        Extracts the addresses returned by Ansible
        :param s_text:
        :return: Boolean for success, Array with the Ip's
        """

        b_found = False
        a_ips = []

        i_count = 0
        while True:
            i_count += 1
            if i_count > 20:
                print("Breaking look")
                break
            s_substr = "'public_ip': '"
            i_first_pos = s_text.find(s_substr)
            if i_first_pos > -1:
                s_text_sub = s_text[i_first_pos + len(s_substr):]
                # Find the ending delimiter
                i_second_pos = s_text_sub.find("'")
                if i_second_pos > -1:
                    b_found = True
                    s_ip = s_text_sub[0:i_second_pos]
                    a_ips.append(s_ip)
                    s_text_sub = s_text_sub[i_second_pos:]
                    s_text = s_text_sub
                    continue

            # No more Ip's
            break

        return b_found, a_ips
Then you’ll use with something like:
        # Catching the Ip's from the output
        b_success, a_ips = self.extract_public_ips_from_text(s_output)
        if b_success is True:
            print("Public Ips:")
            s_ips = ""
            for s_ip in a_ips:
                print(s_ip)
                s_ips = s_ips + self.get_ip_text_line_for_inventory(s_ip)
            print("Adding Ips to group1_inventory file")
            self.o_fileutils.append_to_file("group1_inventory", s_ips)
            print()
The get_ip_text_line_for_inventory_method() returns a line for the inventory file, with the ip and the key to use separated by a tab (\t):
    def get_ip_text_line_for_inventory(self, s_ip, s_key_path="ansible.pem"):
        """
        Returns the line to add to the inventory, with the Ip and the keypath
        """
        return s_ip + "\tansible_ssh_private_key_file=" + s_key_path + "\n"
Once you have the inventory file, like this below, you can execute the playbook for your group of hosts:
You can run this Bash Shell Script to get only the public ips when you provision to Amazon AWS EC2 the Instances from your group named group1 in this case:
I set again the credentials because as this Bash Shell Script is invoked from Python, there are not sourced.
The trick in here is that the launch_aws_instances-group1.yaml file has a task to add the hosts to Ansible’s in memory inventory, and to print the information.
That output is what I scrap from Python and then I use extract_public_ips_from_text() showed before.
So my launch_aws_instances-group1.yaml (which I generate from Python customizing the parameter) looks like this:
In this case I use t1.micro cause I provision to EC2-Classic and not to the default VPC, otherwise I would use t2.micro.
So I have a Security Group named ansible created in Amazon AWS EC2 console as EC2-Classic, and not as VPC.
In this Security group I opened the Inbound HTTP Port and the SSH port for the Ip from I’m provisioning, so Ansible can SSH using the Key ansible.pem
The Public Key has been created and named ansible as well (section key_name under ec2).
The Image used is Ubuntu 20.04 LTS (free tier) for the region eu-west-1 which is my wonderful Ireland.
For the variables (vars) I use the MT Notation, so the prefixes show exactly what we are expecting s_ for Strings i_ for Integers and I never have collisions with reserved names.
It is very important to use the count_tag and instance_tags with the name of the group, as the actions will be using that group name. Remember the idempotency.
The task with the add_host is the one that makes the information for the instances to be displayed, like in this screenshot.
I had this idea after one my Python and Linux students with two laptops, a Mac OS X and a Windows one explained me that the Mac OS X is often taken by their daughters, and that the Windows 10 laptop has not enough memory to run PyCharm and Virtual Box fluently. She wanted to have a Linux VM to practice Linux, and do the Bash exercises.
So this article explains how to create a Ubuntu 20.04 LTS Docker Container, and execute a shell were you can practice Linux, Ubuntu, Bash, and you can use it to run Python, Apache, PHP, MySQL… as well, if you want.
You need to install Docker for Windows of for Mac:
Just pay attention to your type of processor: Mac with Intel chip or Mac with apple chip.
The first thing is to create the Dockerfile.
FROM ubuntu:20.04

MAINTAINER Carles Mateo

ARG DEBIAN_FRONTEND=noninteractive

RUN apt update && \
    apt install -y vim python3-pip &&  \
    apt install -y net-tools mc htop less strace zip gzip lynx && \
    pip3 install pytest && \
    apt-get clean

RUN echo "#!/bin/bash\nwhile [ true ]; do sleep 60; done" > /root/loop.sh; chmod +x /root/loop.sh

CMD ["/root/loop.sh"]
So basically the file named Dockerfile contains all the blueprints for our Docker Container to be created.
You see that I all the installs and clean ups in one single line. That’s because Docker generates a layer of virtual disk per each line in the Dockerfile. The layers are persistent, so even if in the next line we delete the temporary files, the space used will not be recovered.
You see also that I generate a Bash file with an infinite loop that sleeps 60 seconds each loop and save it as /root/loop.sh This is the file that later is called with CMD, so basically when the Container is created will execute this infinite loop. Basically we give to the Container a non ending task to prevent it from running, and exiting.
Now that you have the Dockerfile is time to build the Container.
For Mac open a terminal and type this command inside the directory where you have the Dockerfile file:
sudo docker build -t cheap_ubuntu .
I called the image cheap_ubuntu but you can set the name that you prefer.
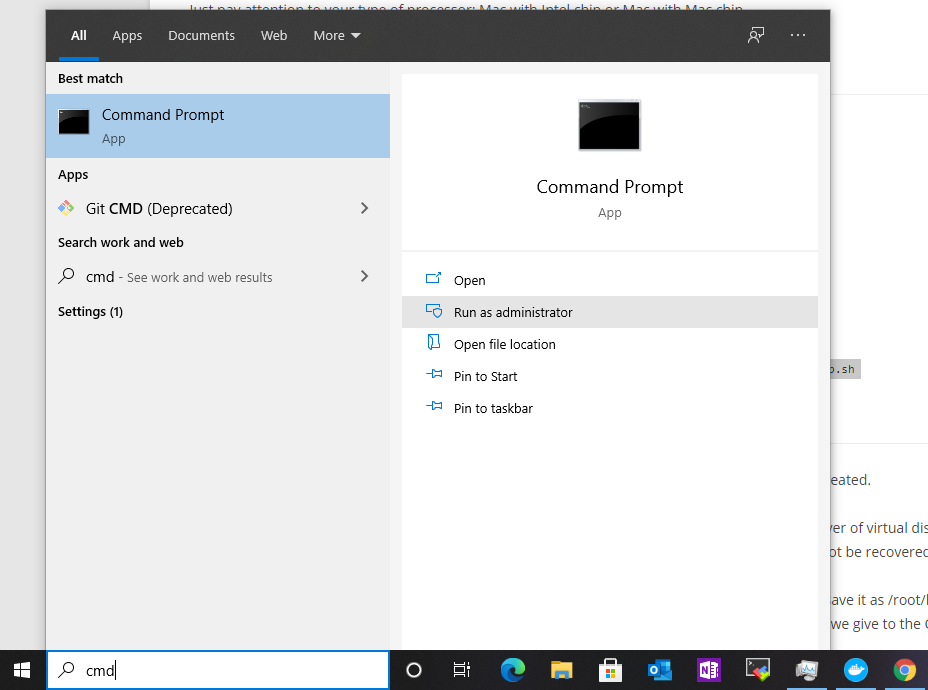
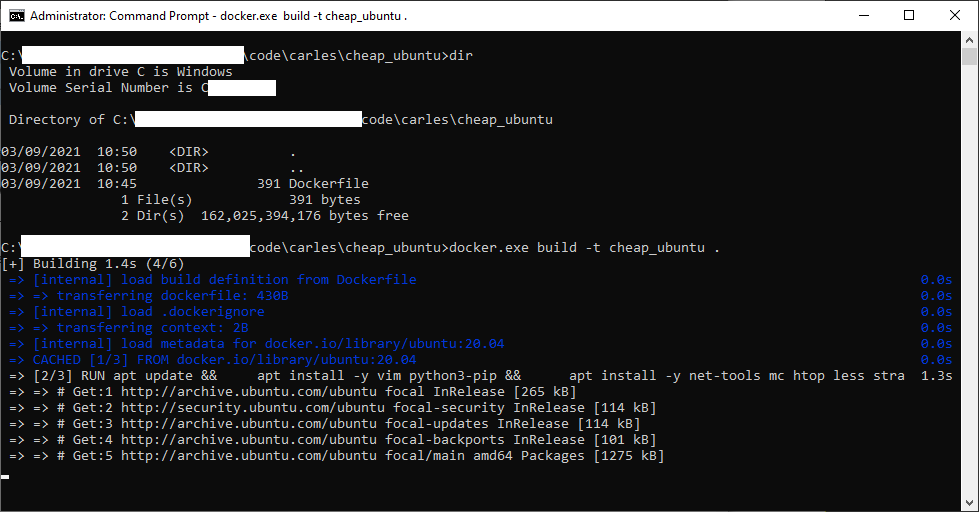
For Windows 10 open a Command Prompt with Administrative rights and then change directory (cd) to the one that has your Dockerfile file.
docker.exe build -t cheap_ubuntu .
Image being built… (some data has been covered in white)
Now that you have the image built, you can create a Container based on it.
For Mac:
sudo docker run -d --name cheap_ubuntu cheap_ubuntu
For Windows (you can use docker.exe or just docker):
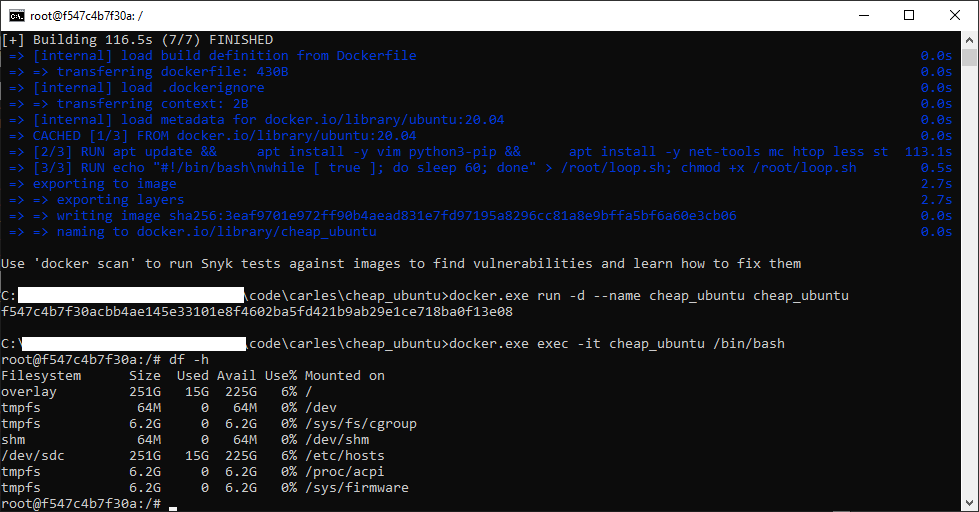
docker.exe run -d --name cheap_ubuntu cheap_ubuntu
Now you have Container named cheap_ubuntu based on the image cheap_ubuntu.
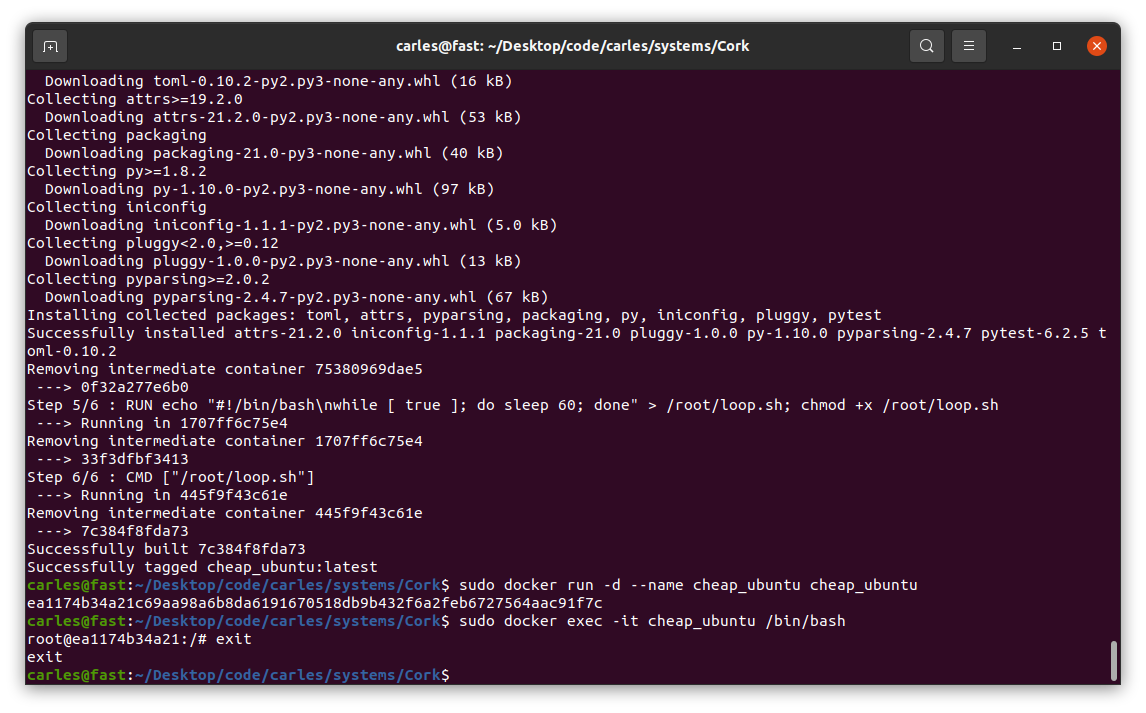
It’s time to execute an interactive shell and be able to play:
sudo docker exec -it cheap_ubuntu /bin/bash
For Windows:
docker.exe exec -it cheap_ubuntu /bin/bash
Our Ubuntu terminal inside Windows
Now you have an interactive shell, as root, to your cheap_ubuntu Ubuntu 20.04 LTS Container.
You’ll not be able to run the graphical interface, but you have a complete Ubuntu to learn to program in Bash and to use Linux from Command Line.
You will exit the interactive Bash session in the container with:
exit
If you want to stop the Container:
sudo docker stop cheap_ubuntu
Or for Windows:
docker.exe stop cheap_ubuntu
If you want to see what Containers are running do:
I’ve upgraded one of my AWS machines from Ubuntu 18.04 LTS to Ubuntu 20.04 LTS.
The process was really straightforward, basically run:
sudo apt update
sudp apt upgrade
Then Reboot in order to load the last kernel.
Then execute:
sudo do-release-upgrade
And ask two or three questions in different moments.
After, reboot, and that’s it.
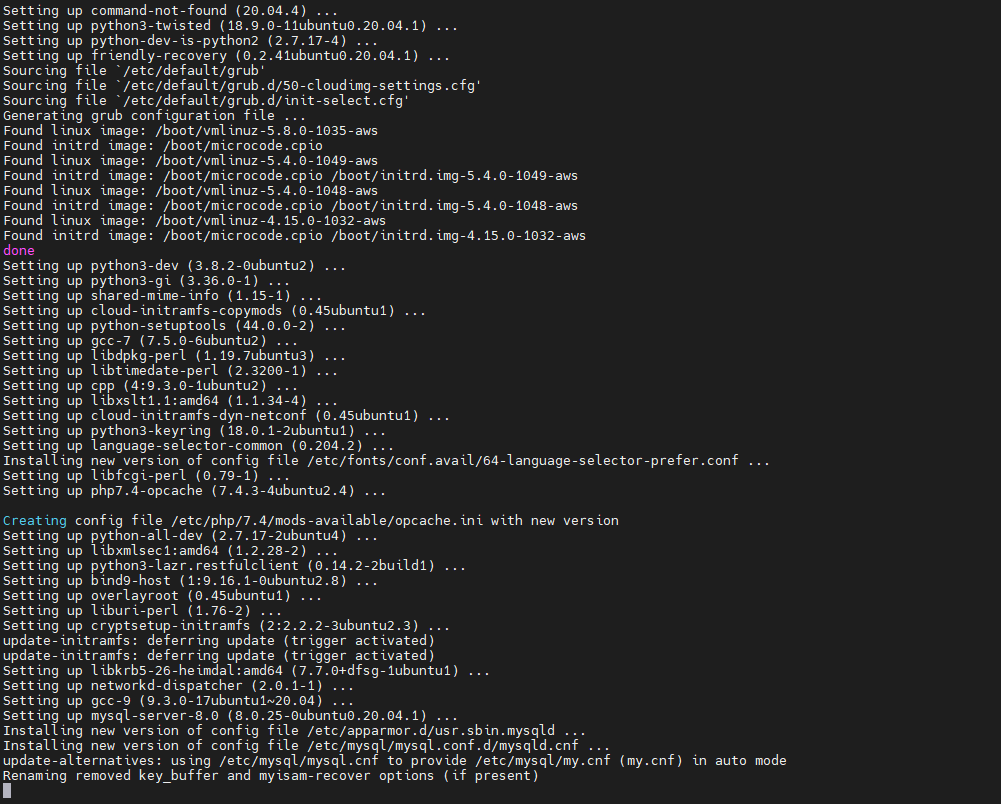
All my Firewall rules, were kept, the services were restarted as they were available, or deferred to be executed when the service is reinstalled in case of dependencies (like for PHP, which was upgraded before Apache) and I’ve not found anything out of place, by the moment. The Kernels were special, with Amazon customization too.
I also recommend you to make sure to disable your Apache directory browsing, if you had like that, as new software install may have enabled it:
a2dismod autoindex
systemctl restart apache2
I always recommend, for Production, to run the Ubuntu LTS version.
Those are the programs that more or less, I use always in all my Linux workstations.
I use Ubuntu LTS. I like how they maintain the packages.
I like to run the same base version in my Desktops, like I have in the Servers. So if I have my Servers deployed with Ubuntu 20.04 LTS, then my Desktops will run with the same version. Is a way to get to better know the distribution, compatibilities, run faster than the problems, and an easy way to test things. If I have several deployments with several versions (so LTS not upgraded) I may run VMs with that version as Desktop or Server, to ensure compatibility. And obviously I use Docker and a lot of Command Line Tools, which I covered in another article.
Audacity sound recorder and editor
Charles Proxy
Chromium web browser
The Chrome Extension of LastPass for Teams
Filezilla
Firefox
GIMP
IntelliJ
LibreOffice
OpenShot Video Editor
PAC
Packet Tracer from Cisco
PHPStorm
PyCharm
Slack
Skype (usage going down in favor of Zoom and Slack)
This article is written at 2021-03-22 so this conclusion will evolve as time passes.
Some of my articles are checked after 7 years, so be advised this choice will not be valid in a year. Although the reasoning and considerations to take in count will be the same.
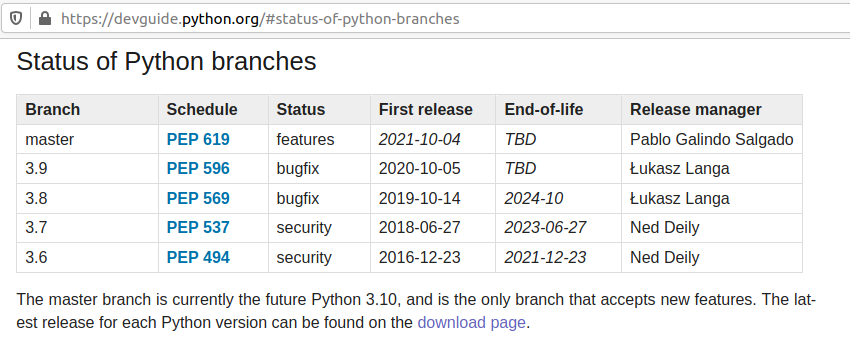
I answer to the question: Why Carles, do you suggest to adopt Python 3.8, and not 3.9 or 3.7 for our Internal Automation Tools?.
Python 3.6 was released on 2016-12-23 and will get EOL on 2021-12-23.
That’s EOL in 9 months. We don’t want to recommend that.
Python 3.7 was released on 2018-06-27 and will get EOL 2023-06-27.
That’s 2 years and 3 months from now. The Status of development is focus in Security bugfixes.
Python 3.9 was released 2020-10-05 that’s 5 months approx from now.
Honestly, I don’t recommend for Production a version of Software that has not been in the market for a year.
Most of the bugs and security bugs appears before the first year.
New features released, often are not widely fully tested , and bugs found and fixed, once a year has passed.
Python 3.8 was released on 2019-10-14.
That means that the new features have been tested for a year and five months approximately.
This is enough time to make appear most bugs.
EOL is 2024-10, that is 3 years and 7 months from now. A good balance of EOL for the effort to standardize.
Finally Python 3.8 is the Python mainline for Ubuntu 20.04 LTS.
If our deploy strategy is synchronized, we want to use Long Time Support versions, of course.
So my recommendation would be, at least for your internal tools, to use containers based in Ubuntu 20.04 LTS with Python 3.8.
We know Docker images will be bigger using Ubuntu 20.04 LTS than using other images, but that disk space is really a small difference, and we get the advantage of being able to install additional packages in the Containers if we need to debug.
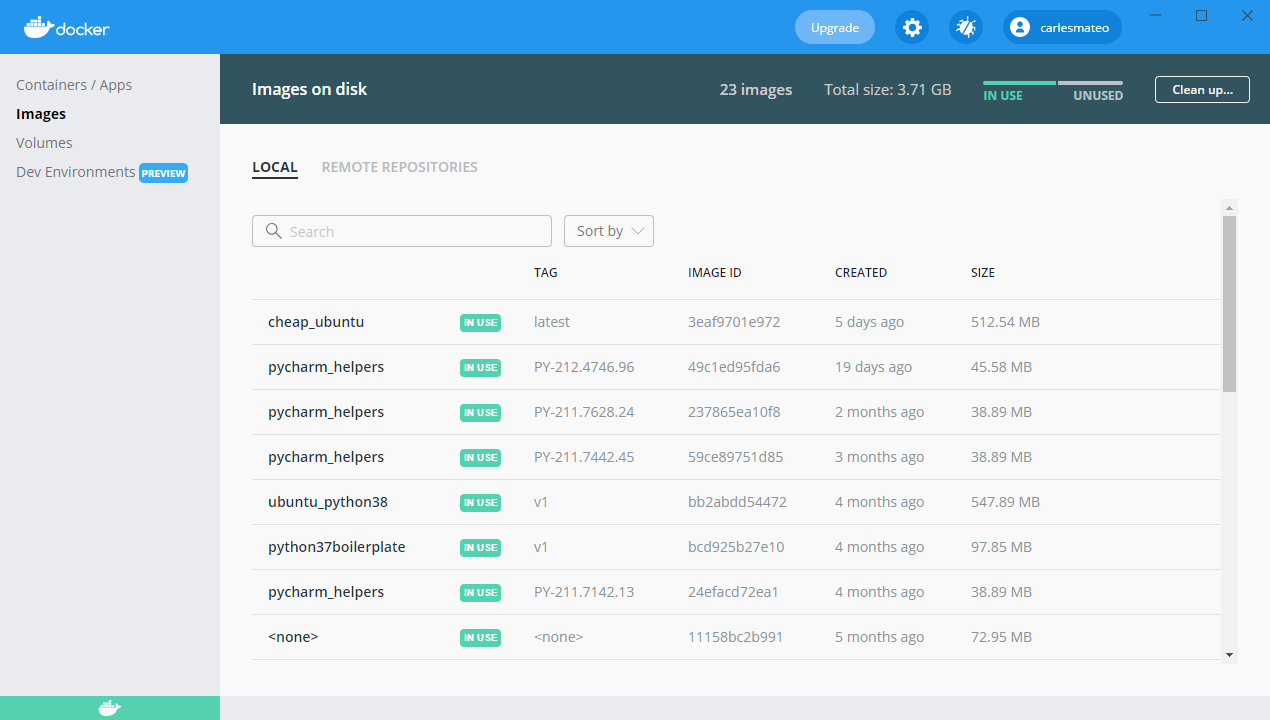
An Ubuntu 20.04 Image with Pyhton 3.8 and pytest, uses 540 MB.
This is a small amount of space nowadays. Even if very basic Alpine images can use 25MB only, when you install Python they start to grow close to Ubuntu, to 360MB. The difference is not much, and if you used Alpine and you have suffered from Community packages being updated and becoming incompatible with wheel and you lost hours fixing the dependencies, you’ll really appreciate using my Ubuntu LTS packages approach.
So you are trying to program the Raspberry expansion PINS in Python, for example for this 3D LED Christmas Tree, and you’re getting the error:
GPIO.setup(self.number, GPIO.IN, self.GPIO_PULL_UPS[self._pull]) RuntimeError: Not running on a RPi!
I’m running this on Ubuntu 20.04LTS with a Raspberry 4.
The first thing:
Make sure you have an official Raspberry Pi charger.
Or at least, make sure your USB charger provides enough intensity to power the Raspberry and the LEDs.
The LED power comes from the motherboard and if Raspberry Pi has not enough energy this is not going to work.
My colleague Michela had her tree not working because of the charger was not able to provide enough energy. When she ordered a new charger, it worked like a charm.
Install the base Software
In order to communicate with General Purpose Input Output ports (GPIO) you need to install this Software:
I saw many people stuck, in the forums, because of that.
To work with the LEDs you need to run the samples as root.
Some code examples
To provide a bit of “the whole package” here are some simple examples.
Turn to red the LED’s one by one
from tree import RGBXmasTree
from time import sleep

o_tree = RGBXmasTree()

for o_pixel in o_tree:
    o_pixel.color = (1, 0, 0)
    sleep(0.1)
Turn to a different color, sleep, and again
from tree import RGBXmasTree
from time import sleep

o_tree = RGBXmasTree()

a_t_colors = [(1, 0, 0), (0, 1, 0), (0, 0, 1)]

for t_color in a_t_colors:
    o_tree.color = t_color
    sleep(1)
Turn off the lights
from tree import RGBXmasTree

o_tree = RGBXmasTree()

o_tree.color = (0, 0, 0)