Few days ago I was under a heavy DoS attack.
Nothing new, zombie computers, hackers, pirates, networks of computers… trying to abuse the system and to hack into it. Why? There could be many reasons, from storing pirate movies, trying to use your Server for sending Spam, try to phishing or to host Ransomware pages…
Most of those guys doesn’t know that is almost impossible to Spam from Amazon. Few emails per hour can come out from the Server unless you explicitly requests that update and configure everything.
But I thought it was a great opportunity to force myself to update the Operating System, core tools, versions of PHP and MySql.
Forensics / Postmortem of the incident
The task was divided in two parts:
- Understanding the origin of the attack
- Blocking the offending Ip addresses or disabling XMLRPC
- Making the VM boot again (problems with Amazon AWS)
- I didn’t know why it was not booting so.
- Upgrading the OS
I disabled the access to the site while I was working using Amazon Web Services Firewall. Basically I turned access to my ip only. Example: 8.8.8.8/32

That way the logs were reflecting only what I was doing from my Ip.
Dealing with Snapshots and Volumes in AWS
Well the first thing was doing an Snapshot.
After, I tried to boot the original Blog Server (so I don’t stop offering service) but no way, the Server appeared to be dead.
So then I attached the Volume to a new Server with the same base OS, in order to extract (dump) the database. Later I would attach the same Volume to a new Server with the most recent OS and base Software.
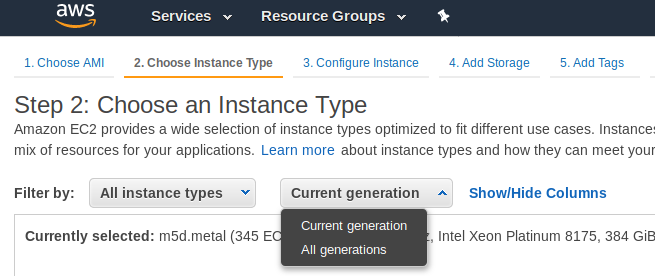
Something that is a bit annoying is that the new Instances, the new generation instances, run only in VPC, not in Amazon EC2 Classic. But my static Ip addresses are created for Amazon EC2 Classic, so I could not use them in new generation instances.

I choose the option to see all the All the generations.
Upgrading the system base Software had its own challenges too.
Upgrading the OS / Base Software
My approach was to install an Ubuntu 18.04 LTS, and install the base Software clean, and add any modification I may need.
I wanted to have all the supported packages and a recent version of PHP 7 and the latest Software pieces link Apache or MySQL.
sudo apt update

sudo apt install apache2

sudo apt install mysql-server

sudo apt install php libapache2-mod-php php-mysql
Apache2
Config files that before were working stopped working as the new Apache version requires the files or symlinks under /etc/apache2/sites-enabled/ to end with .conf extension.
Also some directives changed, so some websites will not able to work properly.
Those projects using my Catalonia Framework were affected, although I have this very well documented to make it easy to work with both versions of Apache Http Server, so it was a very straightforward change.
From the previous version I had to change my www.cataloniaframework.com.conf file and enable:
<Directory /www/www.cataloniaframework.com>Options Indexes FollowSymLinks MultiViewsAllowOverride AllOrder allow,denyallow from all</Directory>
Then Open the ports for the Web Server (443 and 80).
sudo ufw allow in "Apache Full"Then service apache restart
MySQL
The problem was to use the most updated version of the Database. I could use one of the backups I keep, from last week, but I wanted more fresh data.
I had the .db files and it should had been very straightforward to copy to /var/lib/mysql/ … if they were the same version. But they weren’t. So I launched an instance with the same base Software as the old previous machine had, installed mysql-server, stopped it, copied the .db files, started it, and then I made a dump with mysqldump –all-databases > 2019-04-29-all-databases.sql
Note, I copied the .db files using the mythical mc, which is a clone from Norton Commander.
Then I stopped that instance and I detached that volume and attached it to the new Blog Instance.
I did a Backup of my original /var/lib/mysql/ files for the purpose of faster restoring if something went wrong.
I mounted it under /mnt/blog_old and did mysql -u root -p < /mnt/blog_old/home/ubuntu/2019-04-29-all-databases.sql
That worked well I had restored the blog. But as I was watching the /var/log/mysql/error.log I noticed some columns were not where they should be. That’s because inadvertently I overwritten the MySql table as well, which in MySQL 5.7 has different structure than in MySQL 5.5. So I screwed. As I previewed this possibility I restored from the backup in seconds.
So basically then I edited my .sql files and removed all that was for the mysql database.
I started MySql, and run the mysql import procedure again. It worked, but I had to recreate the users for all the Databases and Grant them permissions.
GRANT ALL PRIVILEGES ON db_mysqlproxycache.* TO 'wp_dbuser_mysqlproxy'@'localhost' IDENTIFIED BY 'XWy$&{yS@qlC|<¡!?;:-ç';
PHP7
Some modules in my blogs where returning errors in /var/log/apache2/mysite-error.log so I checked that it was due to lack of support of latest PHP versions, and so I patched manually the code or I just disabled the offending plugin.
WordPress
As seen checking the /var/log/apache2/blog.carlesmateo.com-error.log some URLs where not located by WordPress.
For example:
The requested URL /wordpress/wp-json/ was not found on this server
I had to activate modrewrite and then restart Apache.
a2enmod rewrite; service apache2 restart
Making the site more secure
Checking at the logs of Apache, /var/log/apache2/blog.carlesmateo.com-access.log I checked for Ip’s accessing Admin areas, I looked for 404 Errors pointing to intents to exploit any unsafe WP Plugin, I checked for POST protocol as well.
I added to the Ubuntu Uncomplicated Firewall (UFW) the offending Ip’s and patched the xmlrpc.php file to exit always.