2020-03-06 Heya, I’m doing a set of improvements to the blog.
One, you can already see. I added a new section to the CSS @media, so now screens bigger than 1,800 px in width, will use that width for rendering the page. The original WordPress theme at 960x was too small for our current screens. I will add a new CSS @media for 4K screens promptly.
Other is about the organization of the content. I want to separate a bit the contents, now articles are sequential and is difficult to discover nice contents if they have 2 or more articles more recent, so I will group articles by content and provide a small index on the top page. Also I will provide more areas for Operations, SRE, where it will be easy to locate code, scripts, tricks… things that are useful to our day to day. I also want to make visible the articles about living in different cities, for IT Engineers, with useful tricks and tips. And keep the more complex and more interesting Engineering matters in the main page.
Updates
2020-03-13 15:49 Added SSL to the blog
With more delay I wanted, I bought a SSL certificate, configured Apache, and after few changes to the blog has been set. One very annoying is that WordPress linked the images statically pointing to http://blog.carlesmateo.com so I changed the latest article’s images to point to relative path so they will work nice with http or https.
My reflection is that everything negative can have its positive output. With this coronavirus thing, I decided to focus into improving things. And so I’m doing. :)
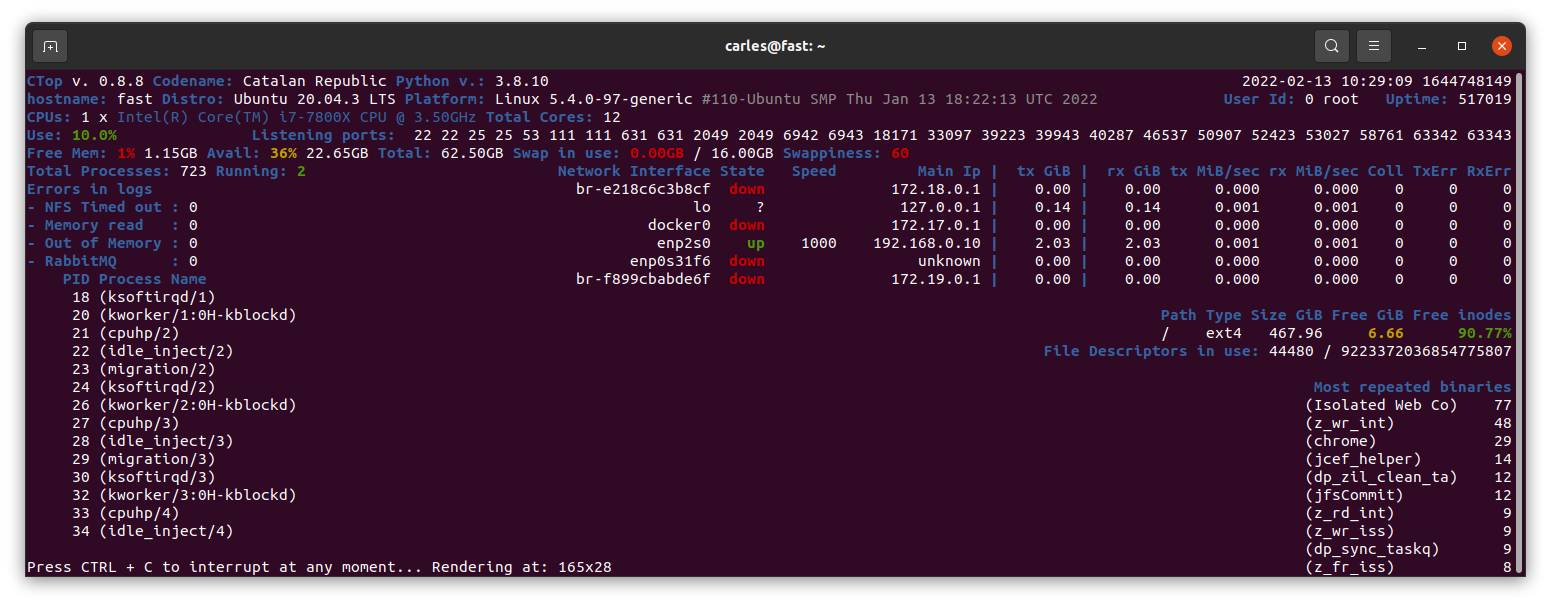
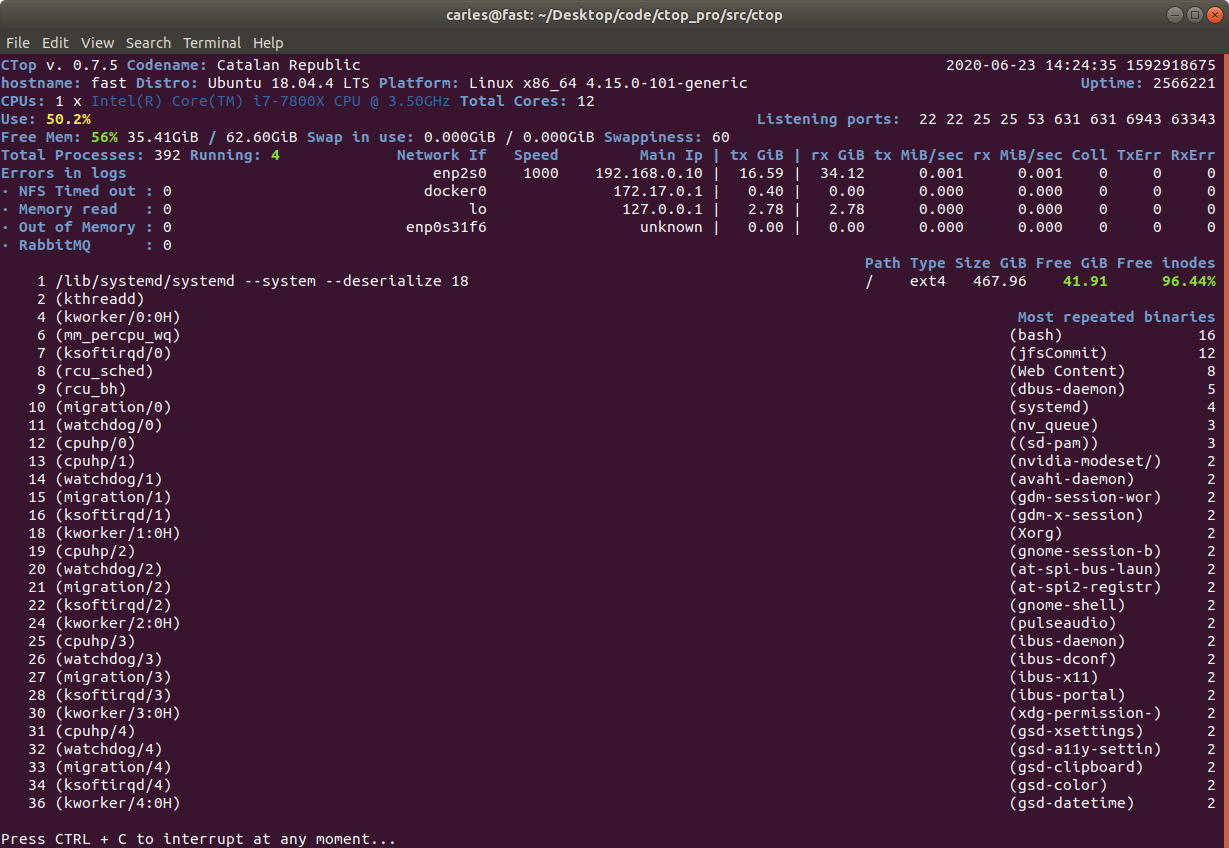
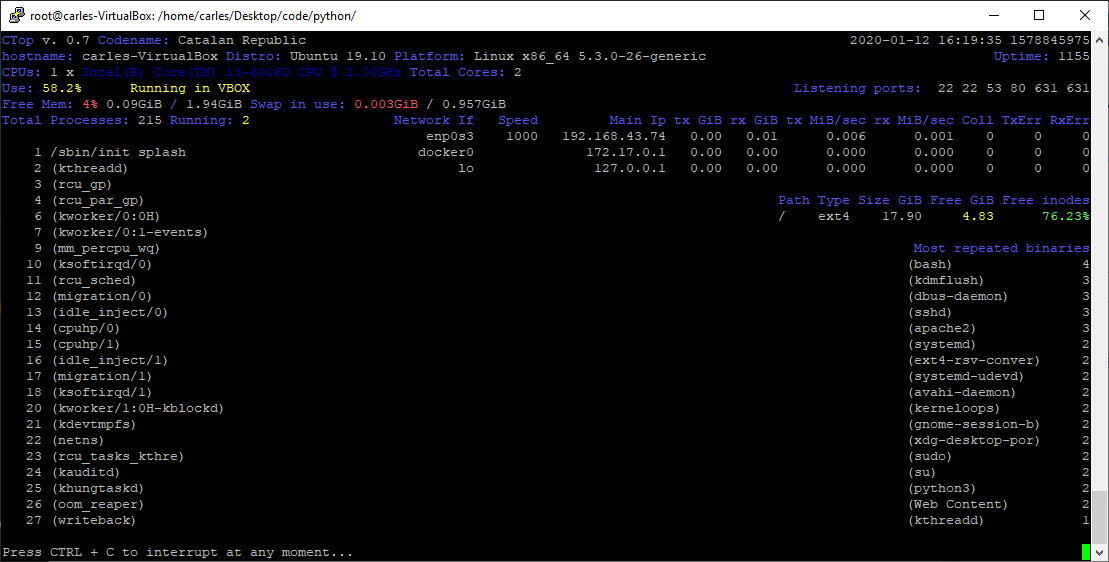
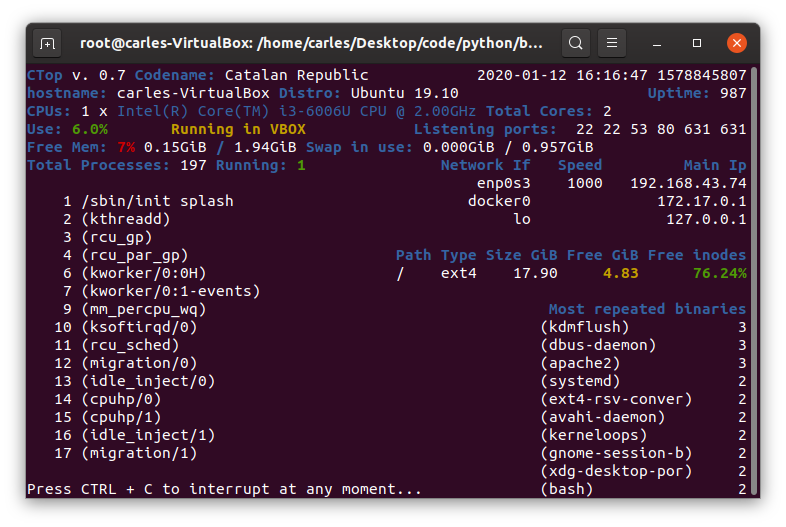
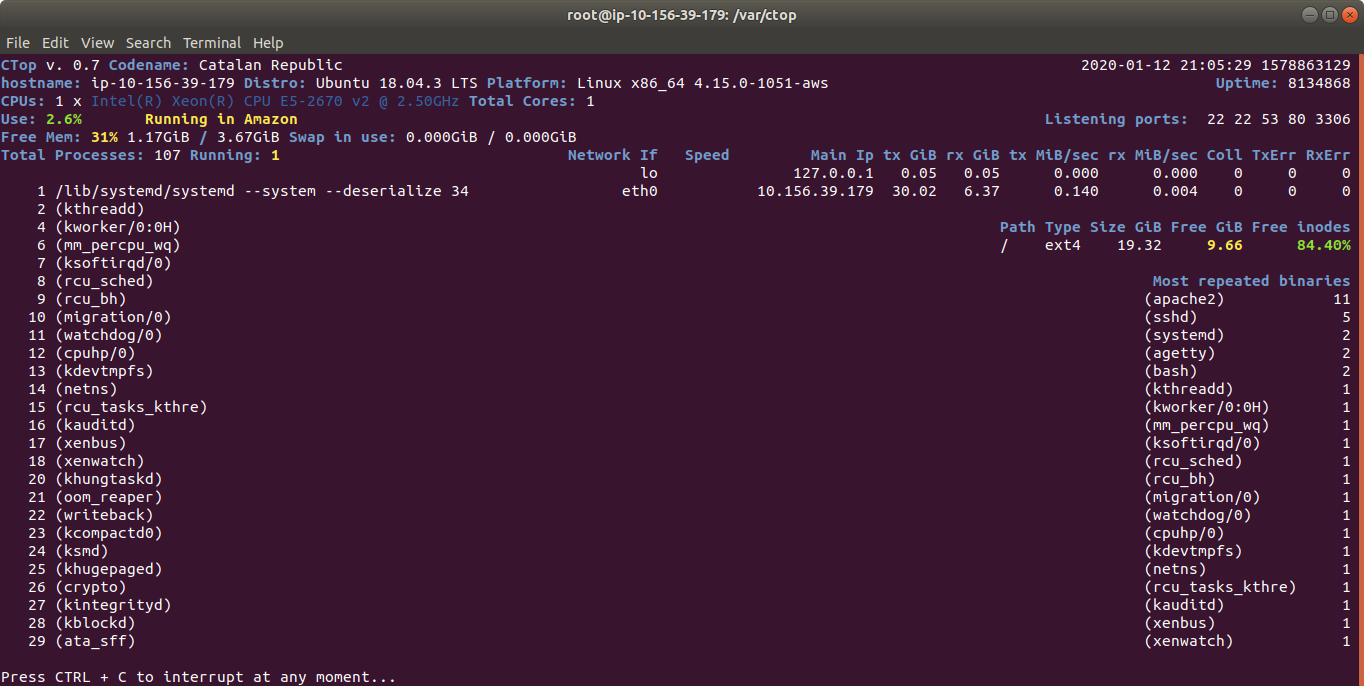
ctop.py is an Open Source tool for Linux System Administration that I’ve written in Python3. It uses only the System (/proc), and not third party libraries, in order to get all the information required. I use only this modules, so it’s ideal to run in all the farm of Servers and Dockers:
os
sys
time
shutil (for getting the Terminal width and height)
The purpose of this tool is to help to troubleshot and to identify problems with a single view to a single tool that has all the typical indicators.
It provides in a single view information that is typically provided by many programs:
top, htop for the CPU usage, process list, memory usage
meminfo
cpuinfo
hostname
uptime
df to see the free space in / and the free inodes
iftop to see real-time bandwidth usage
ip addr list to see the main Ip for the interfaces
netstat or lsof to see the list of listening TCP Ports
uname -a to see the Kernel version
Other cool things it does is:
Identifying if you’re inside an Amazon VM, Google GCP, OpenStack VMs, Virtual Box VMs, Docker Containers or lxc.
Compatible with Raspberry Pi (tested on 3 and 4, on Raspbian and Ubuntu 20.04LTS)
Uses colors, and marks in yellow the warnings and in red the errors, problems like few disk space reaming or high CPU usage according to the available cores and CPUs.
Redraws the screen and adjust to the size of the Terminal, bigger terminal displays more information
It doesn’t use external libraries, and does not escape to shell. It reads everything from /proc /sys or /etc files.
Identifies the Linux distribution
Supports Plugins loaded on demand.
Shows the most repeated binaries, so you can identify DDoS attacks (like having 5,000 apache instances where you have normally 500 or many instances of Python)
Indicates if an interface has the cable connected or disconnected
Shows the Speed of the Network Connection (useful for Mellanox cards than can operate and 200Gbit/sec, 100, 50, 40, 25, 10…)
It displays the local time and the Linux Epoch Time, which is universal (very useful for logs and to detect when there was an issue, for example if your system restarted, your SSH Session would keep latest Epoch captured)
No root required
Displays recent errors like NFS Timed outs or Memory Read Errors.
You can enforce the output to be in a determined number of columns and rows, for data scrapping.
You can specify the number of loops (1 for scrapping, by default is infinite)
You can specify the time between screen refreshes, for long placed SSH sessions
You can specify to see the output in b/w or in color (default)
Plugins allow you to extend the functionality effortlessly, without having to learn all the code. I provide a Plugin sample for starting lights on a Raspberry Pi, depending on the CPU Load, and playing a message “The system is healthy” or “Warning. The CPU is at 80%”.
Limitations:
It only works for Linux, not for Mac or for Windows. Although the idea is to help with Server’s Linux Administration and Troubleshot, and Mac and Windows do not have /proc
The list of process of the System is read every 30 seconds, to avoid adding much overhead on the System, other info every second
It does not run in Python 2.x, requires Python 3 (tested on 3.5, 3.6, 3.7, 3.8, 3.9)
I decided to code name the version 0.7 as “Catalan Republic” to support the dreams and hopes and democratic requests of the Catalan people, to become and independent republic.
I created this tool as Open Source and if you want to help I need people to test under different versions of:
Atypical Linux distributions
If you are a Cloud Provider and want me to implement the detection of your VMs, so the tool knows that is a instance of the Amazon, Google, Azure, Cloudsigma, Digital Ocean… contact me through my LinkedIn.
Monitoring an Amazon Instance, take a look at the amount of traffic sent and received
Some of the features I’m working on are parsing the logs checking for errors, kernel panics, processed killed due to lack of memory, iscsi disconnects, nfs errors, checking the logs of mysql and Oracle databases to locate errors
First you have to understand that Python, Java and PHP are worlds completely different.
In Python you’ll probably use Flask, and listen to the port you want, inside Docker Container.
In PHP you’ll use a Frameworks like Laravel, or Symfony, or Catalonia Framework (my Framework) :) and a repo or many (as the idea is that the change in one microservice cannot break another it is recommended to have one git repo per Service) and split the requests with the API Gateway and Filters (so /billing/ goes to the right path in the right Server, is like rewriting URLs). You’ll rely in Software to split your microservices. Usually you’ll use Docker, but you have to add a Web Server and any other tools, as the source code is not packet with a Web Server and other Dependencies like it is in Java Spring Boot.
In Java you’ll use Spring Cloud and Spring Boot, and every Service will be auto-contained in its own JAR file, that includes Apache Tomcat and all other Dependencies and normally running inside a Docker. Tcp/Ip listening port will be set at start via command line, or through environment. You’ll have many git repositories, one per each Service.
Using many repos, one per Service, also allows to deploy only that repository and to have better security, with independent deployment tokens.
It is not unlikely that you’ll use one language for some of your Services and another for other, as well as a Database or another, as each Service is owner of their data.
In any case, you will be using CI/CD and your pipeline will be something like this:
Pull the latest code for the Service from the git repository
Compile the code (if needed)
Run the Unit and Integration Tests
Compile the service to an executable artifact (f.e. Java JAR with Tomcat server and other dependencies)
Generate a Machine image with your JAR deployed (for Java. Look at Spotify Docker Plugin to Docker build from Maven), or with Apache, PHP, other dependencies, and the code. Normally will be a Docker image. This image will be immutable. You will probably use Dockerhub.
Machine image will be started. Platform test are run.
If platform tests pass, the service is promoted to the next environment (for example Dev -> Test -> PreProd -> Prod), the exact same machine is started in the next environment and platform tests are repeated.
Before deploying to Production the new Service, I recommend running special Application Tests / Behavior-driven. By this I mean, to conduct tests that really test the functionality of everything, using a real browser and emulating the acts of a user (for example with BeHat, Cucumber or with JMeter). I recommend this specially because Microservices are end-points, independent of the implementation, but normally they are API that serve to a whole application. In an Application there are several components, often a change in the Front End can break the application. Imagine a change in Javascript Front End, that results in a call a bit different, for example, with an space before a name. Imagine that the Unit Tests for the Service do not test that, and that was not causing a problem in the old version of the Service and so it will crash when the new Service is deployed. Or another example, imagine that our Service for paying with Visa cards generates IDs for the Payment Gateway, and as a result of the new implementation the IDs generated are returned. With the mocked objects everything works, but when we deploy for real is when we are going to use the actual Bank Payment. This is also why is a good idea to have a PreProduction environment, with PreProduction versions of the actual Services we use (all banks or the GDS for flights/hotel reservation like Galileo or Amadeus have a Test, exactly like Production, Gateway)
If you work with Microsoft .NET, you’ll probably use Azure DevOps.
We IT Engineers, CTOs and Architects, serve the Business. We have to develop the most flexible approaches and enabling the business to release as fast as their need.
Take in count that Microservices is a tool, a pattern. We will use it to bring more flexibility and speed developing, resilience of the services, and speed and independence deploying. However this comes at a cost of complexity.
Microservices is more related to giving flexibility to the Business, and developing according to the Business Domains. Normally oriented to suite an API. If you have an API that is consumed by third party you will have things like independence of Services (if one is down the others will still function), gradual degradation, being able to scale the Services that have more load only, being able to deploy a new version of a Service which is independent of the rest of the Services, etc… the complexity in the technical solution comes from all this resilience, and flexibility.
If your Dev Team is up to 10 Developers or you are writing just a CRUD Web Application, a PoC, or you are an Startup with a critical Time to Market you probably you will not want to use Microservices approach. Is like killing flies with laser cannons. You can use typical Web services approach, do everything in one single Https request, have transactions, a single Database, etc…
But if your team is 100 Developer, like a big eCommerce, you’ll have multiple Teams between 5 and 10 Developers per Business Domain, and you need independence of each Service, having less interdependence. Each Service will own their own Data. That is normally around 5 to 7 tables. Each Service will serve a Business Domain. You’ll benefit from having different technologies for the different needs, however be careful to avoid having Teams with different knowledge that can have hardly rotation and difficult to continue projects when the only 2 or 3 Devs that know that technology leave. Typical benefit scenarios can be having MySql for the Billing Services, but having NoSQL Database for the image catalog, or to store logs of account activity. With Microservices, some services will be calling other Services, often asynchronously, using Queues or Streams, you’ll have Callbacks, Databases for reading, you’ll probably want to have gradual and gracefully failure of your applications, client load balancing, caches and read only databases/in-memory databases… This complexity is in order to protect one Service from the failure of others and to bring it the necessary speed under heavy load.
Here you can find a PDF Document of the typical resources I use for Microservice Projects.
As the company I was working for, Sanmina, has decided to move all the Software Development to Colorado, US, and closing the offices in Bishopstown, Cork, Ireland I found myself with the need to get a new laptop. At work I was using two Dell laptops, one very powerful and heavy equipped with an Intel Xeon processor and 32 GB of RAM. The other a lightweight one that I updated to 32 GB of RAM.
I had an accident around 8 months ago, that got my spine damaged, and so I cannot carry much weight.
My personal laptops at home, in Ireland are a 15″ with 16 GB of RAM, too heavy, and an Acer 11,6″ with 8GB of RAM and SSD (I upgraded it), but unfortunately the screen crashed. I still use it through the HDMI port. My main computer is a tower with a Core i7, 64GB of RAM and a Samsung NVMe SSD drive. And few Raspberrys Pi 4 and 3 :)
I was thinking about what ultra-lightweight laptop to buy, but I wanted to buy it in Barcelona, as I wanted a Catalan keyboard (the layout with the broken ç and accents). I tried by Amazon.es but I have problems to have shipped the Catalan keyboard layout laptops to my address in Ireland.
I was trying to find the best laptop for me.
While I was investigating I found out that none of the laptops in the market were convincing me.
The ones in around 1Kg, which was my initial target, were too big, and lack a proper full size HDMI port and Gigabit Ethernet. Honestly, some models get the HDMI or the Ethernet from an USB 3.1, through an adapter, or have mini-HDMI, many lack the Gigabit port, which is very annoying. Also most of the models come with 8GB of RAM only and were impossible to upgrade. I enrolled my best friend in my quest, in the research, and had the same conclusions.
I don’t want to have to carry adapters with me to just plug to a monitor or projector. I don’t even want to carry the power charger. I want a laptop that can work with me for a complete day, a full work session, without needing to recharge.
So while this investigation was going on, I decided to buy a cheap laptop with a good trade off of weight and cost, in order to be able to work on the coffee. I needed it for writing documents in Google Docs, creating microservices architectures, programming in Java and PHP, and writing articles in my blog. I also decided that this would be my only laptop with Windows, as honestly I missed playing Star Craft 2, and my attempts with Wine and Linux did not success.
Not also, for playing games :) , there are tools that are only available for Windows or for Mac Os X and Windows, like: POSTMAN, Kitematic for managing dockers visually, vSphere…
(Please note, as I reviewed the article I realized that POSTMAN is available for Linux too)
Please note: although I use mainly Linux everywhere (Ubuntu, CentOS, and RedHat mainly) and I contribute to Open Source projects, I do have Windows machines.
I created my Start up in 2004, and I still have Windows Servers, physical machines in a Data Center in Barcelona, and I still have VMs and Instances in Public Clouds with Windows Servers. Also I programmed some tools using Visual Studio and Visual Basic .NET, ASP.NET and C#, but when I needed to do this I found more convenient spawn an instance in Amazon or Azure and pay for its use.
When I created my Start up I offered my infrastructure as a way to get funding too, and I offered VMs with VMWare. I found that having my Mail Servers in VMs was much more convenient for Backups, cloning, to scale up, to avoid disruption and for Disaster and Recovery.
I wanted a cheap laptop that will not make feel bad if transporting it in a daily basis gets a hit and breaks, or that if it rains (and this happens more than often in Ireland) and it breaks is not super-hurtful, or even if it gets stolen. Yes, I’m from a big city, like is Barcelona, Catalonia, and thieves are a real problem. I travel, so I want a laptop decent enough that I can take to travel, and for going for a coffee, coding anything, and I feel comfortable enough that if something happens to it is not the end of the world.
Cork is not a big city, so the options were reduced. I found a laptop that meets my needs.
It is equipped with a Intel® Core™ i3-6006U (2 GHz, 3 MB cache, 2 cores) , a 500GB SATA HDD, and 4 GB of DDR4 RAM.
The information on HP webpage is really scarce, but checking other pages I was able to see that the motherboard has 2 memory banks, accepting a max of 16GB of RAM.
I saw that there was an slot, unclear if supporting NVMe SSD drives, but supporting M.2 SSD for sure.
So I bought in Amazon 2x8GB and a M.2 500GB drive.
Since I was 5 years old I’ve been upgrading and assembling by myself all the computers. And this is something that I want to keep doing. It keeps me sharp, knowing the new ports, CPUs, and motherboard architectures, and keeps me in contact with the Hardware. All my life I’ve thought that specializing Software Engineers and Systems Engineers, like if computers were something separate, is a mistake, so I push myself to stay up to date of the news in all the fields.
I removed the spinning 500 GB SATA HDD, cause it’s slow and it consumes a lot of energy. With the M.2 SSD the battery last forever.
The interesting part is how I cloned the drive from the Spinning HDD to the new M.2.
I did:
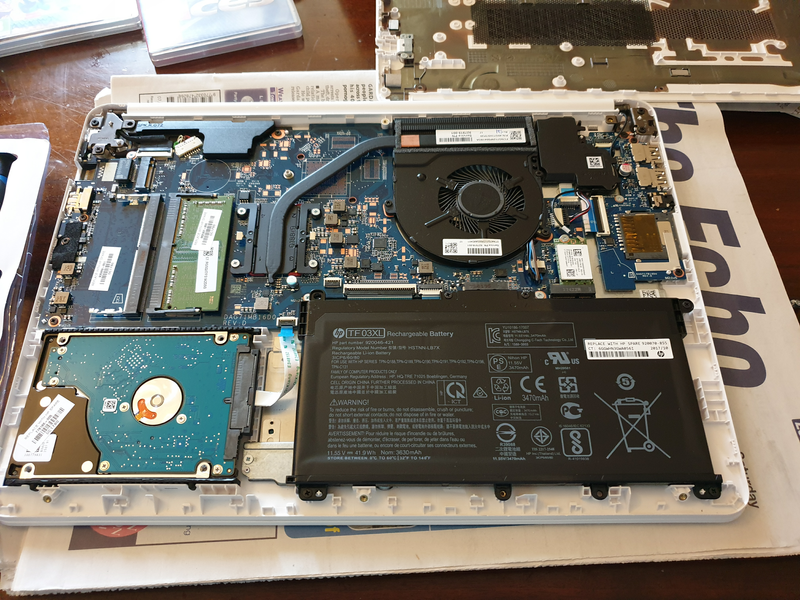
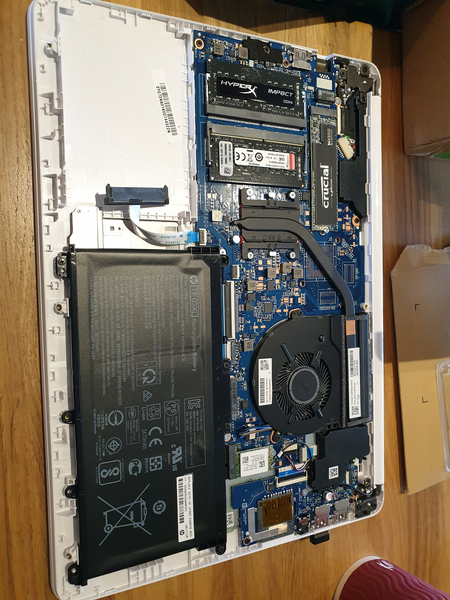
Open the computer (see pics below) and Insert the new drive M.2
Boot with an USB Linux Rescue distribution (to do that I had to enable Legacy Boot on BIOS and boot with the USB)
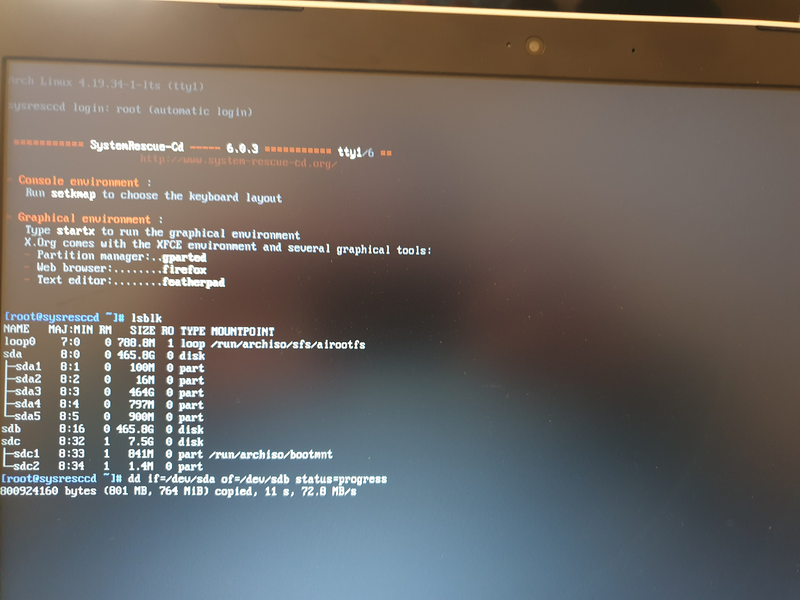
Use lsblk command to identify the HDD drive, it was easy as it was the one with partitions
dd from if=/dev/sda to of=/dev/sdb with status=progress to see live status and speed (around 70MB/s) and estimated time to complete.
Please note that the new drive should be bigger or at least have the same number of bytes to avoid problems with the last partition.
I removed the HDD drive, this reduces the weight of my laptop by 100 grams
Disable Legacy Boot, and boot the computer. Windows started perfectly :)
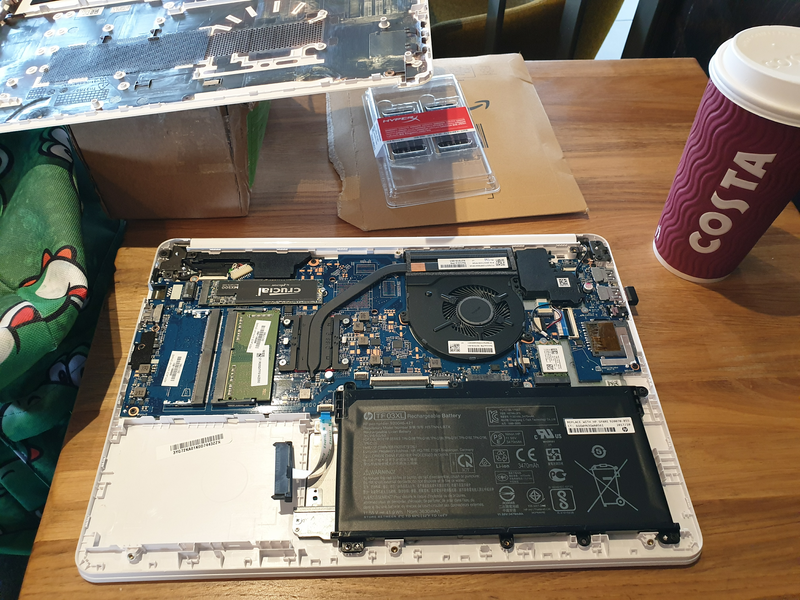
I found so few information about this model, that I wanted to share the pictures with the Community. Here are the pictures of the upgrade process.
Here you can see the Crucial M.2 SSD installed and the Spinning HDD removed. Yes, I did in a coffee :)Final step, installing the 2x8GB RAM memory modules
Few months ago I encountered with a problem with RHEL installer and some of the M.2 drives.
I’ve productized my Product, to be released with M.2 booting SATA drives of 128GB.
The procedure for preparing the Servers (90 and 60 drives, Cold Storage) was based on the installation of RHEL in the M.2 128GB drive. Then the drives are cloned.
Few days before mass delivery the company request to change the booting M.2 drives for others of our own, 512 GB drives.
I’ve tested many different M.2 drives and all of them were slightly different.
Those 512 GB M.2 drives had one problem… Red Hat installer was failing with a python error.
We were running out of time, so I decided to clone directly from the 128GB M.2 working card, with everything installed, to the 512 GB card. Doing that is so easy as booting with a Rescue Linux USB disk, and then doing a dd from the 128GB drive to the 512GB drive.
Booting with a live USB system is important, as Filesystem should not be mounted to prevent corruption when cloning.
Then, the next operation would be booting the 512 GB drive and instructing Linux to claim the additional space.
Here is the procedure for doing it (note, the OS installed in the M.2 was CentOS in this case):
Determine the device that needs to be operated on (this will usually be the boot drive); in this example it is /dev/sdae
Extend the desired LVM partition (lvextend command)
# pvdisplay
  /dev/sdbm: open failed: No medium found
  /dev/sdbn: open failed: No medium found
  /dev/sdbj: open failed: No medium found
  /dev/sdbk: open failed: No medium found
  /dev/sdbl: open failed: No medium found
  --- Physical volume ---
  PV Name               /dev/sdae2
  VG Name               centos_4602c
  PV Size               118.24 GiB / not usable 3.00 MiB
  Allocatable           yes (but full)
  PE Size               4.00 MiB
  Total PE              30269
  Free PE               0
  Allocated PE          30269
  PV UUID               yvHO6t-cYHM-CCCm-2hOO-mJWf-6NUI-zgxzwc
# pvresize /dev/sdae2
  /dev/sdbm: open failed: No medium found
  /dev/sdbn: open failed: No medium found
  /dev/sdbj: open failed: No medium found
  /dev/sdbk: open failed: No medium found
  /dev/sdbl: open failed: No medium found
  Physical volume "/dev/sdae2" changed
  1 physical volume(s) resized or updated / 0 physical volume(s) not resized
# pvdisplay
  /dev/sdbm: open failed: No medium found
  /dev/sdbn: open failed: No medium found
  /dev/sdbj: open failed: No medium found
  /dev/sdbk: open failed: No medium found
  /dev/sdbl: open failed: No medium found
  --- Physical volume ---
  PV Name               /dev/sdae2
  VG Name               centos_4602c
  PV Size               <475.84 GiB / not usable 3.25 MiB
  Allocatable           yes
  PE Size               4.00 MiB
  Total PE              121813
  Free PE               91544
  Allocated PE          30269
  PV UUID               yvHO6t-cYHM-CCCm-2hOO-mJWf-6NUI-zgxzwc
# vgdisplay
  --- Volume group ---
  VG Name               centos_4602c
  System ID
  Format                lvm2
  Metadata Areas        2
  Metadata Sequence No  6
  VG Access             read/write
  VG Status             resizable
  MAX LV                0
  Cur LV                3
  Open LV               3
  Max PV                0
  Cur PV                2
  Act PV                2
  VG Size               <475.93 GiB
  PE Size               4.00 MiB
  Total PE              121838
  Alloc PE / Size       30269 / <118.24 GiB
  Free  PE / Size       91569 / 357.69 GiB
  VG UUID               ORcp2t-ntwQ-CNSX-NeXL-Udd9-htt9-kLfvRc
# lvextend -l +91569 /dev/centos_4602c/root
  Size of logical volume centos_4602c/root changed from 50.00 GiB (12800 extents) to <407.69 GiB (104369 extents).
  Logical volume centos_4602c/root successfully resized.
Extend the xfs file system to use the extended space
The xfs file system for the root partition will need to be extended to use the extra space; this is done using the xfs_grow command as shown below.
My Team in The States report an issue with a Red Hat iSCSI Initiator having issues connecting to a Volume exported by a ZFS Server.
There is an issue on GitLab.
As I always do when I troubleshot a problem, I create a forensics post-mortem document recording everything I do, so later, others can learn how I fix it, or they can learn the steps I did in order to troubleshoot.
Please note: Some Ip addresses have been manually edited.
2019-08-09 10:20:10 Start of the investigation
I log into the Server, with Ip Address: xxx.yyy.16.30. Is an All-Flash-Array Server with RHEL6.10 and DRAID v.08091350.
Htop shows normal/low activity.
I check the addresses in the iSCSI Initiator (client), to make sure it is connecting to the right Server.
[root@Host-164 ~]# ip addr list
1: lo: <LOOPBACK,UP,LOWER_UP> mtu 65536 qdisc noqueue state UNKNOWN qlen 1
    link/loopback 00:00:00:00:00:00 brd 00:00:00:00:00:00
    inet 127.0.0.1/8 scope host lo
    valid_lft forever preferred_lft forever
    inet6 ::1/128 scope host
    valid_lft forever preferred_lft forever
2: eno1: <BROADCAST,MULTICAST,UP,LOWER_UP> mtu 1500 qdisc mq state UP qlen 1000
    link/ether 00:25:90:c5:1e:ea brd ff:ff:ff:ff:ff:ff
    inet xxx.yyy.13.164/16 brd xxx.yyy.255.255 scope global eno1
    valid_lft forever preferred_lft forever
    inet6 fe80::225:90ff:fec5:1eea/64 scope link
    valid_lft forever preferred_lft forever
3: eno2: <NO-CARRIER,BROADCAST,MULTICAST,UP> mtu 1500 qdisc mq state DOWN qlen 1000
    link/ether 00:25:90:c5:1e:eb brd ff:ff:ff:ff:ff:ff
4: enp3s0f0: <BROADCAST,MULTICAST,UP,LOWER_UP> mtu 1500 qdisc mq state UP qlen 1000
    link/ether 24:8a:07:a4:94:9c brd ff:ff:ff:ff:ff:ff
    inet 192.168.100.164/24 brd 192.168.100.255 scope global enp3s0f0
    valid_lft forever preferred_lft forever
    inet6 fe80::268a:7ff:fea4:949c/64 scope link
    valid_lft forever preferred_lft forever
5: enp3s0f1: <BROADCAST,MULTICAST,UP,LOWER_UP> mtu 1500 qdisc mq state UP qlen 1000
    link/ether 24:8a:07:a4:94:9d brd ff:ff:ff:ff:ff:ff
    inet 192.168.200.164/24 brd 192.168.200.255 scope global enp3s0f1
    valid_lft forever preferred_lft forever inet6 fe80::268a:7ff:fea4:949d/64 scope link
    valid_lft forever preferred_lft forever
I see the luns on the host, connecting to the 10Gbps of the Server:
/dev/sdg1 on /mnt/large type ext4 (ro,relatime,seclabel,data=ordered)
Lsblk shows that /dev/sdg is not present:
[root@Host-164 ~]# lsblk
 NAME
 MAJ:MIN RM SIZE RO TYPE MOUNTPOINT
 sda 8:0 0 119.2G 0 disk
 ├─sda1 8:1 0 500M 0 part /boot
 └─sda2 8:2 0 118.8G 0 part
  ├─rhel-swap 253:0 0 11.9G 0 lvm [SWAP]
  └─rhel-root 253:1 0 106.8G 0 lvm /
 sdb 8:16 0 100G 0 disk
 sdc 8:32 0 100G 0 disk
 sdd 8:48 0 100G 0 disk
 sde 8:64 0 100G 0 disk
 sdf 8:80 0 100G 0 disk
And as expected:
[root@Host-164 ~]# ls -al /mnt/large
 ls: reading directory /mnt/large: Input/output error
 total 0
I see that the Volumes appear to not having being partitioned:
[root@Host-164 ~]# fdisk /dev/sdf
 Welcome to fdisk (util-linux 2.23.2).
 Changes will remain in memory only, until you decide to write them.
 Be careful before using the write command.
 Device does not contain a recognized partition table
 Building a new DOS disklabel with disk identifier 0xddf99f40.
 Command (m for help): p
 Disk /dev/sdf: 107.4 GB, 107374182400 bytes, 209715200 sectors
 Units = sectors of 1 * 512 = 512 bytes
 Sector size (logical/physical): 512 bytes / 512 bytes
 I/O size (minimum/optimal): 512 bytes / 512 bytes
 Disk label type: dos
 Disk identifier: 0xddf99f40
 Device Boot
 Start
 End
 Blocks Id System
 Command (m for help): q
I create a partition and format with ext2
[root@Host-164 ~]# mke2fs /dev/sdb1
 mke2fs 1.42.9 (28-Dec-2013)
 Filesystem label=
 OS type: Linux
 Block size=4096 (log=2)
 Fragment size=4096 (log=2)
 Stride=0 blocks, Stripe width=0 blocks
 6553600 inodes, 26214144 blocks
 1310707 blocks (5.00%) reserved for the super user
 First data block=0
 Maximum filesystem blocks=4294967296
 800 block groups
 32768 blocks per group, 32768 fragments per group
 8192 inodes per group
 Superblock backups stored on blocks:
 32768, 98304, 163840, 229376, 294912, 819200, 884736, 1605632, 2654208,
 4096000, 7962624, 11239424, 20480000, 23887872
 Allocating group tables: done
 Writing inode tables: done
 Writing superblocks and filesystem accounting information: done
I mount:
[root@Host-164 ~]# mount /dev/sdb1 /mnt/vol1
I fill the volume from the client, and it works. I check the activity in the Server with iostat and there are more MB/s written to the Server’s drives than actually speed copying in the client.
I completely fill 100GB but speed is slow. We are working on a 10Gbps Network so I expected more speed.
I check the connections to the Server:
[root@obs4602-1810 ~]# netstat | grep -v "unix"
Active Internet connections (w/o servers)
Proto Recv-Q Send-Q Local Address               Foreign Address             State
tcp        0      0 192.168.10.10:iscsi-target  192.168.10.180:55300        ESTABLISHED
tcp        0      0 192.168.10.10:iscsi-target  192.168.10.180:55298        ESTABLISHED
tcp        0      0 xxx.yyy.18.10:ssh            xxx.yyy.12.154:57137         ESTABLISHED
tcp        0      0 192.168.10.10:iscsi-target  192.168.10.180:55304        ESTABLISHED
tcp        0      0 192.168.10.10:iscsi-target  192.168.10.180:55301        ESTABLISHED
tcp        0      0 192.168.10.10:iscsi-target  192.168.10.180:55306        ESTABLISHED
tcp        0      0 xxx.yyy.18.10:ssh            xxx.yyy.12.154:56395         ESTABLISHED
tcp        0      0 xxx.yyy.18.10:ssh            xxx.yyy.14.52:57330          ESTABLISHED
tcp        0      0 192.168.10.10:iscsi-target  192.168.10.180:55296        ESTABLISHED
tcp        0      0 192.168.10.10:iscsi-target  192.168.10.180:55305        ESTABLISHED
tcp        0      0 xxx.yyy.18.10:ssh            xxx.yyy.12.154:57133         ESTABLISHED
tcp        0      0 192.168.10.10:iscsi-target  192.168.10.180:55303        ESTABLISHED
tcp        0      0 192.168.10.10:iscsi-target  192.168.10.180:55299        ESTABLISHED
tcp        0      0 192.168.10.10:iscsi-target  192.168.10.176:57542        ESTABLISHED
tcp        0      0 192.168.10.10:iscsi-target  192.168.10.180:55302        ESTABLISHED
I see many connections from Host 180, I check that and another member of the Team is using that client to test with vdbench against the Server.
This explains the slower speed I was getting.
Conclusions
There was a local problem on the Host. The problems with the disconnection seem to be related to a connection that was lost (sdg). All that information was written to iSCSI buffer, not to the Server. In fact, that volume was mapped in the system with another letter, sdg was not in use.
Speed was slow due to another client pushing Data to the Server too
Windows clients with auto reconnect option are not reporting timeout reports while in Red Hat clients iSCSI connection timeouts. It should be increased
2020-03-10 22:16 IST TIP: At that time we were using Google suite and Skype to communicate internally with the different members across the world. If we had used a tool like Slack, and we had a channel like #engineering for example or #sanjoselab, then I could have paged and asked “Is somebody using obs4602-1810?“
1- Make sure the zfs file exists under zfs/contrib/initramfs/scripts/local-top/
if not exists, create a file called zfs under zfs/contrib/initramfs/scripts/local-top/ and add the following to that file:
#!/bin/sh PREREQ=”mdadm mdrun multipath”
prereqs() { echo “$PREREQ” }
case $1 in # get pre-requisites prereqs) prereqs exit 0 ;; esac
# # Helper functions # message() { if [ -x /bin/plymouth ] && plymouth –ping; then plymouth message –text=”$@” else echo “$@” >&2 fi return 0 }
udev_settle() { # Wait for udev to be ready, see https://launchpad.net/bugs/85640 if [ -x /sbin/udevadm ]; then /sbin/udevadm settle –timeout=30 elif [ -x /sbin/udevsettle ]; then /sbin/udevsettle –timeout=30 fi return 0 }
activate_vg() { # Sanity checks if [ ! -x /sbin/lvm ]; then [ “$quiet” != “y” ] && message “lvm is not available” return 1 fi
# Detect and activate available volume groups /sbin/lvm vgscan /sbin/lvm vgchange -a y –sysinit return $? }
So this basically will get all the methods (“def ” whatever), strip the parenthesis with tr, and get the second column with awk, so basically the method name, sort it and write it to the file.
Then I will cd to the src directory and execute the seconds part:
cd /home/carles/code/gitlab/cloud/terraform/src/
for fname in $(cat ~/function_names_iscsi.txt); do printf "%s: %s\n" "$fname" "$(grep -r $fname *|grep -v 'def ' -c)"; done > ~/functions_being_used.txt
That will produce a nice list with the number of times of the method being called, in the form of:
method_name: occurrences
That’s the equivalent to doing Find Usages is PyCharm.
It’s easy to identify dead code then, with method_name: 0.
You can also run this to your Jenkins to warn when there is Dead Code in your repository.
Update: 2021-07-23 Ubuntu 19.04 is no longer available, so I updated the article in order to work with Ubuntu 20.04. and with PHP 7.4 and all their dependencies.
This was interesting under the point of view of dealing with elastic Ip’s, Amazon AWS Volumes, etc… but was a process basically manual. I could have generated an immutable image to start from next time, but this is another discussion, specially because that Server Instance has different base Software, including a MySql Database.
This time I want to explain, step by step, how to containerize my Server, so I can port to different platforms, and I can be independent on what the Server Operating System is. It will work always, as we defined the Operating System for the Docker Container.
So we start to use IaC (Infrastructure as Code).
So first you need to install docker.
So basically if your laptop is an Ubuntu 18.04 LTS or 20.04 LTS you have to:
sudo apt install docker.io
Start and Automate Docker
The Docker service needs to be setup to run at startup. To do so, type in each command followed by enter:
sudo systemctl start docker
sudo systemctl enable docker
Create the Dockerfile
For doing this you can use any text editor, but as we are working with IaC why not use a Code Editor?.
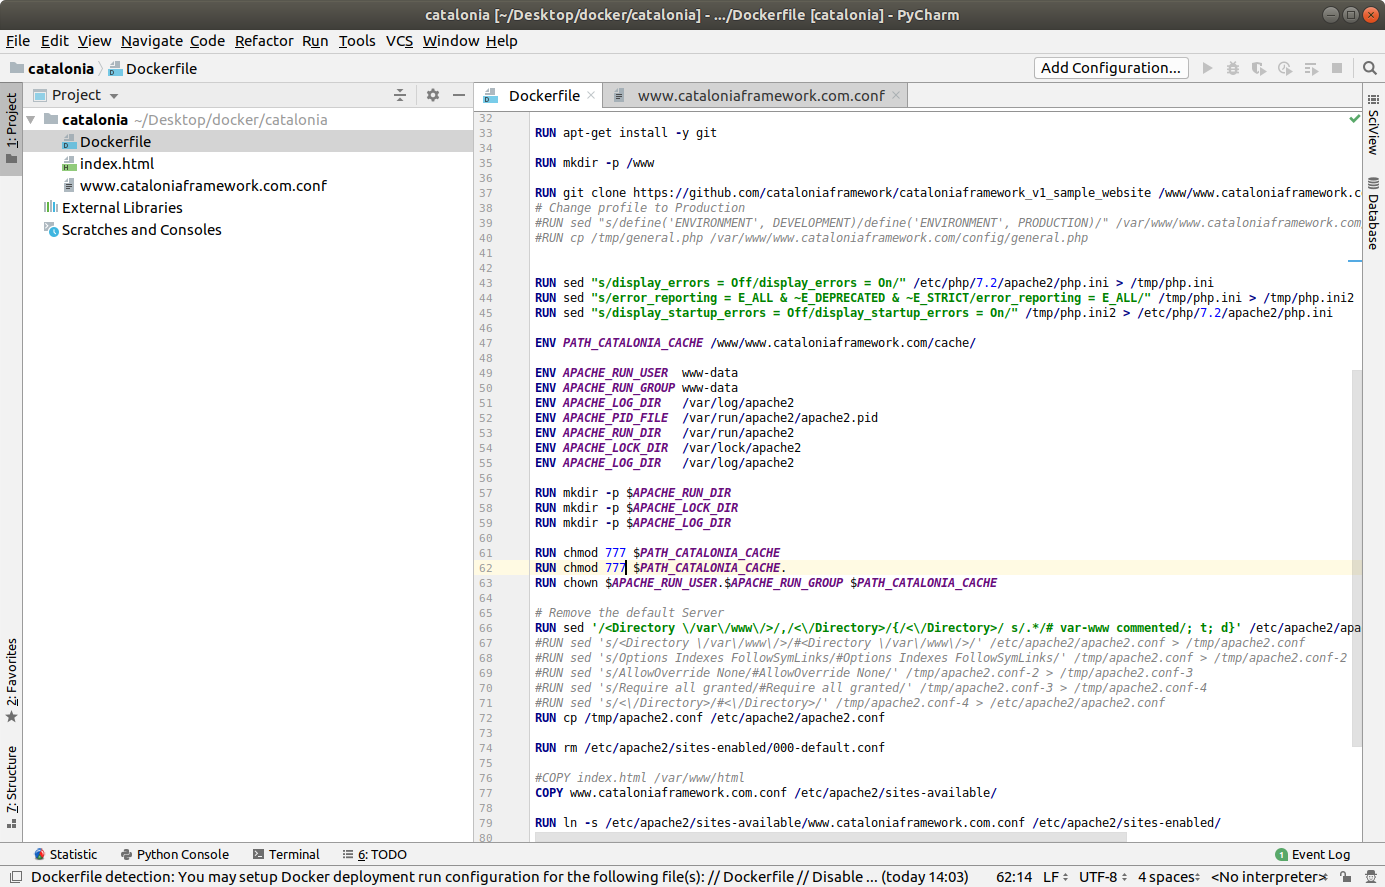
You can use the versatile PyCharm, that has modules for understanding Docker and so you can use Control Version like git too.
This is the updated Dockerfile to work with Ubuntu 20.04 LTS
FROM ubuntu:20.04

MAINTAINER Carles <carles@carlesmateo.com>

ARG DEBIAN_FRONTEND=noninteractive

#RUN echo "nameserver 8.8.8.8" > /etc/resolv.conf

RUN echo "Europe/Ireland" | tee /etc/timezone

# Note: You should install everything in a single line concatenated with
#       && and finalizing with
# apt autoremove && apt clean

#       In order to use the less space possible, as every command is a layer
RUN apt update && apt install -y apache2 ntpdate libapache2-mod-php7.4 mysql-server php7.4-mysql php-dev libmcrypt-dev php-pear git && apt autoremove && apt clean

RUN a2enmod rewrite

RUN mkdir -p /www

# In order to activate Debug
# RUN sed -i "s/display_errors = Off/display_errors = On/" /etc/php/7.2/apache2/php.ini
# RUN sed -i "s/error_reporting = E_ALL & ~E_DEPRECATED & ~E_STRICT/error_reporting = E_ALL/" /etc/php/7.2/apache2/php.ini
# RUN sed -i "s/display_startup_errors = Off/display_startup_errors = On/" /etc/php/7.2/apache2/php.ini
# To Debug remember to change:
# config/{production.php|preproduction.php|devel.php|docker.php}
# in order to avoid Error Reporting being set to 0.

ENV PATH_CATALONIA /www/www.cataloniaframework.com/
ENV PATH_CATALONIA_WWW /www/www.cataloniaframework.com/www/
ENV PATH_CATALONIA_CACHE /www/www.cataloniaframework.com/cache/

ENV APACHE_RUN_USER  www-data
ENV APACHE_RUN_GROUP www-data
ENV APACHE_LOG_DIR   /var/log/apache2
ENV APACHE_PID_FILE  /var/run/apache2/apache2.pid
ENV APACHE_RUN_DIR   /var/run/apache2
ENV APACHE_LOCK_DIR  /var/lock/apache2
ENV APACHE_LOG_DIR   /var/log/apache2

RUN mkdir -p $APACHE_RUN_DIR
RUN mkdir -p $APACHE_LOCK_DIR
RUN mkdir -p $APACHE_LOG_DIR
RUN mkdir -p $PATH_CATALONIA
RUN mkdir -p $PATH_CATALONIA_WWW
RUN mkdir -p $PATH_CATALONIA_CACHE

# Remove the default Server
RUN sed -i '/<Directory \/var\/www\/>/,/<\/Directory>/{/<\/Directory>/ s/.*/# var-www commented/; t; d}' /etc/apache2/apache2.conf

RUN rm /etc/apache2/sites-enabled/000-default.conf

COPY www.cataloniaframework.com.conf /etc/apache2/sites-available/

RUN chmod 777 $PATH_CATALONIA_CACHE
RUN chmod 777 $PATH_CATALONIA_CACHE.
RUN chown --recursive $APACHE_RUN_USER.$APACHE_RUN_GROUP $PATH_CATALONIA_CACHE

RUN ln -s /etc/apache2/sites-available/www.cataloniaframework.com.conf /etc/apache2/sites-enabled/

# Note: You should clone locally and COPY to the Docker Image
#       Also you should add the .git directory to your .dockerignore file
#       I made this way to show you and for simplicity, having everything
#       in a single file
##RUN git clone https://github.com/cataloniaframework/cataloniaframework_v1_sample_website /www/www.cataloniaframework.com
##RUN git checkout tags/v.1.16-web-1.0
# In order to change profile to Production
# RUN sed -i "s/define('ENVIRONMENT', DOCKER)/define('ENVIRONMENT', PRODUCTION)/" /var/www/www.cataloniaframework.com/config/general.php
COPY *.php /www/www.cataloniaframework.com/www

# for debugging
#RUN apt-get install -y vim

RUN service apache2 restart

EXPOSE 80

CMD ["/usr/sbin/apache2", "-D", "FOREGROUND"]
This will copy the file www.cataloniaframework.com.conf that must be in the same directory that the Dockerfile file, to the /etc/apache2/sites-available/ folder in the container.
<VirtualHost *:80>
ServerAdmin webmaster@cataloniaframework.com# Uncomment to use a DNS name in a multiple VirtualHost Environment #ServerName www.cataloniaframework.com #ServerAlias cataloniaframework.com DocumentRoot /www/www.cataloniaframework.com/www
<Directory /www/www.cataloniaframework.com/www/>
Options -Indexes +FollowSymLinks +MultiViews AllowOverride All Order allow,deny allow from all Require all granted
</Directory>
ErrorLog ${APACHE_LOG_DIR}/www-cataloniaframework-com-error.log # Possible values include: debug, info, notice, warn, error, crit, # alert, emerg. LogLevel warn CustomLog ${APACHE_LOG_DIR}/www-cataloniaframework-com-access.log combined
</VirtualHost>
Stopping, starting the docker Service and creating the Catalonia image
service docker stop && service docker start
To build the Docker Image we will do:
docker build -t catalonia . --no-cache
I use the –no-cache so git is pulled and everything is reworked, not kept from cache.
Now we can run the Catalonia Docker, mapping the 80 port.
docker run -d -p 80:80 catalonia
If you want to check what’s going on inside the Docker, you’ll do:
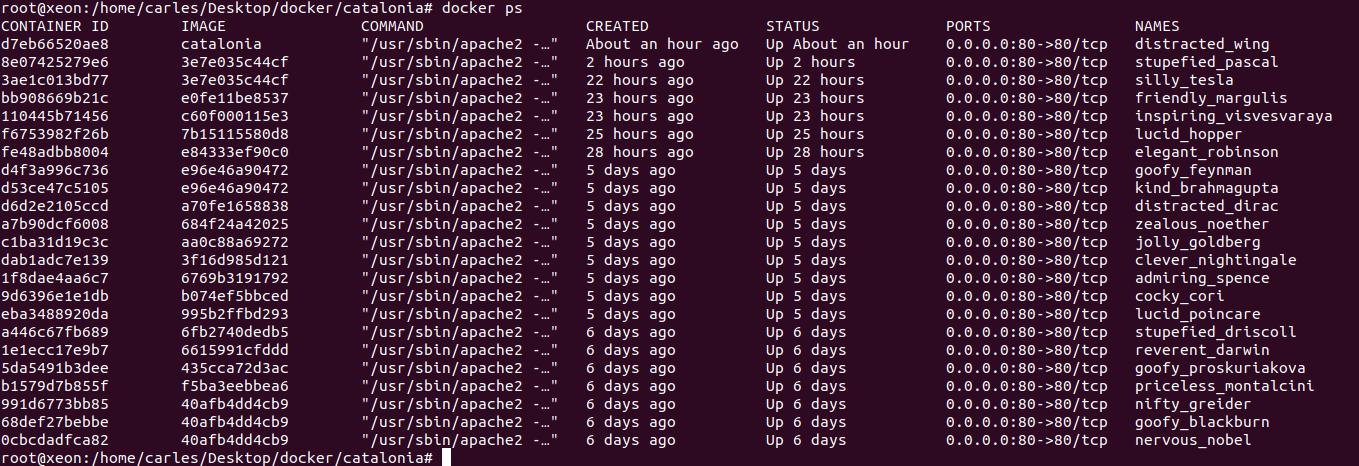
docker ps
And so in this case, we will do:
docker exec -i -t distracted_wing /bin/bash
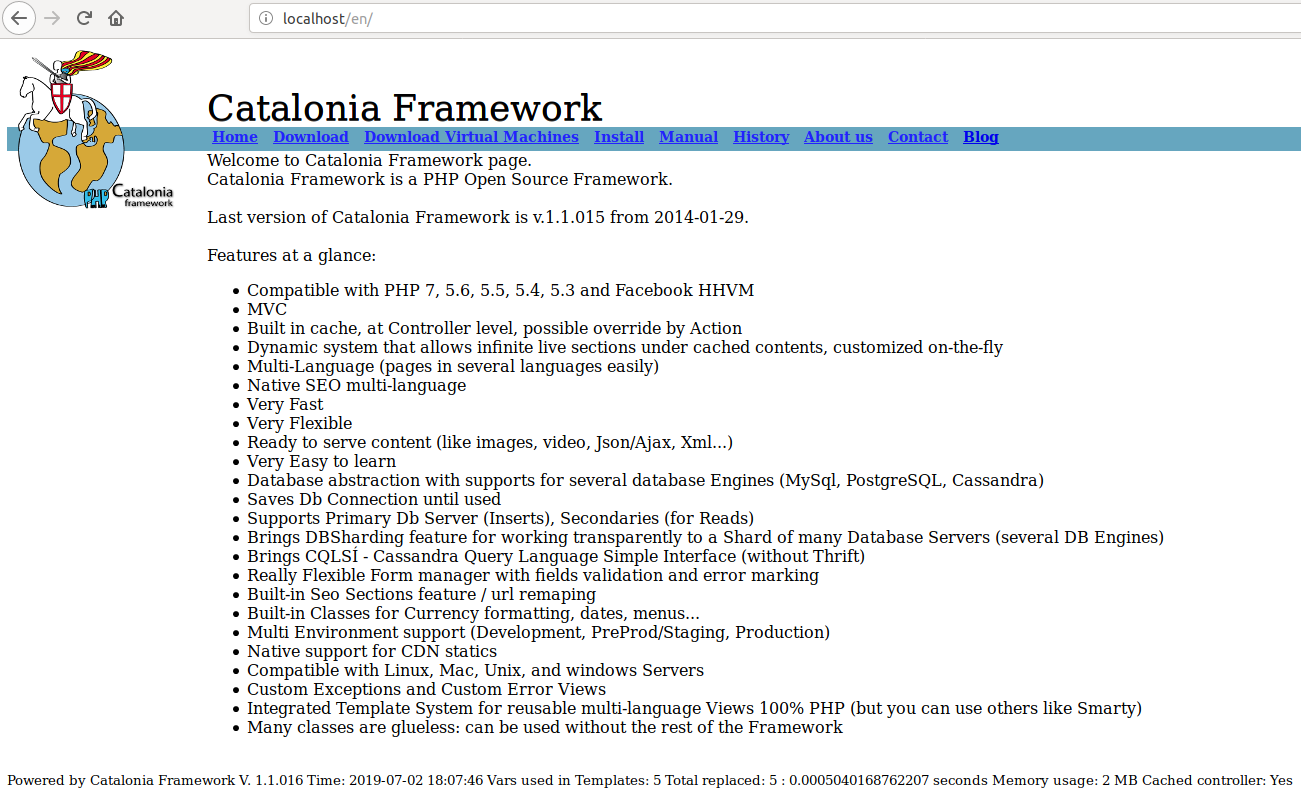
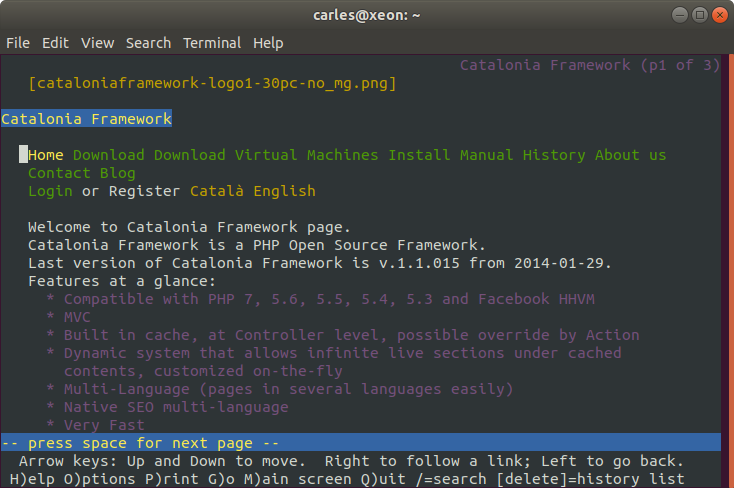
Finally I would like to check that the web page works, and I’ll use my preferred browser. In this case I will use lynx, the text browser, cause I don’t want Firefox to save things in the cache.
I came with this solution when one of my 4U60 Servers had two slots broken. You’ll not use this in Production, as SLOG loses its function, but I managed to use one $40K USD broken Server and to demonstrate that the Speed of the SLOG device (ZFS Intented Log or ZIL device) sets the constraints for the writing speed.
The ZFS DRAID config I was using required 60 drives, basically 58 14TB Spinning drives and 2 SSD for the SLOG ZIL. As I only had 58 slots I came with this idea.
This trick can be very useful if you have a box full of Spinning drives, and when sharing by iSCSI zvols you get disconnected in the iSCSI Initiator side. This is typical when ZFS has only Spinning drives and it has no SLOG drives (dedicated fast devices for the ZIL, ZFS INTENDED LOG)
Create a single Ramdrive of 10GB of RAM:
modprobe brd rd_nr=1 rd_size=10485760 max_part=0
Confirm ram0 device exists now:
ls /dev/ram*
Confirm that the pool is imported:
zpool list
Add to the pool:
zpool add carles-N58-C3-D16-P2-S4 log ram0
In the case that you want to have two ram devices as SLOG devices, in mirror.
It is interesting to know that you can work with partitions instead of drives. So for this test we could have partitioned ram0 with 2 partitions and make it work in mirror. You’ll see how much faster the iSCSI communication goes over the network. The writing speed of the ZIL SLOG device is the constrain for ingesting Data from the Network to the Server.
Creating a partition bigger than 2TiB
Master Boot Record (MBR) based partitioning is limited to 2TiB however GUID Partition Table (GPT) has a limit of 8 ZiB.
That’s something very simply, but make you lose time if you’re partitioning big iSCSI Shares, or ZFS Zvols, so here is the trick:
[root@CTRLA-18 ~]# cat /etc/redhat-release
 Red Hat Enterprise Linux Server release 7.6 (Maipo)
 [root@CTRLA-18 ~]# parted /dev/zvol/N58-C19-D2-P1-S1/vol54854gb
 GNU Parted 3.1
 Using /dev/zd0
 Welcome to GNU Parted! Type 'help' to view a list of commands.
 (parted) mklabel gpt
 Warning: The existing disk label on /dev/zd0 will be destroyed and all data on this disk will be lost. Do you want to continue?
 Yes/No? y
 (parted) print
 Model: Unknown (unknown)
 Disk /dev/zd0: 58.9TB
 Sector size (logical/physical): 512B/65536B
 Partition Table: gpt
 Disk Flags:
 Number  Start  End  Size  File system  Name  Flags
 (parted) mkpart primary 0GB 58.9TB
 (parted) print
 Model: Unknown (unknown)
 Disk /dev/zd0: 58.9TB
 Sector size (logical/physical): 512B/65536B
 Partition Table: gpt
 Disk Flags:
 Number  Start   End     Size    File system  Name     Flags
  1      1049kB  58.9TB  58.9TB               primary
 (parted) quit
 Information: You may need to update /etc/fstab.
 [root@CTRLA-18 ~]# mkfs
 mkfs         mkfs.btrfs   mkfs.cramfs  mkfs.ext2    mkfs.ext3    mkfs.ext4    mkfs.minix   mkfs.xfs
 [root@CTRLA-18 ~]# mkfs.ext4 /dev/zvol/N58-C19-D2-P1-S1/vol54854gb
 mke2fs 1.42.9 (28-Dec-2013)
....
[root@CTRLA-18 ~]# mount /dev/zvol/N58-C19-D2-P1-S1/vol54854gb /Data
[root@CTRLA-18 ~]# df -h
 Filesystem             Size  Used Avail Use% Mounted on
 /dev/mapper/rhel-root   50G  2.5G   48G   5% /
 devtmpfs               126G     0  126G   0% /dev
 tmpfs                  126G     0  126G   0% /dev/shm
 tmpfs                  126G  1.1G  125G   1% /run
 tmpfs                  126G     0  126G   0% /sys/fs/cgroup
 /dev/sdp1             1014M  151M  864M  15% /boot
 /dev/mapper/rhel-home   65G   33M   65G   1% /home
 logs                    49G  349M   48G   1% /logs
 mysql                  9.7G  128K  9.7G   1% /mysql
 tmpfs                   26G     0   26G   0% /run/user/0
 /dev/zd0                54T   20K   51T   1% /Data
ZFS is unable to use a disk
Some times, after creating many pools ZFS may be unable to create a new pool using a drive that is perfectly fine. In this situation, the ideal is wipe the first areas of it, or all of it if you want. If it’s an SSD that is very fast:
dd if=/dev/zero of=/dev/sdc bs=1M status=progress
The status=progress will show a nice progress bar.
Filling a half Petabyte pool as fast as possible
To fill a 60 drives pool composed by 10TB or 14TB spinning drives, so more than half PB, in order to test with real data, you can use this trick:
First, write to the Dataset directly, that’s way much more faster than using zvols.
Secondly, disable the ZIL, set sync=disabled.
Third, use a file in memory to avoid the paytime of reading the file from disk.
Fourth, increase the recordsize to 1M for faster filling (in my experience).
You can use this script of mine that does everything for you, normally you would like to run it inside an screen session, and create a Dataset called Data. The script will mount it in /Data (zfs set mountpoint=/data YOURPOOL/Data):
#!/usr/bin/env bash
# Created by Carles Mateo
FILE_ORIGINAL="/run/urandom.1GB"
FILE_PATTERN="/Data/urandom.1GB-clone."
# POOL="N56-C5-D8-P3-S1"
POOL="N58-C3-D16-P3-S1"
# The starting number, if you interrupt the filling process, you can update it just by updating this number to match the last partially written file
i_COPYING_INITIAL_NUMBER=1
# For 75% of 10TB (3x(16+3)+1 has 421TiB, so 75% of 421TiB or 431,104GiB is 323,328) use 323328
# i_COPYING_FINAL_NUMBER=323328
# For 75% of 10TB, 5x(8+3)+1 ZFS sees 352TiB, so 75% use 270336
# For 75% of 14TB, 3x(16+3)+1, use 453120
i_COPYING_FINAL_NUMBER=453120

# Creating an array that will hold the speed of the latest 1 minute
a_i_LATEST_SPEEDS=(0 0 0 0 0 0 0 0 0 0 0 0 0 0 0 0 0 0 0 0 0 0 0 0 0 0 0 0 0 0 0 0 0 0 0 0 0 0 0 0 0 0 0 0 0 0 0 0 0 0 0)
i_POINTER_SPEEDS=0
i_COUNTER_SPEEDS=-1
i_ITEMS_KEPT_SPEEDS=60
i_AVG_SPEED=0
i_FILES_TO_BE_COPIED=$((i_COPYING_FINAL_NUMBER-i_COPYING_INITIAL_NUMBER))

get_average_speed () {
# Calculates the Average Speed
   i_AVG_SPEED=0
   for i_index in {0..59..1}
       do
           i_SPEED=$((a_i_LATEST_SPEEDS[i_index]))
           i_AVG_SPEED=$((i_AVG_SPEED + i_SPEED))
       done
   i_AVG_SPEED=$((i_AVG_SPEED/((i_COUNTER_SPEEDS)+1)))
}


echo "Bash version ${BASH_VERSION}..."

echo "Disabling sync in the pool $POOL for faster speed"
zfs set sync=disabled $POOL
echo "Maximizing performance with recordsize"
zfs set recordsize=1M ${POOL}
zfs set recordsize=1M ${POOL}/Data
echo "Mounting the Dataset Data"
zfs set mountpoint=/Data ${POOL}/Data
zfs mount ${POOL}/Data

echo "Checking if file ${FILE_ORIGINAL} exists..."
if [[ -f ${FILE_ORIGINAL} ]]; then
    ls -al ${FILE_ORIGINAL}
    sha1sum ${FILE_ORIGINAL}
else
    echo "Generating file..."
    dd if=/dev/urandom of=${FILE_ORIGINAL} bs=1M count=1024 status=progress
fi

echo "Starting filling process..."
echo "We are going to copy ${i_FILES_TO_BE_COPIED} , starting from: ${i_COPYING_INITIAL_NUMBER} to: ${i_COPYING_FINAL_NUMBER}"

for ((i_NUMBER=${i_COPYING_INITIAL_NUMBER}; i_NUMBER<=${i_COPYING_FINAL_NUMBER}; i_NUMBER++));
    do
        s_datetime_ini=$(($(date +%s%N)/1000000))
        DATE_NOW=`date '+%Y-%m-%d_%H-%M-%S'`
        echo "${DATE_NOW} Copying ${FILE_ORIGINAL} to ${FILE_PATTERN}${i_NUMBER}"
        cp ${FILE_ORIGINAL} ${FILE_PATTERN}${i_NUMBER}
        s_datetime_end=$(($(date +%s%N)/1000000))
        MILLISECONDS=$(expr "$s_datetime_end" - "$s_datetime_ini")
        if [[ ${MILLISECONDS} -lt 1 ]]; then
            BANDWIDTH_MBS="Unknown (too fast)"
            # That sould not happen, but if did, we don't account crazy speeds
        else
            BANDWIDTH_MBS=$((1000*1024/MILLISECONDS))
            # Make sure the Array space has been allocated
            if [[ ${i_POINTER_SPEEDS} -gt ${i_COUNTER_SPEEDS} ]]; then
                # Add item to the Array the first times only
                a_i_LATEST_SPEEDS[i_POINTER_SPEEDS]=${BANDWIDTH_MBS}
                i_COUNTER_SPEEDS=$((i_COUNTER_SPEEDS+1))
            else
                a_i_LATEST_SPEEDS[i_POINTER_SPEEDS]=${BANDWIDTH_MBS}
            fi
            i_POINTER_SPEEDS=$((i_POINTER_SPEEDS+1))
            if [[ ${i_POINTER_SPEEDS} -ge ${i_ITEMS_KEPT_SPEEDS} ]]; then
                i_POINTER_SPEEDS=0
            fi
            get_average_speed
        fi
        i_FILES_TO_BE_COPIED=$((i_FILES_TO_BE_COPIED-1))
        i_REMAINING_TIME=$((1024*i_FILES_TO_BE_COPIED/i_AVG_SPEED))
        i_REMAINING_HOURS=$((i_REMAINING_TIME/3600))
        echo "File cloned in ${MILLISECONDS} milliseconds at ${BANDWIDTH_MBS} MB/s"
        echo "Avg. Speed: ${i_AVG_SPEED} MB/s Remaining Files: ${i_FILES_TO_BE_COPIED} Remaining seconds: ${i_REMAINING_TIME} s. (${i_REMAINING_HOURS} h.)"
    done

echo "Enabling sync=always"
zfs set sync=always ${POOL}
echo "Setting back recordsize to 128K"
zfs set recordsize=128K ${POOL}
zfs set recordsize=128K ${POOL}/Data
echo "Unmounting /Data"
zfs set mountpoint=none ${POOL}/Data
Creating a Sparse file that you can partition or create a loopback on it
I know, your laptop has 512GB of M.2 SSD or NVMe, so that’s it.
Well, you can create a sparse file much more bigger than your capacity, and use 0 bytes of it at all.
For example:
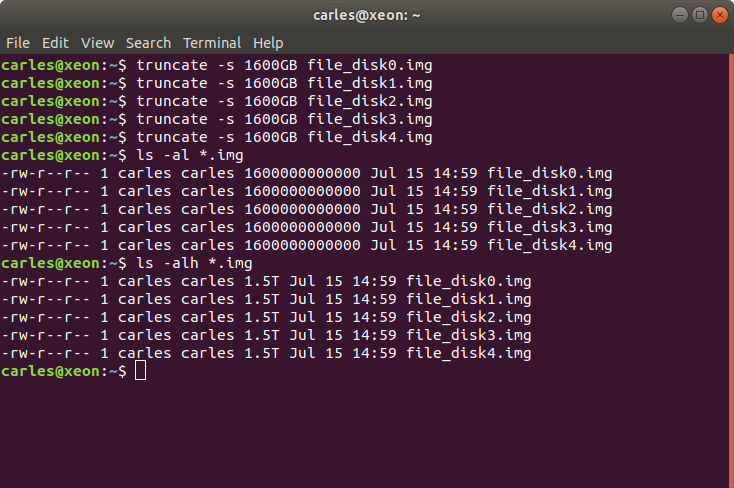
truncate -s 1600GB file_disk0.img
If the files are stored in / then you can add a loop device:
sudo losetup -f /file_disk0.img
I do with the 5 I created.
Then you can check that they exist with:
lsblk
or
cat /proc/partitions
The loop devices will appear under /dev/ now.
For some tests I did this in a Virtual Box Virtual Machine: