Category Archives: Software development

How to block scanners that look for vulnerabilities to your Ubuntu Apache site

There are many robots scanning sites for vulnerabilities, to gain control or exploit the servers. Most of them come from China and Russia ip’s.

Here I explain an easy way to block them using the Ubuntu Firewall ufw.

If you use a CMS like WordPress and you know there are extensions that have had security exploits, for example, wp-file-manager then you can search directly for this request in Apache Access Logs.

For example:

cat /var/log/apache2/blog_carlesmateo_com-access.log | grep "wp-file-manager" | awk '{ print $1; }' | sort -u >> 2020-10-03-offending-ips.txt

cat /var/log/apache2/blog_carlesmateo_com-access.log.1 | grep "wp-file-manager" | awk '{ print $1; }' | sort -u >> 2020-10-03-offending-ips.txt

zcat /var/log/apache2/blog_carlesmateo_com-access.log.2.gz | grep "wp-file-manager" | awk '{ print $1; }' | sort -u >> 2020-10-03-offending-ips.txt

In the example we look for the access.log file, for the rotated access.log.1 and for the rotated and compressed access.log.2.gz. We use the tool zcat which does a cat over a compressed file.

If we don’t expect to have anybody posting to our xmlrpc Service, we can check for the offending Ip’s by doing:

cat /var/log/apache2/blog_carlesmateo_com-access.log | grep "POST /xmlrpc.php" | wc --lines
2490

In my case I have 2490 request just in the last log.

cat /var/log/apache2/blog_carlesmateo_com-access.log | grep "POST /xmlrpc.php" |awk '{ print $1; }' | sort -u | wc --lines

Interested in how many Ip’s are launching those requests, you can see how many different Ip’s are those:

cat /var/log/apache2/blog_carlesmateo_com-access.log | grep "POST /xmlrpc.php" |awk '{ print $1; }' | sort -u | wc --lines
145

And to add those Ip’s to the offending Ip’s list:

cat /var/log/apache2/blog_carlesmateo_com-access.log | grep "POST /xmlrpc.php" | awk '{ print $1; }' | sort -u >> 2020-10-03-offending-ips.txt

I can also check for repeated requests in the logs:

cat /var/log/apache2/blog_carlesmateo_com-access.log | awk '{ print $7; }' | sort | uniq -c | sort -r | less

That shows me some requests legit and others that are not:

   2532 /xmlrpc.php
    209 /wp-login.php
    205 /wp-admin/admin-ajax.php
     84 /
     83 *
     48 /robots.txt
     21 /favicon.ico
     16 /wp-login.php?redirect_to=https%3A%2F%2Fblog.carlesmateo.com%2Fwp-admin%2F&reauth=1
     15 /wp-includes/js/jquery/jquery.js?ver=1.12.4-wp
     14 /wp-includes/css/dist/block-library/theme.min.css?ver=5.5.1
     14 /wp-includes/css/dist/block-library/style.min.css?ver=5.5.1
     14 /wp-content/themes/2012-carles/style.css?ver=5.5.1
     14 /wp-content/plugins/contact-form-7/includes/js/scripts.js?ver=5.2.2
     14 /wp-content/plugins/captcha/css/front_end_style.css?ver=4.4.5
     13 /wp-includes/css/dashicons.min.css?ver=5.5.1
     13 /wp-content/themes/2012-carles/css/blocks.css?ver=20181230
     13 /wp-content/plugins/contact-form-7/includes/css/styles.css?ver=5.2.2
     12 /wp-includes/js/wp-embed.min.js?ver=5.5.1
     12 /wp-includes/images/w-logo-blue-white-bg.png
     12 /wp-content/themes/2012-carles/js/navigation.js?ver=20140711
     11 /wp-includes/js/wp-emoji-release.min.js?ver=5.5.1
     11 /wp-content/plugins/captcha/css/desktop_style.css?ver=4.4.5
     11 /feed/
     11 /contact/
     10 /wp-comments-post.php
     10 /?author=1
      9 /2016/06/30/creating-a-content-filter-for-postfix-in-php/
      9 /2014/10/13/performance-of-several-languages/
      8 /wp-includes/js/comment-reply.min.js?ver=5.5.1
      8 /wp-content/plugins/captcha/js/front_end_script.js?ver=5.5.1
      8 /e/admin/index.php
      8 /e/admin/
      7 /wp-login.php?action=register
      7 /current-projects/
      7 //xmlrpc.php
      6 /.env
      5 /2019/08/12/a-sample-forensic-post-mortem-for-a-iscsi-initiator-client-that-had-connectivity-problems-to-the-server/
      5 /2017/03/26/csort-multithread-versus-quicksort-java/
      4 /wp-json/wp/v2/types/wp_block?_locale=user
      4 /wp-json/wp/v2/blocks?per_page=100&_locale=user
      4 /wp-admin/
      4 /diguo/index.php
      4 /diguo/
      4 /category/web-development/
      4 /category/news-for-the-blog/
      3 /vendor/phpunit/phpunit/src/Util/PHP/eval-stdin.php
      3 /mt-notation-for-python/
      3 /ebk/index.php
      3 /ebk/
      3 /comments/feed/
      3 /bf/index.php
      3 /bf/
      3 /beifen/index.php
      3 /beifen/
      3 /Ebak/index.php
      3 /Ebak/
      3 /Bak/index.php
      3 /Bak/
      3 /2020/09/21/how-to-recover-access-to-your-amazon-aws-ec2-instance-if-you-loss-your-private-key-for-ssh/
      3 /2020/08/23/adding-a-ramdisk-as-slog-zil-to-zfs/
      3 /2019/07/03/adding-my-server-as-docker-with-php-catalonia-framework-explained/
      3 /2019/06/25/some-handy-tricks-for-working-with-zfs/
      3 /2015/02/01/stopping-definitively-the-massive-distributed-dos-attack/
      2 /ycadmin/login.php?gotopage=%2Fycadmin%2Findex.php
      2 /ueditor/net/controller.ashx
      2 /sql_beifen/index.php
      2 /sql_beifen/
      2 /sql/index.php
      2 /sql/
      2 /dgbf/index.php
      2 /dgbf/
      2 //xmlrpc.php?rsd
      2 //.env
      1 /wp-login.php?registration=disabled
      1 /wp-login.php?action=lostpassword
      1 /wp-json/wp/v2/users/me?_locale=user
      1 /wp-json/wp/v2/users/?who=authors&per_page=100&_locale=user
      1 /wp-json/wp/v2/taxonomies/post_tag?context=edit&_locale=user
      1 /wp-json/wp/v2/taxonomies/category?context=edit&_locale=user
      1 /wp-json/wp/v2/tags?per_page=100&orderby=count&order=desc&_fields=id%2Cname&search=ufw&_locale=user

You can identify manually what are attacks, and what are legit requests.

After you have your definitive list of offending Ip’s (and make sure you didn’t introduce yours accidentally), then you can execute the second part of the script:

echo '#!/bin/bash' > add_ufw_rules.sh

i_COUNTER_RULE=0; for s_OFFENDING_IP in $(cat 2020-10-03-offending-ips.txt); do i_COUNTER_RULE=$((i_COUNTER_RULE+1)); echo "ufw insert $i_COUNTER_RULE deny from $s_OFFENDING_IP to any" >> add_ufw_rules.sh; done

echo "ufw status numbered" >> add_ufw_rules.sh
echo "sudo ufw allow OpenSSH" >> add_ufw_rules.sh
echo "sudo ufw allow 22/tcp" >> add_ufw_rules.sh
echo 'sudo ufw allow "Apache Full"' >> add_ufw_rules.sh
echo "sudo ufw enable" >> add_ufw_rules.sh

Then you less your file add_ufw_rules.sh to see everything is Ok:

#!/bin/bash
ufw insert 1 deny from 40.79.250.88 to any
ufw insert 2 deny from 52.173.148.212 to any
ufw insert 3 deny from 94.103.85.175 to any
ufw insert 4 deny from 40.79.250.88 to any
ufw insert 5 deny from 78.85.208.240 to any
ufw insert 6 deny from 80.82.68.173 to any
ufw insert 7 deny from 188.165.230.118 to any
ufw insert 8 deny from 195.201.117.103 to any
ufw insert 9 deny from 40.79.250.88 to any
ufw insert 10 deny from 5.135.138.188 to any
ufw insert 11 deny from 51.116.189.135 to any
...
ufw insert 223 deny from 95.173.161.167 to any
ufw insert 224 deny from 95.84.228.227 to any
ufw status numbered
sudo ufw allow OpenSSH
sudo ufw allow 22/tcp
sudo ufw allow "Apache Full"
sudo ufw enable

Then you simply give permissions with chmod +x add_ufw_rules.sh and run the script to apply.

It’s up to you to turn on the Firewall logging:

sudo ufw logging on

A simple trick to find your Git Submodules imports in Python by adding to Syspath

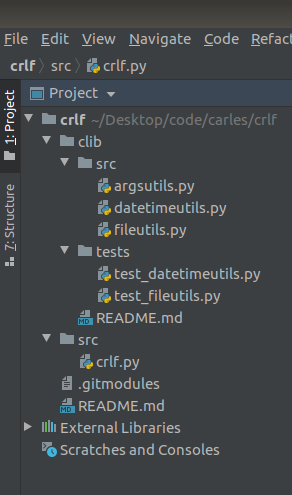
If you are using Git Submodules, is very probable that at some point you will create you own libraries. Probably those libraries will have their own structure, even with their own tests/ folder and you’re adding into a subfolder into your new project and maybe you have problems using relative imports.

This is a trick you can use to add the relevant root folder of your project to the System Path, so the libraries are found, specially when you call by command line from anywhere in the filesystem. This works for Python2 and Python3.

#!/usr/bin/env python3

import sys
import os

s_path_program = os.path.dirname(__file__)
sys.path.append(s_path_program + '../../')

from clib.src.argsutils import ArgsUtils
from clib.src.datetimeutils import DateTimeUtils
from clib.src.fileutils import FileUtils

This sample can be found in my book Pythom Combat Guide.

iostat_bandwitdth.sh – Utility to calculate the bandwidth used by all your drives

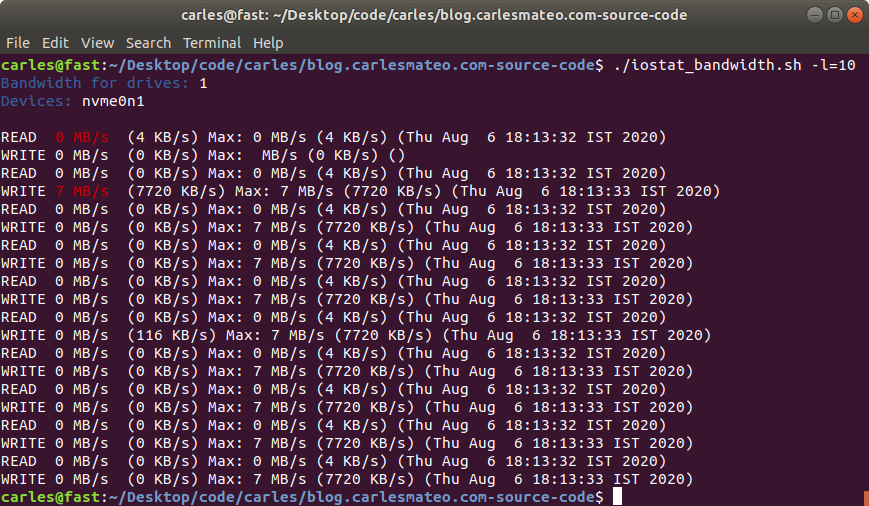
This is a shell script I made long time ago and I use it to monitor in real time what’s the total or individual bandwidth and maximum bandwidth achieved, for READ and WRITE, of Hard drives and NMVe devices.

It uses iostat to capture the metrics, and then processes the maximum values, the combined speed of all the drives… has also an interesting feature to let out the booting device. That’s very handy for Rack Servers where you boot from an SSD card or and SD, and you want to monitor the speed of the other (SAS probably) devices.

I used it to monitor the total bandwidth achieved by our 4U60 and 4U90 Servers, the All-Flash-Arrays 2U and the NVMe 1U units in Sanmina and the real throughput of IOC (Input Output Controllers).

I used also to compare what was the real data written to ZFS and mdraid RAID systems, and to disks and the combined speed with different pool configurations, as well as the efficiency of iSCSI and NFS from clients to the Servers.

You can specify how many times the information will be printed, whether you want to keep the max speed of each device per separate, and specify a drive to exclude. Normally it will be the boot drive.

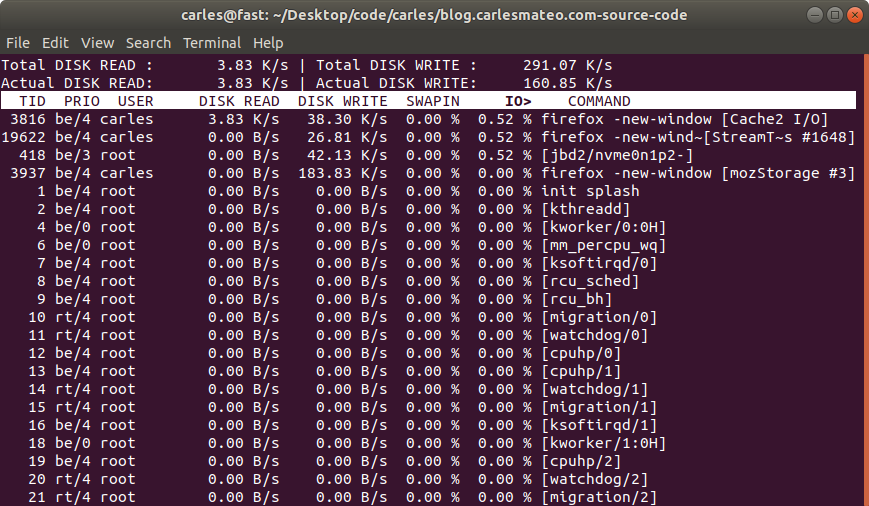
If you want to test performance metrics you should make sure that other programs are not running or using the swap, to prevent bias. You should disable the boot drive if it doesn’t form part of your tests (like in the 4U60 with an SSD boot drive in a card, and 60 hard drive bays SAS or SATA).

You may find useful tools like iotop.

You can find the code here, and in my gitlab repo:

https://gitlab.com/carles.mateo/blog.carlesmateo.com-source-code/-/blob/master/iostat_bandwidth.sh

#!/usr/bin/env bash

AUTHOR="Carles Mateo"
VERSION="1.4"

# Changelog
# 1.4
# Added support for NVMe drives
# 1.3
# Fixed Decimals in KB count that were causing errors
# 1.2
# Added new parameter to output per drive stats
# Counting is performed in KB

# Leave boot device empty if you want to add its activity to the results
# Specially thinking about booting SD card or SSD devices versus SAS drives bandwidth calculation.
# Otherwise use i.e.: s_BOOT_DEVICE="sdcv"
s_BOOT_DEVICE=""
# If this value is positive the loop will be kept n times
# If is negative ie: -1 it will loop forever
i_LOOP_TIMES=-1
# Display all drives separatedly
i_ALL_SEPARATEDLY=0
# Display in KB or MB
s_DISPLAY_UNIT="M"

# Init variables
i_READ_MAX=0
i_WRITE_MAX=0
s_READ_MAX_DATE=""
s_WRITE_MAX_DATE=""
i_IOSTAT_READ_KB=0
i_IOSTAT_WRITE_KB=0

# Internal variables
i_NUMBER_OF_DRIVES=0
s_LIST_OF_DRIVES=""
i_UNKNOWN_OPTION=0

# So if you run in screen you see colors :)
export TERM=xterm

# ANSI colors
s_COLOR_RED='\033[0;31m'
s_COLOR_BLUE='\033[0;34m'
s_COLOR_NONE='\033[0m'

for i in "$@"
do
    case $i in
        -b=*|--boot_device=*)
        s_BOOT_DEVICE="${i#*=}"
        shift # past argument=value
        ;;
        -l=*|--loop_times=*)
        i_LOOP_TIMES="${i#*=}"
        shift # past argument=value
        ;;
        -a=*|--all_separatedly=*)
        i_ALL_SEPARATEDLY="${i#*=}"
        shift # past argument=value
        ;;
        *)
        # unknown option
        i_UNKNOWN_OPTION=1
        ;;
    esac
done

if [[ "${i_UNKNOWN_OPTION}" -eq 1 ]]; then
    echo -e "${s_COLOR_RED}Unknown option${s_COLOR_NONE}"
    echo "Use: [-b|--boot_device=sda -l|--loop_times=-1 -a|--all-separatedly=1]"
    exit 1
fi

if [ -z "${s_BOOT_DEVICE}" ]; then
    i_NUMBER_OF_DRIVES=`iostat -d -m | grep "sd\|nvm" | wc --lines`
    s_LIST_OF_DRIVES=`iostat -d -m | grep "sd\|nvm" | awk '{printf $1" ";}'`
else
    echo -e "${s_COLOR_BLUE}Excluding Boot Device:${s_COLOR_NONE} ${s_BOOT_DEVICE}"
    # Add an space after the name of the device to prevent something like booting with sda leaving out drives like sdaa sdab sdac...
    i_NUMBER_OF_DRIVES=`iostat -d -m | grep "sd\|nvm" | grep -v "${s_BOOT_DEVICE} " | wc --lines`
    s_LIST_OF_DRIVES=`iostat -d -m | grep "sd\|nvm" | grep -v "${s_BOOT_DEVICE} " | awk '{printf $1" ";}'`
fi

AR_DRIVES=(${s_LIST_OF_DRIVES})
i_COUNTER_LOOP=0
for s_DRIVE in ${AR_DRIVES};
do
    AR_DRIVES_VALUES_AVG[i_COUNTER_LOOP]=0
    AR_DRIVES_VALUES_READ_MAX[i_COUNTER_LOOP]=0
    AR_DRIVES_VALUES_WRITE_MAX[i_COUNTER_LOOP]=0
    i_COUNTER_LOOP=$((i_COUNTER_LOOP+1))
done


echo -e "${s_COLOR_BLUE}Bandwidth for drives:${s_COLOR_NONE} ${i_NUMBER_OF_DRIVES}"
echo -e "${s_COLOR_BLUE}Devices:${s_COLOR_NONE} ${s_LIST_OF_DRIVES}"
echo ""

while [ "${i_LOOP_TIMES}" -lt 0 ] || [ "${i_LOOP_TIMES}" -gt 0 ] ;
do
    s_READ_PRE_COLOR=""
    s_READ_POS_COLOR=""
    s_WRITE_PRE_COLOR=""
    s_WRITE_POS_COLOR=""
    # In MB
    # s_IOSTAT_OUTPUT_ALL_DRIVES=`iostat -d -m -y 1 1 | grep "sd\|nvm"`
    # In KB
    s_IOSTAT_OUTPUT_ALL_DRIVES=`iostat -d -y 1 1 | grep "sd\|nvm"`
    if [ -z "${s_BOOT_DEVICE}" ]; then
        s_IOSTAT_OUTPUT=`printf "${s_IOSTAT_OUTPUT_ALL_DRIVES}" | awk '{sum_read += $3} {sum_write += $4} END {printf sum_read"|"sum_write"\n"}'`
    else
        # Add an space after the name of the device to prevent something like booting with sda leaving out drives like sdaa sdab sdac...
        s_IOSTAT_OUTPUT=`printf "${s_IOSTAT_OUTPUT_ALL_DRIVES}" | grep -v "${s_BOOT_DEVICE} " | awk '{sum_read += $3} {sum_write += $4} END {printf sum_read"|"sum_write"\n"}'`
    fi

    if [ "${i_ALL_SEPARATEDLY}" -eq 1 ]; then
        i_COUNTER_LOOP=0
        for s_DRIVE in ${AR_DRIVES};
        do
            s_IOSTAT_DRIVE=`printf "${s_IOSTAT_OUTPUT_ALL_DRIVES}" | grep $s_DRIVE | head --lines=1 | awk '{sum_read += $3} {sum_write += $4} END {printf sum_read"|"sum_write"\n"}'`
            i_IOSTAT_READ_KB=`printf "%s" "${s_IOSTAT_DRIVE}" | awk -F '|' '{print $1;}'`
            i_IOSTAT_WRITE_KB=`printf "%s" "${s_IOSTAT_DRIVE}" | awk -F '|' '{print $2;}'`
            if [ "${i_IOSTAT_READ_KB%.*}" -gt ${AR_DRIVES_VALUES_READ_MAX[i_COUNTER_LOOP]%.*} ]; then
                AR_DRIVES_VALUES_READ_MAX[i_COUNTER_LOOP]=${i_IOSTAT_READ_KB}
                echo -e "New Max Speed Reading for ${s_COLOR_BLUE}$s_DRIVE${s_COLOR_NONE} at ${s_COLOR_RED}${i_IOSTAT_READ_KB} KB/s${s_COLOR_NONE}"
            echo
            fi
            if [ "${i_IOSTAT_WRITE_KB%.*}" -gt ${AR_DRIVES_VALUES_WRITE_MAX[i_COUNTER_LOOP]%.*} ]; then
                AR_DRIVES_VALUES_WRITE_MAX[i_COUNTER_LOOP]=${i_IOSTAT_WRITE_KB}
                echo -e "New Max Speed Writing for ${s_COLOR_BLUE}$s_DRIVE${s_COLOR_NONE} at ${s_COLOR_RED}${i_IOSTAT_WRITE_KB} KB/s${s_COLOR_NONE}"
            fi

            i_COUNTER_LOOP=$((i_COUNTER_LOOP+1))
        done
    fi

    i_IOSTAT_READ_KB=`printf "%s" "${s_IOSTAT_OUTPUT}" | awk -F '|' '{print $1;}'`
    i_IOSTAT_WRITE_KB=`printf "%s" "${s_IOSTAT_OUTPUT}" | awk -F '|' '{print $2;}'`

    # CAST to Integer
    if [ "${i_IOSTAT_READ_KB%.*}" -gt ${i_READ_MAX%.*} ]; then
        i_READ_MAX=${i_IOSTAT_READ_KB%.*}
        s_READ_PRE_COLOR="${s_COLOR_RED}"
        s_READ_POS_COLOR="${s_COLOR_NONE}"
        s_READ_MAX_DATE=`date`
        i_READ_MAX_MB=$((i_READ_MAX/1024))
    fi
    # CAST to Integer
    if [ "${i_IOSTAT_WRITE_KB%.*}" -gt ${i_WRITE_MAX%.*} ]; then
        i_WRITE_MAX=${i_IOSTAT_WRITE_KB%.*}
        s_WRITE_PRE_COLOR="${s_COLOR_RED}"
        s_WRITE_POS_COLOR="${s_COLOR_NONE}"
        s_WRITE_MAX_DATE=`date`
        i_WRITE_MAX_MB=$((i_WRITE_MAX/1024))
    fi

    if [ "${s_DISPLAY_UNIT}" == "M" ]; then
        # Get MB
        i_IOSTAT_READ_UNIT=${i_IOSTAT_READ_KB%.*}
        i_IOSTAT_WRITE_UNIT=${i_IOSTAT_WRITE_KB%.*}
        i_IOSTAT_READ_UNIT=$((i_IOSTAT_READ_UNIT/1024))
        i_IOSTAT_WRITE_UNIT=$((i_IOSTAT_WRITE_UNIT/1024))
    fi

    # When a MAX is detected it will be displayed in RED
    echo -e "READ  ${s_READ_PRE_COLOR}${i_IOSTAT_READ_UNIT} MB/s ${s_READ_POS_COLOR} (${i_IOSTAT_READ_KB} KB/s) Max: ${i_READ_MAX_MB} MB/s (${i_READ_MAX} KB/s) (${s_READ_MAX_DATE})"
    echo -e "WRITE ${s_WRITE_PRE_COLOR}${i_IOSTAT_WRITE_UNIT} MB/s ${s_WRITE_POS_COLOR} (${i_IOSTAT_WRITE_KB} KB/s) Max: ${i_WRITE_MAX_MB} MB/s (${i_WRITE_MAX} KB/s) (${s_WRITE_MAX_DATE})"
    if [ "$i_LOOP_TIMES" -gt 0 ]; then
        i_LOOP_TIMES=$((i_LOOP_TIMES-1))
    fi
done

LDAPGUI a LDAP GUI program in Python and Tkinter

I wanted to automate certain operations that we do very often, and so I decided to do a PoC of how handy will it be to create GUI applications that can automate tasks.

As locating information in several repositories of information (ldap, databases, websites, etc…) can be tedious I decided to create a small program that queries LDAP for the information I’m interested, in this case a Location. This small program can very easily escalated to launch the VPN, to query a Database after querying LDAP if no results are found, etc…

I share with you the basic application as you may find interesting to create GUI applications in Python, compatible with Windows, Linux and Mac.

I’m super Linux fan but this is important, as many multinationals still use Windows or Mac even for Engineers and SRE positions.

With the article I provide a Dockerfile and a docker-compose.yml file that will launch an OpenLDAP Docker Container preloaded with very basic information and a PHPLDAPMIN Container.

Installation of the dependencies

Ubuntu:

sudo apt-get install python3.8 python3-tk
pip install ldap3

Windows and Mac:

Install Python3.6 or greater and from command line.

For Mac install pip if you don’t have it.

pip install ldap3

Python Code

#!/bin/env python3

import tkinter as tk
from ldap3 import Server, Connection, MODIFY_ADD, MODIFY_REPLACE, ALL_ATTRIBUTES, ObjectDef, Reader
from ldap3.utils.dn import safe_rdn
from lib.fileutils import FileUtils

# sudo apt-get install python3.8 python3-tk
# pip install ldap3


class LDAPGUI:

    s_config_file = "config.cfg"

    s_ldap_server = "ldapslave01"
    s_connection = "uid=%USERNAME%, cn=users, cn=accounts, dc=demo1, dc=carlesmateo, dc=com"
    s_username = "carlesmateo"
    s_password = "Secret123"
    s_query = "location=%LOCATION%,dc=demo1,dc=carlesmateo,dc=com"

    i_window_width = 610
    i_window_height = 650
    i_frame_width = i_window_width-5
    i_frame_height = 30
    i_frame_results_height = 400

    # Graphical objects
    o_window = None
    o_entry_ldap = None
    o_entry_connection = None
    o_entry_results = None
    o_entry_username = None
    o_entry_location = None
    o_button_search = None

    def __init__(self, o_fileutils):
        self.o_fileutils = o_fileutils

    def replace_connection_with_username(self):
        s_connection_raw = self.o_entry_username.get()
        s_connection = self.s_connection.replace("%USERNAME%", s_connection_raw)
        return s_connection

    def replace_query_with_location(self):
        s_query_raw = self.o_entry_location.get()
        s_query = self.s_query.replace("%LOCATION%", s_query_raw)
        return s_query

    def clear_results(self):
        self.o_entry_results.delete("1.0", tk.END)

    def enable_button(self):
        self.o_button_search["state"] = tk.NORMAL

    def disable_button(self):
        self.o_button_search["state"] = tk.DISABLED

    def ldap_run_query(self):

        self.disable_button()
        self.clear_results()

        s_ldap_server = self.o_entry_ldap.get()
        self.o_entry_results.insert(tk.END, "Connecting to: " + s_ldap_server + "...\n")
        try:

            o_server = Server(s_ldap_server)
            o_conn = Connection(o_server,
                                self.replace_connection_with_username(),
                                self.s_password,
                                auto_bind=False)
            o_conn.bind()

            if isinstance(o_conn.last_error, str):
                s_last_error = o_conn.last_error
                self.o_entry_results.insert(tk.END, "Last error: " + s_last_error + "\n")

            if isinstance(o_conn.result, str):
                s_conn_result = o_conn.result
                self.o_entry_results.insert(tk.END, "Connection result: " + s_conn_result + "\n")

            s_query = self.replace_query_with_location()
            self.o_entry_results.insert(tk.END, "Performing Query: " + s_query + "\n")

            obj_location = ObjectDef('organizationalUnit', o_conn)
            r = Reader(o_conn, obj_location, s_query)
            r.search()
            self.o_entry_results.insert(tk.END, "Results: \n" + str(r) + "\n")
            #print(r)

            #print(0, o_conn.extend.standard.who_am_i())
            # https://github.com/cannatag/ldap3/blob/master/tut1.py
            # https://github.com/cannatag/ldap3/blob/master/tut2.py

        except:
            self.o_entry_results.insert(tk.END, "There has been a problem" + "\n")

            if isinstance(o_conn.last_error, str):
                s_last_error = o_conn.last_error
                self.o_entry_results.insert(tk.END, "Last error: " + s_last_error + "\n")

        try:
            self.o_entry_results.insert(tk.END, "Closing connection\n")
            o_conn.unbind()
        except:
            self.o_entry_results.insert(tk.END, "Problem closing connection" + "\n")

        self.enable_button()

    def create_frame_location(self, o_window, i_width, i_height):
        o_frame = tk.Frame(master=o_window, width=i_width, height=i_height)
        o_frame.pack()

        o_lbl_location = tk.Label(master=o_frame,
                                  text="Location:",
                                  width=10,
                                  height=1)
        o_lbl_location.place(x=0, y=0)

        o_entry = tk.Entry(master=o_frame, fg="yellow", bg="blue", width=50)
        o_entry.insert(tk.END, "")
        o_entry.place(x=100, y=0)

        return o_frame, o_entry

    def create_frame_results(self, o_window, i_width, i_height):
        o_frame = tk.Frame(master=o_window, width=i_width, height=i_height)
        o_frame.pack()

        o_entry = tk.Text(master=o_frame, fg="grey", bg="white", width=75, height=20)
        o_entry.insert(tk.END, "")
        o_entry.place(x=0, y=0)

        return o_frame, o_entry

    def create_frame_username(self, o_window, i_width, i_height, s_username):
        o_frame = tk.Frame(master=o_window, width=i_width, height=i_height)
        o_frame.pack()

        o_lbl_location = tk.Label(master=o_frame,
                                  text="Username:",
                                  width=10,
                                  height=1)
        o_lbl_location.place(x=0, y=0)

        o_entry_username = tk.Entry(master=o_frame, fg="yellow", bg="blue", width=50)
        o_entry_username.insert(tk.END, s_username)
        o_entry_username.place(x=100, y=0)

        return o_frame, o_entry_username

    def create_frame_ldapserver(self, o_window, i_width, i_height, s_server):
        o_frame = tk.Frame(master=o_window, width=i_width, height=i_height)
        o_frame.pack()

        o_lbl_ldapserver = tk.Label(master=o_frame,
                                    text="LDAP Server:",
                                    width=10,
                                    height=1)
        o_lbl_ldapserver.place(x=0, y=0)
        # We don't need to pack the label, as it is inside a Frame, packet
        # o_lbl_ldapserver.pack()

        o_entry = tk.Entry(master=o_frame, fg="yellow", bg="blue", width=50)
        o_entry.insert(tk.END, s_server)
        o_entry.place(x=100, y=0)

        return o_frame, o_entry

    def create_frame_connection(self, o_window, i_width, i_height, s_connection):
        o_frame = tk.Frame(master=o_window, width=i_width, height=i_height)
        o_frame.pack()

        o_lbl_connection = tk.Label(master=o_frame,
                                    text="Connection:",
                                    width=10,
                                    height=1)
        o_lbl_connection.place(x=0, y=0)
        # We don't need to pack the label, as it is inside a Frame, packet
        # o_lbl_ldapserver.pack()

        o_entry_connection = tk.Entry(master=o_frame, fg="yellow", bg="blue", width=50)
        o_entry_connection.insert(tk.END, s_connection)
        o_entry_connection.place(x=100, y=0)

        return o_frame, o_entry_connection

    def create_frame_query(self, o_window, i_width, i_height, s_query):
        o_frame = tk.Frame(master=o_window, width=i_width, height=i_height)
        o_frame.pack()

        o_lbl_query = tk.Label(master=o_frame,
                                    text="Connection:",
                                    width=10,
                                    height=1)
        o_lbl_query.place(x=0, y=0)

        o_entry_query = tk.Entry(master=o_frame, fg="yellow", bg="blue", width=50)
        o_entry_query.insert(tk.END, s_query)
        o_entry_query.place(x=100, y=0)

        return o_frame, o_entry_query

    def create_button(self):
        o_button = tk.Button(
            text="Search",
            width=25,
            height=1,
            bg="blue",
            fg="yellow",
            command=self.ldap_run_query
        )

        o_button.pack()

        return o_button

    def render_screen(self):
        o_window = tk.Tk()
        o_window.title("LDAPGUI by Carles Mateo")
        self.o_window = o_window
        self.o_window.geometry(str(self.i_window_width) + 'x' + str(self.i_window_height))

        o_frame_ldap, o_entry_ldap = self.create_frame_ldapserver(o_window=o_window,
                                                                  i_width=self.i_frame_width,
                                                                  i_height=self.i_frame_height,
                                                                  s_server=self.s_ldap_server)
        self.o_entry_ldap = o_entry_ldap
        o_frame_connection, o_entry_connection = self.create_frame_connection(o_window=o_window,
                                                                              i_width=self.i_frame_width,
                                                                              i_height=self.i_frame_height,
                                                                              s_connection=self.s_connection)
        self.o_entry_connection = o_entry_connection

        o_frame_user, o_entry_user = self.create_frame_username(o_window=o_window,
                                                                i_width=self.i_frame_width,
                                                                i_height=self.i_frame_height,
                                                                s_username=self.s_username)
        self.o_entry_username = o_entry_user

        o_frame_query, o_entry_query = self.create_frame_query(o_window=o_window,
                                                               i_width=self.i_frame_width,
                                                               i_height=self.i_frame_height,
                                                               s_query=self.s_query)
        self.o_entry_query = o_entry_query


        o_frame_location, o_entry_location = self.create_frame_location(o_window=o_window,
                                                                        i_width=self.i_frame_width,
                                                                        i_height=self.i_frame_height)

        self.o_entry_location = o_entry_location

        o_button_search = self.create_button()
        self.o_button_search = o_button_search

        o_frame_results, o_entry_results = self.create_frame_results(o_window=o_window,
                                                                     i_width=self.i_frame_width,
                                                                     i_height=self.i_frame_results_height)
        self.o_entry_results = o_entry_results

        o_window.mainloop()

    def load_config_values(self):
        b_success, d_s_config = self.o_fileutils.read_config_file_values(self.s_config_file)
        if b_success is True:
            if 'server' in d_s_config:
                self.s_ldap_server = d_s_config['server']
            if 'connection' in d_s_config:
                self.s_connection = d_s_config['connection']
            if 'username' in d_s_config:
                self.s_username = d_s_config['username']
            if 'password' in d_s_config:
                self.s_password = d_s_config['password']
            if 'query' in d_s_config:
                self.s_query = d_s_config['query']


def main():
    o_fileutils = FileUtils()

    o_ldapgui = LDAPGUI(o_fileutils=o_fileutils)
    o_ldapgui.load_config_values()

    o_ldapgui.render_screen()


if __name__ == "__main__":
    main()

Dockerfile

FROM osixia/openldap

# Note: Docker compose will generate the Docker Image.
# Run:  sudo docker-compose up -d

LABEL maintainer="Carles Mateo"

ENV LDAP_ORGANISATION="Carles Mateo Test Org" \
    LDAP_DOMAIN="carlesmateo.com"

COPY bootstrap.ldif /container/service/slapd/assets/config/bootstrap/ldif/50-bootstrap.ldif

docker-compose.yml

version: '3.3'
services:
  ldap_server:
      build:
        context: .
        dockerfile: Dockerfile
      environment:
        LDAP_ADMIN_PASSWORD: test1234
        LDAP_BASE_DN: dc=carlesmateo,dc=com
      ports:
        - 389:389
      volumes:
        - ldap_data:/var/lib/ldap
        - ldap_config:/etc/ldap/slapd.d
  ldap_server_admin:
      image: osixia/phpldapadmin:0.7.2
      ports:
        - 8090:80
      environment:
        PHPLDAPADMIN_LDAP_HOSTS: ldap_server
        PHPLDAPADMIN_HTTPS: 'false'
volumes:
  ldap_data:
  ldap_config:

config.cfg

# Config File for LDAPGUI by Carles Mateo
# https://blog.carlesmateo.com
#

# Configuration for working with the prepared Docker
server=127.0.0.1:389
connection=cn=%USERNAME%,dc=carlesmateo,dc=com
username=admin_gh
password=admin_gh_pass
query=cn=%LOCATION%,dc=carlesmateo,dc=com

# Carles other tests
#server=ldapslave.carlesmateo.com
#connection=uid=%USERNAME%, cn=users, cn=accounts, dc=demo1, dc=carlesmateo, dc=com
#username=carlesmateo
#password=Secret123
#query=location=%LOCATION%,dc=demo1,dc=carlesmateo,dc=com

bootstrap.ldif

In order to bootstrap the Data on the LDAP Server I use a bootstrap.ldif file copied into the Server.

Credits, I learned this trick in this page: https://medium.com/better-programming/ldap-docker-image-with-populated-users-3a5b4d090aa4

dn: cn=developer,dc=carlesmateo,dc=com
changetype: add
objectclass: Engineer
cn: developer
givenname: developer
sn: Developer
displayname: Developer User
mail: developer@carlesmateo.com
userpassword: developer_pass

dn: cn=maintainer,dc=carlesmateo,dc=com
changetype: add
objectclass: Engineer
cn: maintainer
givenname: maintainer
sn: Maintainer
displayname: Maintainer User
mail: maintainer@carlesmateo.com
userpassword: maintainer_pass

dn: cn=admin,dc=carlesmateo,dc=com
changetype: add
objectclass: Engineer
cn: admin
givenname: admin
sn: Admin
displayname: Admin
mail: admin@carlesmateo.com
userpassword: admin_pass

dn: ou=Groups,dc=carlesmateo,dc=com
changetype: add
objectclass: organizationalUnit
ou: Groups

dn: ou=Users,dc=carlesmateo,dc=com
changetype: add
objectclass: organizationalUnit
ou: Users

dn: cn=Admins,ou=Groups,dc=carlesmateo,dc=com
changetype: add
cn: Admins
objectclass: groupOfUniqueNames
uniqueMember: cn=admin,dc=carlesmateo,dc=com

dn: cn=Maintaners,ou=Groups,dc=carlesmateo,dc=com
changetype: add
cn: Maintaners
objectclass: groupOfUniqueNames
uniqueMember: cn=maintainer,dc=carlesmateo,dc=com
uniqueMember: cn=developer,dc=carlesmateo,dc=com

lib/fileutils.py

You can download this file from the lib folder in my project CTOP.py

More information about programming with tkinter:

https://realpython.com/python-gui-tkinter/#getting-user-input-with-entry-widgets

https://www.tutorialspoint.com/python/python_gui_programming.htm

https://effbot.org/tkinterbook/entry.htm

About LDAP:

https://ldap3.readthedocs.io/en/latest/

A script to backup your partition compressed and a game to learn about dd and pipes

This article is more an exercise, like a game, so you get to know certain things about Linux, and follow my mental process to uncover this. Is nothing mysterious for the Senior Engineers but Junior Sys Admins may enjoy this reading. :)

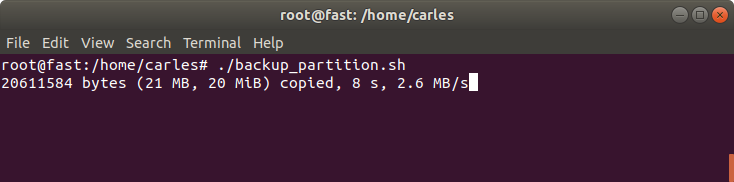
Ok, so the first thing is I wrote an script in order to completely backup my NVMe hard drive to a gziped file and then I will use this, as a motivation to go deep into investigations to understand.

Ok, so the first script would be like this:

#!/bin/bash
SOURCE_DRIVE="/dev/nvme0n1"
TARGET_PATH="/media/carles/Seagate\ Backup\ Plus\ Drive/BCK/"
TARGET_FILE="nvme.img"
sudo bash -c "dd if=${SOURCE_DRIVE} | gzip > ${TARGET_PATH}${TARGET_FILE}.gz"

So basically, we are going to restart the computer, boot with Linux Live USB Key, mount the Seagate Hard Drive, and run the script.

We are booting with a Live Linux Cd in order to have our partition unmounted and unmodified while we do the backup. This is in order to avoid corruption or data loss as a live Filesystem is getting modifications as we read it.

The problem with this first script is that it will generate a big gzip file.

By big I mean much more bigger than 2GB. Not all physical supports support files bigger than 2GB or 4GB, but even if they do, it’s a pain to transfer this over the Network, or in USB files, so we are going to do a slight modification.

#!/bin/bash
SOURCE_DRIVE="/dev/nvme0n1"
TARGET_PATH="/media/carles/Seagate\ Backup\ Plus\ Drive/BCK/"
TARGET_FILE="nvme.img"
sudo bash -c "dd if=${SOURCE_DRIVE} | gzip | split -b 1024MiB - ${TARGET_PATH}${TARGET_FILE}-split.gz_"

Ok, so we will use pipes and split in order to generate many files as big as 1GB.

If we ls we will get:

-rwxrwxrwx 1 carles carles 1073741824 May 24 14:57 nvme.img-split.gz_aa
-rwxrwxrwx 1 carles carles 1073741824 May 24 14:58 nvme.img-split.gz_ab
-rwxrwxrwx 1 carles carles 1073741824 May 24 14:59 nvme.img-split.gz_ac

Then one may say, Ok, this is working, but how I know the progress?.

For old versions of dd you can use pv which stands for Pipe Viewer and allows you to know the transference between processes using pipes.

For more recent versions of dd you can use status=progress.

So the script updated with status=progress is:

#!/bin/bash
SOURCE_DRIVE="/dev/nvme0n1"
TARGET_PATH="/media/carles/Seagate\ Backup\ Plus\ Drive/BCK/"
TARGET_FILE="nvme.img"
sudo bash -c "dd if=${SOURCE_DRIVE} status=progress | gzip | split -b 1024MiB - ${TARGET_PATH}${TARGET_FILE}-split.gz_"

You can also download the code from:

https://gitlab.com/carles.mateo/blog.carlesmateo.com-source-code/-/blob/master/backup_partition_in_files.sh

Then one may ask himself, wait, if pipes use STDOUT and STDIN and dd is displaying into the screen, then will our gz file get corrupted?.

I like when people question things, and investigate, so let’s answer this question.

If it was a young member of my Team I would ask:

  • Ok, try,it. Check the output file to see if is corrupted.

So they can do zcat or zless to inspect the file, see if it has errors, and to make sure:

gzip -v -t nvme.img.gz
nvme.img.gz:        OK

Ok, so what happened?, because we were seeing output in the screen.

Assuming the young Engineer does not know the answer I would had told:

  • Ok, so you know that if dd would print to STDOUT, then you won’t see it, cause it would be sent to the pipe, so there is something more you’re missing. Let’s check the source code of dd to see what status=progress does

And then look for “progress”.

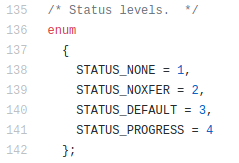
Soon you’ll find things like everywhere:

  if (progress_time)
    fputc ('\r', stderr);

Ok, pay attention to where is the data written: stderr. So basically the answer is: dd status=progress does not corrupt STDOUT and prints into the screen because it uses STDERR.

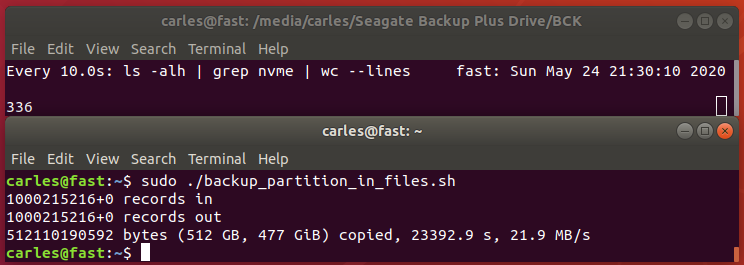
Other funny ways to get the progress would be to use:

watch -n10 "ls -alh /BCK/ | grep nvme | wc --lines"
So you would see in real time what was the advance and finally 512GB where compressed to around 336GB in 336 files of 1 GB each (except the last one)

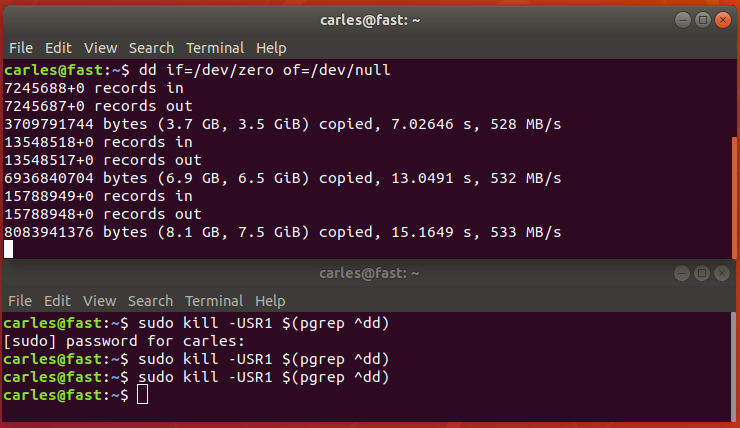
Another funny way would had been sending USR1 signal to the dd process:

Hope you enjoyed this little exercise about the importance of going deep, to the end, to understand what’s going on on the system. :)

Instead of gzip you can use bzip2 or pixz. pixz is very handy if you want to just compress a file, as it uses multiple processors in parallel for the tasks.

xz or lrzip are other compressors. lrzip aims to compress very large files, specially source code.

Refreshing settings in a Docker immutable image with Python and Flask

This is a trick to restart a Service that is running on a immutable Docker, with some change, and you need to refresh the values very quickly without having to roll the CI/CD Jenkins Pipeline and uploading a new image.

So why would you need to do that?.

I can think about possible scenarios like:

  • Need to roll out an urgent fix in a time critical manner
  • Jenkins is broken
  • Somebody screw it on the git master branch
  • Docker Hub is down
  • GitHub is down
  • Your artifactory is down
  • The lines between your jumpbox or workstation and the secure Server are down and you have really few bandwidth
  • You have to fix something critical and you only have a phone with you and SSH only
  • Maybe the Dockerfile had latest, and the latest image has changed
FROM os:latest

The ideal is that if you work with immutable images, you roll out a new immutable image and that’s it.

But if for whatever reason you need to update this super fast, this trick may become really handy.

Let’s go for it!.

Normally you’ll start your container with a command similar to this:

docker run -d --rm -p 5000:5000 api_carlesmateo_com:v7 prod 

The first thing we have to do is to stop the container.

So:

docker ps

Locate your container across the list of running containers and stop it, and then restart without the –rm:

docker stop container_name
docker run -d -p 5000:5000 api_carlesmateo_com:v7 prod

the –rm makes the container to cleanup. By default a container’s file system persists even after the container exits. So don’t start it with –rm.

Ok, so login to the container:

docker exec -it container_name /bin/sh 

Edit the config you require to change, for example config.yml

If what you have to update is a password, and is encoded in base64, encode it:

echo -n "ThePassword" | base64
VGhlUGFzc3dvcmQ=

Stop the container. You can do it by stopping the container with docker stop or from inside the container, killing the listening process, probably a Python Flask.

If your Dockerfile ends with something like:

ENTRYPOINT ["./webservice.py"]

And webservice.py has Python Flask code similar to this:

#!/usr/bin/python3
#
# webservice.py
#
# Author: Carles Mateo
# Creation Date: 2020-05-10 20:50 GMT+1
# Description: A simple Flask Web Application
#              Part of the samples of https://leanpub.com/pythoncombatguide
#              More source code for the book at https://gitlab.com/carles.mateo/python_combat_guide
#


from flask import Flask, request
import logging

# Initialize Flask
app = Flask(__name__)


# Sample route so http://127.0.0.1/carles
@app.route('/carles', methods=['GET'])
def carles():
    logging.critical("A connection was established")
    return "200"

logging.info("Initialized...")

if __name__ == "__main__":
    app.run(host='0.0.0.0', port=5000, debug=True)

Then you can kill the process, and so ending the container, from inside the container by doing:

ps -ax | grep webservice
 5750 root     56:31 {webservice.py} /usr/bin/python /opt/webservice/webservice.py
kill -9 5790

This will finish the container the same way as docker stop container_name.

Then start the container (not run)

docker start container_name

You can now test from outside or from inside the container. If from inside:

/opt/webservice # wget localhost:5000/carles
Connecting to localhost:5000 (127.0.0.1:5000)
carles               100% |**************************************************************************************************************|     3  0:00:00 ETA
/opt/webservice # cat debug.log
2020-05-06 20:46:24,349 Initialized...
2020-05-06 20:46:24,359  * Running on http://0.0.0.0:5000/ (Press CTRL+C to quit)
2020-05-06 20:46:24,360  * Restarting with stat
2020-05-06 20:46:24,764 Initialized...
2020-05-06 20:46:24,771  * Debugger is active!
2020-05-06 20:46:24,772  * Debugger PIN: 123-456-789
2020-05-07 13:18:43,890 127.0.0.1 - - [07/May/2020 13:18:43] "GET /carles HTTP/1.1" 200 -

if you don’t use YAML files or what you need is to change the code, all this can be avoided as when you update the Python code, Flash realizes that and reloads. See this line in the logs:

2020-05-07 13:18:40,431  * Detected change in '/opt/webservice/wwebservice.py', reloading

The webservice.py autoreloads because we init Flask with debug set to on.

You can also start a container with shell directly:

sudo docker run -it ctop /bin/bash

Python Combat Guide published

After some work reviewing it and ensuring it has the expected quality, I finally published my book Python Combat Guide.

Is an atypical creation. Is more a Master Class to my best friend, it could be a SDM, TL leading a small Software Development department, a Coder or a Scientist wanting to join IT as programmer and to learn a lot of stuff very quickly, than rather a formal Python Book for learning. Absolutely is not for beginners.

If you want to buy it, to explore the TOC, extended description…

https://leanpub.com/pythoncombatguide

Bash Script: Count repeated lines in the logs

Last Update: 2022-02-19 15:08 Irish Time

This small script will count repeated patterns in the Logs.

Ideal for checking if there are errors that you’re missing while developing.

#!/usr/bin/env bash
# count_repeated_pattern_in_logs.sh
# By Carles Mateo
# Helps to find repeated lines in Logs
LOGFILE_MESSAGES="/var/log/messages"
LOGFILE_SYSLOG="/var/log/syslog"
if [[ -f "${LOGFILE_MESSAGES}" ]]; then
    LOGFILE=${LOGFILE_MESSAGES}
else
    LOGFILE=${LOGFILE_SYSLOG}
    if [[ ! -f "${LOGFILE_SYSLOG}" ]]; then
        echo "${LOGFILE_MESSAGES} and ${LOGFILE_SYSLOG} do not exist. Exitting"
        exit 1
    fi
fi
echo "Using Logfile: ${LOGFILE}"
CMD_OUTPUT=`cat ${LOGFILE} | awk '{ $1=$2=$3=$4=""; print $0 }' | sort | uniq --count | sort --ignore-case --reverse --numeric-sort`
echo -e "$CMD_OUTPUT"

Basically it takes out the non relevant fields that can prevent from detecting repetition, like the time, and prints the rest.
Then you will launch it like this:

count_repeated_pattern_in_logs.sh | head -n20

If you are checking a machine with Ubuntu UFW (Firewall) and want to skip those likes:

./count_repeated_pattern_in_logs.sh | grep -v "UFW BLOCK" | head -n20

You can also run the same against the output of dmesg -T for counting over the messages in the Kernel this year:

dmesg -T | awk '{ $1=$2=$3=$4=""; print $0 }' | sort | uniq --count | sort --ignore-case --reverse --numeric-sort

And as sample output, the top messages are Ip’s blocked by the Firewall:

     10     2022] [UFW BLOCK] IN=ens4 OUT= MAC=42:01:02:03:04:05:06:07:0a:80:00:01:08:00 SRC=3.217.247.223 DST=10.128.0.2 LEN=40 TOS=0x00 PREC=0x00 TTL=54 ID=0 DF PROTO=TCP SPT=60636 DPT=443 WINDOW=0 RES=0x00 RST URGP=0
      8     2022] [UFW BLOCK] IN=ens4 OUT= MAC=42:01:02:03:04:05:06:07:0a:80:00:01:08:00 SRC=99.41.165.200 DST=10.128.0.2 LEN=40 TOS=0x00 PREC=0x00 TTL=57 ID=0 DF PROTO=TCP SPT=53960 DPT=443 WINDOW=0 RES=0x00 RST URGP=0
      7     2022] [UFW BLOCK] IN=ens4 OUT= MAC=42:01:02:03:04:05:06:07:0a:80:00:01:08:00 SRC=183.82.177.237 DST=10.128.0.2 LEN=40 TOS=0x00 PREC=0x00 TTL=59 ID=0 DF PROTO=TCP SPT=17697 DPT=443 WINDOW=0 RES=0x00 RST URGP=0
      6     2022] [UFW BLOCK] IN=ens4 OUT= MAC=42:01:02:03:04:05:06:07:0a:80:00:01:08:00 SRC=157.90.181.146 DST=10.128.0.2 LEN=40 TOS=0x00 PREC=0x00 TTL=60 ID=0 DF PROTO=TCP SPT=53558 DPT=443 WINDOW=0 RES=0x00 RST URGP=0
      6     2022] [UFW BLOCK] IN=ens4 OUT= MAC=42:01:02:03:04:05:06:07:0a:80:00:01:08:00 SRC=137.226.113.44 DST=10.128.0.2 LEN=40 TOS=0x00 PREC=0x00 TTL=43 ID=0 DF PROTO=TCP SPT=55338 DPT=443 WINDOW=0 RES=0x00 RST URGP=0

The Ethernet standards group announces a new 800 GbE specification

Here is the link to the new: https://www.pcgamer.com/amp/the-ethernet-standards-group-developed-a-new-speed-so-fast-it-had-to-change-its-name/

This is a great new for scaling performance in the Data Centers. For routers, switches…

And this makes me think about all the Architects that are using Memcached and Redis in different Servers, in Networks of 1Gbps and makes me want to share with you what a nonsense, is often, that.

So the idea of having Memcache or Redis is just to cache the queries and unload the Database from those queries.

But 1Gbps is equivalent to 125MB (Megabytes) per second.

Local RAM Memory in Servers can perform at 24GB and more (24,000,000 Megabytes) per second, even more.

A PCIE NVMe drive at 3.5GB per second.

A local SSD drive without RAID 550 MB/s.

A SSD in the Cloud, varies a lot on the provider, number of drives, etc… but I’ve seen between 200 MB/s and 2.5GB/s aggregated in RAID.

In fact I have worked with Servers equipped with several IO Controllers, that were delivering 24GB/s of throughput writing or reading to HDD spinning drives.

If you’re in the Cloud. Instead of having 2 Load Balancers, 100 Front Web servers, with a cluster of 5 Redis with huge amount of RAM, and 1 MySQL Master and 1 Slave, all communicating at 1Gbps, probably you’ll get a better performance having the 2 LBs, and 11 Front Web with some more memory and having the Redis instance in the same machine and saving the money of that many small Front and from the 5 huge dedicated Redis.

The same applies if you’re using Docker or K8s.

Even if you just cache the queries to drive, speed will be better than sending everything through 1 Gbps.

This will matter for you if your site is really under heavy load. Most of the sites just query the MySQL Server using 1 Gbps lines, or 2 Gbps in bonding, and that’s enough.

Lesson 0, learning to code in Python for non programmers

Please note: Even if I tried to make it easy, probably there are too many concepts for a non-programmer. Will try to deliver more basic previous knowledge and foundations, so people with zero knowledge don’t feel overwhelmed.

Start by installing Python 3.8 or 3.9 in your computer, and the IDE PyCharm. Install also Git, and create an account in GitLab so you can share code with other people and understand how Git works.

Here you can read the basic steps for setup PyCharm and GitLab.

Ok, so you can take a look at my video, and hopefully it makes spark your motivation to learn by yourself. :)

I’ve been asked why I used print(“”) instead of print().

Is a good question. The reason is, when we programmed in Python 2.x the native way was to print without parenthesis, like:

print "Hello World!"

Python 3.x was incompatible with that and requires to use parenthesis, like:

print("Hello World!")

Fortunately Python 2.x accepts also to print using parenthesis. In order to have compatibility within Python 2.x and Python 3.x or for future compatibility we were using always print(“Whatever”) in Python2.

However, there is one difference.

If you user print() or print(“”) in Python3 that will generate an empty line.

In Python 2 print(“”) will generate too an empty line, nevertheless print() in Python2 will print two parenthesis. We don’t want that.

This is illustrated in this screenshot:

So all the people that are at home, closed down for coronavirus, you have a chance now to start learning Python and from there get a live as programmer.

You can download the code for this lesson 0, from:

https://gitlab.com/carles.mateo/teach-unit-testing/-/blob/master/lesson0/tree.py

Capturing data from keyboard

In order to be able to do more samples, and then being a bit interesting an dynamic, I will introduce here how to get data inputted by the Keyboard.

print("Please enter your name:")
s_name = input()

This will add whatever we type, without the final Enter, to the String variable s_name.

Capturing numbers from Keyboard

How we do to capture a number, like how old are you, in years?.

The same way, and then we convert this to an Integer value. An Integer is a data type which is basically a number, not decimal. Like: 1, 2, 7, 1000 o -5.

print("Please enter your name:")
s_name = input()

print("Please enter your age:")
s_age = input()
# With int() we convert a String to an Integer, as long as it is possible.
# Wit str() we convert a Integer to a String, as long as it is possible.
i_age = int(s_age)

If you enter a number incorrectly and so that cannot be converted, you will get an Exception Error. That is something that happened in a way that was not expected. These error can be trapped, and we will see this later, in the future.

You know:

  • How to capture data from the keyboard with input()
  • How to convert data entered as String to Integer with int()
  • How to sum two numbers, like 2 + 3
  • How to subtract two numbers, like 2 – 3
  • How to multiply, like 2 * 3

So know, you should be able to solve a basic arithmetic exercise in Hacker Rank:

https://www.hackerrank.com/challenges/python-arithmetic-operators/problem

More sources with explanations

I’m teaching Unit Testing, Refactors, Quality Code and moving from Procedural to OOP to some colleagues, you can find source code for our classes here (please, be aware that there are some error made on purpose to show why and why not do things and hot to apply proper unit testing)

https://gitlab.com/carles.mateo/teach-unit-testing/-/tree/master

More resources

There are many free useful resources to learn Python: