If accidentally you removed PIP from your windows machine, or you attempted a PIP upgrade which failed after removing the current version, and let you unable to install it anymore, you can address it this way.
All the Operation Engineers and SREs that work with systems have found the situation of having a Server with the disk full of logs and needing to keep those logs, and at the same time needing the system to keep running.
This is an uncomfortable situation.
I remember when I was being interviewed in Facebook, in Menlo Park, for a SDM position in the SRE (Software Development Manager) back in 2013-2014. They asked me about a situation where they have the Server disk full, and they deleted a big log file from Apache, but the space didn’t come back. They told me that nobody ever was able to solve this.
I explained that what happened is that Apache still had the fd (file descriptor), and that he will try to write to end of that file, even if they removed the huge log file with rm command, from the system they will not get back any free space. I explained that the easiest solution was to stop apache. They agreed and asked me how we could do the same without restarting the Webserver and I said that manipulating the file descriptors under /proc. They told me what I was the first person to solve this.
How it works
Basically cmemgzip will read a file, as binary, and will load it completely in to Memory.
Then it will compress it also in Memory. Then it will release the memory used to keep the original, will validate write permissions on the folder, will check that the compressed file is smaller than the original, and will delete the original and, using the new space now available in disk, write the compressed and smaller version of the file in gzip format.
Since version 0.3 you can specify an amount of memory that you will use for the blocks of data read from the file, so you can limit greatly the memory usage and compress files much more bigger than the amount of memory.
If for whatever reason the gz version cannot be written to disk, you’ll be asked for another route.
I mentioned before about File Descriptors, and programs that may keep those files open.
So my advice here, is that if you have to compress Apache logs or logs from a multi-thread program, and disk is full, and several instances may be trying to write to the log file: to stop Apache service if you can, and then run cmemgzip. I want to add it the future to auto-release open fd, but this is delicate and requires a lot of time to make sure it will be reliable in all the circumstances and will obey the exact desires of the SRE realizing the operation, without unexpected undesired side effects. It can be implemented with a new parameter, so the SysAdmin will know what is requesting.
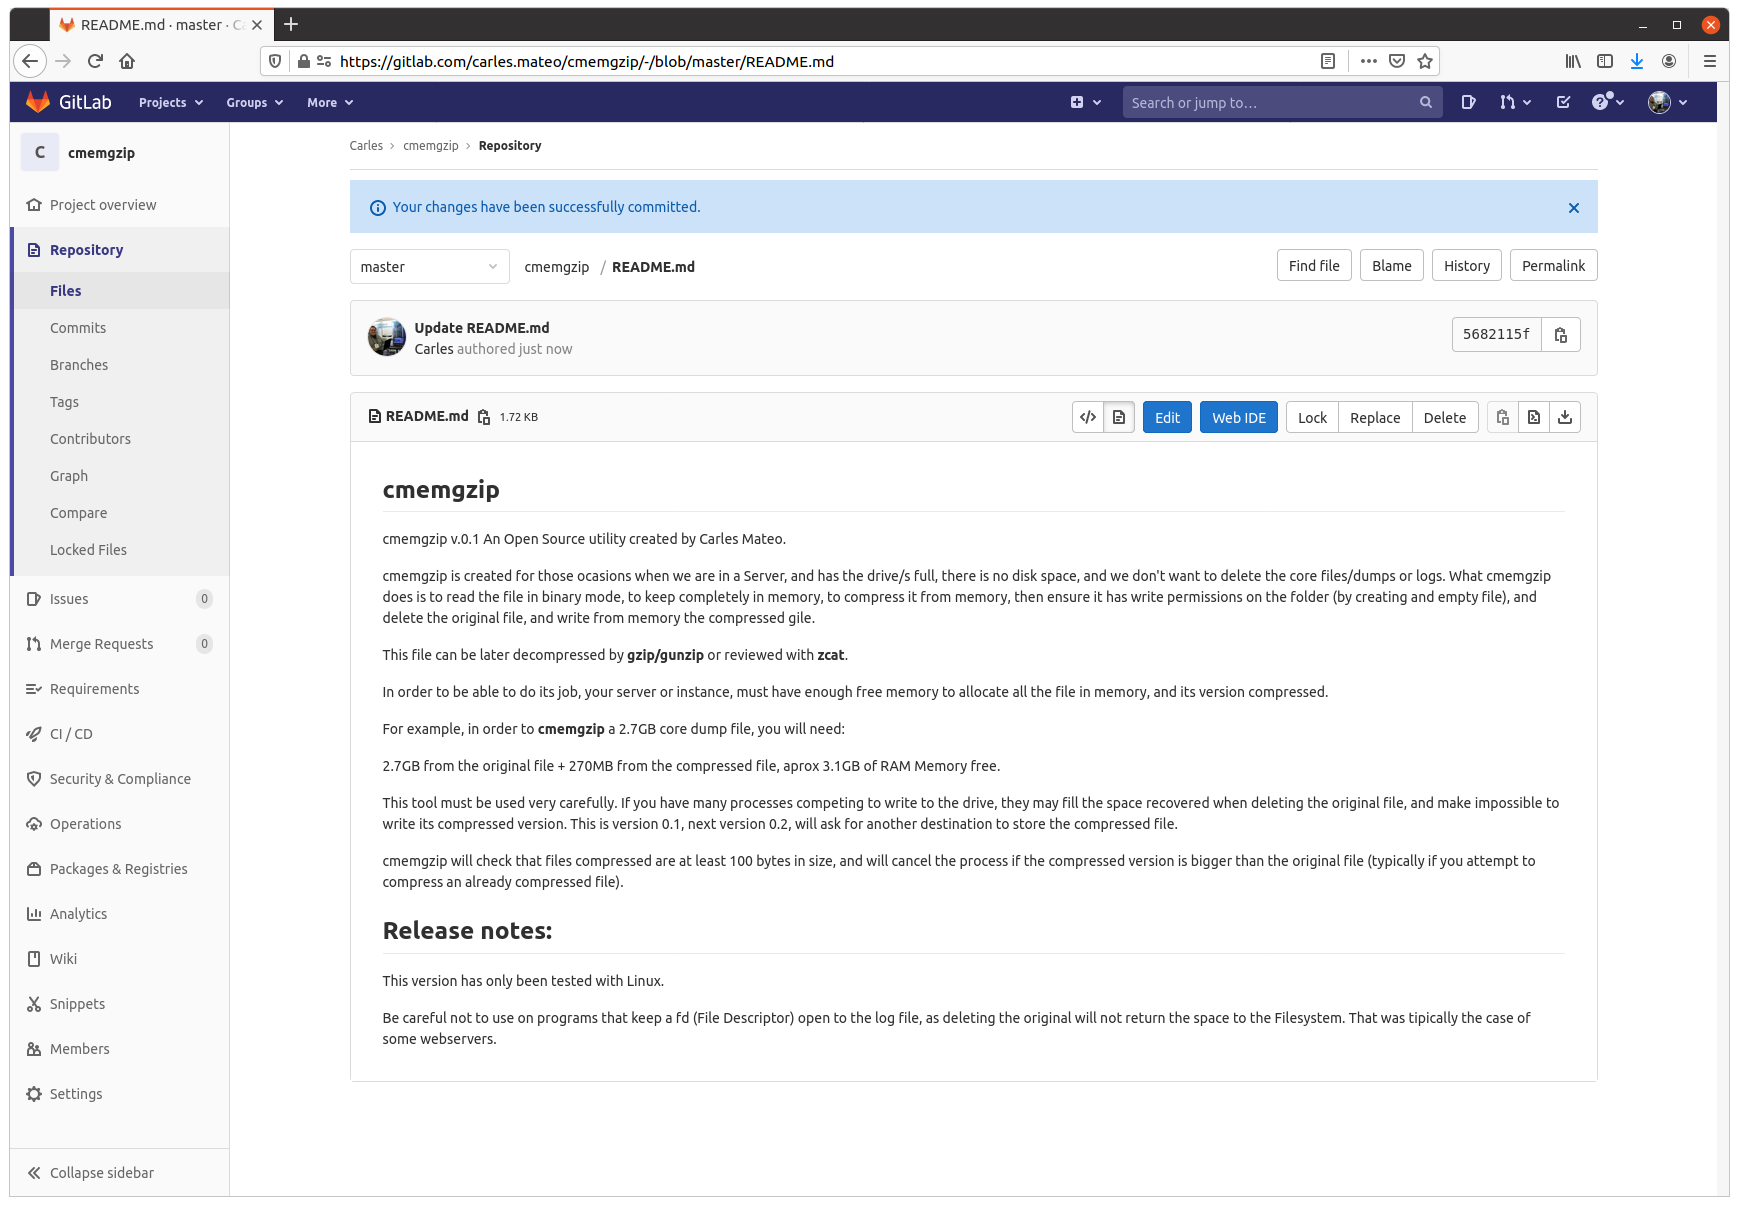
Get the source code
You can decompress it later with gzip/gunzip.
So about cmemgzip you can git clone the project from here:
The program is written in Python 3, and I gave it License MIT, so you can use it and the Open Source really with Freedom.
Do you want to test in other platforms?
This is a version 0.3.
I have only tested it in:
Ubuntu 20.04 LTS Linux for x64
Ubuntu 20.04 LTS 64 bits under Raspberry Pi 4 (ARM Processors)
Windows 10 Professional x64
Mac OS X
CentOS
It should work in all the platforms supporting Python, but if you want to contribute testing for other platforms, like Windows 32 bit, Solaris or BSD, let me know.
Alternative solutions
You can create a ramdisk and compress it to there. Then delete the original and move the compressed file from ramdisk to the hard drive, and unload the ramdrive Kernel Module. However we find very often with this problems in Docker containers or in instances that don’t have the Kernel module installed. Is much more easier to run cmemgzip.
Another strategy you can do for the future is to have a folder based on ZFS and compression. Again, ZFS should be installed on the system, and this doesn’t happen with Docker containers.
cmemgzip is designed to work when there is no free space, if there is free space, you should use gzip command.
In a real emergency when you don’t have enough RAM, neither disk space, neither the possibility to send the log files to another server to be compressed there, you could stop using the swap, and fdisk the swap partition to be a ext4 Linux format, format it, mount is, and use the space to compress the files. And after moving the files compressed to the original folder, fdisk the old swap partition to change type to Swap again, and enable swap again (swapon).
Memory requirements
As you can imagine, the weak point of cmemgzip, is that, if the file is completely loaded into memory and then compressed, the requirements of free memory on the Server/Instance/VM are at least the sum of the size of the file plus the sum of the size of the file compressed. You guess right. That’s true.
If there is not enough memory for loading the file in memory, the program is interrupted gracefully.
I decided to keep it simple, but this can be an option for the future.
So if your VM has 2GB of Available Memory, you will be able to use cmemgzip in uncompressed log files around 1.7GB.
In version 0.3 I implemented the ability to load chunks of the original file, and compress into memory, so I would be able use less memory. But then the compression is less efficient and initial tests point that I’ll have to keep a separate file for each compressed chunk. So I will need to created a uncompress tool as well, when now is completely compatible with gzip/gunzip, zcat, the file extractor from Ubuntu, etc…
For a big Server with a logfile of 40TB, around 300GB of RAM should be sufficient (the Servers I use have 768 GB of RAM normally).
Honestly, nowadays we find ourselves more frequently with VMs or Instances in the Cloud with small drives (10 to 15GB) and enough Available RAM, rather than Servers with huge mount points. This kind of instances, which means scaling horizontally, makes more difficult to have NFS Servers were we can move those logs, for security.
So cmemgzip covers very well some specific cases, while is not useful for all the scenarios.
I think it’s safe to say it covers 95% of the scenarios I’ve found in the past 7 years.
cmemgzip will not help you if you run out inodes.
Usage
Usage is very simple, and I kept it very verbose as the nature of the work is Operations, Engineers need to know what is going on.
I return error level/exit code 0 if everything goes well or 1 on errors.
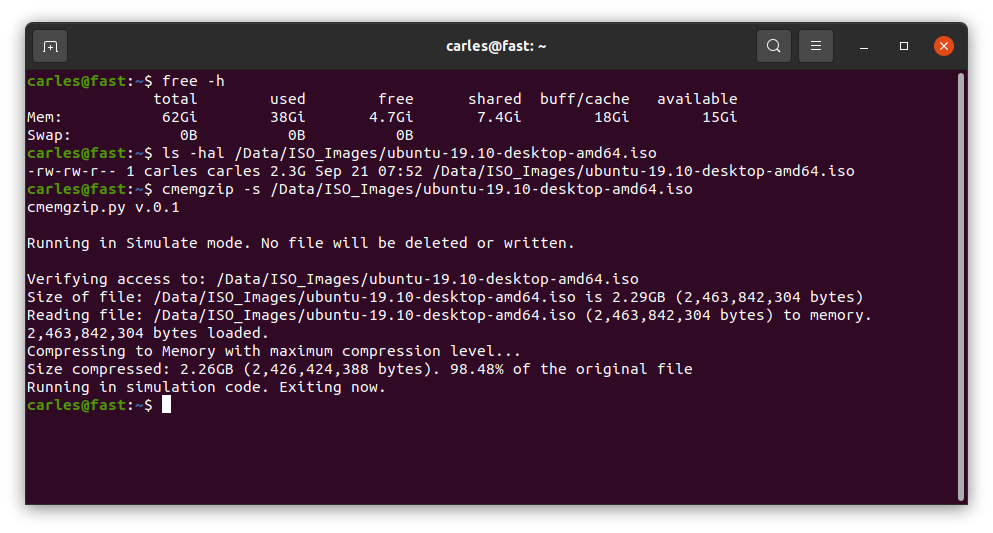
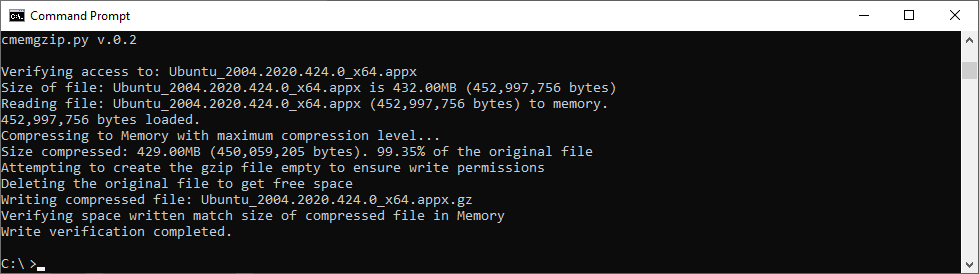
./cmemgzip.py /home/carles/test_extract/SherlockHolmes.txt

 cmemgzip.py v.0.1

 Verifying access to: /home/carles/test_extract/SherlockHolmes.txt
 Size of file: /home/carles/test_extract/SherlockHolmes.txt is 553KB (567,291 bytes)
 Reading file: /home/carles/test_extract/SherlockHolmes.txt (567,291 bytes) to memory.
 567,291 bytes loaded.
 Compressing to Memory with maximum compression level…
 Size compressed: 204KB (209,733 bytes). 36.97% of the original file
 Attempting to create the gzip file empty to ensure write permissions
 Deleting the original file to get free space
 Writing compressed file /home/carles/test_extract/SherlockHolmes.txt.gz
 Verifying space written match size of compressed file in Memory
 Write verification completed.
You can also simulate, without actually delete or write to disk, just in order to know what will be the
Installation
There are no third party libraries to install. I only use the standard ones: os, sys, gzip
So clone it with git in your preferred folder and just create a symbolic link with your favorite name:
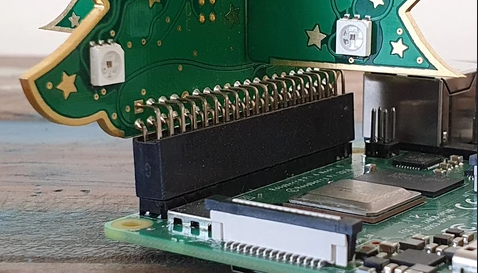
So you are trying to program the Raspberry expansion PINS in Python, for example for this 3D LED Christmas Tree, and you’re getting the error:
GPIO.setup(self.number, GPIO.IN, self.GPIO_PULL_UPS[self._pull]) RuntimeError: Not running on a RPi!
I’m running this on Ubuntu 20.04LTS with a Raspberry 4.
The first thing:
Make sure you have an official Raspberry Pi charger.
Or at least, make sure your USB charger provides enough intensity to power the Raspberry and the LEDs.
The LED power comes from the motherboard and if Raspberry Pi has not enough energy this is not going to work.
My colleague Michela had her tree not working because of the charger was not able to provide enough energy. When she ordered a new charger, it worked like a charm.
Install the base Software
In order to communicate with General Purpose Input Output ports (GPIO) you need to install this Software:
I saw many people stuck, in the forums, because of that.
To work with the LEDs you need to run the samples as root.
Some code examples
To provide a bit of “the whole package” here are some simple examples.
Turn to red the LED’s one by one
from tree import RGBXmasTree
from time import sleep

o_tree = RGBXmasTree()

for o_pixel in o_tree:
    o_pixel.color = (1, 0, 0)
    sleep(0.1)
Turn to a different color, sleep, and again
from tree import RGBXmasTree
from time import sleep

o_tree = RGBXmasTree()

a_t_colors = [(1, 0, 0), (0, 1, 0), (0, 0, 1)]

for t_color in a_t_colors:
    o_tree.color = t_color
    sleep(1)
Turn off the lights
from tree import RGBXmasTree

o_tree = RGBXmasTree()

o_tree.color = (0, 0, 0)
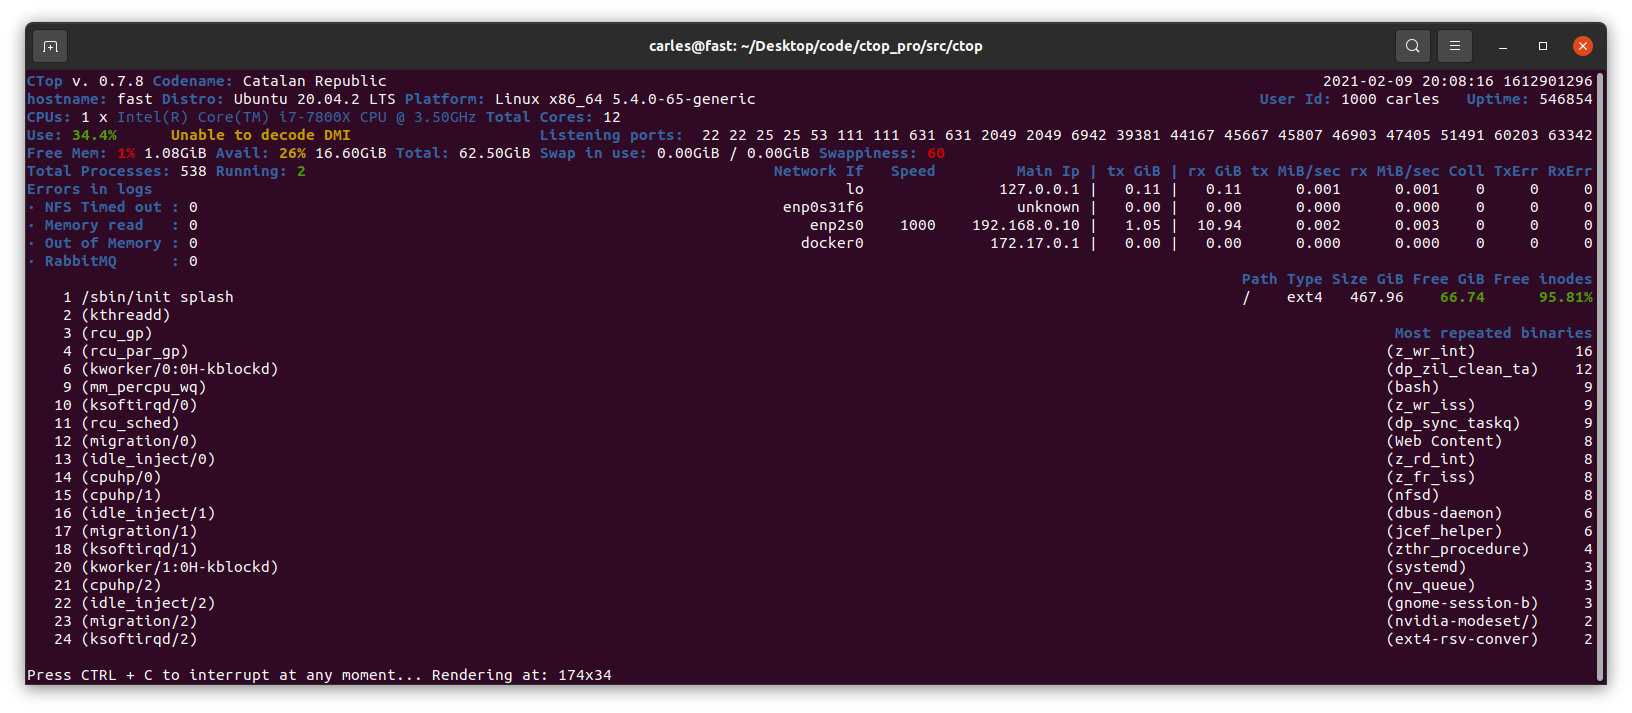
I have updated CTOP.py so now it detects if is running in a Google GCP instance.
So the list of instances/type of virtualization detected is:
Amazon AWS
Google GCP
OpenStack
VirtualBox
Docker containers
LXC
I’m working in detecting Raspberry Pi, models running CTOP, and in enabling the plugins system so anybody can easily expand the functionality of ctop.py.
v.0.7.8
Commented annotations and type hinting, to make CTOP compatible with Python 3.5.0.
Added Available RAM.
Added Google GCP detection.
Inform if it doesn't have permissions to decode DMI.
Print the userId (numeric) and the User (string), like: 1000 carles or 0 root.
Logic for swappiness <= 10 Ok, >10 and <= 30 warning, >30 red (alert).
Reduced digits for swap to 2, to avoid confusions.
I have updated my book Python 3 Combat Guide, with another full cycle, step by step, to convert an ugly script that escapes to shell to a nice OOP code with Unit Testing, step by step.
I have updated my book ZFS for Ubuntu 20.04 LTS, adding how to create a pool and Datasets for home, sharing NFS for the Media Player.
If you like Star Wars and the Mandalorian, you may laugh has much as I did with this video:
As you see I’m writing more articles about Windows, Mac Os X, and proprietary Software. Some of my colleagues work in companies and use proprietary Software, so I’ll be writing more articles about those ecosystems. I spend more time now with colleagues working on all kind of projects, and with students that have other problems too, so I help them. However my main focus is Open Source, Architecture, Scaling, programming in Python and Java.
Time ago there was a web page that was rendered in blank for certain group of users.
The errors were coming from an Oracle instance. One SysAdmin restarted the instance, but the errors continued.
Often there are problems due to having two different worlds: Development and Production/Operations.
What works in Development, or even in Docker, may not work at Scale in Production.
That query that works with 100,000 products, may not work with 10,000,000.
I have programmed a lot for web, so when I saw a blank page I knew it was an internal error as the headers sent by the Web Server indicated 500. DBAs were seeing elevated number of errors in one of the Servers.
So I went straight to the Oracle’s logs for that Servers.
Just before this error, there was an error with a Query, and the PID matched, so it seemed cleared to me that the query was causing the crash at Oracle level.
Basically in our case, the query that was launched by the BackEnd was using more memory than allowed, which caused Oracle to kill it.
That is a tunnable that you can modify introduced in Oracle 10g.
You can see the current values first:
SQL> select
2 nam.ksppinm NAME,
3 nam.ksppdesc DESCRIPTION,
4 val.KSPPSTVL
5 from
6 x$ksppi nam,
7 x$ksppsv val
8 where nam.indx = val.indx and nam.ksppinm like '%kgl_large_heap_%_threshold%';

NAME                              | DESCRIPTION                       | KSPPSTVL
=============================================================================================
_kgl_large_heap_warning_threshold | maximum heap size before KGL      | 4194304
                                    writes warnings to the alert log
---------------------------------------------------------------------------------------------
_kgl_large_heap_assert_threshold  | maximum heap size before KGL      | 4194304
                                    raises an internal error
So, _kgl_large_heap_warning_threshold is the maximum heap before getting a warning, and _kgl_large_heap_assert_threshold is the maximum heap before getting the error.
Depending in your case the solution can be either:
Breaking your query in several to reduce the memory used
Use paginating or LIMIT
Set a bigger value for those tunnables.
It will work setting 0 for these to variables, although I don’t recommend it to you, as you want your Server to kill queries that are taking more memory than you want.
To increase the value of , you have to update it. Please note it is in bytes, so for 32MB is 32 * 1024 * 1024, so 33,554,432, and using spfile:
SQL> alter system set "_kgl_large_heap_warning_threshold"=33554432scope=spfile ;
SQL> shutdown immediate
SQL> startup
SQL> show parameter _kgl_large_heap_warning_threshold
NAME TYPE VALUE
==================================|=========|===============
_kgl_large_heap_warning_threshold | integer | 33554432
This is a trick I share, as I see many students having problems with this.
Assuming that your Kali distribution is recent (Linux Kernel bigger than Kernel 5.3), the most typical problem student have is that laptops xps from Dell and other brands have a combination of keys to enable or disable the Wifi.
On the Dell xps is on the key PrtScr, so if your Wifi is disabled, you can enable it in Kali Linux press:
CTRL + ALT + Fn + PrtScr
As you can see in the PrtScr the is an icon of Wifi Signal.
The Fn key is on the bottom left, next to Ctrl.
This is a very simple to fix problem, but many people suffer this problem and go crazy trying to update drivers or even having to use an external USB dongle.
I reproduced your case in a VM and paste here step by step. :)
Note: First of all, please do a backup of your data. I added an empty new disk, so ZFS had no doubt what was the master drive. Although you should have no problem as the first drive already forms part of the pool, a backup is recommended.
Quick answer: You need the zpool attach command.
Basically:
sudo zpool attach hdd0 existinghdd blankhdd
After, do:
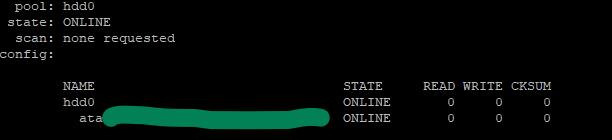
zpool status
And you will see that a mirror has been created. Your data on the already existing drive will be keep, and will be replicated to the new one (Resilvered).
As ZFS only copys the actual information this process will take more or less depending on the amount of Data.
In my VM 300 GB were replicated in 3 seconds, while my experience with SAS and SATA drives, I was Resilvering 10 TB in less than 24 hours (for that I was using drives from 10TB to 14TB SAS) .
Now the long answer with everything I did in my Virtual Box VM:
lsblk --scsi
identify the two empty drives by:
ls /dev/disk/by-id/
Select one of them and create a pool like your: sudo zpool create hdd0 id_of_mydrive
See that pool /hdd0 has been created and mounted on root.
sudo zpool statussudo zpool listsudo ls -al /hdd0
Fill with some random data (or better copy files there) to generate a drive like data like you. I generated from random:
pool: hdd0
state: ONLINE
scan: resilvered 301M in 0 days 00:00:03 with 0 errors…

   NAME                            STATE   READ WRITE CKSUM
   hdd0
     mirror-0
       ata-VBOX_HARDDISK_VBa8...   ONLINE     0     0     0
       ata-VBOX_HARDDISK_VB8c...   ONLINE     0     0     0

errors: No known data errors
I verified the checksums.
zpool list will return as well 99GB of space available, as two drives of 100GB are being used in mirror.
So as kaulex mentioned the format is: zpool attach
Where device is your previous vdev with data (the single hard drive with Data in the ZFS pool named ‘hdd0’).
As I did you want to use the Id of the device and not the name, so you will use the identifier in /dev/disk/by-id/ and not sdb, sdc… (Please note, adding /dev/ is not necessary). The reason to do not use device names like sdb, sdc, sdea, etc… is that those names may change why live is running or between reboots. The id never changes. In real systems, not Virtual Box, they may start by wwn or ata.
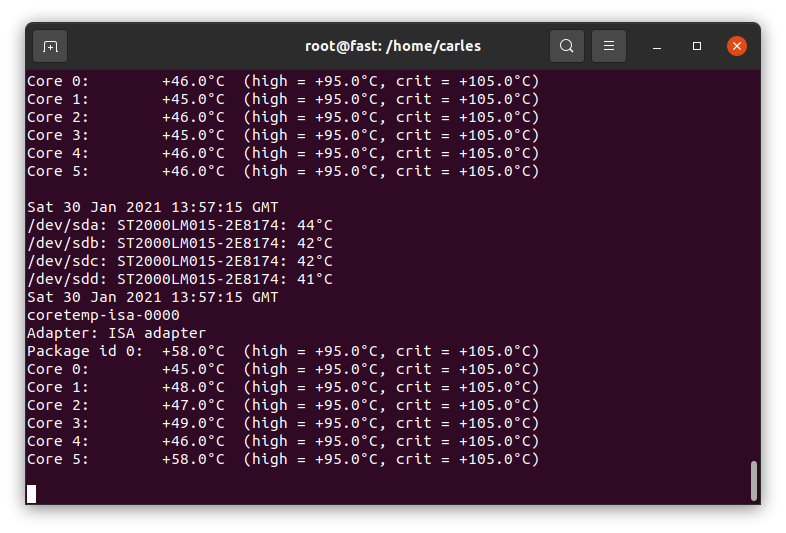
I’ve been helping to troubleshoot the reason one Commodity Server (with no iDrac/Ilo ipmi) is powering off randomly. One of the hypothesis is the temperature.
This is a very simple script that will print the temperature of the HDDs and the CPU and keep to a log file.
First you need to install hddtemp and lm-sensors:
sudo apt install hddtemp lm-sensors
Then this is the one line script, that you should execute as root:
while [ true ]; do date | tee -a /var/log/hddtemp.log; hddtemp /dev/sda /dev/sdb /dev/sdc /dev/sdd | tee -a /var/log/hddtemp.log; date | tee -a /var/log/cputemp.log; sensors | tee -a /var/log/cputemp.log; sleep 2; done
Feel free to change sleep 2 for the number of seconds you want to wait, like sleep 10.
Press CTRL + C to interrupt the script at any time.
You can execute this inside a screen session and leave it running in Background.
Note that I use tee command, so the output is print to the screen and to the log file.
This explains how to solve a problem if you logged in to the domain, via your computer, as a regular user, and then you need to run Active Directory with Administrator privileges as another user.