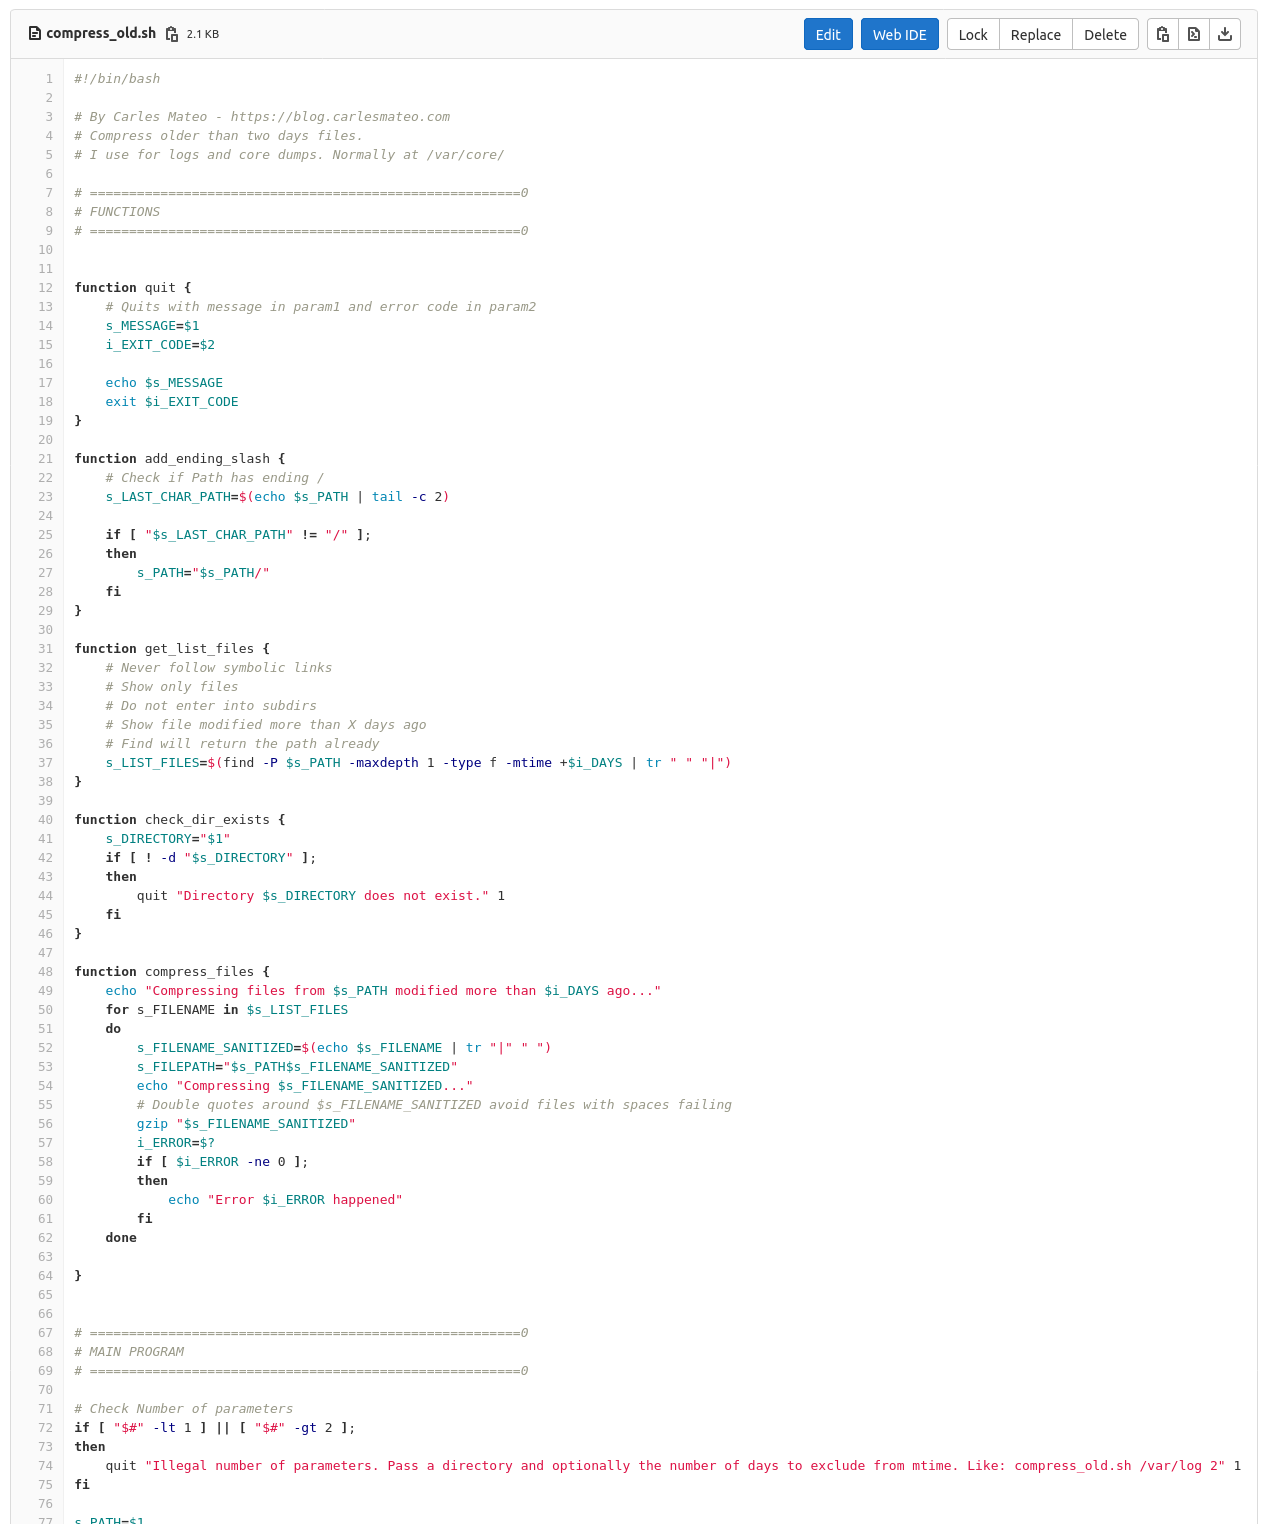
Category Archives: Software development

A simple script to upload a PIP package

If you want to create a package and distribute it like through pip in record time, you can customize my script from cmemgzip for Ubuntu 20.04.

Here is the official documentation if you want to do everything manually:

https://packaging.python.org/tutorials/packaging-projects

Here is the script customized for Test Environment.

You’ll need to create a Test account in test.pypi.org

#!/bin/bash

PACKAGE="cmemgzip-test"
mkdir $PACKAGE
mkdir $PACKAGE/src
mkdir $PACKAGE/src/$PACKAGE
mkdir $PACKAGE/tests

cp LICENSE $PACKAGE/

echo "[build-system]" > $PACKAGE/pyproject.toml
echo "requires = [" >> $PACKAGE/pyproject.toml
echo '    "setuptools>=42",' >> $PACKAGE/pyproject.toml
echo '    "wheel"' >> $PACKAGE/pyproject.toml
echo "]" >> $PACKAGE/pyproject.toml
echo 'build-backend = "setuptools.build_meta"' >> $PACKAGE/pyproject.toml

cat <<EOF > $PACKAGE/setup.cfg
[metadata]
name = cmemgzip
version = 0.4.1
author = Carles Mateo
author_email = cmemgzip@carlesmateo.com
description = Compresses files in memory and replaces the original by a .gz file when there is no space on drive.
long_description = file: README.md
long_description_content_type = text/markdown
url = https://gitlab.com/carles.mateo/cmemgzip
project_urls =
    Bug Tracker = https://gitlab.com/carles.mateo/cmemgzip/issues
classifiers =
    Programming Language :: Python :: 3
    License :: OSI Approved :: MIT License
    Operating System :: OS Independent

[options]
package_dir =
    = src
packages = find:
python_requires = >=3.6

[options.packages.find]
where = src
EOF

cp README.md $PACKAGE/
cp manual-cmemgzip.pdf $PACKAGE/
cp cmemgzip.py $PACKAGE/src/$PACKAGE/
touch $PACKAGE/src/$PACKAGE/__init__.py
cp test_*.py $PACKAGE/tests/


python3 -m pip install --upgrade build

# Install dependencies
sudo apt-get install python3.8-venv

python3 -m pip install --user --upgrade twine


echo
echo "Entering into directory $PACKAGE"
cd $PACKAGE

echo
echo "Generating distribution binaries"
python3 -m build

# Create account in: https://test.pypi.org/manage/account/

# Create API Token
# https://test.pypi.org/manage/account/

echo
echo "Going to upload the packages. Use your username and password"
echo
python3 -m twine upload --repository testpypi dist/cmemgzip*

The changes for the script to production are just a different package name, and last line:

python3 -m twine upload --repository pypi dist/cmemgzip*

Obviously you’ll need to use credentials for Production.

A live session refactoring and adding Unit Testing to my Python3 project cmemgzip

I refactor and add unit testing to my actual project cmemgzip while I comment every step so you can learn the whys and the reasoning.

Open video in full screen with max 1080 quality, in order to see the code clearly.

Update 2021-03-03: I added a third part. I’m tired but still is worth watching.

Raspberry Pi: Solving the problem GPIO.setup(self.number, GPIO.IN, self.GPIO_PULL_UPS[self._pull]) RuntimeError: Not running on a RPi! in Ubuntu 20.04LTS

So you are trying to program the Raspberry expansion PINS in Python, for example for this 3D LED Christmas Tree, and you’re getting the error:

GPIO.setup(self.number, GPIO.IN, self.GPIO_PULL_UPS[self._pull])
RuntimeError: Not running on a RPi!

I’m running this on Ubuntu 20.04LTS with a Raspberry 4.

The first thing:

Make sure you have an official Raspberry Pi charger.

Or at least, make sure your USB charger provides enough intensity to power the Raspberry and the LEDs.

The LED power comes from the motherboard and if Raspberry Pi has not enough energy this is not going to work.

My colleague Michela had her tree not working because of the charger was not able to provide enough energy. When she ordered a new charger, it worked like a charm.

Install the base Software

In order to communicate with General Purpose Input Output ports (GPIO) you need to install this Software:

sudo apt install python3-pip python3-gpiozero
sudo pip3 install giozero

In order to run the 3D LED Christmas Tree code samples

sudo pip3 install colorzero
sudo pip3 install rpi.gpio --upgrade

Reboot

It may be not required in some cases.

Download the Source code

https://github.com/ThePiHut/rgbxmastree#rgbxmastree

Run the samples as root

I saw many people stuck, in the forums, because of that.

To work with the LEDs you need to run the samples as root.

Some code examples

To provide a bit of “the whole package” here are some simple examples.

Turn to red the LED’s one by one

from tree import RGBXmasTree
from time import sleep

o_tree = RGBXmasTree()

for o_pixel in o_tree:
    o_pixel.color = (1, 0, 0)
    sleep(0.1)

Turn to a different color, sleep, and again

from tree import RGBXmasTree
from time import sleep

o_tree = RGBXmasTree()

a_t_colors = [(1, 0, 0), (0, 1, 0), (0, 0, 1)]

for t_color in a_t_colors:
    o_tree.color = t_color
    sleep(1)

Turn off the lights

from tree import RGBXmasTree

o_tree = RGBXmasTree()

o_tree.color = (0, 0, 0)

Where I used it?

I used it in my Open Source monitor Software CTOP.py in order to show the plugins/extensions capability of it. :)

A simple Bash one line script to log the temperature of your HDDs and CPUs in Ubuntu

I’ve been helping to troubleshoot the reason one Commodity Server (with no iDrac/Ilo ipmi) is powering off randomly. One of the hypothesis is the temperature.

This is a very simple script that will print the temperature of the HDDs and the CPU and keep to a log file.

First you need to install hddtemp and lm-sensors:

sudo apt install hddtemp lm-sensors

Then this is the one line script, that you should execute as root:

while [ true ]; do date | tee -a /var/log/hddtemp.log; hddtemp /dev/sda /dev/sdb /dev/sdc /dev/sdd | tee -a /var/log/hddtemp.log; date | tee -a /var/log/cputemp.log; sensors | tee -a /var/log/cputemp.log; sleep 2; done

Feel free to change sleep 2 for the number of seconds you want to wait, like sleep 10.

Press CTRL + C to interrupt the script at any time.

You can execute this inside a screen session and leave it running in Background.

Note that I use tee command, so the output is print to the screen and to the log file.

News from the blog 2021-01-11

Happy New Year to all.

Is something very simple, but will help my student friends to validate Input from Keyboard without losing too many hours.

The Input Validation Classes I create in PHP for Privalia or in my PHP Catalonia Framework, are much, much, more powerful, allowing the validation of complete forms, rendering errors, etc… although they were created for Web, and not for Keyboard input.

It recursively goes to all the subdirectories looking for .py files, and then it counts the lines.

  • I updated the price of my books to be the minimum allowed by LeanPub, to $5 USD, and created a bundle of two of them for $7 USD.

So people can benefit from this during the lock down.

  • I’ve updated the Python Combat Guide book with a sample of using Paramiko Libraries for SSH, and increased the Object Oriented Programing and Unit Testing, sections. I also added some books to the Bibliography.
  • I’ve read the postmortem initial analysis from Slack’s incident. It’s really interesting.

I cannot share it, but I guess that at some point they will publish it on their blog:

https://slack.engineering/

  • As I’m giving more Python Classes I decided to write a book to teach to code in Python for non-programmers.

A Bash script for counting the number of lines of your code

I’m teaching a friend how to code. Covid-19 has affected many people, with many jobs loss in many sectors. I encouraged him to learn to code and I helped him to access to a course offered by the Catalan government, but they let him down with a really difficult exam in the very last moment.

I encouraged him to continue and offered to help him, and after a start with several courses via Internet, that were not very useful, I started teaching and training him personally. And I did the way the companies need: Python, PyCharm, Git, Linux, VirtualBox, Web…

I told him since the beginning that I can help him, yes, but 90% has to come from his effort. I’m really happy to see that he is really doing the effort and how much he advanced.

Was not easy as I had to combine it with the classes in the university, my work, the Open Source projects, and my life… but I’m proud of him and of the effort he is doing.

Today he remembered me how shocked he was when I showed some Python builtin libraries, like datetime, and he saw in PyCharm, that the code of that library alone, has 2,476 lines.

I wanted to explain that we can get to create a program with thousands of lines of code, easily, so I decided to write a small program to count the number of lines of our programs.

I quickly wrote it in bash in one single line:

i_counter=0; for s_filename in `find . -name "*.py"`; do wc --lines $s_filename; i_num=`cat $s_filename | wc --lines`; i_counter=$((i_counter+i_num)); done; echo "Total lines: $i_counter"

Execute it from inside your directory.

It can be improved and optimized very easily.

  • wc is executed so it prints the lines and the filename, and then is executed as a pipe from cat to capture just the number, so the first one is not really needed. The same can be achieved with echo as we have the variables $s_filename and $i_counter
  • You can filter out test files or others by using the find options or grep -v, for example to exclude test directories or files.
  • Number of files can very easily added too.
  • Using “” for avoiding problems with files with spaces.
  • The better and most modern $() way to execute, instead of “ can be used.

I made some improvements abovementioned and uploaded this as a several lines script:

https://gitlab.com/carles.mateo/blog.carlesmateo.com-source-code/-/blob/master/count_lines_of_code.sh

Screenshot taken from PyCharm

Please note this script does not only run in Linux, it can also be executed in Windows using GitBash.

For my Open Source project CTOP.py it’s 4,652 lines of Python code. :)

Java validation Classes for Keyboard

I share with you a very lightweight, stand alone, Java validation Class for Input Keyboard, that I created for a university project.

The first thing to mention is an advice about using the Scanner with nextInt(), nextDouble(), next()…

My recommendation is to avoid using these. Work only with Strings and convert to the right Datatype. So use only nextLine(). You will save hours of frustration.

Those are the methods that I’ve implemented:

  • int askQuestion(String question, int minValue, int maxValue)
    Ask a Question expecting to get a number, like “What year was you born: “, and set a minimum value and a maximum value. The method will not allow to continue until the user enters a valid integer between the ranges.
  • float askQuestion(String question, float minValue, float maxValue)
    Same idea with Floats.
  • double askQuestion(String question, double minValue, double maxValue)
    Same with Double, so for example question = “Enter the price: “.
  • String askQuestion(String question)
    Ask a question and get a String. Simple, no validation. Not even if it’s empty String.
  • askQuestionLength(String question, int minLength, int maxLength)
    Here I changed the name of the method. Same mechanics as askQuestion, but will validate that the String entered is between minimum length and maxlength. For example, to ask a password between 8 and 12 characters.
  • String askQuestion(String question, String[] allowedValues)
    This one accepts a question, and an Array of Strings with the values that are acceptable. Is case sensitive.
    So, using MT Notation, you call it with:

String[] a_s_acceptedValues = new String[4];
a_s_acceptedValues[0] = “Barcelona”;
a_s_acceptedValues[1] = “Cork”;
a_s_acceptedValues[2] = “Irvine”;
a_s_acceptedValues[3] = “Edinburgh”;
String s_answer = o_inputFromKeyboard.askQuestion(“What is your favorite city?”, a_s_acceptedValues);

Here is the code for the Class InputFromKeyboard.

package com.carlesmateo;

import java.util.Scanner;

public class InputFromKeyboard {

    private static Scanner keyboard = new Scanner(System.in);

    public static int askQuestion(String question, int minValue, int maxValue) {
        // Make sure we enter in the loop
        int value = minValue -1;

        while (value < minValue || value > maxValue) {
            try {
                String valueString = askQuestion(question);
                value = Integer.parseInt(valueString);

            } catch (Exception e) {
                System.out.println("Invalid number!");
            }
        }

        return value;
    }

    public static float askQuestion(String question, float minValue, float maxValue) {
        // Make sure we enter in the loop
        float value = minValue -1;

        while (value < minValue || value > maxValue) {
            try {
                String valueString = askQuestion(question);
                value = Float.parseFloat(valueString);

            } catch (Exception e) {
                System.out.println("Invalid number!");
            }
        }

        return value;
    }

    public static double askQuestion(String question, double minValue, double maxValue) {
        // Make sure we enter in the loop
        double value = minValue -1;

        while (value < minValue || value > maxValue) {
            try {
                String valueString = askQuestion(question);
                value = Double.parseDouble(valueString);

            } catch (Exception e) {
                System.out.println("Invalid number!");
            }
        }

        return value;
    }


    public static String askQuestion(String question) {
        // Make sure we enter in the loop
        String answer = "";

        while (answer.equals("")) {

            try {
                System.out.print(question);
                answer = keyboard.nextLine();

            } catch (Exception e) {
                System.out.println("Invalid value!");
                // System.out.println(e.getMessage());
            }
        }

        return answer;
    }

    public static String askQuestionLength(String question, int minLength, int maxLength) {
        // Make sure we enter in the loop
        String answer = "";

        while (answer.equals("")) {

            try {
                System.out.print(question);
                answer = keyboard.nextLine();

                int length = answer.length();
                if (length < minLength || length > maxLength) {
                    answer = "";
                    System.out.println("Answer should be between " + minLength + " and " + maxLength + " characters.");
                }

            } catch (Exception e) {
                System.out.println("Invalid value!");
                // System.out.println(e.getMessage());
            }
        }

        return answer;
    }

    public static String askQuestion(String question, String[] allowedValues) {
        // Make sure we enter in the loop
        String answer = "";

        while (answer.equals("")) {

            try {
                System.out.print(question);
                answer = keyboard.nextLine();

                boolean found = false;
                for (int counter=0; counter < allowedValues.length; counter++) {
                    if (answer.equals(allowedValues[counter])) {
                        found = true;
                    }
                }

                if (found == false) {
                    System.out.println("Please enter any of the allowed values:");
                    for (int counter=0; counter < allowedValues.length; counter++) {
                        System.out.println(allowedValues[counter]);
                    }
                    answer = "";
                }

            } catch (Exception e) {
                System.out.println("Invalid value!");
                // System.out.println(e.getMessage());
            }
        }

        return answer;
    }

}

Is a reduced subset of functionality respect what I created in my Web PHP Framework Catalonia Framework, or the Input Data Validation that my friend Joim created in Privalia and later I extended and maintained.

All the Frameworks have similar Input Data functionalities, some much more complex, supporting RegExp, or several rules, multiselection (typical for web), accepting only a subset of characters, but this is the typical 80% functionality that everybody needs when writing a console program.

News from the blog 2020-10-16

  • I’ve been testing and adding more instances to CMIPS. I’m planning on testing the Azure instance with 120 cores.
  • News: Microsoft makes an option to permanently remote work

https://www.bbc.com/news/business-54482245

  • One of my colleagues showed me dstat, a very nice tool for system monitoring, and bandwidth of a drive monitoring. Also ifstat, as complement to iftop is very cool for Network too. This functionality is also available in CTOP.py
  • As I shared in the past news of the blog, I’m resuming my contributions to ZFS Community.

Long time ago I created some ZFS tools that I want to share soon as Open Source.

I equipped myself with the proper Hardware to test on SAS and SATA:

  • 12G Internal PCI-E SAS/SATA HBA RAID Controller Card, Broadcom’s SAS 3008, compatible for SAS 9300-8I.
    This is just an HDA (Host Data Adapter), it doesn’t support RAID. Only connects up to 8 drives or 1024 through expander, to my computer.
    It has a bandwidth of 9,600 MB/s which guarantees me that I’ll be able to add 12 SAS SSD Enterprise grade at almost the max speed of the drives. Those drives perform at 900 MB/s so if I’m using all of them at the same time, like if I have a pool of 8 + 3 and I rebuild a broken drive or I just push Data, I would be using 12×900 = 10,800 MB/s. Close. Fair enough.
  • VANDESAIL Mini-SAS Cables, 1m Internal Mini-SAS to 4x SAS SATA Forward Breakout Cable Hard Drive Data Transfer Cable (SAS Cable).
  • SilverStone SST-FS212B – Aluminium Trayless Hot Swap Mobile Rack Backplane / Internal Hard Drive Enclosure for 12x 2.5 Inch SAS/SATA HDD or SSD, fit in any 3x 5.25 Inch Drive Bay, with Fan and Lock, black
  • Terminator is here.
    I ordered this T-800 head a while ago and finally arrived.

Finally I will have my empty USB keys located and protected. ;)

Remember to be always nice to robots. :)

A trick to see what causes Python error Unindent does not match any outer indentation level with PyCharm

That’s one of the problems with Python. Blocks of code are defined by their indentation position.

That’s a pain when you copy and past and the IDE reindents the code thinking that is doing great, or generate a new inner class instead of replacing all the code.

Well, this error is very annoying cause it means that you mixed spaces and Tabs as indent separators.

But you can go crazy trying to find a tab in your code, so there is a trick that I came with:

Basically go to Menu Edit > Find and then type 4 times space. PyCharm will highlight all the places were this indentation (4 spaces) is present, so you’ll find the impostor without going blind or losing to many time.

As you can see, in front of def execute_command_without_waiting we don’t have 4 spaces. And in this case the impostor was not a camouflaged tab \t but 3 spaces instead of four.