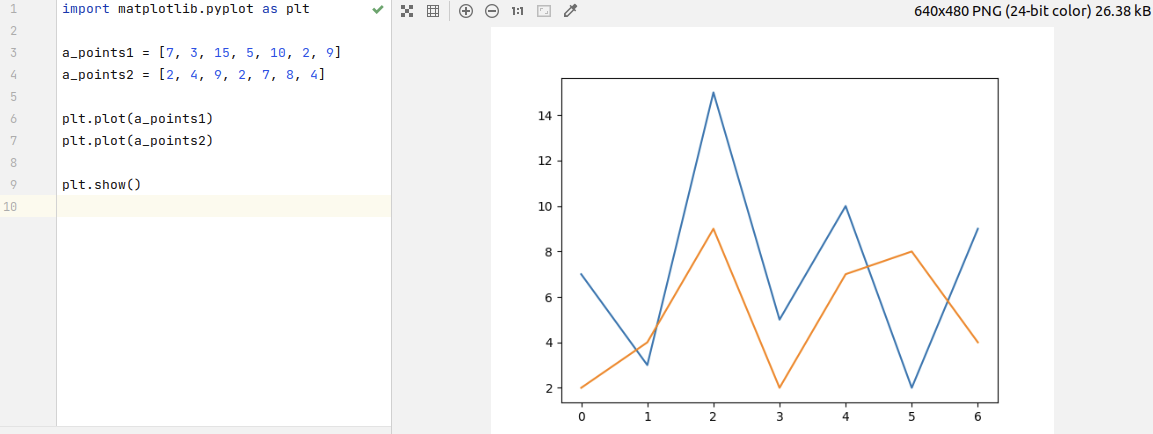
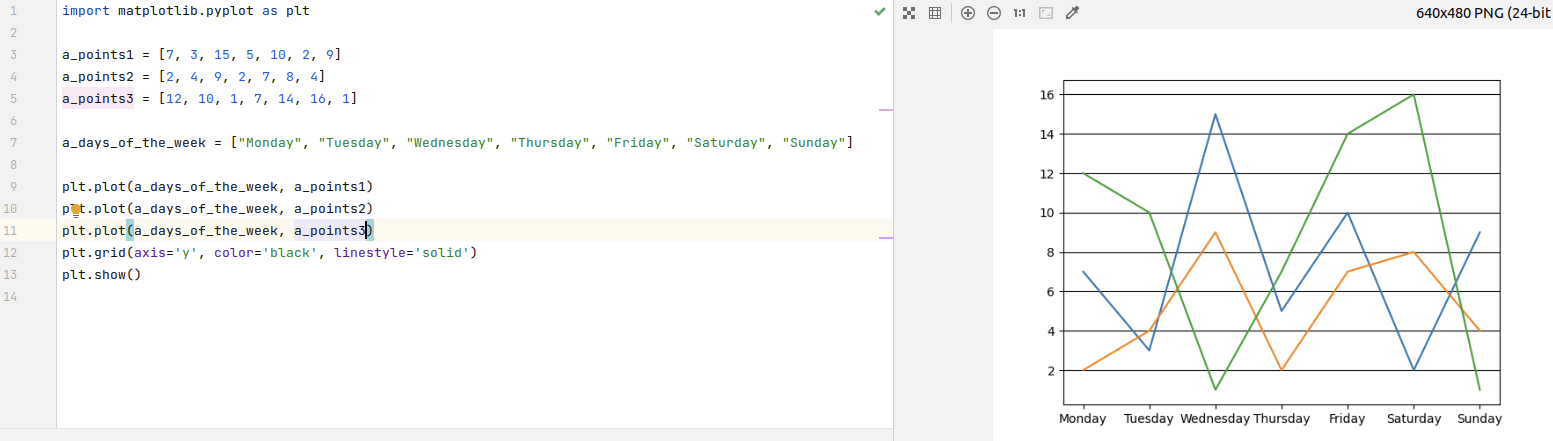
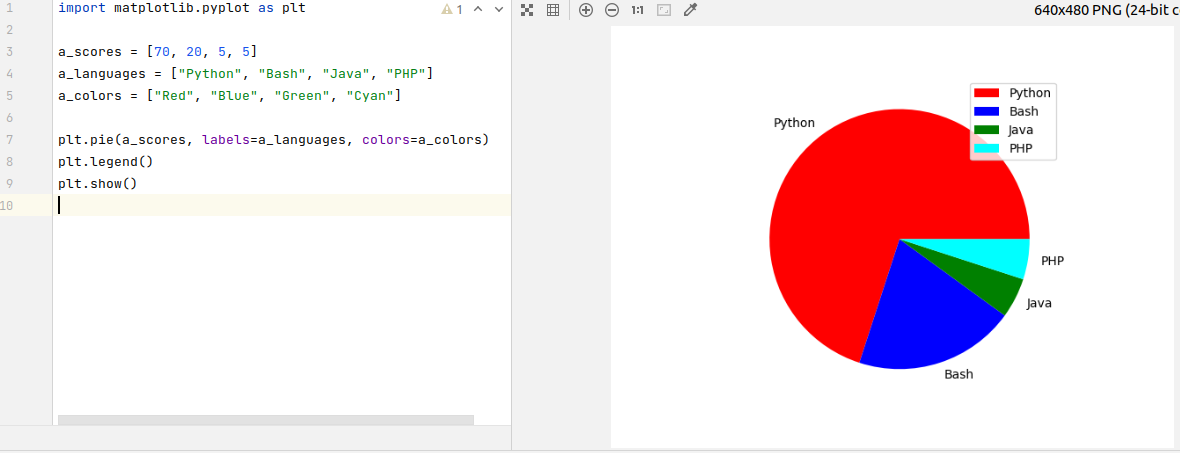
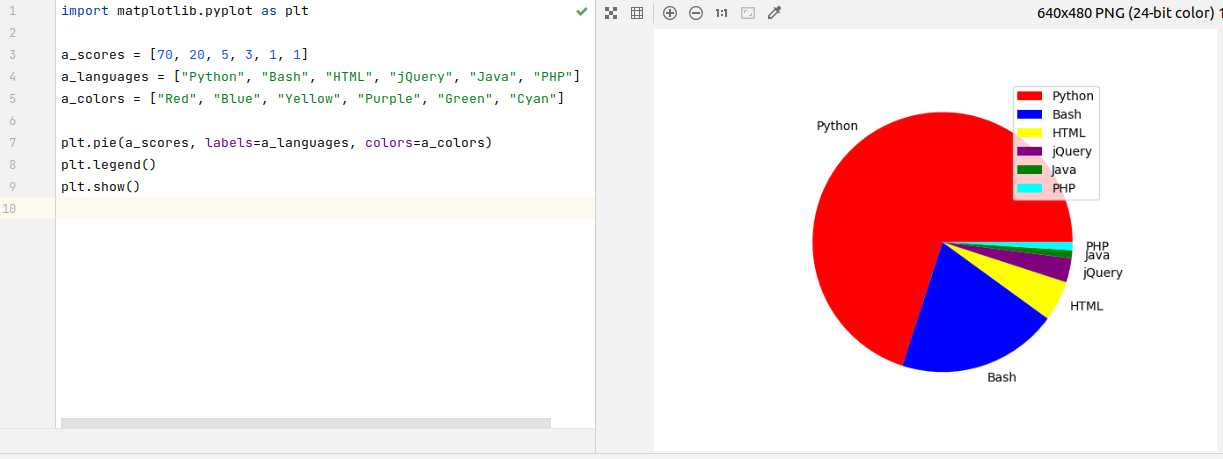
You may like some of other graphs that can be easily generated with matlib package.
I’ve been always working on BackEnd and APIs and I don’t work on FrontEnd, although I programmed some videogames by myself and I’ve fixed some huge bugs in JavaScript in some of the companies I work, but they considered myself the last resource, so I would fix a FrontEnd bug when nobody else could. But even if you work 99.9% of your time in BackEnd, Scaling, Architecture… like me, it is useful being able to draw graphics, for example, when you create a tool that shows the number of players per minute, and its evolution over time, or web visitors in real time, etc…
I’m not talking about the wonderful things, like how big can the Integers be, but about the bizarre things that may ruin your day.
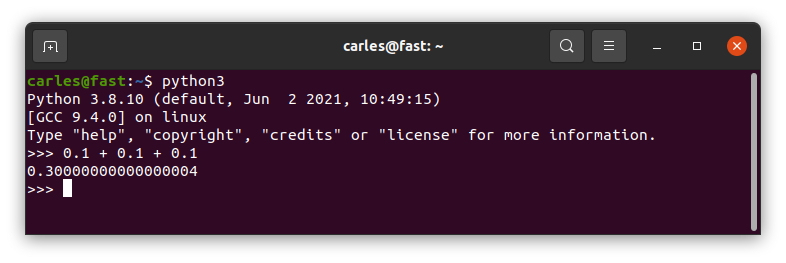
What sums 0.1 + 0.1 + 0.1 in Python?
0.3?
Wrong answer.
A bit of humor
Well, to be honest the computer was wrong. They way programming languages handle the Floats tend to be less than ideal.
Floats
Maybe you know JavaScript and its famous NaN (Not a number).
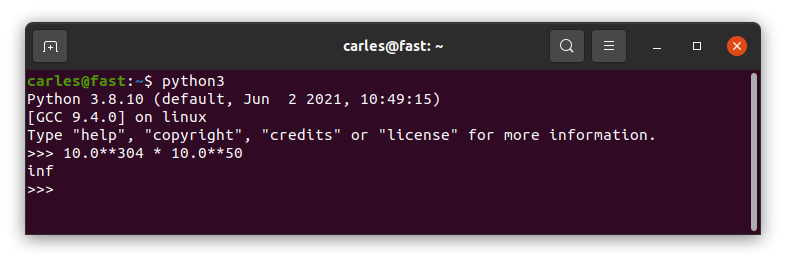
You are probably sure that Python is much more exact than that…
…well, until you do a big operation with Floats, like:
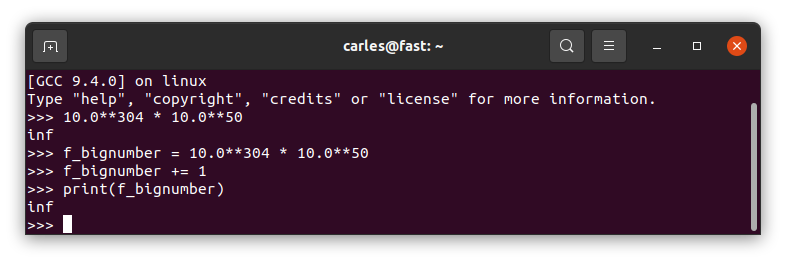
10.0**304 * 10.0**50
and
It returns infinite
I see your infinite and I add one :)
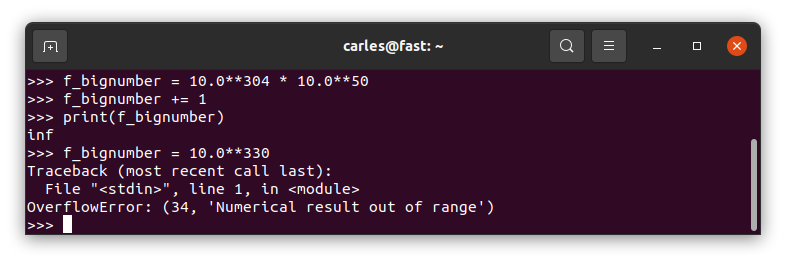
However If we try to define a number too big directly it will return OverflowError:
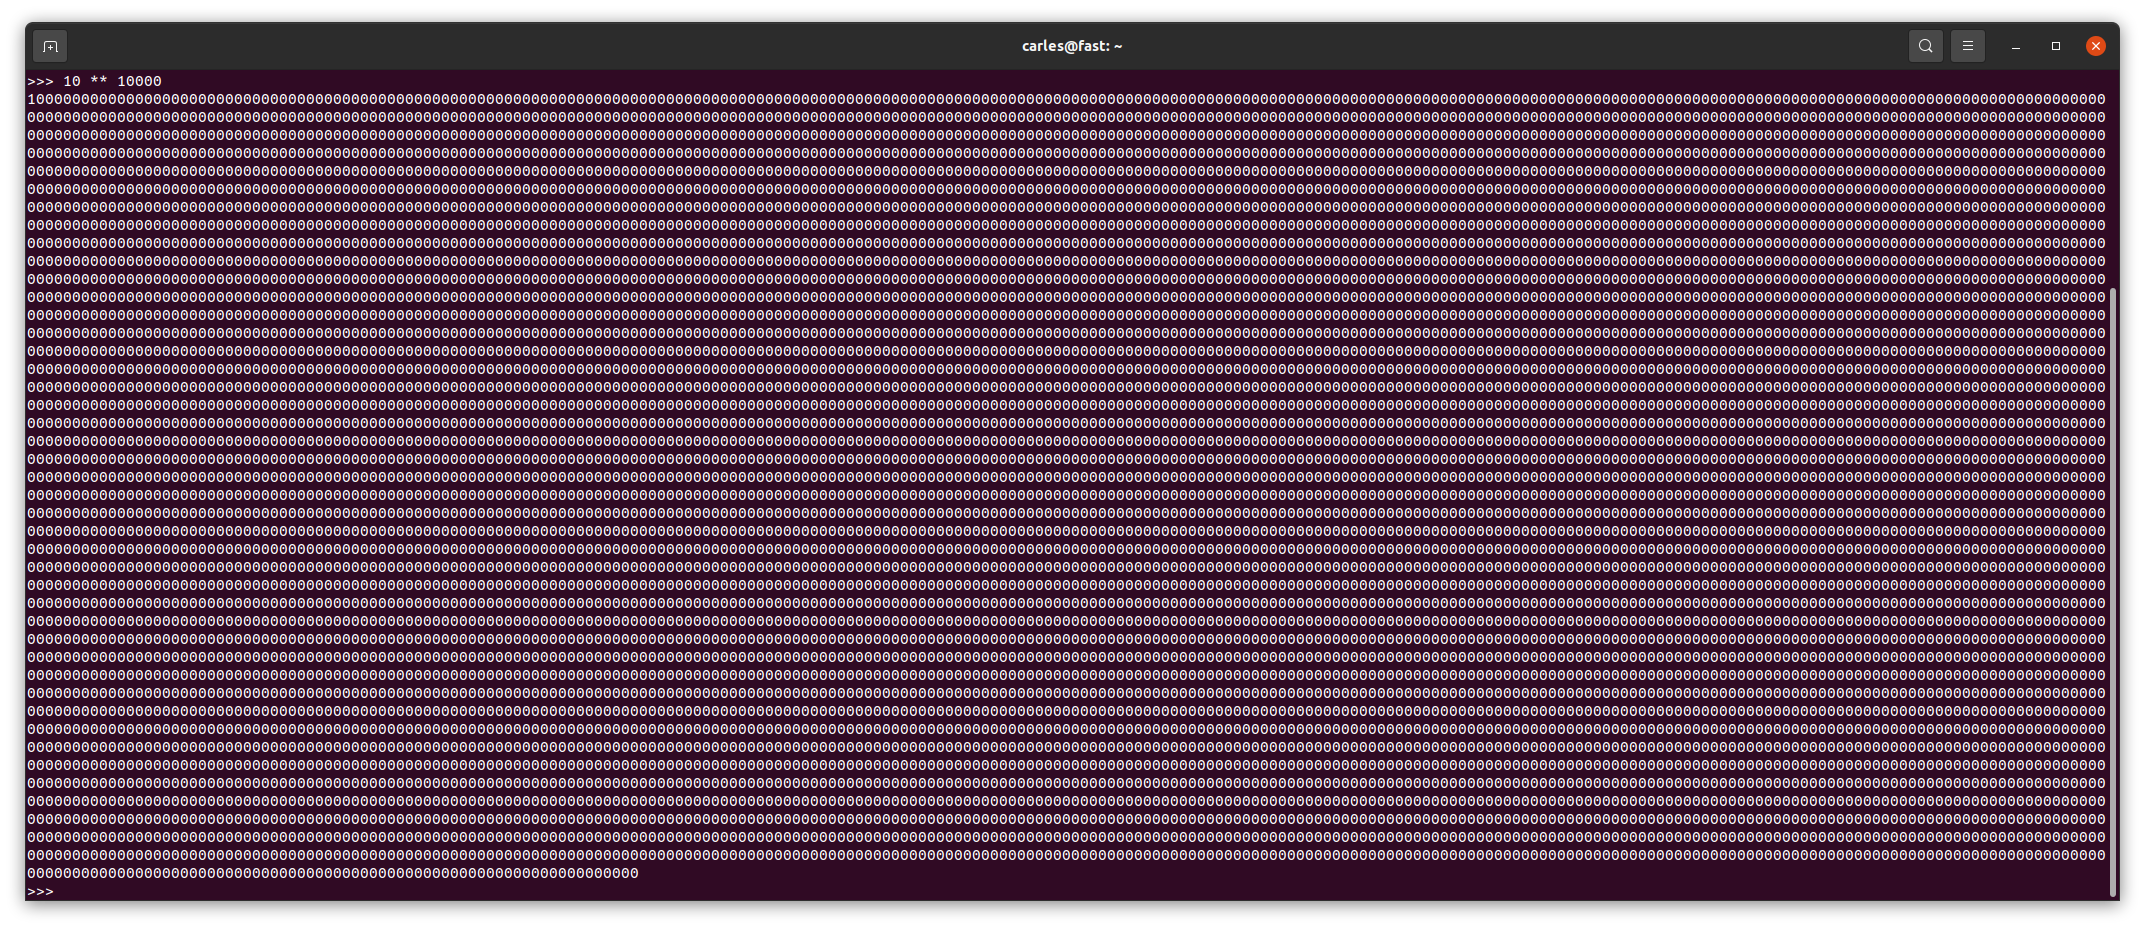
Please note Integers are handled in a much more robust cooler way:
Negative floats
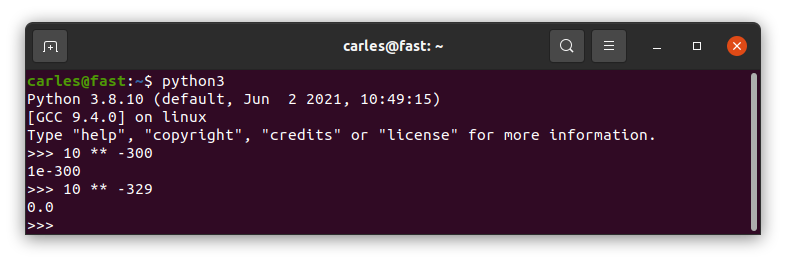
Ok. What happens if we define a number with a negative power, like 10 ** -300 ?
And if we go somewhere a bit more far? Like 10 ** -329
It returns 0.0
Ups!
I mention in my books why is better to work with Integers, and in fact most of the eCommerces, banks and APIs work with Integers. For example, if the amount in USD 10.00 they send multiplied by 100, so they will send 1000. All the actor know that they have to divide by 2.
Breaking the language innocently
I mentioned always that I use the MT Notation, the prefix notation I invented, inspired by the Hungarian Notation and by an amazing C++ programmer I worked with in Volkswagen and in la caixa (now caixabank), that passed away many years ago.
Well, that system of prefixes will name a variable with a prefix for its type.
It’s very useful and also prevents the next weird thing from Python.
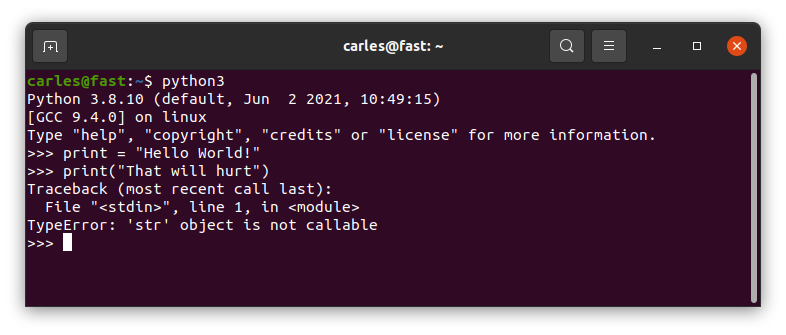
Imagine a Junior wants to print a String and they put in a variable. And unfortunately they call this variable print. Well…
print = "Hello World!"
print("That will hurt")
Observe the output of this and try not to scream:
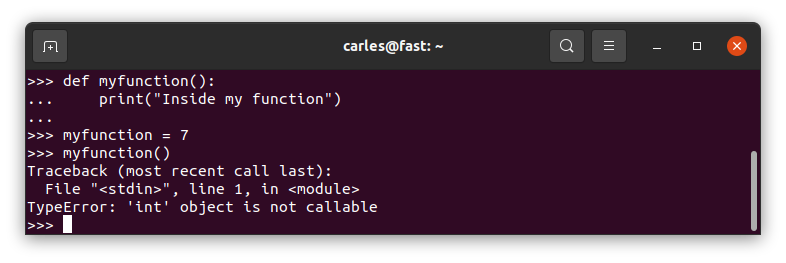
Variables and Functions named equally
Well, most of languages are able to differentiate a function, with its parenthesis, from a variable.
The way Python does it hurts my coder heart:
Another good reason to use MT Notation for the variables, and for taking seriously doing Unit Testing and giving a chance to using getters and setters and class Constructor for implementing limits and sanitation.
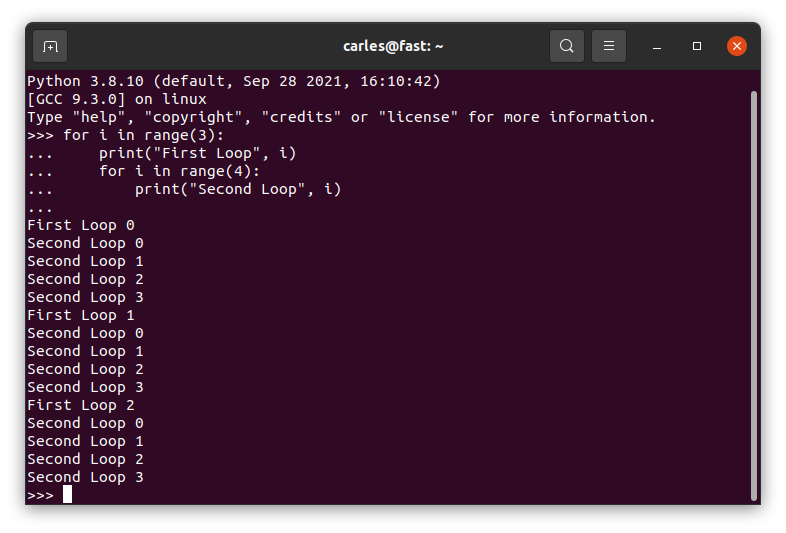
Nested Loops
This will work in Python, it doesn’t work in other languages (but please never do it).
for i in range(3):
    print("First Loop", i)
    for i in range(4):
        print("Second Loop", i)
The code will not crash by overwriting i used in the first loop, but the new i will mask the first variable.
And please, name variables properly.
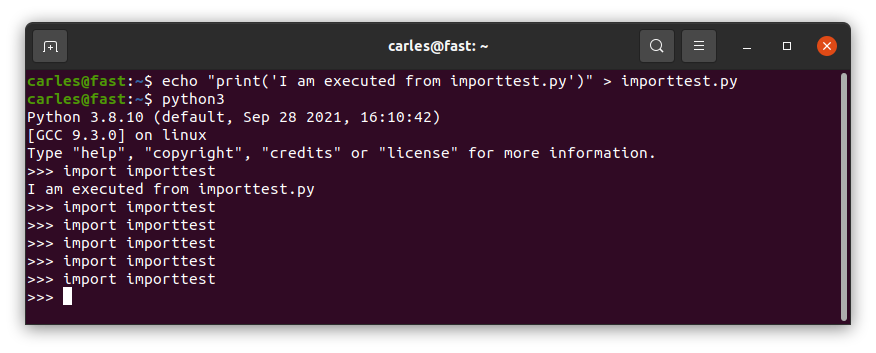
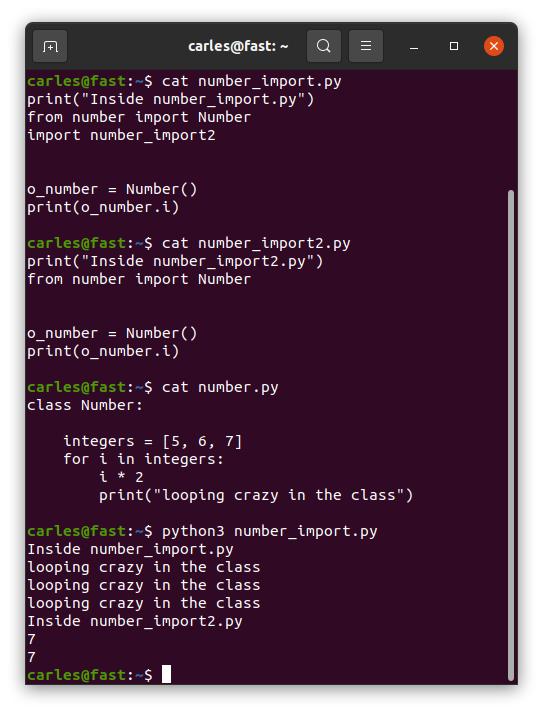
Import… once?
Imports are imported only once. Even if different files imported do import the same file.
So don’t have code in the middle of them, outside functions/classes, unless you’re really know what you’re doing.
Define functions first, and execute code after if __name__ == “__main__”:
Take a look at this code:
def first_function():
    print("Inside first function")
    second_function()

first_function()

def second_function():
    print("Inside second function")
Well, this will crash as Python executes the code from top to bottom, and when it gets to first_function() it will attempt to call second_function() which has not been read by Python yet. This example will throw an error.
You’ll get an error like:
Inside first function
Traceback (most recent call last):
  File "/home/carles/Desktop/code/carles/python_combat_guide/src/structure_dont_do_this.py", line 14, in <module>
    first_function()
  File "/home/carles/Desktop/code/carles/python_combat_guide/src/structure_dont_do_this.py", line 12, in first_function
    second_function()
NameError: name 'second_function' is not defined

Process finished with exit code 1
Add your code at the bottom always, under:
if __name__ == "__main__":
    first_function()
The code inside this if will only be executed if you directly call this code as main file, but will not be executed if you import this file from another one.
You don’t have this problem with classes in Python, as they are defined first, completely read, and then you instantiate or use them. To avoid messing and creating bugs, have the imports always on the top of your file.
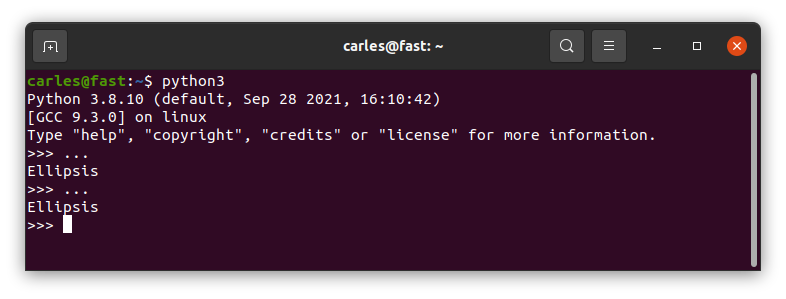
…Ellipsis
Today is Halloween and one of my colleagues asked me help to improve his Automation project.
I found something weird in his code.
He had something like that.
class Router:

    def router_get_info(self):
        ...

    def get_help_command(self):
        return "help"
So I asked why you use … (dot dot dot) on that empty method?.
He told me that when he don’t want to implement code he just put that.
Well, dot dot dot is Ellipsis.
And what is Ellipsis?.
Ellipsis is an object that may appear in slice notation.
In Python all the methods, functions, if, while …. require to have an instruction at least.
So the instruction my colleague was looking for is pass.
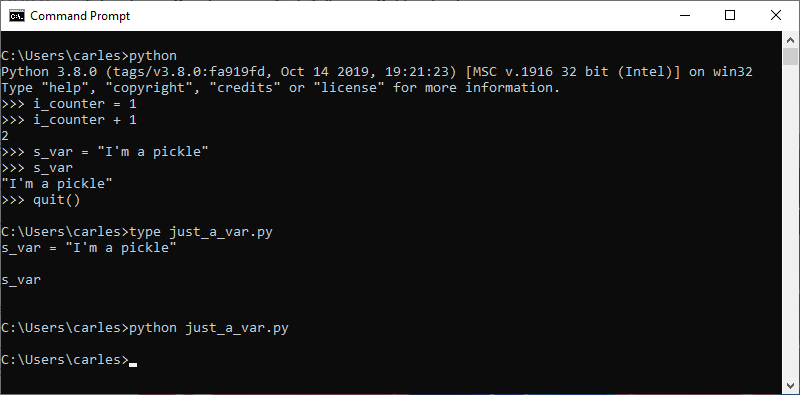
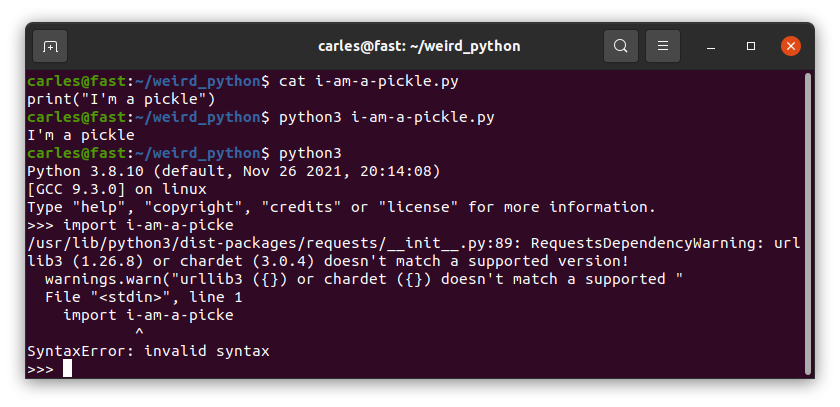
Just a variable?
In Python you can have just a var, without anything else, like no operation with it, no call, nothing.
This makes it easy to commit an error and not detecting it.
As you see we can have just s_var variable in a line, which is a String, and this does not raises an error.
If we do from python interpreter interactively, it will print the String “I’m a pickle” (famous phrase from Rick and Morty).
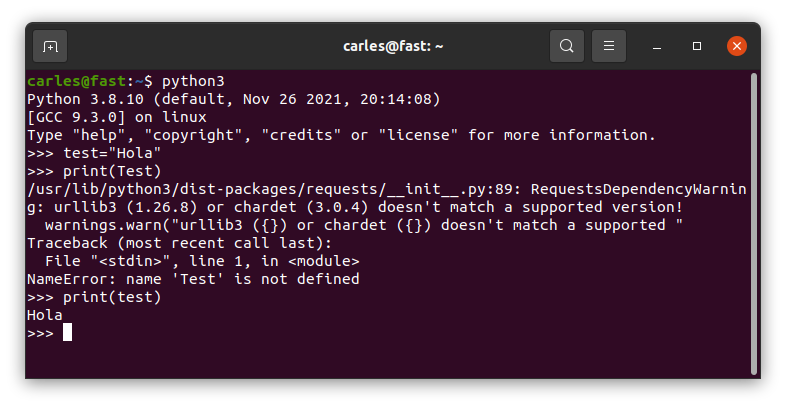
Variables are case sensitive
So you can define true false none … as they are different from True False None
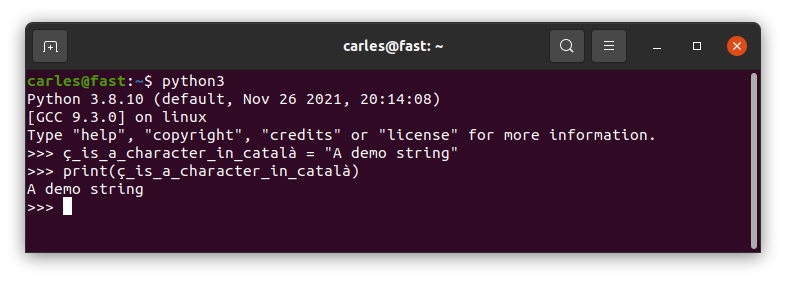
Variables in Unicode
Python3 accepts variables in Unicode.
I would completely discourage you to use variables with accents or other characters different from a-z 0-9 and _
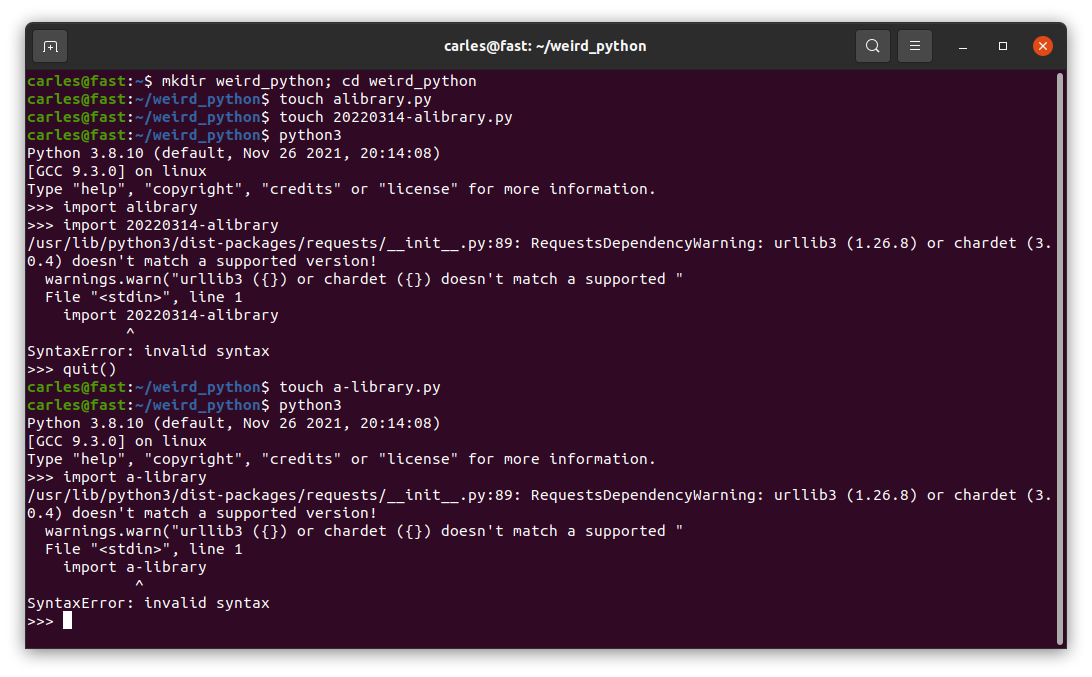
Python files with these names yes, but kaboom if you import them
So you can create Python files with dash or beginning with numbers, like 20220314_programming_class.py and execute them, but you cannot import them.
RYYFTK RODRIGUEZ,LEELA,FRY, FUTURAMA, 1999
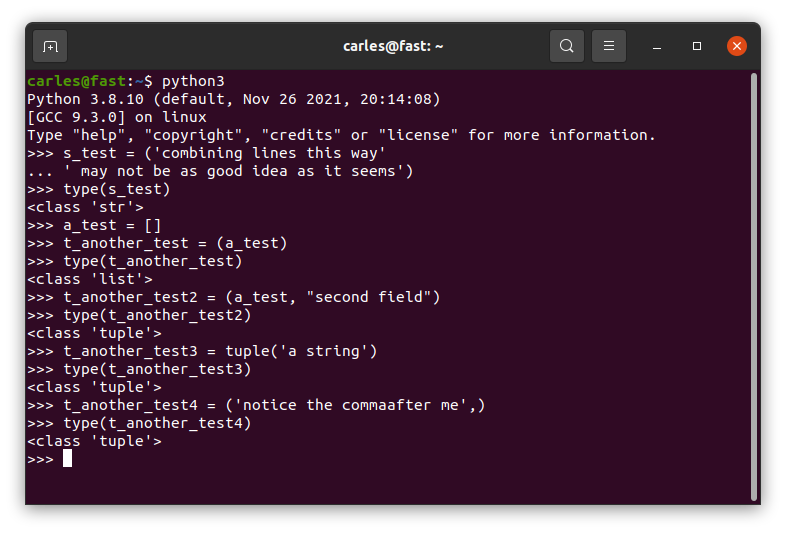
A Tuple of a String is not a Tuple, it’s a String
This can be very messy and confusing. Normally you define a tuple with parenthesis, although you can use tuple() too.
Parenthesis are the way we normally build tuples. But if we do:
print(type('this is a String'))
You get that this is a String, I mean
<class 'str'>
If you want to get a tuple of a String you can add a comma after the first String, which is weird. You can also do tuple("this is a String")
I think the definition of a tuple should be consistent and idempotent, no matter if you use one or more parameters. Probably as parenthesis are used for other tasks, like invoking functions or methods, or separating arithmetic operations, that reuse of the signs () for multiple purposes is what caused a different behavior depending on if there is one or more parameters the mayhem IMO.
See some example cases.
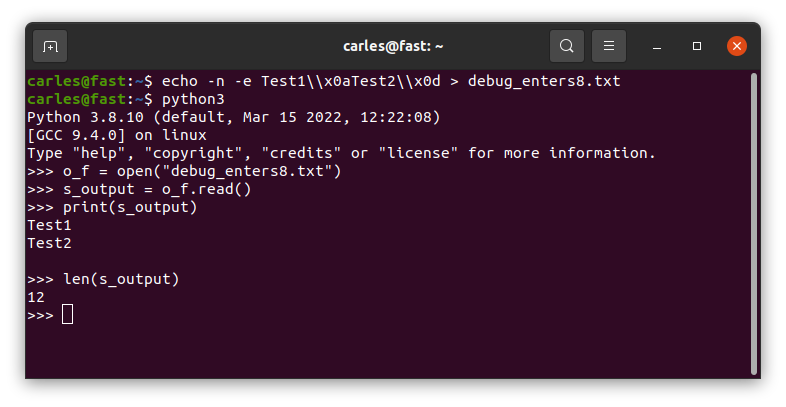
Python simplifies the jump of line \n platform independent and some times it’s messy
If you come from a C background you will expect text file in different platforms: Linux, Mac OS X (changes from old to new versions), Windows… to be represented different. In some cases this is an ASCii code 10 (LF), in others 13 (CR), and in other two characters: 13 and immediately after 10.
Python simplifies the Enter character by naming it \n like in C.
So, platform independent, whenever you read a text file you will get \n for any ASCii 10 [LF] or 13 [CR]. [CR] will be converted to [10] in Linux.
If you read a file in a Linux system, where enters are represented by 10, which was generated in a Windows system, so it has [CR][LF] instead of [LF] at the end of each line, you’ll get a \n too, but two times.
And if you do len(“\n”) to know the len of that String, this returns 1 in all the platform.
To read the [LF] and [CR] (represented by \r) you need to open the file as binary. By default Python opens the files as text.
You can check this by writting [LF] and [CR] in Linux and see how Python seamlessly reads the file as it was [LF].
A file generated by Windows will get \n\n:
Random code when the class is imported
In a procedural file, the code that is outside a function, will be executed when it is imported. But if this file is imported again it will not be re-executed.
Things are more messy if you import a class file. Inside the body of the class, in the space you would reserve for static variables definition, you can have random code. And this code will be only executed on the first import, not on subsequent.
Disclaimer: the pictures from Futurama are from their respective owners.
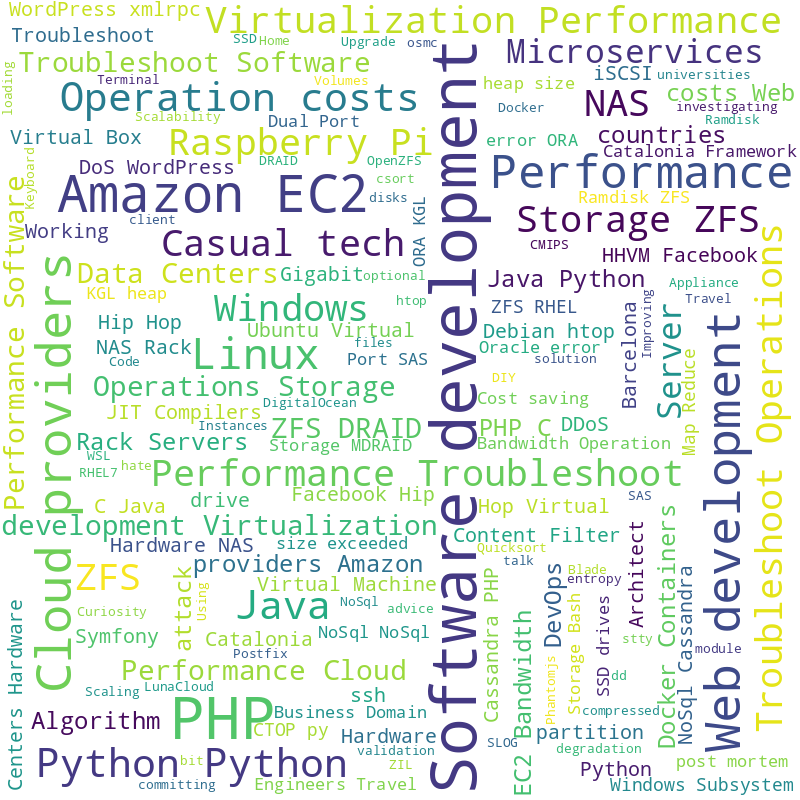
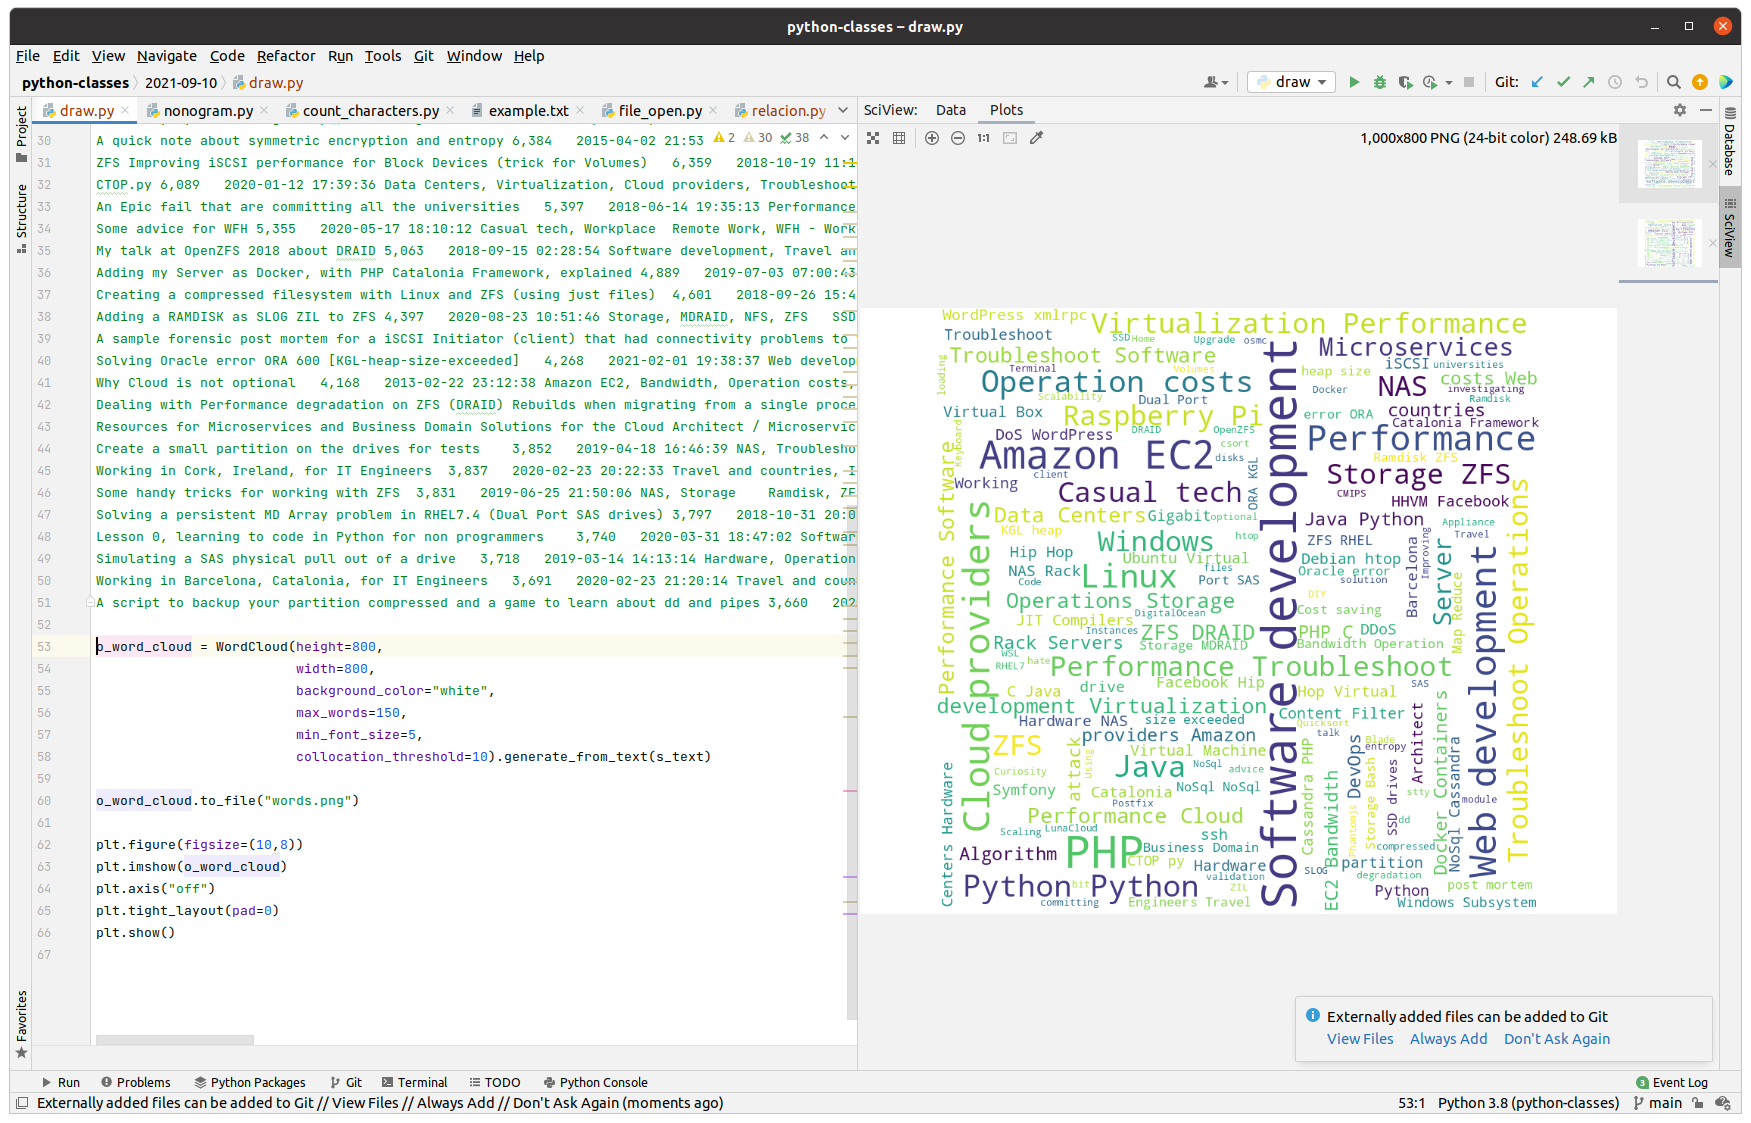
This is a very simple code but generates very cool Word Cloud result in PNG format.
from wordcloud import WordCloud

# Add your tags in here separated by commas and as many times as they appear
s_text = "Python, Software development, PHP, Cloud providers, Python, Python, Software development, Scaling"

o_word_cloud = WordCloud(height=800,
                         width=800,
                         background_color="white",
                         max_words=150,
                         min_font_size=5,
                         collocation_threshold=10).generate_from_text(s_text)

o_word_cloud.to_file("words.png")
That version generated the image .PNG file.
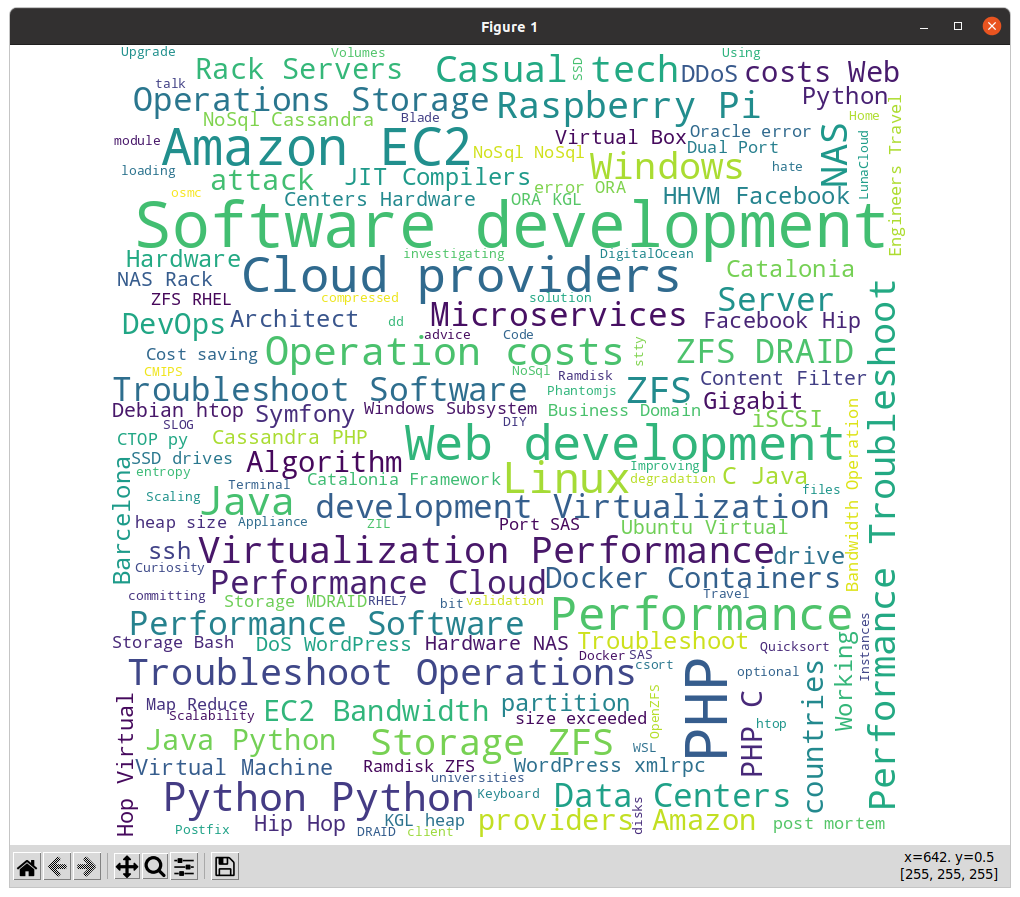
If you want to display this in mathlib or inside PyCharm embedded view, you can install matplotlib with:
pip3 install matplotlib
Then with this code you can display a matplotlib viewer:
import matplotlib.pyplot as plt
from wordcloud import WordCloud

if __name__ == "__main__":
    # Add your tags in here separated by commas and as many times as they appear
    s_text = "Python, Software development, PHP, Cloud providers, Python, Python, Software development, Scaling"

    o_word_cloud = WordCloud(height=800,
                             width=800,
                             background_color="white",
                             max_words=150,
                             min_font_size=5,
                             collocation_threshold=10).generate_from_text(s_text)

    plt.figure(figsize=(10,8))
    plt.imshow(o_word_cloud)
    plt.axis("off")
    plt.tight_layout(pad=0)
    plt.show()
After Docker Image flask_app is built, you can run a Docker Container based on it with:
sudo docker run -d -p 5000:5000 --name flask_app flask_app
After you’re done, in order to stop the Container type:
sudo docker stop flask_app
Here is the source code of the Python file flask_app.py:
#
# flask_app.py
#
# Author: Carles Mateo
# Creation Date: 2020-05-10 20:50 GMT+1
# Description: A simple Flask Web Application
# Part of the samples of https://leanpub.com/pythoncombatguide
# More source code for the book at https://gitlab.com/carles.mateo/python_combat_guide
#
from flask import Flask
import datetime
def get_datetime(b_milliseconds=False):
"""
Return the datetime with miliseconds in format YYYY-MM-DD HH:MM:SS.xxxxx
or without milliseconds as YYYY-MM-DD HH:MM:SS
"""
if b_milliseconds is True:
s_now = str(datetime.datetime.now())
else:
s_now = str(datetime.datetime.now().strftime("%Y-%m-%d %H:%M:%S"))
return s_now
app = Flask(__name__)
# Those variables will keep their value as long as Flask is running
i_votes_r2d2 = 0
i_votes_bb8 = 0
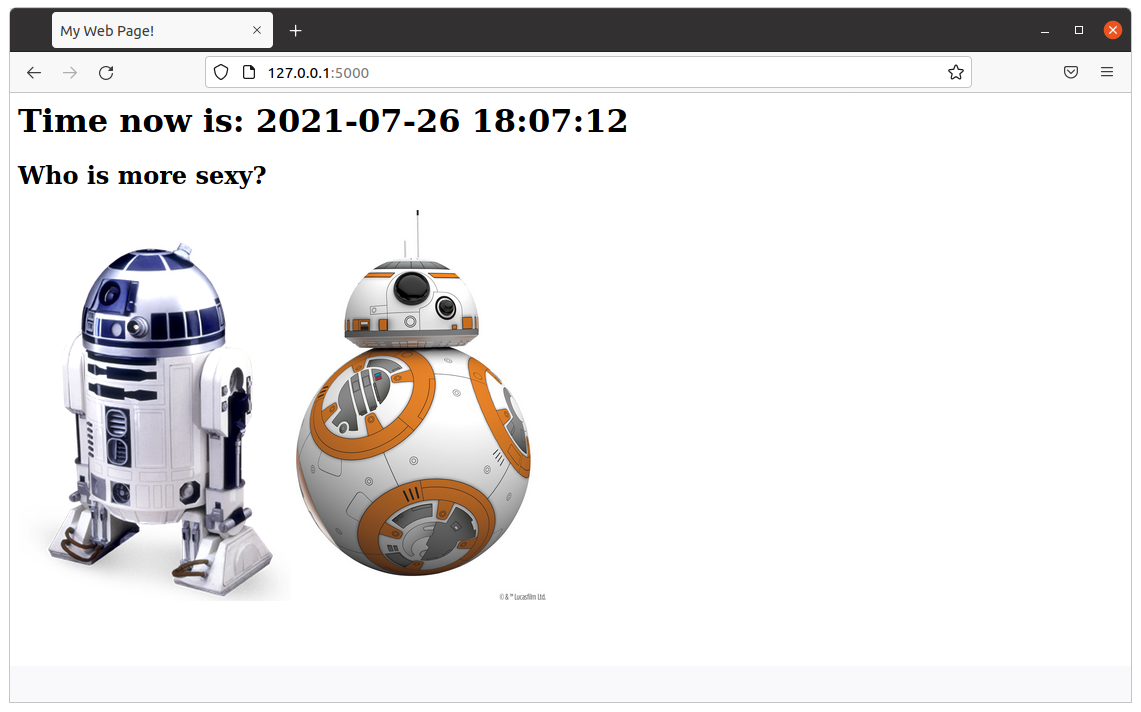
@app.route('/')
def page_root():
s_page = "<html>"
s_page += "<title>My Web Page!</title>"
s_page += "<body>"
s_page += "<h1>Time now is: " + get_datetime() + "</h1>"
s_page += """<h2>Who is more sexy?</h2>
<a href="r2d2"><img src="static/r2d2.png"></a> <a href="bb8"><img width="250" src="static/bb8.jpg"></a>"""
s_page += "</body>"
s_page += "</html>"
return s_page
@app.route('/bb8')
def page_bb8():
global i_votes_bb8
i_votes_bb8 = i_votes_bb8 + 1
s_page = "<html>"
s_page += "<title>My Web Page!</title>"
s_page += "<body>"
s_page += "<h1>Time now is: " + get_datetime() + "</h1>"
s_page += """<h2>BB8 Is more sexy!</h2>
<img width="250" src="static/bb8.jpg">"""
s_page += "<p>I have: " + str(i_votes_bb8) + "</p>"
s_page += "</body>"
s_page += "</html>"
return s_page
@app.route('/r2d2')
def page_r2d2():
global i_votes_r2d2
i_votes_r2d2 = i_votes_r2d2 + 1
s_page = "<html>"
s_page += "<title>My Web Page!</title>"
s_page += "<body>"
s_page += "<h1>Time now is: " + get_datetime() + "</h1>"
s_page += """<h2>R2D2 Is more sexy!</h2>
<img src="static/r2d2.png">"""
s_page += "<p>I have: " + str(i_votes_r2d2) + "</p>"
s_page += "</body>"
s_page += "</html>"
return s_page
if __name__ == "__main__":
app.run(host="0.0.0.0", port=5000, debug=True)
As always, the naming of the variables is based on MT Notation.
The Dockerfile is very straightforward:
FROM ubuntu:20.04

MAINTAINER Carles Mateo

ARG DEBIAN_FRONTEND=noninteractive

RUN apt update && \
    apt install -y vim python3-pip &&  pip3 install pytest && \
    apt-get clean

ENV PYTHON_COMBAT_GUIDE /var/python_combat_guide

RUN mkdir -p $PYTHON_COMBAT_GUIDE

COPY ./ $PYTHON_COMBAT_GUIDE

ENV PYTHONPATH "${PYTHONPATH}:$PYTHON_COMBAT_GUIDE/src/:$PYTHON_COMBAT_GUIDE/src/lib"

RUN pip3 install -r $PYTHON_COMBAT_GUIDE/requirements.txt

# This is important so when executing python3 -m current directory will be added to Syspath
# Is not necessary, as we added to PYTHONPATH
#WORKDIR $PYTHON_COMBAT_GUIDE/src/lib

EXPOSE 5000

# Launch our Flask Application
CMD ["/usr/bin/python3", "/var/python_combat_guide/src/flask_app.py"]
Google Instances’ Performance I’ve updated the CMIPS score for the latest Google instances vs last Amazon’s I tried and baremetals.
I’ve updated my book Python Combat Guide, version 0.99 has already 365 pages DIN-A4.
This is the changelog for latest version:
v. 0.99
 A whole new chapter showing sorting in Python and lambdas. (.sort() and sorted() package First)

 I show writing lambdas for Sorting, and also what makes them crash.

 Explained why Lambdas are not recommended unless you use for working with data, like for sorting or filtering out, and unless you know what you are doing. They are difficult to Debug.

 Explained about PEP8 tool to validate style.

 Explaining why we define Instance variables in the Constructor.

 Provided more samples for Flask Applications.

 Fixed code sample https://gitlab.com/carles.mateo/python_combat_guide/-/blob/master/src/keywords.py as the editor removed the white line spaces.

 Added more books to the bibliography

 I explain the importance of running Unit Testing as both root and as regular users.

 Explain how to run as regular user inside a Docker Container.

 Explained requirements.txt file. And how integrates PyCharm to create venv/ Virtual Environment.

 Also how it is used in Dockerfile to make sure all the dependencies are satisfied in the Docker Container.
I’ve seen an increment in pirate attacks that potentially causes lost of lives.
In Ireland that ransomware leave KO the hospital. Some of my older friends that require blood analysis cannot do in their hospital because is completely out of business. Their systems are down due to the ransomware. If you miss that, two newspaper articles:
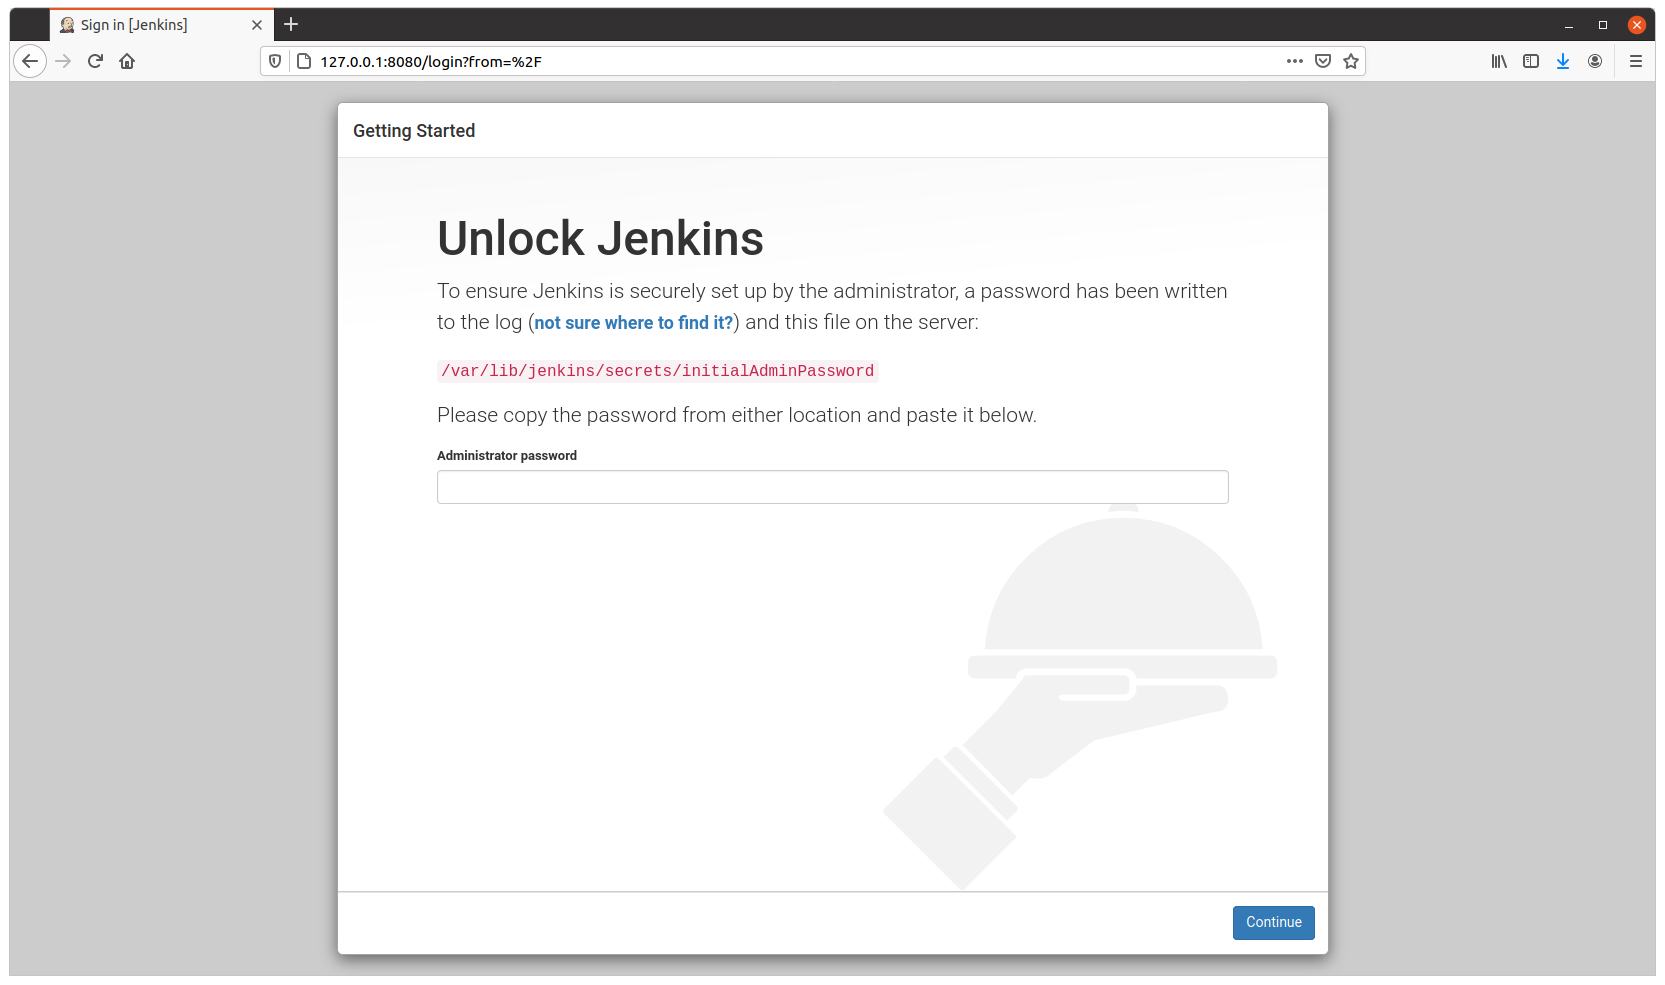
So I share with you my base Jenkins Dockerfile, so you can spawn a new Jenkins for your projects.
The Dockerfile installs Ubuntu 20.04 LTS as base image and add the required packages to run jenkins but also Development and Testing tools to use inside the Container to run Unit Testing on your code, for example. So you don’t need external Servers, for instance.
You will need 3 files:
Dockerfile
docker_run_jenkins.sh
requirements.txt
The requirements.txt file contains your PIP3 dependencies. In my case I only have pytest version 4.6.9 which is the default installed with Ubuntu 20.04, however, this way, I enforce that this and not any posterior version will be installed.
File requirements.txt:
pytest==4.6.9
The file docker_run_jenkins.txt start Jenkins when the Container is run and it will wait until the initial Admin password is generated and then it will display it.
File docker_run_jenkins.sh:
#!/bin/bash

echo "Starting Jenkins..."

service jenkins start

echo "Configure jenkins in http://127.0.0.1:8080"

s_JENKINS_PASSWORD_FILE="/var/lib/jenkins/secrets/initialAdminPassword"

i_PASSWORD_PRINTED=0

while [ true ];
do
    sleep 1
    if [ $i_PASSWORD_PRINTED -eq 1 ];
    then
        # We are nice with multitasking
        sleep 60
        continue
    fi

    if [ ! -f "$s_JENKINS_PASSWORD_FILE" ];
    then
        echo "File $s_FILE_ORIGIN does not exist"
    else
        echo "Password for Admin is:"
        cat $s_JENKINS_PASSWORD_FILE
        i_PASSWORD_PRINTED=1
    fi
done
That file has the objective to show you the default admin password, but you don’t need to do that, you can just start a shell into the Container and check manually by yourself.
However I added it to make it easier for you.
And finally you have the Dockerfile:
FROM ubuntu:20.04

LABEL Author="Carles Mateo" \
      Email="jenkins@carlesmateo.com" \
      MAINTAINER="Carles Mateo"

# Build this file with:
# sudo docker build -f Dockerfile -t jenkins:base .
# Run detached:
# sudo docker run --name jenkins_base -d -p 8080:8080 jenkins:base
# Run seeing the password:
# sudo docker run --name jenkins_base -p 8080:8080 -i -t jenkins:base
# After you CTRL + C you will continue with:
# sudo docker start
# To debug:
# sudo docker run --name jenkins_base -p 8080:8080 -i -t jenkins:base /bin/bash

ARG DEBIAN_FRONTEND=noninteractive

ENV SERVICE jenkins

RUN set -ex

RUN echo "Creating directories and copying code" \
    && mkdir -p /opt/${SERVICE}

COPY requirements.txt \
    docker_run_jenkins.sh \
    /opt/${SERVICE}/

# Java with Ubuntu 20.04 LST is 11, which is compatible with Jenkins.
RUN apt update \
    && apt install -y default-jdk \
    && apt install -y wget curl gnupg2 \
    && apt install -y git \
    && apt install -y python3 python3.8-venv python3-pip \
    && apt install -y python3-dev libsasl2-dev libldap2-dev libssl-dev \
    && apt install -y python3-venv \
    && apt install -y python3-pytest \
    && apt install -y sshpass \
    && wget -qO - https://pkg.jenkins.io/debian-stable/jenkins.io.key | apt-key add - \
    && echo "deb http://pkg.jenkins.io/debian-stable binary/" > /etc/apt/sources.list.d/jenkins.list \
    && apt update \
    && apt -y install jenkins \
    && apt-get clean

RUN echo "Setting work directory and listening port"
WORKDIR /opt/${SERVICE}

RUN chmod +x docker_run_jenkins.sh

RUN pip3 install --upgrade pip \
    && pip3 install -r requirements.txt


EXPOSE 8080


ENTRYPOINT ["./docker_run_jenkins.sh"]
Build the Container
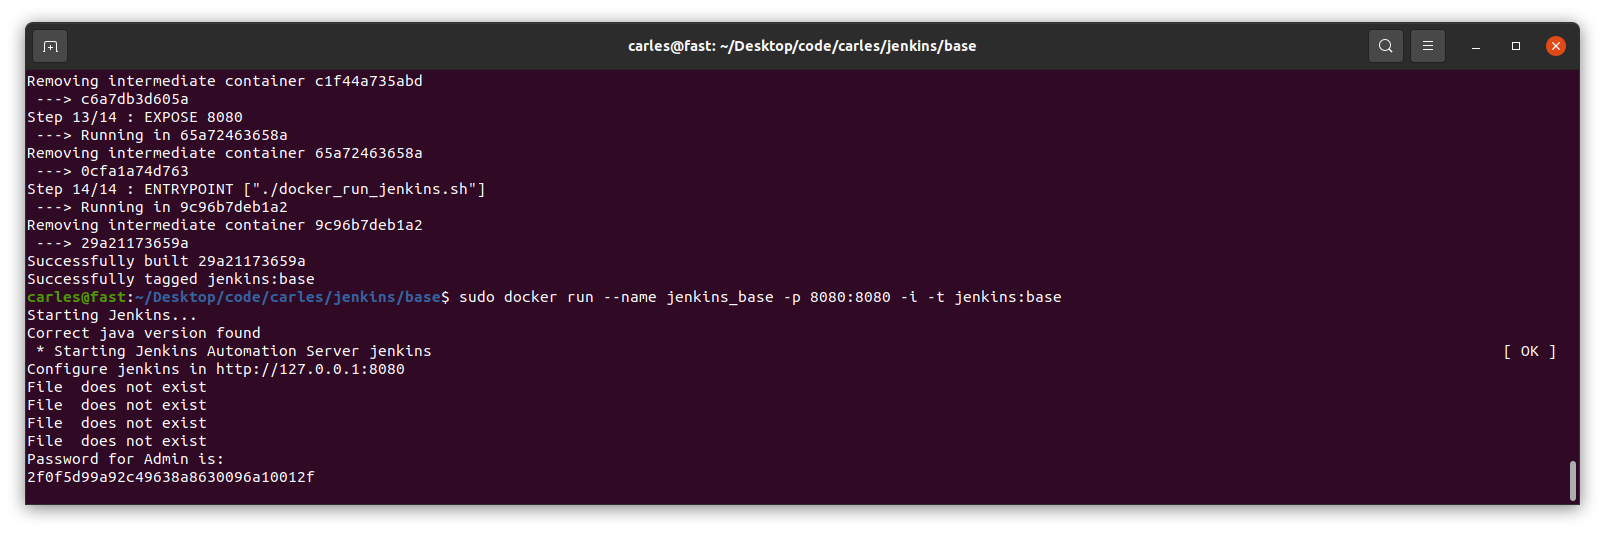
docker build -f Dockerfile -t jenkins:base .
Run the Container displaying the password
sudo docker run --name jenkins_base -p 8080:8080 -i -t jenkins:base
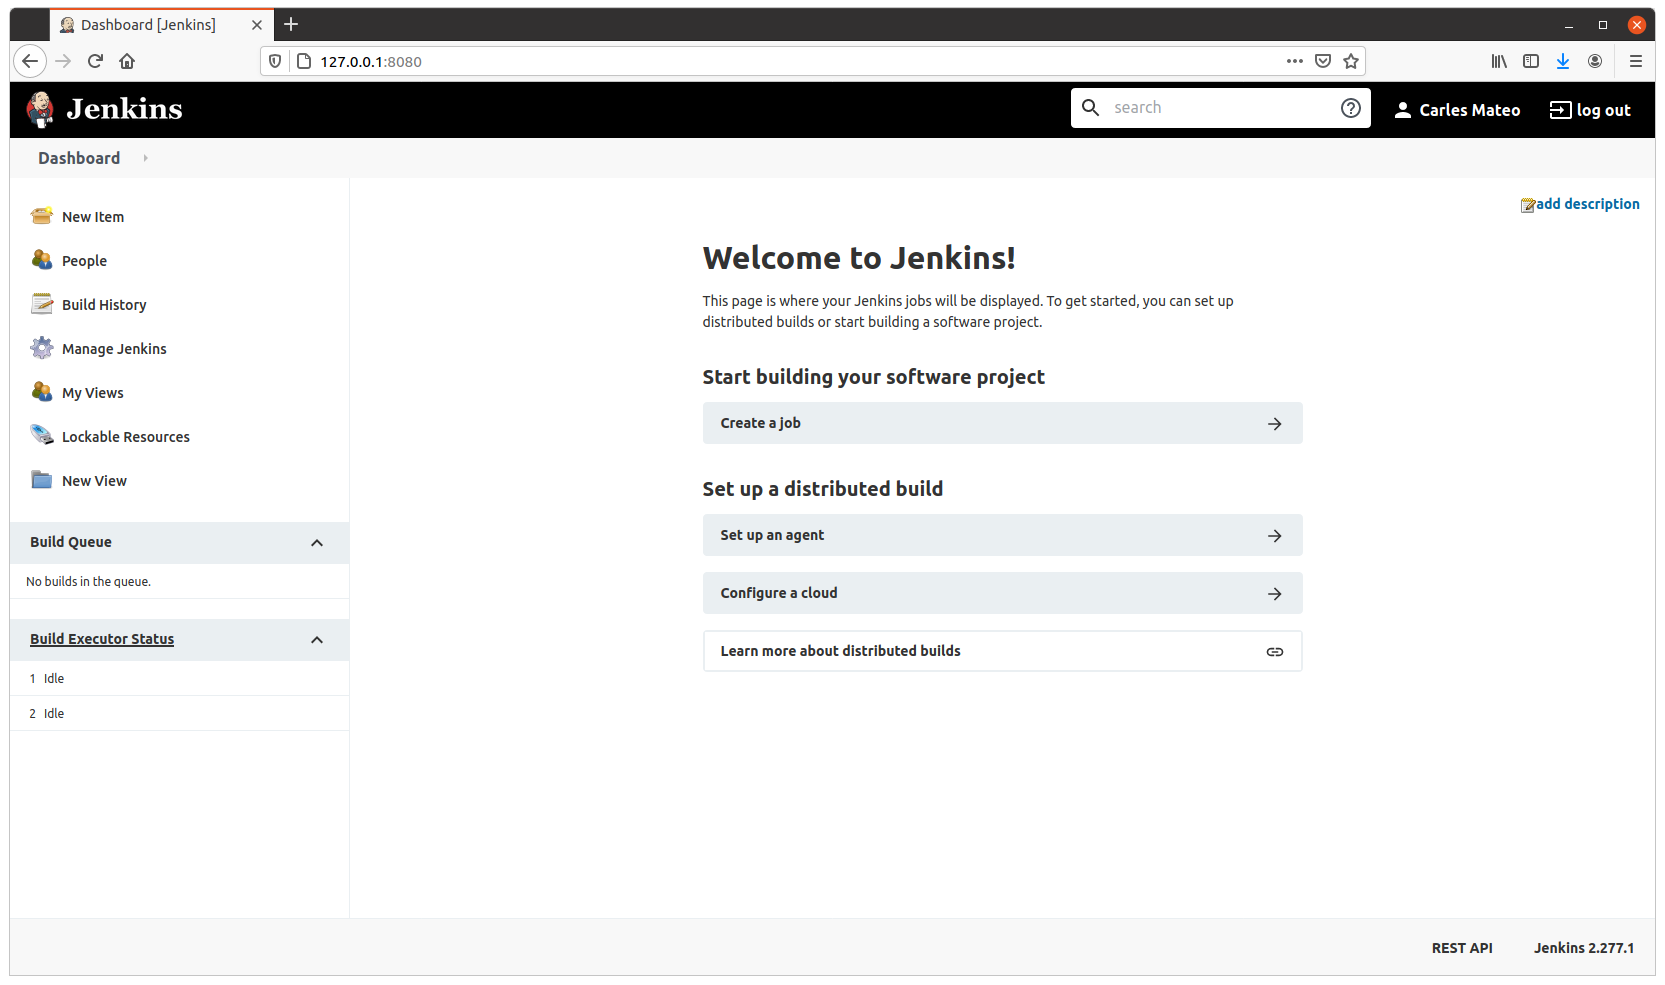
You need this password for starting the configuration process through the web.
Visit http://127.0.0.1:8080 to configure Jenkins.
Configure as usual
Resuming after CTRL + C
After you configured it, on the terminal, press CTRL + C.
And continue, detached, by running:
sudo docker start jenkins_base
The image is 1.2GB in size, and will allow you to run Python3, Virtual Environments, Unit Testing with pytest and has Java 11 (not all versions of Java are compatible with Jenkins), use sshpass to access other Servers via SSH with Username and Password…