Last Update: 2022-04-16 14:50 Irish time
Adding a RAM drive as SLOG (ZIL)
I came with this solution when one of my 4U60 Servers had two slots broken. You’ll not use this in Production, as SLOG loses its function, but I managed to use one $40K USD broken Server and to demonstrate that the Speed of the SLOG device (ZFS Intented Log or ZIL device) sets the constraints for the writing speed.
The ZFS DRAID config I was using required 60 drives, basically 58 14TB Spinning drives and 2 SSD for the SLOG ZIL. As I only had 58 slots I came with this idea.
This trick can be very useful if you have a box full of Spinning drives, and when sharing by iSCSI zvols you get disconnected in the iSCSI Initiator side. This is typical when ZFS has only Spinning drives and it has no SLOG drives (dedicated fast devices for the ZIL, ZFS INTENDED LOG)
Create a single Ramdrive of 10GB of RAM:
modprobe brd rd_nr=1 rd_size=10485760 max_part=0Confirm ram0 device exists now:
ls /dev/ram*Confirm that the pool is imported:
zpool listAdd to the pool:
zpool add carles-N58-C3-D16-P2-S4 log ram0In the case that you want to have two ram devices as SLOG devices, in mirror.
zpool add carles-N58-C3-D16-P2-S4 log mirror <partition/drive 1> <partition/drive 2>It is interesting to know that you can work with partitions instead of drives. So for this test we could have partitioned ram0 with 2 partitions and make it work in mirror. You’ll see how much faster the iSCSI communication goes over the network. The writing speed of the ZIL SLOG device is the constrain for ingesting Data from the Network to the Server.
Creating a partition bigger than 2TiB
Master Boot Record (MBR) based partitioning is limited to 2TiB however GUID Partition Table (GPT) has a limit of 8 ZiB.
That’s something very simply, but make you lose time if you’re partitioning big iSCSI Shares, or ZFS Zvols, so here is the trick:
[root@CTRLA-18 ~]# cat /etc/redhat-release
 Red Hat Enterprise Linux Server release 7.6 (Maipo)
 [root@CTRLA-18 ~]# parted /dev/zvol/N58-C19-D2-P1-S1/vol54854gb
 GNU Parted 3.1
 Using /dev/zd0
 Welcome to GNU Parted! Type 'help' to view a list of commands.
 (parted) mklabel gpt
 Warning: The existing disk label on /dev/zd0 will be destroyed and all data on this disk will be lost. Do you want to continue?
 Yes/No? y
 (parted) print
 Model: Unknown (unknown)
 Disk /dev/zd0: 58.9TB
 Sector size (logical/physical): 512B/65536B
 Partition Table: gpt
 Disk Flags:
 Number  Start  End  Size  File system  Name  Flags
 (parted) mkpart primary 0GB 58.9TB
 (parted) print
 Model: Unknown (unknown)
 Disk /dev/zd0: 58.9TB
 Sector size (logical/physical): 512B/65536B
 Partition Table: gpt
 Disk Flags:
 Number  Start   End     Size    File system  Name     Flags
  1      1049kB  58.9TB  58.9TB               primary
 (parted) quit
 Information: You may need to update /etc/fstab.
 [root@CTRLA-18 ~]# mkfs
 mkfs         mkfs.btrfs   mkfs.cramfs  mkfs.ext2    mkfs.ext3    mkfs.ext4    mkfs.minix   mkfs.xfs
 [root@CTRLA-18 ~]# mkfs.ext4 /dev/zvol/N58-C19-D2-P1-S1/vol54854gb
 mke2fs 1.42.9 (28-Dec-2013)
....
[root@CTRLA-18 ~]# mount /dev/zvol/N58-C19-D2-P1-S1/vol54854gb /Data
[root@CTRLA-18 ~]# df -h
 Filesystem             Size  Used Avail Use% Mounted on
 /dev/mapper/rhel-root   50G  2.5G   48G   5% /
 devtmpfs               126G     0  126G   0% /dev
 tmpfs                  126G     0  126G   0% /dev/shm
 tmpfs                  126G  1.1G  125G   1% /run
 tmpfs                  126G     0  126G   0% /sys/fs/cgroup
 /dev/sdp1             1014M  151M  864M  15% /boot
 /dev/mapper/rhel-home   65G   33M   65G   1% /home
 logs                    49G  349M   48G   1% /logs
 mysql                  9.7G  128K  9.7G   1% /mysql
 tmpfs                   26G     0   26G   0% /run/user/0
 /dev/zd0                54T   20K   51T   1% /Data
ZFS is unable to use a disk
Some times, after creating many pools ZFS may be unable to create a new pool using a drive that is perfectly fine. In this situation, the ideal is wipe the first areas of it, or all of it if you want. If it’s an SSD that is very fast:
dd if=/dev/zero of=/dev/sdc bs=1M status=progress
The status=progress will show a nice progress bar.
Filling a half Petabyte pool as fast as possible
To fill a 60 drives pool composed by 10TB or 14TB spinning drives, so more than half PB, in order to test with real data, you can use this trick:
First, write to the Dataset directly, that’s way much more faster than using zvols.
Secondly, disable the ZIL, set sync=disabled.
Third, use a file in memory to avoid the paytime of reading the file from disk.
Fourth, increase the recordsize to 1M for faster filling (in my experience).
You can use this script of mine that does everything for you, normally you would like to run it inside an screen session, and create a Dataset called Data. The script will mount it in /Data (zfs set mountpoint=/data YOURPOOL/Data):
#!/usr/bin/env bash
# Created by Carles Mateo
FILE_ORIGINAL="/run/urandom.1GB"
FILE_PATTERN="/Data/urandom.1GB-clone."
# POOL="N56-C5-D8-P3-S1"
POOL="N58-C3-D16-P3-S1"
# The starting number, if you interrupt the filling process, you can update it just by updating this number to match the last partially written file
i_COPYING_INITIAL_NUMBER=1
# For 75% of 10TB (3x(16+3)+1 has 421TiB, so 75% of 421TiB or 431,104GiB is 323,328) use 323328
# i_COPYING_FINAL_NUMBER=323328
# For 75% of 10TB, 5x(8+3)+1 ZFS sees 352TiB, so 75% use 270336
# For 75% of 14TB, 3x(16+3)+1, use 453120
i_COPYING_FINAL_NUMBER=453120

# Creating an array that will hold the speed of the latest 1 minute
a_i_LATEST_SPEEDS=(0 0 0 0 0 0 0 0 0 0 0 0 0 0 0 0 0 0 0 0 0 0 0 0 0 0 0 0 0 0 0 0 0 0 0 0 0 0 0 0 0 0 0 0 0 0 0 0 0 0 0)
i_POINTER_SPEEDS=0
i_COUNTER_SPEEDS=-1
i_ITEMS_KEPT_SPEEDS=60
i_AVG_SPEED=0
i_FILES_TO_BE_COPIED=$((i_COPYING_FINAL_NUMBER-i_COPYING_INITIAL_NUMBER))

get_average_speed () {
# Calculates the Average Speed
   i_AVG_SPEED=0
   for i_index in {0..59..1}
       do
           i_SPEED=$((a_i_LATEST_SPEEDS[i_index]))
           i_AVG_SPEED=$((i_AVG_SPEED + i_SPEED))
       done
   i_AVG_SPEED=$((i_AVG_SPEED/((i_COUNTER_SPEEDS)+1)))
}


echo "Bash version ${BASH_VERSION}..."

echo "Disabling sync in the pool $POOL for faster speed"
zfs set sync=disabled $POOL
echo "Maximizing performance with recordsize"
zfs set recordsize=1M ${POOL}
zfs set recordsize=1M ${POOL}/Data
echo "Mounting the Dataset Data"
zfs set mountpoint=/Data ${POOL}/Data
zfs mount ${POOL}/Data

echo "Checking if file ${FILE_ORIGINAL} exists..."
if [[ -f ${FILE_ORIGINAL} ]]; then
    ls -al ${FILE_ORIGINAL}
    sha1sum ${FILE_ORIGINAL}
else
    echo "Generating file..."
    dd if=/dev/urandom of=${FILE_ORIGINAL} bs=1M count=1024 status=progress
fi

echo "Starting filling process..."
echo "We are going to copy ${i_FILES_TO_BE_COPIED} , starting from: ${i_COPYING_INITIAL_NUMBER} to: ${i_COPYING_FINAL_NUMBER}"

for ((i_NUMBER=${i_COPYING_INITIAL_NUMBER}; i_NUMBER<=${i_COPYING_FINAL_NUMBER}; i_NUMBER++));
    do
        s_datetime_ini=$(($(date +%s%N)/1000000))
        DATE_NOW=`date '+%Y-%m-%d_%H-%M-%S'`
        echo "${DATE_NOW} Copying ${FILE_ORIGINAL} to ${FILE_PATTERN}${i_NUMBER}"
        cp ${FILE_ORIGINAL} ${FILE_PATTERN}${i_NUMBER}
        s_datetime_end=$(($(date +%s%N)/1000000))
        MILLISECONDS=$(expr "$s_datetime_end" - "$s_datetime_ini")
        if [[ ${MILLISECONDS} -lt 1 ]]; then
            BANDWIDTH_MBS="Unknown (too fast)"
            # That sould not happen, but if did, we don't account crazy speeds
        else
            BANDWIDTH_MBS=$((1000*1024/MILLISECONDS))
            # Make sure the Array space has been allocated
            if [[ ${i_POINTER_SPEEDS} -gt ${i_COUNTER_SPEEDS} ]]; then
                # Add item to the Array the first times only
                a_i_LATEST_SPEEDS[i_POINTER_SPEEDS]=${BANDWIDTH_MBS}
                i_COUNTER_SPEEDS=$((i_COUNTER_SPEEDS+1))
            else
                a_i_LATEST_SPEEDS[i_POINTER_SPEEDS]=${BANDWIDTH_MBS}
            fi
            i_POINTER_SPEEDS=$((i_POINTER_SPEEDS+1))
            if [[ ${i_POINTER_SPEEDS} -ge ${i_ITEMS_KEPT_SPEEDS} ]]; then
                i_POINTER_SPEEDS=0
            fi
            get_average_speed
        fi
        i_FILES_TO_BE_COPIED=$((i_FILES_TO_BE_COPIED-1))
        i_REMAINING_TIME=$((1024*i_FILES_TO_BE_COPIED/i_AVG_SPEED))
        i_REMAINING_HOURS=$((i_REMAINING_TIME/3600))
        echo "File cloned in ${MILLISECONDS} milliseconds at ${BANDWIDTH_MBS} MB/s"
        echo "Avg. Speed: ${i_AVG_SPEED} MB/s Remaining Files: ${i_FILES_TO_BE_COPIED} Remaining seconds: ${i_REMAINING_TIME} s. (${i_REMAINING_HOURS} h.)"
    done

echo "Enabling sync=always"
zfs set sync=always ${POOL}
echo "Setting back recordsize to 128K"
zfs set recordsize=128K ${POOL}
zfs set recordsize=128K ${POOL}/Data
echo "Unmounting /Data"
zfs set mountpoint=none ${POOL}/Data
Creating a Sparse file that you can partition or create a loopback on it
I know, your laptop has 512GB of M.2 SSD or NVMe, so that’s it.
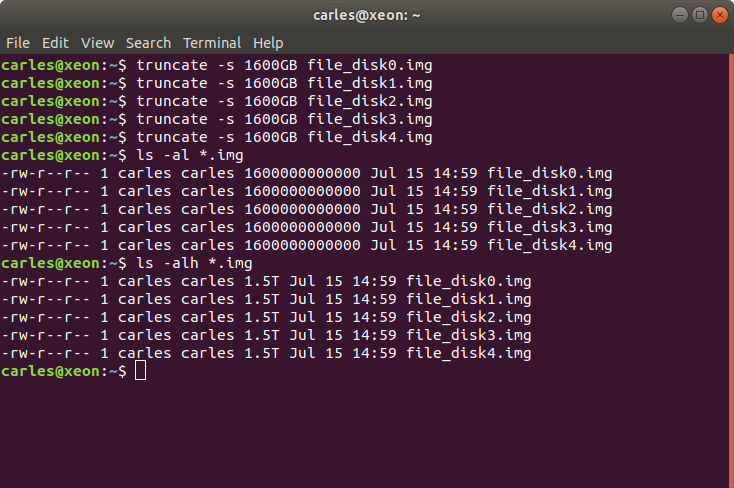
Well, you can create a sparse file much more bigger than your capacity, and use 0 bytes of it at all.
For example:
truncate -s 1600GB file_disk0.img
If the files are stored in / then you can add a loop device:
sudo losetup -f /file_disk0.img
I do with the 5 I created.
Then you can check that they exist with:
lsblk
or
cat /proc/partitions
The loop devices will appear under /dev/ now.
For some tests I did this in a Virtual Box Virtual Machine:
root@ansiblemaster:/home/carles# truncate -s 1GB /file_disk0.img
root@ansiblemaster:/home/carles# truncate -s 1GB /file_disk1.img
root@ansiblemaster:/home/carles# truncate -s 1GB /file_disk2.img
root@ansiblemaster:/home/carles# sudo losetup -f /file_disk0.img
root@ansiblemaster:/home/carles# sudo losetup -f /file_disk1.img
root@ansiblemaster:/home/carles# sudo losetup -f /file_disk2.img
root@ansiblemaster:/home/carles# lsblk
NAME                      MAJ:MIN RM   SIZE RO TYPE MOUNTPOINT
loop0                       7:0    0  61.9M  1 loop /snap/core20/1270
loop1                       7:1    0  94.5M  1 loop /snap/go/9028
loop2                       7:2    0  61.9M  1 loop /snap/core20/1328
loop3                       7:3    0    15M  1 loop /snap/aws-cli/130
loop4                       7:4    0  55.5M  1 loop /snap/core18/2344
loop5                       7:5    0 110.8M  1 loop /snap/core/12725
loop6                       7:6    0  55.5M  1 loop /snap/core18/2284
loop7                       7:7    0  67.8M  1 loop /snap/lxd/22753
loop8                       7:8    0  67.2M  1 loop /snap/lxd/21835
loop9                       7:9    0  38.7M  1 loop /snap/postgresql10/47
loop10                      7:10   0  43.6M  1 loop /snap/snapd/14978
loop11                      7:11   0    12M  1 loop /snap/slcli/2072
loop12                      7:12   0 254.4M  1 loop /snap/google-cloud-sdk/226
loop13                      7:13   0 293.2M  1 loop /snap/google-cloud-sdk/234
loop14                      7:14   0  43.6M  1 loop /snap/snapd/15177
loop15                      7:15   0  12.3M  1 loop /snap/slcli/2111
loop16                      7:16   0  99.4M  1 loop /snap/go/9415
loop17                      7:17   0 953.7M  0 loop
loop18                      7:18   0 953.7M  0 loop
loop19                      7:19   0 953.7M  0 loop
sda                         8:0    0    20G  0 disk
├─sda1                      8:1    0     1M  0 part
├─sda2                      8:2    0     1G  0 part /boot
└─sda3                      8:3    0    19G  0 part
  └─ubuntu--vg-ubuntu--lv 253:0    0    19G  0 lvm  /
sr0                        11:0    1  1024M  0 rom
root@ansiblemaster:/home/carles# cat /proc/partitions
major minor  #blocks  name

   7        0      63392 loop0
   7        1      96796 loop1
   7        2      63396 loop2
   7        3      15324 loop3
   7        4      56848 loop4
   7        5     113456 loop5
   7        6      56840 loop6
   7        7      69440 loop7
  11        0    1048575 sr0
   8        0   20971520 sda
   8        1       1024 sda1
   8        2    1048576 sda2
   8        3   19919872 sda3
 253        0   19918848 dm-0
   7        8      68856 loop8
   7        9      39632 loop9
   7       10      44632 loop10
   7       11      12244 loop11
   7       12     260484 loop12
   7       13     300224 loop13
   7       14      44676 loop14
   7       15      12584 loop15
   7       16     101792 loop16
   7       17     976562 loop17
   7       18     976562 loop18
   7       19     976562 loop19
Finally I create a ZFS pool:
root@ansiblemaster:/home/carles# zpool create zfspool raidz loop17 loop18 loop19
root@ansiblemaster:/home/carles# zpool status
  pool: zfspool
 state: ONLINE
  scan: none requested
config:

	NAME        STATE     READ WRITE CKSUM
	zfspool     ONLINE       0     0     0
	  raidz1-0  ONLINE       0     0     0
	    loop17  ONLINE       0     0     0
	    loop18  ONLINE       0     0     0
	    loop19  ONLINE       0     0     0

errors: No known data errors