This article shows the code for my PHP program posts_and_views.php that you can see at the bottom of in the Quick Selection bar.
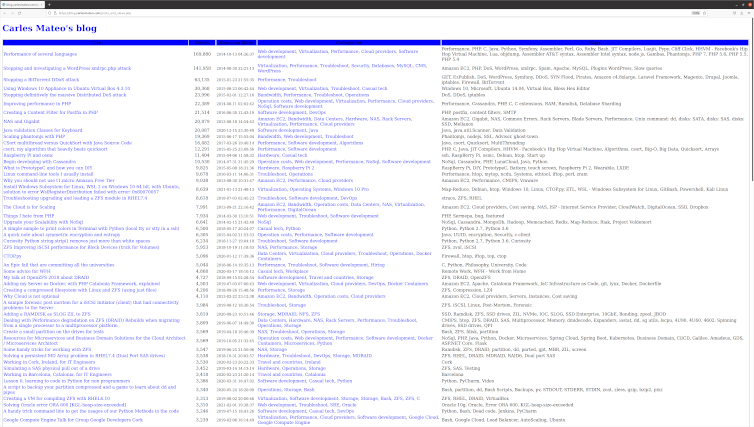
So I wrote this small PHP Code to display the number of Post Views recorded in my WordPress Database, sorted by Views in descending order.
In other words, sorted from Most Viewed.
Please note: In order to track the post views I use the excellent plugin WP-PostViews by Lester ‘GaMerZ’ Chan
Here is the code for posts_and_views.php
As you can see I use wp-config.php file to get the Database Settings (username, password, database) but I don’t use the WordPress Engine, it is just a stand alone PHP. So I wrote my own function to get the slug based on the category name. I believe the slug for it is in the Database and I could have added this as a SubQuery with JOINs, which would be better, but I wanted to keep the Database workload lightweight and especially, I did not want to invest more time investigating how the get the slug.
As I tested my function I didn’t find any Category failing but I saw that I had the Category Storage repeated in two different structure tree in Categories, and I will only always link to just the first one (So I was not linkin to the slug storage-2). I fixed that Category that I found repeated but to be honest if this script was a commercial solution or an Open Source solution properly maintained rather than just a sample, I would update it to have Categories and Tags’ slugs coming from the Database.
I would probably make it work with a Cron that would generate a cached page, updated every hour or every ten minutes. I did this in other projects I worked or in my PHP Framework Catalonia Framerwork.
But honestly, the load of the page does not justify a major effort in optimizing here, in this case.
<!DOCTYPE html>
<html>
<head>
    <style>
        .first {

            background-color: blue;
            padding: 12px;
        }
        .second {
            background-color: rgba(254, 253, 252, 0.7);
            text-align: center;
            padding:20px 0;
            font-size: 20px;
        }

        .centered {
            text-align: center;
        }

        /* unvisited link */
        a:link {
            color: blue;
            text-decoration: none;
        }

        /* visited link */
        a:visited {
            color: blue;
            text-decoration: none;
        }

        /* mouse over link */
        a:hover {
            color: #00A8EF;
            text-decoration: underline;
        }

        /* selected link */
        a:active {
            color: blue;
        }
    </style>
<body>
<?php

include "wp-config.php";

$s_site_name = "Carles Mateo's blog";
$s_site_link = "https://blog.carlesmateo.com";

function get_category_slug($s_text) {
    $s_output_text = strtolower($s_text);
    $s_output_text = str_replace(" ", "-", $s_output_text);

    return $s_output_text;
}

?>
<h1><a href="<?php print $s_site_link; ?>"><?php print($s_site_name); ?></a></h1>
<?php


$s_sort = "views DESC, post_date, post_title DESC";

if (array_key_exists("sort", $_GET)) {
    if ($_GET["sort"] == "date") {
        $s_sort = "post_date, views, post_title";
    }
}

$s_servername = "localhost";
$s_database = DB_NAME;
$s_username = DB_USER;
$s_password = DB_PASSWORD;


// Create connection
$o_conn = new mysqli($s_servername, $s_username, $s_password, $s_database);

// Check connection
if ($o_conn->connect_error) {
    die("Connection failed: " . $o_conn->connect_error);
}

/*
mysql> DESCRIBE wp_posts;
+-----------------------+-----------------+------+-----+---------------------+----------------+
| Field                 | Type            | Null | Key | Default             | Extra          |
+-----------------------+-----------------+------+-----+---------------------+----------------+
| ID                    | bigint unsigned | NO   | PRI | NULL                | auto_increment |
| post_author           | bigint unsigned | NO   | MUL | 0                   |                |
| post_date             | datetime        | NO   |     | 0000-00-00 00:00:00 |                |
| post_date_gmt         | datetime        | NO   |     | 0000-00-00 00:00:00 |                |
| post_content          | longtext        | NO   |     | NULL                |                |
| post_title            | text            | NO   |     | NULL                |                |
| post_excerpt          | text            | NO   |     | NULL                |                |
| post_status           | varchar(20)     | NO   |     | publish             |                |
| comment_status        | varchar(20)     | NO   |     | open                |                |
| ping_status           | varchar(20)     | NO   |     | open                |                |
| post_password         | varchar(255)    | NO   |     |                     |                |
| post_name             | varchar(200)    | NO   | MUL |                     |                |
| to_ping               | text            | NO   |     | NULL                |                |
| pinged                | text            | NO   |     | NULL                |                |
| post_modified         | datetime        | NO   |     | 0000-00-00 00:00:00 |                |
| post_modified_gmt     | datetime        | NO   |     | 0000-00-00 00:00:00 |                |
| post_content_filtered | longtext        | NO   |     | NULL                |                |
| post_parent           | bigint unsigned | NO   | MUL | 0                   |                |
| guid                  | varchar(255)    | NO   |     |                     |                |
| menu_order            | int             | NO   |     | 0                   |                |
| post_type             | varchar(20)     | NO   | MUL | post                |                |
| post_mime_type        | varchar(100)    | NO   |     |                     |                |
| comment_count         | bigint          | NO   |     | 0                   |                |
+-----------------------+-----------------+------+-----+---------------------+----------------+
 */

/*
mysql> describe wp_postmeta;
+------------+-----------------+------+-----+---------+----------------+
| Field      | Type            | Null | Key | Default | Extra          |
+------------+-----------------+------+-----+---------+----------------+
| meta_id    | bigint unsigned | NO   | PRI | NULL    | auto_increment |
| post_id    | bigint unsigned | NO   | MUL | 0       |                |
| meta_key   | varchar(255)    | YES  | MUL | NULL    |                |
| meta_value | longtext        | YES  |     | NULL    |                |
+------------+-----------------+------+-----+---------+----------------+
 */

$s_sql = "SELECT DISTINCT post_title, post_content,
                 (SELECT CAST(meta_value AS SIGNED) FROM wp_postmeta WHERE wp_postmeta.meta_key = 'views' AND wp_postmeta.post_id = wp_posts.ID) AS 'views',
                 (SELECT group_concat(wp_terms.name separator ',')
                         FROM wp_terms
                  INNER JOIN wp_term_taxonomy
                          ON wp_terms.term_id = wp_term_taxonomy.term_id
                  INNER JOIN wp_term_relationships wpr
                          ON wpr.term_taxonomy_id = wp_term_taxonomy.term_taxonomy_id
                  WHERE
                         taxonomy= 'category' AND wp_posts.ID = wpr.object_id
                ) AS 'Categories',
                (SELECT group_concat(wp_terms.name separator ', ')
                        FROM wp_terms
                 INNER JOIN wp_term_taxonomy
                         ON wp_terms.term_id = wp_term_taxonomy.term_id
                 INNER JOIN wp_term_relationships wpr
                         ON wpr.term_taxonomy_id = wp_term_taxonomy.term_taxonomy_id
                 WHERE
                        taxonomy= 'post_tag' AND wp_posts.ID = wpr.object_id
                ) AS 'Tags',
               ID, post_name, post_date, post_modified, post_type
          FROM wp_posts
          WHERE
                post_type = 'post' AND post_status = 'publish'
          ORDER BY
                $s_sort";

$o_result = $o_conn->query($s_sql);

if ($o_result->num_rows > 0) {
    ?><table style="border:1px solid">
    <tr class="first"><th>Title</th><th style="min-width:100px">Views</th><th style="min-width:150px">Creation Date</th><th>Categories</th><th>Tags</th></tr>

    <?php
    $i_total_views = 0;
    $i_articles = 0;

    // output data of each row
    while($row = $o_result->fetch_assoc()) {
        $s_style='style="border:1px solid"';
        $s_style='';
        $s_url = $row['post_name'];
        print('<tr>');
        print("<td $s_style>");
        print('<a href="'.$s_url.'" target="_blank">');
        print($row["post_title"]);
        print('</a>');
        print("</td>");
        print('<td class="centered" '.$s_style.'>');
        print(number_format($row["views"]));
        print("</td>");
        print("<td $s_style>");
        print("<small>");
        print($row["post_date"]);
        print("</small>");
        print("</td>");
        print("<td $s_style>");
        $s_categories = $row["Categories"];
        $a_categories = explode (",", $s_categories);
        $s_categories_content = "";
        foreach($a_categories as $s_category) {
            $s_category_slug = "/category/".get_category_slug($s_category)."/";
            $s_categories_content = $s_categories_content .'<a href="'.$s_category_slug.'" target="_blank">';
            $s_categories_content = $s_categories_content .$s_category;
            $s_categories_content = $s_categories_content ."</a>, ";
        }

        if (strlen($s_categories_content) > 0) {
            $s_categories_content = substr($s_categories_content, 0, -2);
        }

        print($s_categories_content);
        print("</td>");
        print("<td $s_style>");
        print($row["Tags"]);
        print("</td>");
        // $row["post_content"];
        $i_total_views = $i_total_views + intval($row["views"]);
        $i_articles++;
        echo "</tr>";
    } ?></table><?php
    print("<strong>Total articles:</strong> ".number_format($i_articles)." <strong>Total Views:</strong> ".number_format($i_total_views));
    print("<br>");
} else {
    echo "<p>0 results</p>";
}
$o_conn->close();

?>
</body>
</html>