TLTR: I’m undergoing a Maintenance on all my sites.
The main reason was that I was getting unexpected API Exceptions on the AWS SDK for Python (boto3), so I connected to the AWS Console to get more information.
Then I saw a message indicating that they will stop EC2-Classic today 30th of October. (Please read the Update on the Postmortem analysis as I understood incorrectly that banner message)
I already started migrating my Services, some I move to other providers like Digital Ocean. Other I had plant to keep in Amazon.
EOL (End of Life) was scheduled for 2022 August, so when I saw the message from Amazon the evening of the 29th, I decided to migrate my EC2-Classic Public Ip’s and Compute to VPC. Trying to deploy from an AMI, Amazon APIs were returning many internal errors, and as I figured out where their failures would be I was able get instances being launch without being Terminated immediately without an explanation. Still I had many problems with the Internet Gateway, VPC NAT, etc… after hours fighting with their errors, and their console, that is more a bunch of pages to manage Infrastructure rather than a user/developer friendly Cloud Tool I decided that I had enough.
After 11 years using Amazon AWS, including a trip to Dublin to be hired as Manager for Cloud Watch, and giving them the idea to add AutoScaling (I was told the project was too easy for me and that I would get bored in a year or too so I was not hired), I decided to move my Services to Google Cloud and to Digital Ocean.
I’m very polite and I saw that when I told to one Manager that the User Interface was terrible he didn’t like, but I have to speak up and say that tools for developers cannot be cold as your evil girlfriend. Cannot be API alike, stand alone pages to manage infinite parts of Architecture. Web providing services for developers cannot be created like in cold SysAdmin style. If the infrastructure is hard to manage and internally you use APIs, build nice Wizards in Javascript. I was leading a Team of Developers with infinite less resources than Amazon or Google and we wrote a Multi-Cloud product, with nice, and clever, and easy to use Wizards, and they were infinitely more better that those giant CSPs. We won a prize at European level at that time. But it was 2013.
I’ve migrated everything, moved all the data, statics, VMs… but I’m completing the adjustments for certain services like Cassandra nodes, web sites, bootstrapping some of my sites based of my PHP Catalonia Framework, adding Firewall rules to GCP, doing changes for Ansible provisioning, deploying the Server scripts from IaC, Docker, etc…
I published this book to help developers to understand and use Docker.
It is not targeted to SysAdmins, is aimed to Developers that want to get an operative know how by examples very quickly, and easy to read.
My other books have also updates not yet published, however an update has been published for Python 3 exercises for beginners book.
University classes are restarted, and I fixed my tower.
For the Cloud computing degree this semester VMWare is used intensively.
I have a dedicated tower with an AMD Ryzen 7 processor, a Samsung NMVe drive PCIe 4.0, which provides me a throughput of 6GB/second (six Gigabytes, so 48 Gbit/second), SAS drives and SATA too. It’s a little monster with 64 GB of RAM and 2.5 Gbps NIC.
It was not starting.
The problem was in the Video card, which made loosely contact to the motherboard.
I had to disconnect everything until I found what it was, but after moving the video card to another PCI slot, it worked.
I knew it was some sort of short circuit / bad contact as the fans were turning for a second and turning off immediately.
After this, the computer works fine but it will poweroff in about 4h and 12 hours. I’ve been testing and removing each component until I believe is the PSU. I’ve ordered a new one from a Dutch provider with web store in Ireland that my former colleague Thomas showed me one year and half ago.
Since England leaved the EU, it is impossible to buy from amazon.co.uk without experiencing problems in the border and delays.
If you want to learn how to assemble a PC, fix the problems and upgrade your laptop, I wrote this book:
If you are curious about what I use in my day to day:
A tower for developing and reading my email, with Linux, Intel i7 7800X (12 cores) and 64 GB of RAM, with Nvidia graphics card
A tower for holding Virtual Machines, with Linux, AMD Ryzen 7 3700x (16 cores) and 64 GB of RAM, with Nvidia graphics card
An upgraded HP laptop for programming in the cafe, is a Windows 10, with 16 GB of RAM
Raspberry Pi 4 and 3, from time to time
A laptop for programming, for Work, 16 GB of RAM
A tower for programming, for Work, at the office, 32 GB of RAM
I also had a Dell computer which battery inflated elevating the touchpad, an Acer 11.6 Latop very lightweight which screen died cracked apparently (it’s a mistery to me how this happened as I removed from the bag and it was cracked. That little laptop accompanied me during years, to many countries, as for a while I carried it with me 100% of the time. At that time if the companies I worked for had outages they were losing thousands of euros per hour, so as CTO I fixed broken stuff even in a restaurant. Believe when I recommend you and your teams to use Unit Testing) and a 15.6″ Acer with 16GB of RAM that was part of the payment of an Start up I was CTO for, and which screen flicks intermittently and I managed to fix it by applying a pressure point to a connector, so I managed to use as fixed computer at the beginning of being in Ireland. I was not using it much, as I had two laptops from work when working for Sanmina, a Dell with 16 GB of RAM and Core i7 with two external monitors and an Intel Xeon with 32GB of RAM, heavy weight, but very useful for my job (programming, doing demos, having VMs…).
I’ve assembled all my PC from the scratch, piece by piece, and I force myself to do it so I keep up to date of the upcoming technologies, buses, etc…
My students are doing well. Congrats to Albert for getting 8.67 from 10 in his university programming course exams!.
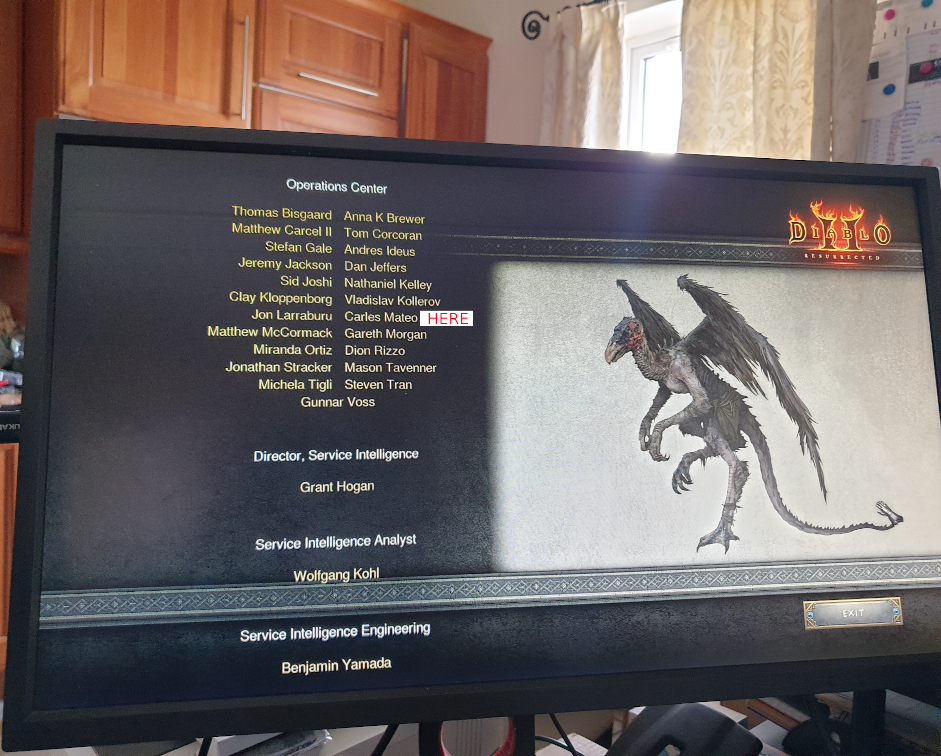
Diablo 2 Resurrected is published and I am in the credits :)
I’m in the credits of all our games since I joined, but I’m happy every time I see myself and my colleagues on them. :)
This release includes SubProcessUtils which is a class that allows you to execute commands to the shell (or without shell) and capture the STDOUT, STDERR, and Exit Code very easily.
I’ve used my libraries for a hackaton PoC for work, for Monitoring one aspect of one of our top games side, and I coded it super quickly. :)
They loved it and we have a meeting scheduled to create a Service from my PoC. :)
I’ve raised back the price for my books to normal levels. I’ve been keeping the price to the minimum to help people that wanted to learn during covid-19. I consider that who wanted to learn has already done it.
I still have bundles with a somewhat reduced price, and I authorized LeanPub platform to do discounts up to 50% at their discretion.
I had this idea after one my Python and Linux students with two laptops, a Mac OS X and a Windows one explained me that the Mac OS X is often taken by their daughters, and that the Windows 10 laptop has not enough memory to run PyCharm and Virtual Box fluently. She wanted to have a Linux VM to practice Linux, and do the Bash exercises.
So this article explains how to create a Ubuntu 20.04 LTS Docker Container, and execute a shell were you can practice Linux, Ubuntu, Bash, and you can use it to run Python, Apache, PHP, MySQL… as well, if you want.
You need to install Docker for Windows of for Mac:
Just pay attention to your type of processor: Mac with Intel chip or Mac with apple chip.
The first thing is to create the Dockerfile.
FROM ubuntu:20.04

MAINTAINER Carles Mateo

ARG DEBIAN_FRONTEND=noninteractive

RUN apt update && \
    apt install -y vim python3-pip &&  \
    apt install -y net-tools mc htop less strace zip gzip lynx && \
    pip3 install pytest && \
    apt-get clean

RUN echo "#!/bin/bash\nwhile [ true ]; do sleep 60; done" > /root/loop.sh; chmod +x /root/loop.sh

CMD ["/root/loop.sh"]
So basically the file named Dockerfile contains all the blueprints for our Docker Container to be created.
You see that I all the installs and clean ups in one single line. That’s because Docker generates a layer of virtual disk per each line in the Dockerfile. The layers are persistent, so even if in the next line we delete the temporary files, the space used will not be recovered.
You see also that I generate a Bash file with an infinite loop that sleeps 60 seconds each loop and save it as /root/loop.sh This is the file that later is called with CMD, so basically when the Container is created will execute this infinite loop. Basically we give to the Container a non ending task to prevent it from running, and exiting.
Now that you have the Dockerfile is time to build the Container.
For Mac open a terminal and type this command inside the directory where you have the Dockerfile file:
sudo docker build -t cheap_ubuntu .
I called the image cheap_ubuntu but you can set the name that you prefer.
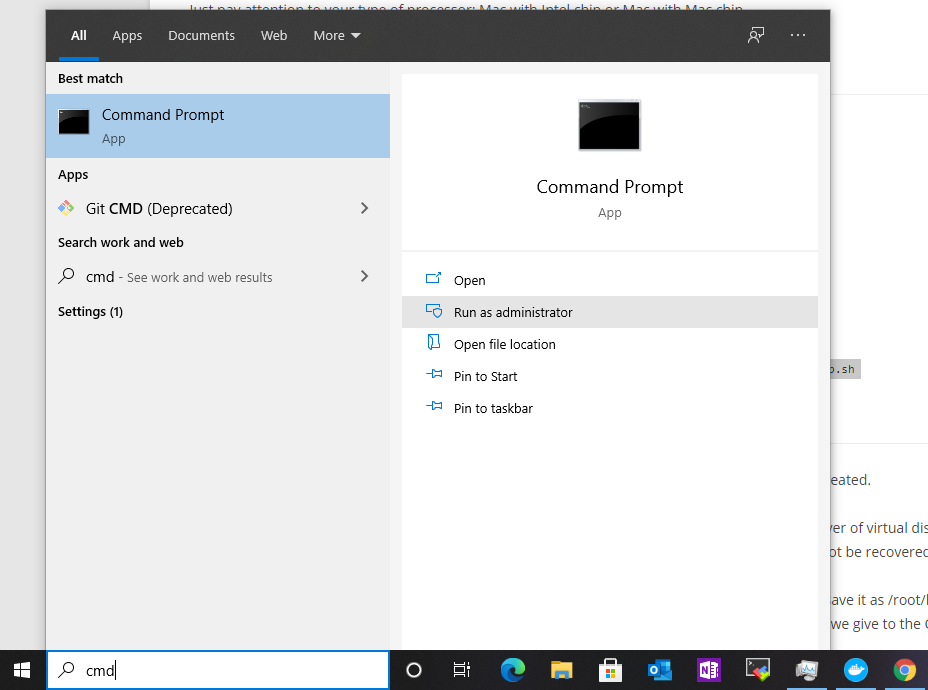
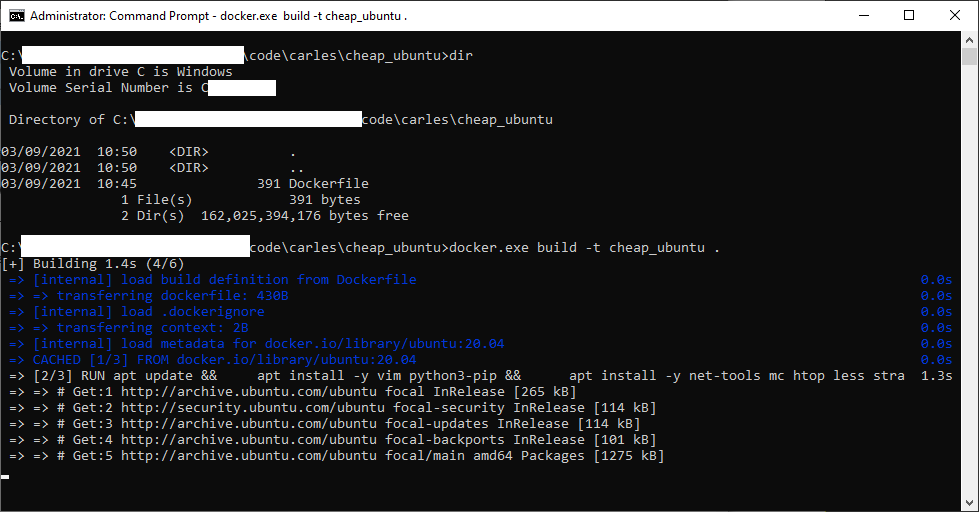
For Windows 10 open a Command Prompt with Administrative rights and then change directory (cd) to the one that has your Dockerfile file.
docker.exe build -t cheap_ubuntu .
Image being built… (some data has been covered in white)
Now that you have the image built, you can create a Container based on it.
For Mac:
sudo docker run -d --name cheap_ubuntu cheap_ubuntu
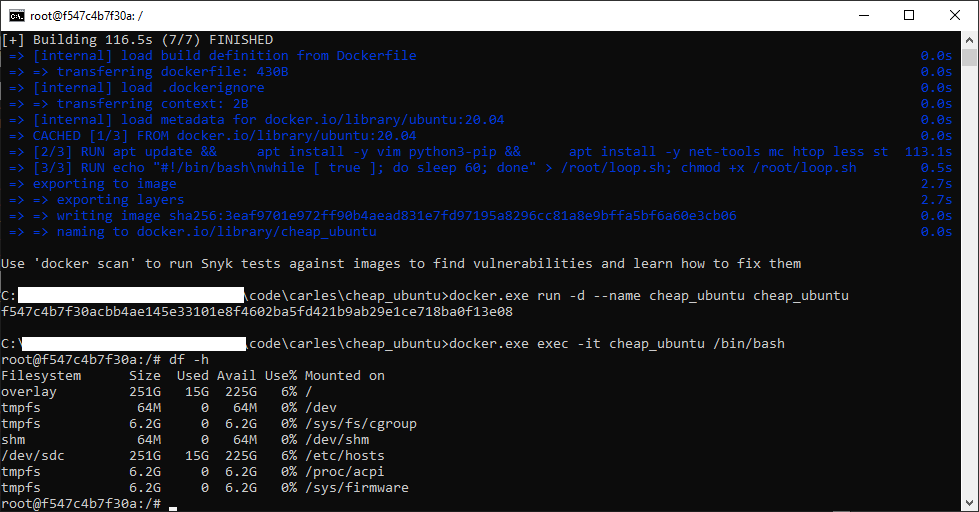
For Windows (you can use docker.exe or just docker):
docker.exe run -d --name cheap_ubuntu cheap_ubuntu
Now you have Container named cheap_ubuntu based on the image cheap_ubuntu.
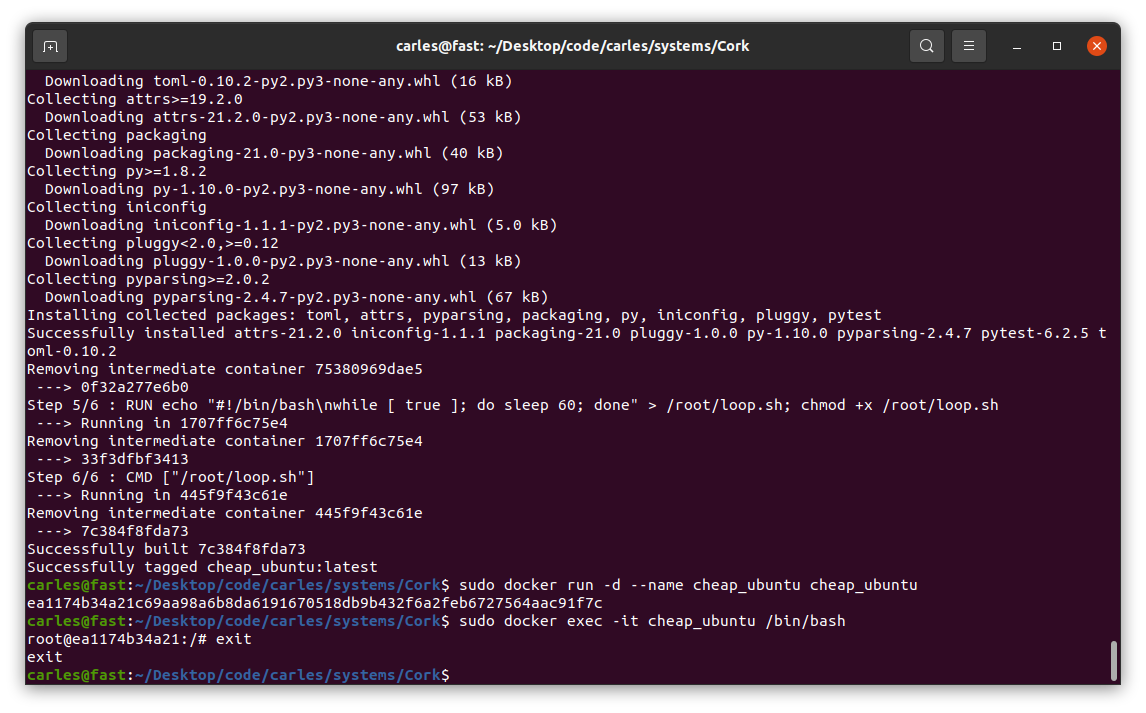
It’s time to execute an interactive shell and be able to play:
sudo docker exec -it cheap_ubuntu /bin/bash
For Windows:
docker.exe exec -it cheap_ubuntu /bin/bash
Our Ubuntu terminal inside Windows
Now you have an interactive shell, as root, to your cheap_ubuntu Ubuntu 20.04 LTS Container.
You’ll not be able to run the graphical interface, but you have a complete Ubuntu to learn to program in Bash and to use Linux from Command Line.
You will exit the interactive Bash session in the container with:
exit
If you want to stop the Container:
sudo docker stop cheap_ubuntu
Or for Windows:
docker.exe stop cheap_ubuntu
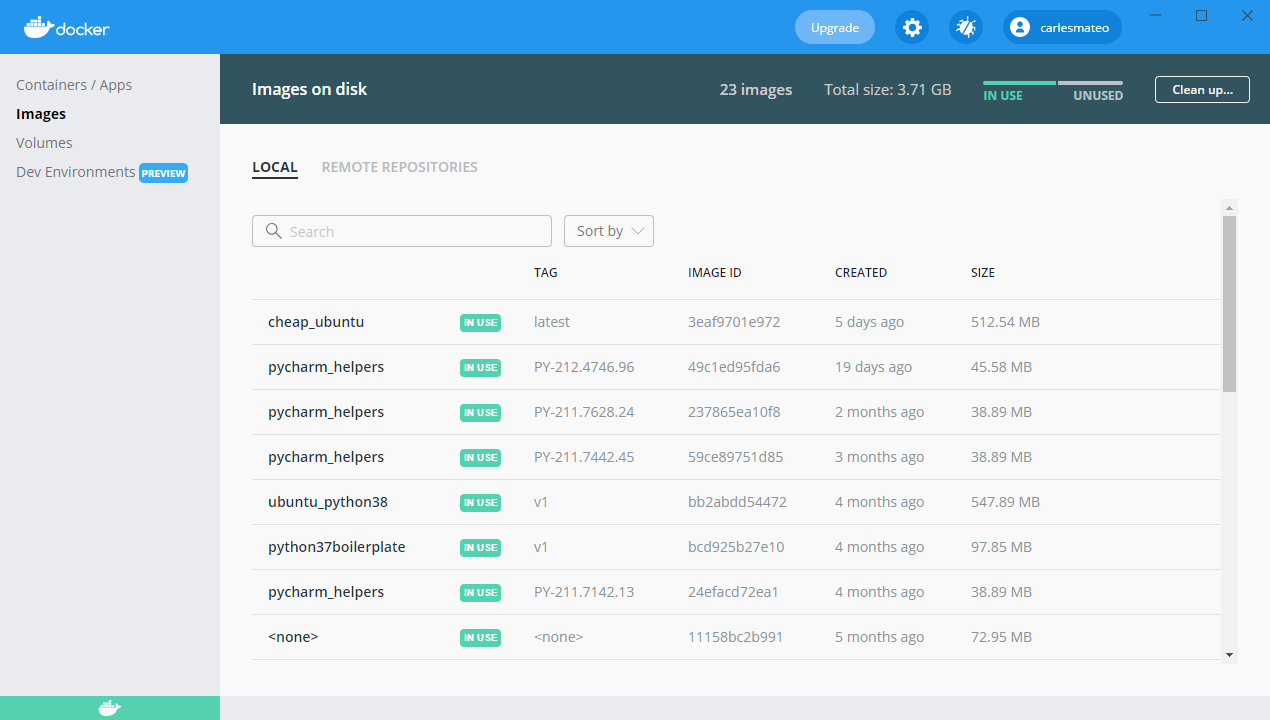
If you want to see what Containers are running do:
I completed my ZFS on Ubuntu 20.04 LTS book. I had an error in an actual hard drive so I added a Troubleshooting section explaining how I fixed it.
I paused for a while the advance of my book Python: basic exercises for beginners, as my colleague Michela is translating it to Italian. She is a great Engineer and I cannot be more happy of having her help.
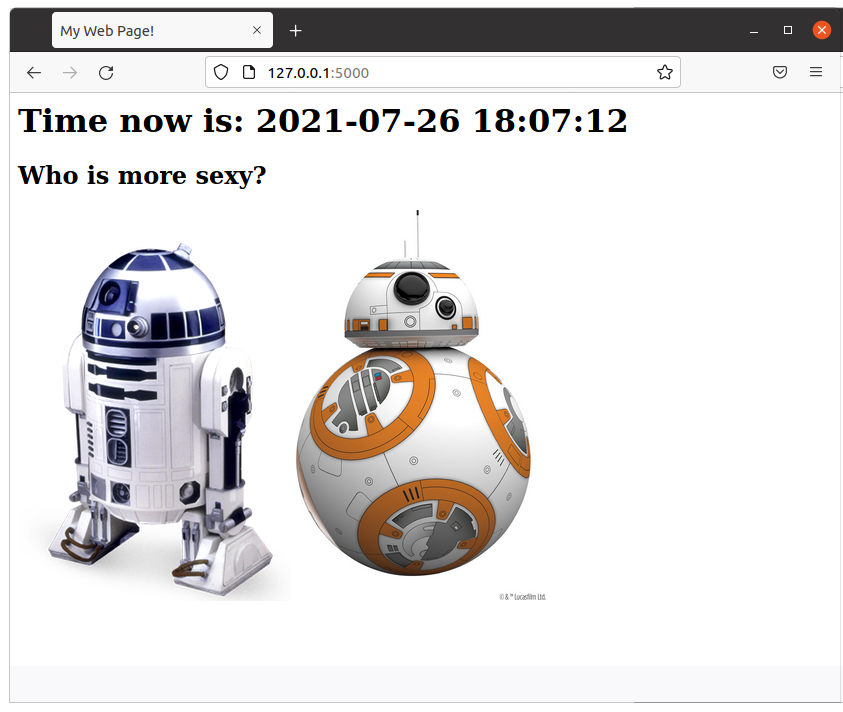
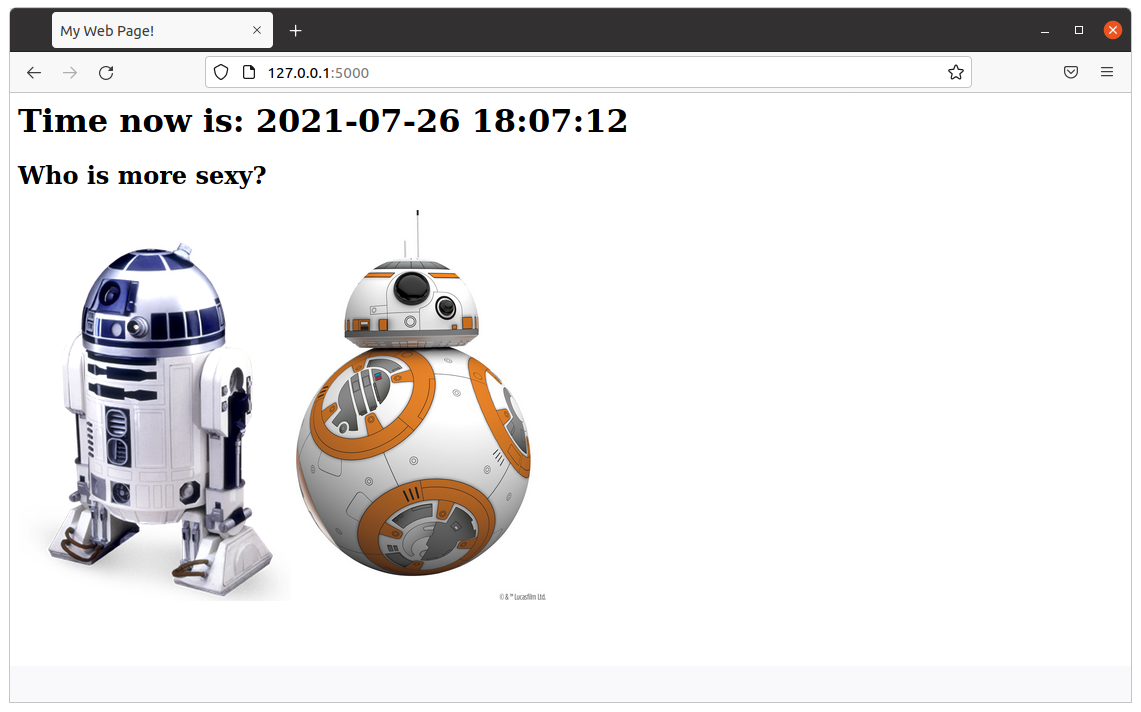
I added a new article about how to create a simple web Star Wars game using Flask. As always, I use Docker and a Dockerfile to automate the deployment, so you can test it without messing with your local system. The code is very simple and easy to understand.
This way I set an entry in /etc/hosts and I can do all the tests I want.
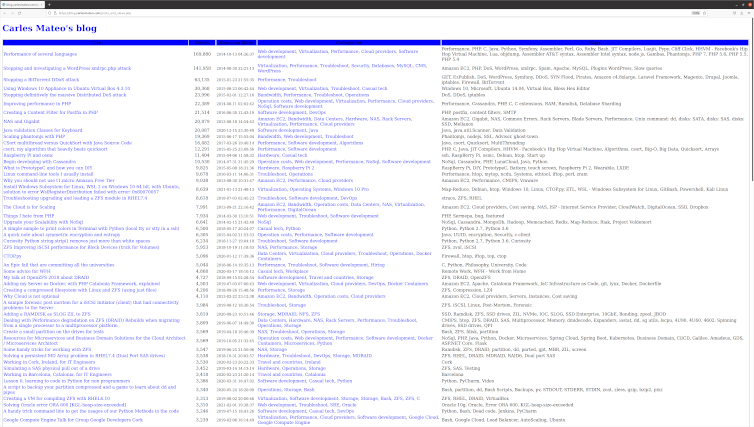
I added a new section to the blog, is a link where you can see all the articles published, ordered by number of views. /posts_and_views.php
Is in the main page, just after the recommended articles. Here you can see the source code.
I removed the Categories:
Storage
ZFS
In favor of:
Hardware
Storage
ZFS
So the articles with Categories in the group deleted were reassigned the Categories in the second group.
Visually:
I removed some annoying lines from the Quick Selection access. They came from inherited CSS properties from my WordPress, long time customized, and I created new styles for this section.
I adjusted the line-height to avoid separation between lines being too much.
I added a link in the section of Other Engineering Blogs that I like, to the great https://github.com/lesterchan site, author of many super cool WordPress plugins.
After Docker Image flask_app is built, you can run a Docker Container based on it with:
sudo docker run -d -p 5000:5000 --name flask_app flask_app
After you’re done, in order to stop the Container type:
sudo docker stop flask_app
Here is the source code of the Python file flask_app.py:
#
# flask_app.py
#
# Author: Carles Mateo
# Creation Date: 2020-05-10 20:50 GMT+1
# Description: A simple Flask Web Application
#              Part of the samples of https://leanpub.com/pythoncombatguide
#              More source code for the book at https://gitlab.com/carles.mateo/python_combat_guide
#

from flask import Flask
import datetime


def get_datetime(b_milliseconds=False):
    """
    Return the datetime with miliseconds in format YYYY-MM-DD HH:MM:SS.xxxxx
    or without milliseconds as YYYY-MM-DD HH:MM:SS
    """
    if b_milliseconds is True:
        s_now = str(datetime.datetime.now())
    else:
        s_now = str(datetime.datetime.now().strftime("%Y-%m-%d %H:%M:%S"))

    return s_now


app = Flask(__name__)

# Those variables will keep their value as long as Flask is running
i_votes_r2d2 = 0
i_votes_bb8 = 0


@app.route('/')
def page_root():
    s_page = "<html>"
    s_page += "<title>My Web Page!</title>"
    s_page += "<body>"
    s_page += "<h1>Time now is: " + get_datetime() + "</h1>"
    s_page += """<h2>Who is more sexy?</h2>
<a href="r2d2"><img src="static/r2d2.png"></a> <a href="bb8"><img width="250" src="static/bb8.jpg"></a>"""
    s_page += "</body>"
    s_page += "</html>"

    return s_page


@app.route('/bb8')
def page_bb8():
    global i_votes_bb8

    i_votes_bb8 = i_votes_bb8 + 1

    s_page = "<html>"
    s_page += "<title>My Web Page!</title>"
    s_page += "<body>"
    s_page += "<h1>Time now is: " + get_datetime() + "</h1>"
    s_page += """<h2>BB8 Is more sexy!</h2>
                <img width="250" src="static/bb8.jpg">"""
    s_page += "<p>I have: " + str(i_votes_bb8) + "</p>"
    s_page += "</body>"
    s_page += "</html>"

    return s_page


@app.route('/r2d2')
def page_r2d2():
    global i_votes_r2d2

    i_votes_r2d2 = i_votes_r2d2 + 1

    s_page = "<html>"
    s_page += "<title>My Web Page!</title>"
    s_page += "<body>"
    s_page += "<h1>Time now is: " + get_datetime() + "</h1>"
    s_page += """<h2>R2D2 Is more sexy!</h2>
                <img src="static/r2d2.png">"""
    s_page += "<p>I have: " + str(i_votes_r2d2) + "</p>"
    s_page += "</body>"
    s_page += "</html>"

    return s_page


if __name__ == "__main__":
    app.run(host="0.0.0.0", port=5000, debug=True)
As always, the naming of the variables is based on MT Notation.
The Dockerfile is very straightforward:
FROM ubuntu:20.04

MAINTAINER Carles Mateo

ARG DEBIAN_FRONTEND=noninteractive

RUN apt update && \
    apt install -y vim python3-pip &&  pip3 install pytest && \
    apt-get clean

ENV PYTHON_COMBAT_GUIDE /var/python_combat_guide

RUN mkdir -p $PYTHON_COMBAT_GUIDE

COPY ./ $PYTHON_COMBAT_GUIDE

ENV PYTHONPATH "${PYTHONPATH}:$PYTHON_COMBAT_GUIDE/src/:$PYTHON_COMBAT_GUIDE/src/lib"

RUN pip3 install -r $PYTHON_COMBAT_GUIDE/requirements.txt

# This is important so when executing python3 -m current directory will be added to Syspath
# Is not necessary, as we added to PYTHONPATH
#WORKDIR $PYTHON_COMBAT_GUIDE/src/lib

EXPOSE 5000

# Launch our Flask Application
CMD ["/usr/bin/python3", "/var/python_combat_guide/src/flask_app.py"]
However we are going to run everything from a Docker Container so the only thing you need is to have installed Docker.
If you prefer to install MySql in your computer (or Virtual Box instance) directly, skip the Docker steps.
Dockerfile
The Dockerfile is the file that Docker uses to build the Docker Container.
Ours is like that:
FROM ubuntu:20.04

MAINTAINER Carles Mateo

ARG DEBIAN_FRONTEND=noninteractive

RUN apt update && apt install -y python3 pip mysql-server vim mc wget curl && apt-get clean

RUN pip install mysql-connector-python

EXPOSE 3306

ENV FOLDER_PROJECT /var/mysql_carles

RUN mkdir -p $FOLDER_PROJECT

COPY docker_run_mysql.sh $FOLDER_PROJECT
COPY start.sql $FOLDER_PROJECT
COPY src $FOLDER_PROJECT

RUN chmod +x /var/mysql_carles/docker_run_mysql.sh

CMD ["/var/mysql_carles/docker_run_mysql.sh"]
The first line defines that we are going to use Ubuntu 20.04 (it’s a LTS version).
We install all the apt packages in a single line, as Docker works in layers, and what is used as disk space in the previous layer is not deleted even if we delete the files, so we want to run apt update, install all the packages, and clean the temporal files in one single step.
I also install some useful tools like: vim, mc, less, wget and curl.
We expose to outside the port 3306, in case you want to run the Python code from your computer, but having the MySql in the Container.
The last line executes a script that starts the MySql service, creates the table, the user, and add two rows and runs an infinite loop so the Docker does not finish.
build_docker.sh
build_docker.sh is a Bash script that builds the Docker Image for you very easily.
It stops the container and removes the previous image, so your hard drive does not fill with Docker images if you do modifications.
It checks for errors building and it also remembers you how to run and debug the Docker Container.
#!/bin/bash

# Execute with sudo

s_DOCKER_IMAGE_NAME="blog_carlesmateo_com_mysql"

printf "Stopping old image %s\n" "${s_DOCKER_IMAGE_NAME}"
sudo docker stop "${s_DOCKER_IMAGE_NAME}"

printf "Removing old image %s\n" "${s_DOCKER_IMAGE_NAME}"
sudo docker rm "${s_DOCKER_IMAGE_NAME}"

printf "Creating Docker Image %s\n" "${s_DOCKER_IMAGE_NAME}"
sudo docker build -t ${s_DOCKER_IMAGE_NAME} . --no-cache

i_EXIT_CODE=$?
if [ $i_EXIT_CODE -ne 0 ]; then
    printf "Error. Exit code %s\n" ${i_EXIT_CODE}
    exit
fi

echo "Ready to run ${s_DOCKER_IMAGE_NAME} Docker Container"
echo "To run type: sudo docker run -d -p 3306:3306 --name ${s_DOCKER_IMAGE_NAME} ${s_DOCKER_IMAGE_NAME}"
echo "or just use run_in_docker.sh"
echo
echo "Debug running Docker:"
echo "docker exec -it ${s_DOCKER_IMAGE_NAME} /bin/bash"
echo
docker_run.sh
I also provide a script named docker_run.sh that runs your Container easily, exposing the MySql port.
#!/bin/bash

# Execute with sudo

s_DOCKER_IMAGE_NAME="blog_carlesmateo_com_mysql"

docker run -d -p 3306:3306 --name ${s_DOCKER_IMAGE_NAME} ${s_DOCKER_IMAGE_NAME}

echo "Showing running Instances"
docker ps
As you saw before I named the image after blog_carlesmateo_com_mysql.
I did that so basically I wanted to make sure that the name was unique, as the build_docker.sh deletes an image named like the name I choose, I didn’t want to use a generic name like “mysql” that may lead to you to delete the Docker Image inadvertently.
docker_run_mysql.sh
This script will run when the Docker Container is launched for the first time:
#!/bin/bash

# Allow to be queried from outside
sed -i '31 s/bind-address/#bind-address/' /etc/mysql/mysql.conf.d/mysqld.cnf

service mysql start

# Create a Database, a user with password, and permissions
cd /var/mysql_carles
mysql -u root < start.sql

while [ true ]; do sleep 60; done
With sed command we modify the line 31 of the the MySQL config file so we can connect from Outside the Docker Instance (bind-address: 127.0.0.1)
As you can see it executes the SQL contained in the file start.sql as root and we start MySql.
Please note: Our MySql installation has not set a password for root. It is only for Development purposes.
start.sql
The SQL file that will be ran inside our Docker Container.
CREATE DATABASE carles_database;

CREATE USER 'python'@'localhost' IDENTIFIED BY 'blog.carlesmateo.com-db-password';
CREATE USER 'python'@'%' IDENTIFIED BY 'blog.carlesmateo.com-db-password';
GRANT ALL PRIVILEGES ON carles_database.* TO 'python'@'localhost';
GRANT ALL PRIVILEGES ON carles_database.* TO 'python'@'%';

USE carles_database;

CREATE TABLE car_queue (
    i_id_car int,
    s_model_code varchar(25),
    s_color_code varchar(25),
    s_extras varchar(100),
    i_right_side int,
    s_city_to_ship varchar(25)
);

INSERT INTO car_queue (i_id_car, s_model_code, s_color_code, s_extras, i_right_side, s_city_to_ship) VALUES (1, "GOLF2021", "BLUE7", "COND_AIR, GPS, MULTIMEDIA_V3", 0, "Barcelona");
INSERT INTO car_queue (i_id_car, s_model_code, s_color_code, s_extras, i_right_side, s_city_to_ship) VALUES (2, "GOLF2021_PLUGIN_HYBRID", "BLUEMETAL_5", "COND_AIR, GPS, MULTIMEDIA_V3, SECURITY_V5", 1, "Cork");
As you can see it creates the user “python” with the password ‘blog.carlesmateo.com-db-password’ for access local and remote (%).
It also creates a Database named carles_database and grants all the permissions to the user “python”, for local and remote.
This is the user we will use to authenticate from out Python code.
Then we switch to use the carles_database and we create the car_queue table.
We insert two rows, as an example.
select_values_example.py
Finally the Python code that will query the Database.
import mysql.connector

if __name__ == "__main__":
    o_conn = mysql.connector.connect(user='python', password='blog.carlesmateo.com-db-password', database='carles_database')
    o_cursor = o_conn.cursor()

    s_query = "SELECT * FROM car_queue"

    o_cursor.execute(s_query)

    for a_row in o_cursor:
        print(a_row)

    o_cursor.close()
    o_conn.close()
Nothing special, we open a connection to the MySql and perform a query, and parse the cursor as rows/lists.
Please note: Error control is disabled so you may see any exception.
Executing the Container
First step is to build the Container.
From the directory where you cloned the project, execute:
sudo ./build_docker.sh
Then run the Docker Container:
sudo ./docker_run.sh
The script also performs a docker ps command, so you can see that it’s running.
Then change to the directory where I installed the sample files:
cd /var/mysql_carles
And execute the Python 3 example:
python3 select_values_example.py
Tying together MySql and a Python Menu with Object Oriented Programming
In order to tie all together, and specially to give a consistent view to my students, to avoid showing only pieces but a complete program, and to show a bit of Objects Oriented in action I developed a small program which simulates the handling of a production queue for Volkswagen.
MySQL Library
First I created a library to handle MySQL operations.
lib/mysqllib.py
import mysql.connector


class MySql():

    def __init__(self, s_user, s_password, s_database, s_host="127.0.0.1", i_port=3306):
        self.s_user = s_user
        self.s_password = s_password
        self.s_database = s_database
        self.s_host = s_host
        self.i_port = i_port

        o_conn = mysql.connector.connect(host=s_host, port=i_port, user=s_user, password=s_password, database=s_database)
        self.o_conn = o_conn

    def query(self, s_query):
        a_rows = []

        o_cursor = self.o_conn.cursor()

        o_cursor.execute(s_query)

        for a_row in o_cursor:
            a_rows.append(a_row)

        o_cursor.close()

        return a_rows

    def insert(self, s_query):

        o_cursor = self.o_conn.cursor()

        o_cursor.execute(s_query)
        i_inserted_row_count = o_cursor.rowcount

        # Make sure data is committed to the database
        self.o_conn.commit()

        return i_inserted_row_count

    def delete(self, s_query):

        o_cursor = self.o_conn.cursor()

        o_cursor.execute(s_query)
        i_deleted_row_count = o_cursor.rowcount

        # Make sure data is committed to the database
        self.o_conn.commit()

        return i_deleted_row_count


    def close(self):

        self.o_conn.close()
Basically when this class is instantiated, a new connection to the MySQL specified in the Constructor is established.
We have a method query() to send SELECT queries.
We have a insert method, to send INSERT, UPDATE queries that returns the number of rows affected.
This method ensures to perform a commit to make sure changes persist.
We have a delete method, to send DELETE Sql queries that returns the number of rows deleted.
We have a close method which closes the MySql connection.
A Data Object: CarDO
Then I’ve defined a class, to deal with Data and interactions of the cars.
Initially I was going to have a CarDO Object without any logic. Only with Data.
In OOP the variables of the Instance are called Properties, and the functions Methods.
Then I decided to add some logic, so I can show what’s the typical use of the objects.
So I will use CarDO as Data Object, but also to do few functions like printing the info of a Car.
Queue Manager
Finally the main program.
We also use Object Oriented Programming, and we use Dependency Injection to inject the MySQL Instance. That’s very practical to do Unit Testing.
from lib.mysqllib import MySql
from do.cardo import CarDO


class QueueManager():

    def __init__(self, o_mysql):
        self.o_mysql = o_mysql

    def exit(self):
        exit(0)

    def main_menu(self):
        while True:
            print("Main Menu")
            print("=========")
            print("")
            print("1. Add new car to queue")
            print("2. List all cars to queue")
            print("3. View car by Id")
            print("4. Delete car from queue by Id")
            print("")
            print("0. Exit")
            print("")

            s_option = input("Choose your option:")
            if s_option == "1":
                self.add_new_car()
            if s_option == "2":
                self.see_all_cars()
            if s_option == "3":
                self.see_car_by_id()
            if s_option == "4":
                self.delete_by_id()

            if s_option == "0":
                self.exit()

    def get_all_cars(self):
        s_query = "SELECT * FROM car_queue"

        a_rows = self.o_mysql.query(s_query)
        a_o_cars = []

        for a_row in a_rows:
            i_id_car = a_row[0]
            s_model_code = a_row[1]
            s_color_code = a_row[2]
            s_extras = a_row[3]
            i_right_side = a_row[4]
            s_city_to_ship = a_row[5]

            o_car = CarDO(i_id_car=i_id_car, s_model_code=s_model_code, s_color_code=s_color_code, s_extras=s_extras, i_right_side=i_right_side, s_city_to_ship=s_city_to_ship)
            a_o_cars.append(o_car)

        return a_o_cars

    def get_car_by_id(self, i_id_car):
        b_success = False
        o_car = None

        s_query = "SELECT * FROM car_queue WHERE i_id_car=" + str(i_id_car)

        a_rows = self.o_mysql.query(s_query)

        if len(a_rows) == 0:
            # False, None
            return b_success, o_car

        i_id_car = a_rows[0][0]
        s_model_code = a_rows[0][1]
        s_color_code = a_rows[0][2]
        s_extras = a_rows[0][3]
        i_right_side = a_rows[0][4]
        s_city_to_ship = a_rows[0][5]

        o_car = CarDO(i_id_car=i_id_car, s_model_code=s_model_code, s_color_code=s_color_code, s_extras=s_extras, i_right_side=i_right_side, s_city_to_ship=s_city_to_ship)
        b_success = True

        return b_success, o_car

    def replace_apostrophe(self, s_text):
        return s_text.replace("'", "´")

    def insert_car(self, o_car):

        s_sql = """INSERT INTO car_queue
                                (i_id_car, s_model_code, s_color_code, s_extras, i_right_side, s_city_to_ship)
                         VALUES
                                (""" + str(o_car.get_i_id_car()) + ", '" + o_car.get_s_model_code() + "', '" + o_car.get_s_color_code() + "', '" + o_car.get_s_extras() + "', " + str(o_car.get_i_right_side()) + ", '" + o_car.get_s_city_to_ship() + "');"

        i_inserted_row_count = self.o_mysql.insert(s_sql)

        if i_inserted_row_count > 0:
            print("Inserted", i_inserted_row_count, " row/s")
            b_success = True
        else:
            print("It was impossible to insert the row")
            b_success = False

        return b_success

    def add_new_car(self):
        print("Add new car")
        print("===========")

        while True:
            s_id_car = input("Enter new ID: ")
            if s_id_car == "":
                print("A numeric Id is needed")
                continue

            i_id_car = int(s_id_car)

            if i_id_car < 1:
                continue

            # Check if that id existed already
            b_success, o_car = self.get_car_by_id(i_id_car=i_id_car)
            if b_success is False:
                # Does not exist
                break

            print("Sorry, this Id already exists")

        s_model_code = input("Enter Model Code:")
        s_color_code = input("Enter Color Code:")
        s_extras = input("Enter extras comma separated:")
        s_right_side = input("Enter R for Right side driven:")
        if s_right_side.upper() == "R":
            i_right_side = 1
        else:
            i_right_side = 0
        s_city_to_ship = input("Enter the city to ship the car:")

        # Sanitize SQL replacing apostrophe
        s_model_code = self.replace_apostrophe(s_model_code)
        s_color_code = self.replace_apostrophe(s_color_code)
        s_extras = self.replace_apostrophe(s_extras)
        s_city_to_ship = self.replace_apostrophe(s_city_to_ship)

        o_car = CarDO(i_id_car=i_id_car, s_model_code=s_model_code, s_color_code=s_color_code, s_extras=s_extras, i_right_side=i_right_side, s_city_to_ship=s_city_to_ship)
        b_success = self.insert_car(o_car)

    def see_all_cars(self):
        print("")

        a_o_cars = self.get_all_cars()

        if len(a_o_cars) > 0:
            print(a_o_cars[0].get_car_header_for_list())
        else:
            print("No cars in queue")
            print("")
            return

        for o_car in a_o_cars:
            print(o_car.get_car_info_for_list())

        print("")

    def see_car_by_id(self, i_id_car=0):
        if i_id_car == 0:
            s_id = input("Car Id:")
            i_id_car = int(s_id)

        s_id_car = str(i_id_car)

        b_success, o_car = self.get_car_by_id(i_id_car=i_id_car)
        if b_success is False:
            print("Error, car id: " + s_id_car + " not located.")
            return False

        print("")
        o_car.print_car_info()
        print("")

        return True

    def delete_by_id(self):

        s_id = input("Enter Id of car to delete:")
        i_id_car = int(s_id)

        if i_id_car == 0:
            print("Invalid Id")
            return

        # reuse see_car_by_id
        b_found = self.see_car_by_id(i_id_car=i_id_car)
        if b_found is False:
            return

        s_delete = input("Are you sure you want to DELETE. Type Y to delete: ")
        if s_delete.upper() == "Y":
            s_sql = "DELETE FROM car_queue WHERE i_id_car=" + str(i_id_car)
            i_num = self.o_mysql.delete(s_sql)

            print(i_num, " Rows deleted")

            # if b_success is True:
            #     print("Car deleted successfully from the queue")


if __name__ == "__main__":

    try:

        o_mysql = MySql(s_user="python", s_password="blog.carlesmateo.com-db-password", s_database="carles_database", s_host="127.0.0.1", i_port=3306)

        o_queue_manager = QueueManager(o_mysql=o_mysql)
        o_queue_manager.main_menu()
    except KeyboardInterrupt:
        print("Detected CTRL + C. Exiting")
This program talks to MySQL, that we have started in a Docker previously.
We have access from inside the Docker Container, or from outside.
The idea of this simple program is to use a library for dealing with MySql, and objects for dealing with the Cars. The class CarDO contributes to the render of its data in the screen.
To enter inside the Docker once you have generated it and is running, do:
I have read a lot of wrong recommendations about the use of Swap and Swappiness so I want to bring some light about it.
The first to say is that every project is different, so it is not possible to make a general rule. However in most of the cases we want systems to operate as fast and efficiently as possible.
So this suggestions try to covert 99% of the cases.
By default Linux will try to be as efficient as possible. So for example, it will use Free Memory to keep IO efficient by keeping in Memory cache and buffers.
That means that if you are using files often, Linux will keep that information cached in RAM.
The swappiness Kernel setting defines what tradeoff will take Linux between keeping buffers with Free Memory and using the available Swap Memory.
# sysctl vm.swappiness
vm.swappiness = 60
The default value is 60 and more or less means that when RAM memory gets to 60%, swap will start to be used.
And so we can find Servers with 256GB of RAM, that when they start to use more than 153 GB of RAM, they start to swap.
Let’s analyze the output of free -h:
carles@vbi78g:~/Desktop/Software/checkswap$ free -h
              total        used        free      shared  buff/cache   available
Mem:          2.9Gi       1.6Gi       148Mi        77Mi       1.2Gi       1.1Gi
Swap:         2.0Gi        27Mi       2.0Gi
So from this VM that has 2.9GB of RAM Memory, 1.6GB are used by applications.
The are 148MB that can immediately used by Applications, and there are 1.2GB in buffers/cache. Does that means that we can only use 148MB (plus swap)?. No, that mean that Linux tried to optimize io speed by keeping 1.2GB of RAM memory in buffers. But this is the best effort of Linux to have performance, for real applications will be also able to use 1.1GB that corresponds to the available field.
About swap, from 2GB, only 27MB have been used.
As vm.swappiness is set to 60, more RAM will be swapped out to swap, even if we have lots available.
As I said every case is different. If we are talking about a Desktop that has NVMe drives, the impact will be low. But if we are talking about a Server that is a hypervisor running VMs and has high usage on CPU and has the swap partition or the swap in a file, that could lead to huge problems. If there is a physical Server with a single spinning drive (or logical unit through RAID), and one partition is for Swap, and the other for mountpoints, and a process is heavily reading/writing to a partition mounted (an elastic search, or a telegraf, prometheus…), and the System tries to swap, then they will be competing for the magnetic head of disk, slowing down everything.
If you take a look on how the process of swapping memory pages from the memory to disk, you will understand that applications may need certain pages before being able to run, so in many cases we get to lock situations, that force everything to wait.
In my career I found Servers that temporarily stopped responding to ping. After a while ping came back, I was able to ssh and uptime showed that the Server did not reboot.
I troubleshooted that, and I saw a combination of high CPU usage spikes and Swap usage.
Using iostat and iotop I monitored what was speed of transference of only 1 MB/second!!.
I even did swapoff and it took one hour to free 4 GB swap partition!.
I also saw swap partition being in a spinning disk, and in another partition of the same spinning drive, having a swapfile. Magnetic spinning drives can only access one are of the drive at the same time, so that situation, using swap is very bad.
And I have seen situations were the swap or swapfile was mounted in a block device shared via network with the Server (like iSCSI or NFS), causing terrible performance when swapping.
So you have to adapt the strategy according to the project.
My preferred strategy for Compute Nodes and NoSQL Databases is to not use swap at all. In other cases, like MySQL Databases I may set swappiness to preferably to 1 or to 10.
The Linux kernel’s swappiness setting defines how aggressively the kernel will swap memory pages versus dropping pages from the page cache. A higher value increases swap aggressiveness, while a lower value tells the kernel to swap as little as possible to disk and favor RAM. The swappiness range is from 0 to 100, and most Linux distributions have swappiness set to 60 by default.
Couchbase Server is optimized with its managed cache to use RAM, and is capable of managing what should be in RAM and what shouldn’t be. Allowing the OS to have too much control over what memory pages are in RAM is likely to lower Couchbase Server’s performance. Therefore, it’s recommended that swappiness be set to the levels listed below.
Another theme, is when you log to a Server and you see all the Swap memory in use.
Linux may have moved the pages that were less used, and that may be Ok for some cases, for example a Cron Service that waits and runs every 24 hours. It is safe to swap that (as long as the swap IO is decent).
When Kernel Swaps it may generate locks.
But if we log to a Server and all the Swap is in use, how can we know that the Swap has been quiet there?.
Well, you can use iostat or iotop or you can:
cat /proc/vmstat
This file contains a lot of values related to Memory, we will focus on:
Paging refers to writing portions, termed pages, of a process’ memory to disk. Swapping, strictly speaking, refers to writing the entire process, not just part, to disk. In Linux, true swapping is exceedingly rare, but the terms paging and swapping often are used interchangeably.
page-out: The system’s free memory is less than a threshold “lotsfree” and unnused / least used pages are moved to the swap area. page-in: One process which is running requested for a page that is not in the current memory (page-fault), it’s pages are being brought back to memory. swap-out: System is thrashing and has deactivated a process and it’s memory pages are moved into the swap area. swap-in: A deactivated process is back to work and it’s pages are being brought into the memory.
Values from /proc/vmstat:
pgpgin, pgpgout – number of pages that are read from disk and written to memory, you usually don’t need to care that much about these numbers
pswpin, pswpout – you may want to track these numbers per time (via some monitoring like prometheus), if there are spikes it means system is heavily swapping and you have a problem.
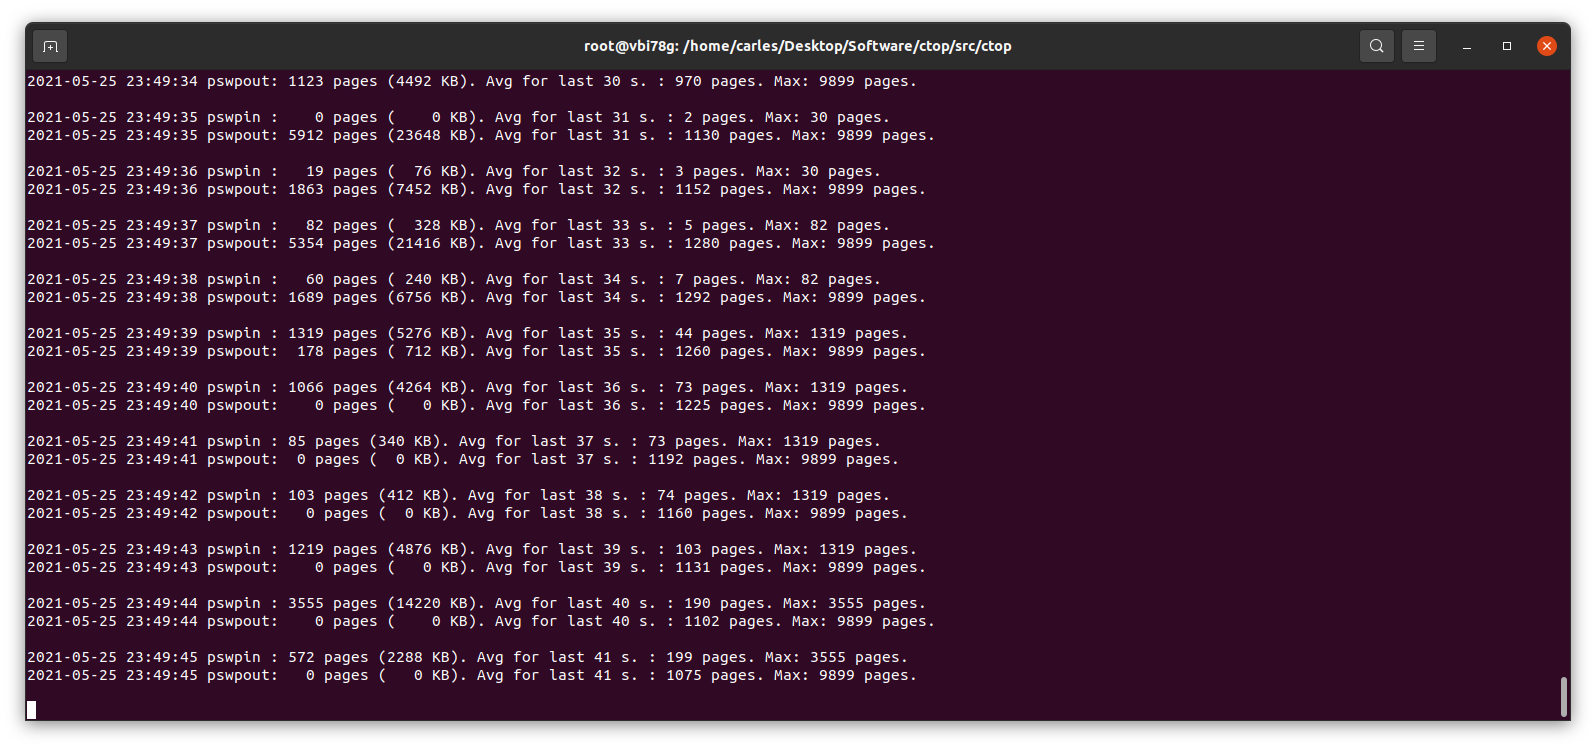
In this actual example that means that since the start of the Server there has been 508992338 Page Swap In (with 4K memory pages this is 1,941 GB, so almost 2 TB transferred) and for Page Swat Out (with 4K memory pages this is 1,071 GB, so 1 TB of transferred). I’m talking about a Server that had a 4GB swap partition in a spinning disk and a 12 GB swapfile in another ext4 partition of the same spinning disk.
The 16 GB of swap were in use and iotop showed only two sources of IO, one being 2 VMs writing, another was a journaling process writing to the mountpoint where the swapfile was. That was an spinning drive (underlying hardware was raid, for simplicity I refer to one single drive. I checked that both spinning drives were healthy and fast). I saw small variations in the size of the Swap, so I decided to monitor the changes in pswpin and pswpout in /proc/vmstat to see how much was transferred from/to swap.
I saw then how many pages were being transferred!.
I wrote a small Python program to track those changes:
This little program works in Python 2 and Python 3, and will show the evolution of pswpin and pswpout in /proc/vmstat and will offer the average for last 5 minutes and keep the max value detected as well.
As those values show the page swaps since the start of the Server, my little program, makes the adjustments to show the Page Swaps per second.
A cheap way to reproduce collapse by using swap is using VirtualBox: install an Ubuntu 20.04 LTS in there, with 2 GB of less of memory, and one single core. Ping that VM from elsewhere.
Then you may run a little program like this in order to force it to swap:
#!/usr/bin/env python3
a_items = []
i_total = 0
# Add zeros if your VM has more memory
for i in range(0, 10000000):
    i_total = i_total + i
    a_items.append(i_total)
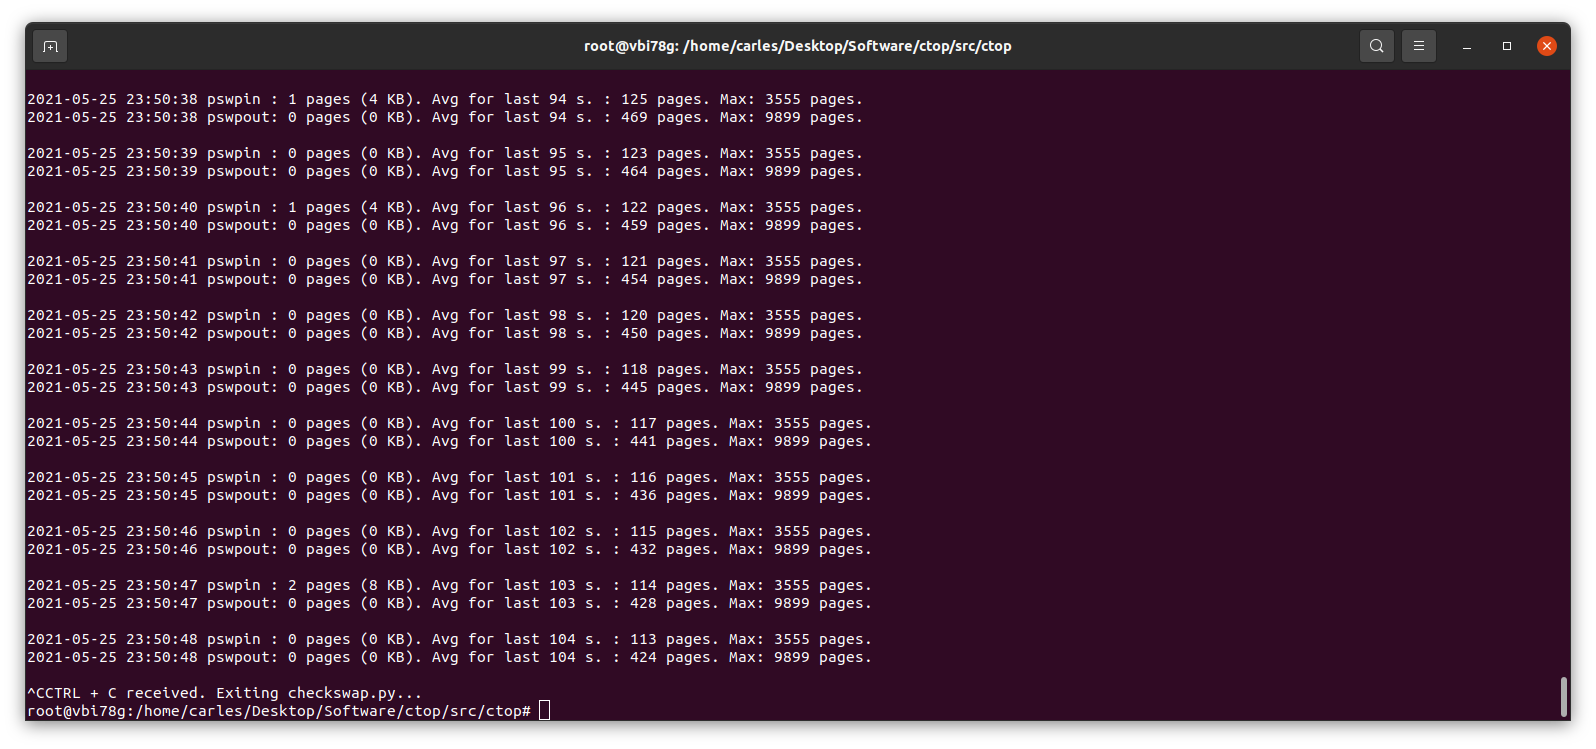
And checkswap will show you the spikes:
Many voices are discordant. Some say swappiness default value of 60 is good, as Linux will use the RAM memory to optimize the IO. In my experience, I’ve seen Hypervisors Servers running Virtual Machines that fit on the available physical RAM and were doing pure CPU calculations, no IO, and the Hypervisor was swapping just because it had swappiness to 60. Also having swap on spinning drives, mixing swap partition and swapfile, and that slowing down everything. In a case like that it would be much better not using Swap at all.
In most cases the price of Swapping to disk is much more higher than the advantage than a buffer for IO brings. And in the case of a swapfile, well, it’s also a file, so my suspect is that the swapfile is also buffered. Nothing I recommend, honestly.
My program https://gitlab.com/carles.mateo/checkswap may help you to demonstrate how much damage the swapping is doing in terms of IO. Combine it with iostat and iotop --only to see how much bandwidth is wasted writing and reading from/to swap.
You may run checkswap from a screen session and launch it with tee so results are logged. For example:
python3 checkswap.py | tee 2021-05-27-2107-checkswap.log
If you want to automatically add the datetime you can use:
python3 checkswap.py | tee `date +%Y-%m-%d-%H%M`-checkswap.log
Press CTRL + a and then d, in order to leave the screen session and return to regular Bash.
Type screen -r to resume your session if this was the only screen session running in background.
An interesting reflection from help Ubuntu:
The “diminishing returns” means that if you need more swap space than twice your RAM size, you’d better add more RAM as Hard Disk Drive (HDD) access is about 10³ slower then RAM access, so something that would take 1 second, suddenly takes more then 15 minutes! And still more then a minute on a fast Solid State Drive (SSD)…
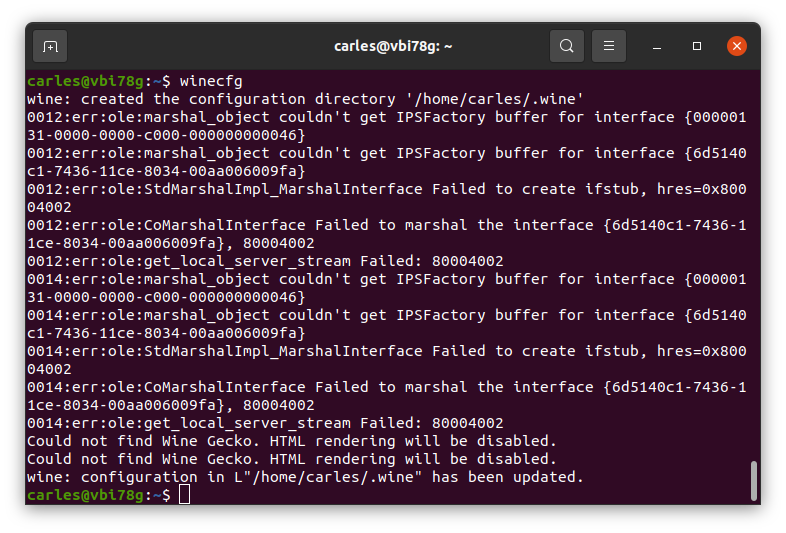
If that fails is very probably that creating a new configuration, for a new user, will make things right.
Update 2022-01-05: Take in count that you will be copying the Windows registry when doing this. I use this trick to clone applications that are no longer downloadable from the Internet. I clone wine to dedicated Virtual Machines. You may need different Virtual Machines for different programs if windows registry is different for them.
So I share with you my base Jenkins Dockerfile, so you can spawn a new Jenkins for your projects.
The Dockerfile installs Ubuntu 20.04 LTS as base image and add the required packages to run jenkins but also Development and Testing tools to use inside the Container to run Unit Testing on your code, for example. So you don’t need external Servers, for instance.
You will need 3 files:
Dockerfile
docker_run_jenkins.sh
requirements.txt
The requirements.txt file contains your PIP3 dependencies. In my case I only have pytest version 4.6.9 which is the default installed with Ubuntu 20.04, however, this way, I enforce that this and not any posterior version will be installed.
File requirements.txt:
pytest==4.6.9
The file docker_run_jenkins.txt start Jenkins when the Container is run and it will wait until the initial Admin password is generated and then it will display it.
File docker_run_jenkins.sh:
#!/bin/bash

echo "Starting Jenkins..."

service jenkins start

echo "Configure jenkins in http://127.0.0.1:8080"

s_JENKINS_PASSWORD_FILE="/var/lib/jenkins/secrets/initialAdminPassword"

i_PASSWORD_PRINTED=0

while [ true ];
do
    sleep 1
    if [ $i_PASSWORD_PRINTED -eq 1 ];
    then
        # We are nice with multitasking
        sleep 60
        continue
    fi

    if [ ! -f "$s_JENKINS_PASSWORD_FILE" ];
    then
        echo "File $s_FILE_ORIGIN does not exist"
    else
        echo "Password for Admin is:"
        cat $s_JENKINS_PASSWORD_FILE
        i_PASSWORD_PRINTED=1
    fi
done
That file has the objective to show you the default admin password, but you don’t need to do that, you can just start a shell into the Container and check manually by yourself.
However I added it to make it easier for you.
And finally you have the Dockerfile:
FROM ubuntu:20.04

LABEL Author="Carles Mateo" \
      Email="jenkins@carlesmateo.com" \
      MAINTAINER="Carles Mateo"

# Build this file with:
# sudo docker build -f Dockerfile -t jenkins:base .
# Run detached:
# sudo docker run --name jenkins_base -d -p 8080:8080 jenkins:base
# Run seeing the password:
# sudo docker run --name jenkins_base -p 8080:8080 -i -t jenkins:base
# After you CTRL + C you will continue with:
# sudo docker start
# To debug:
# sudo docker run --name jenkins_base -p 8080:8080 -i -t jenkins:base /bin/bash

ARG DEBIAN_FRONTEND=noninteractive

ENV SERVICE jenkins

RUN set -ex

RUN echo "Creating directories and copying code" \
    && mkdir -p /opt/${SERVICE}

COPY requirements.txt \
    docker_run_jenkins.sh \
    /opt/${SERVICE}/

# Java with Ubuntu 20.04 LST is 11, which is compatible with Jenkins.
RUN apt update \
    && apt install -y default-jdk \
    && apt install -y wget curl gnupg2 \
    && apt install -y git \
    && apt install -y python3 python3.8-venv python3-pip \
    && apt install -y python3-dev libsasl2-dev libldap2-dev libssl-dev \
    && apt install -y python3-venv \
    && apt install -y python3-pytest \
    && apt install -y sshpass \
    && wget -qO - https://pkg.jenkins.io/debian-stable/jenkins.io.key | apt-key add - \
    && echo "deb http://pkg.jenkins.io/debian-stable binary/" > /etc/apt/sources.list.d/jenkins.list \
    && apt update \
    && apt -y install jenkins \
    && apt-get clean

RUN echo "Setting work directory and listening port"
WORKDIR /opt/${SERVICE}

RUN chmod +x docker_run_jenkins.sh

RUN pip3 install --upgrade pip \
    && pip3 install -r requirements.txt


EXPOSE 8080


ENTRYPOINT ["./docker_run_jenkins.sh"]
Build the Container
docker build -f Dockerfile -t jenkins:base .
Run the Container displaying the password
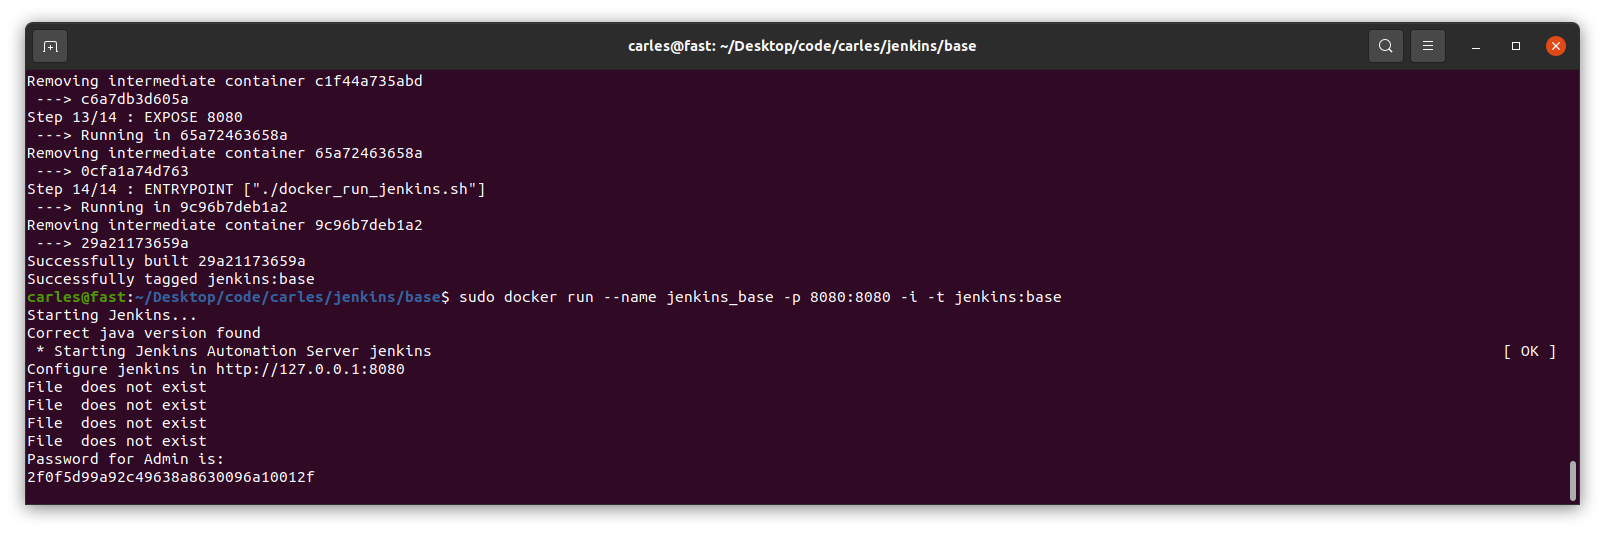
sudo docker run --name jenkins_base -p 8080:8080 -i -t jenkins:base
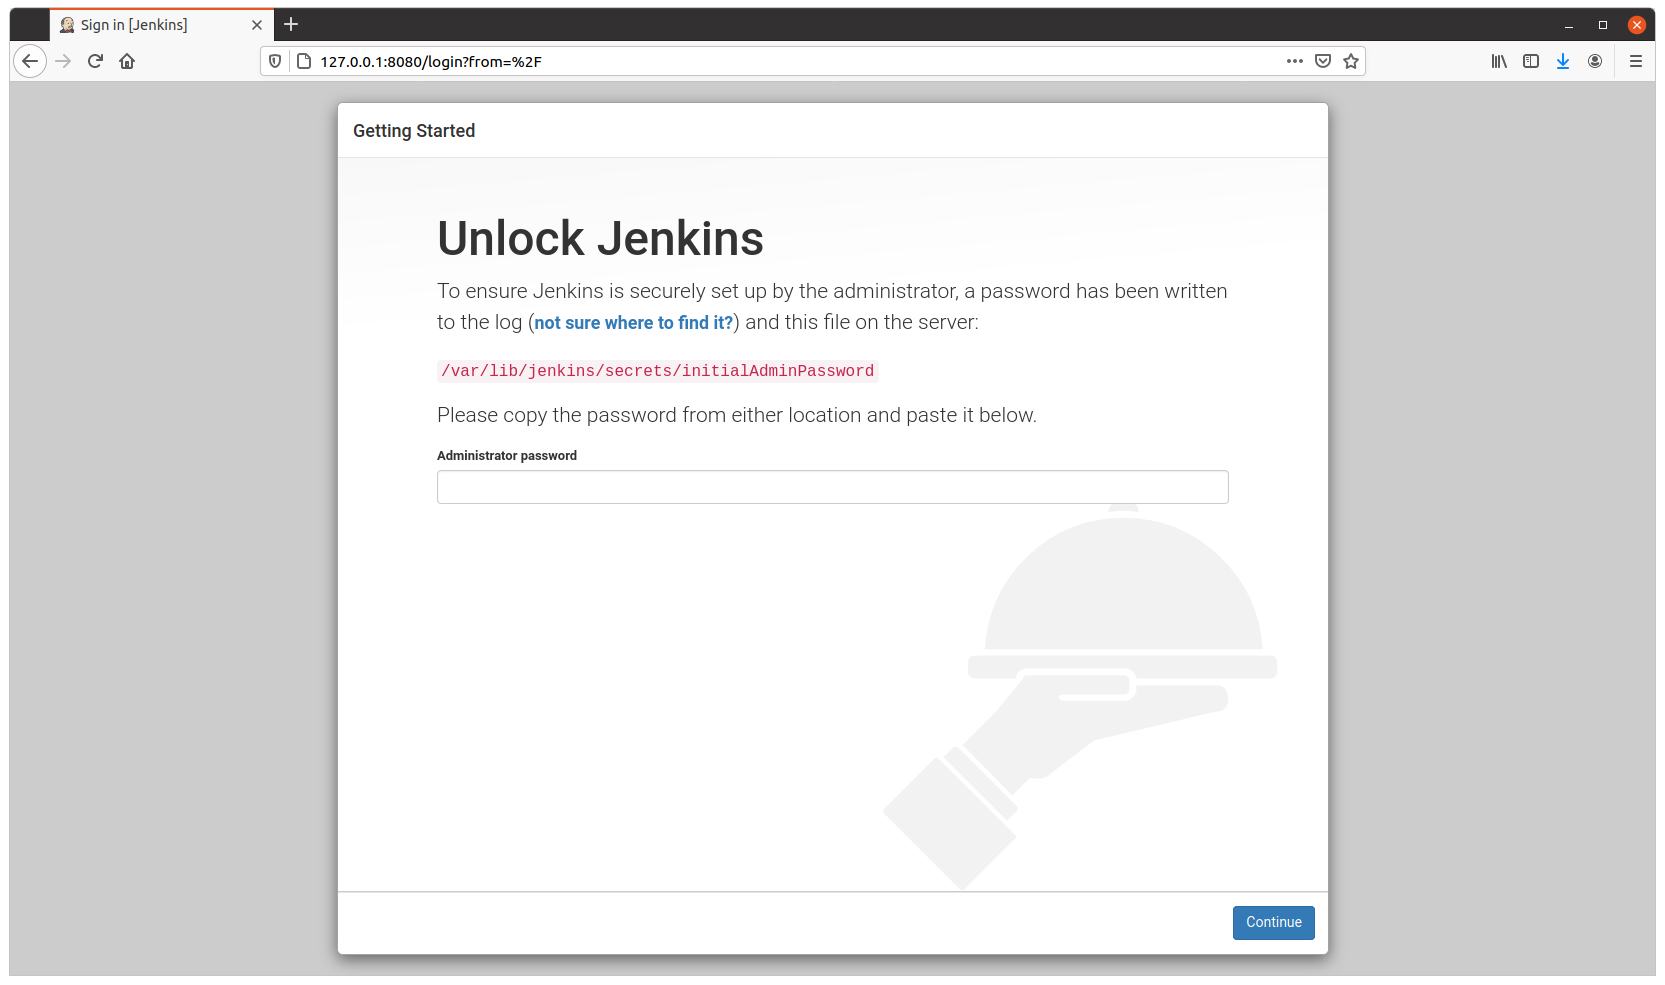
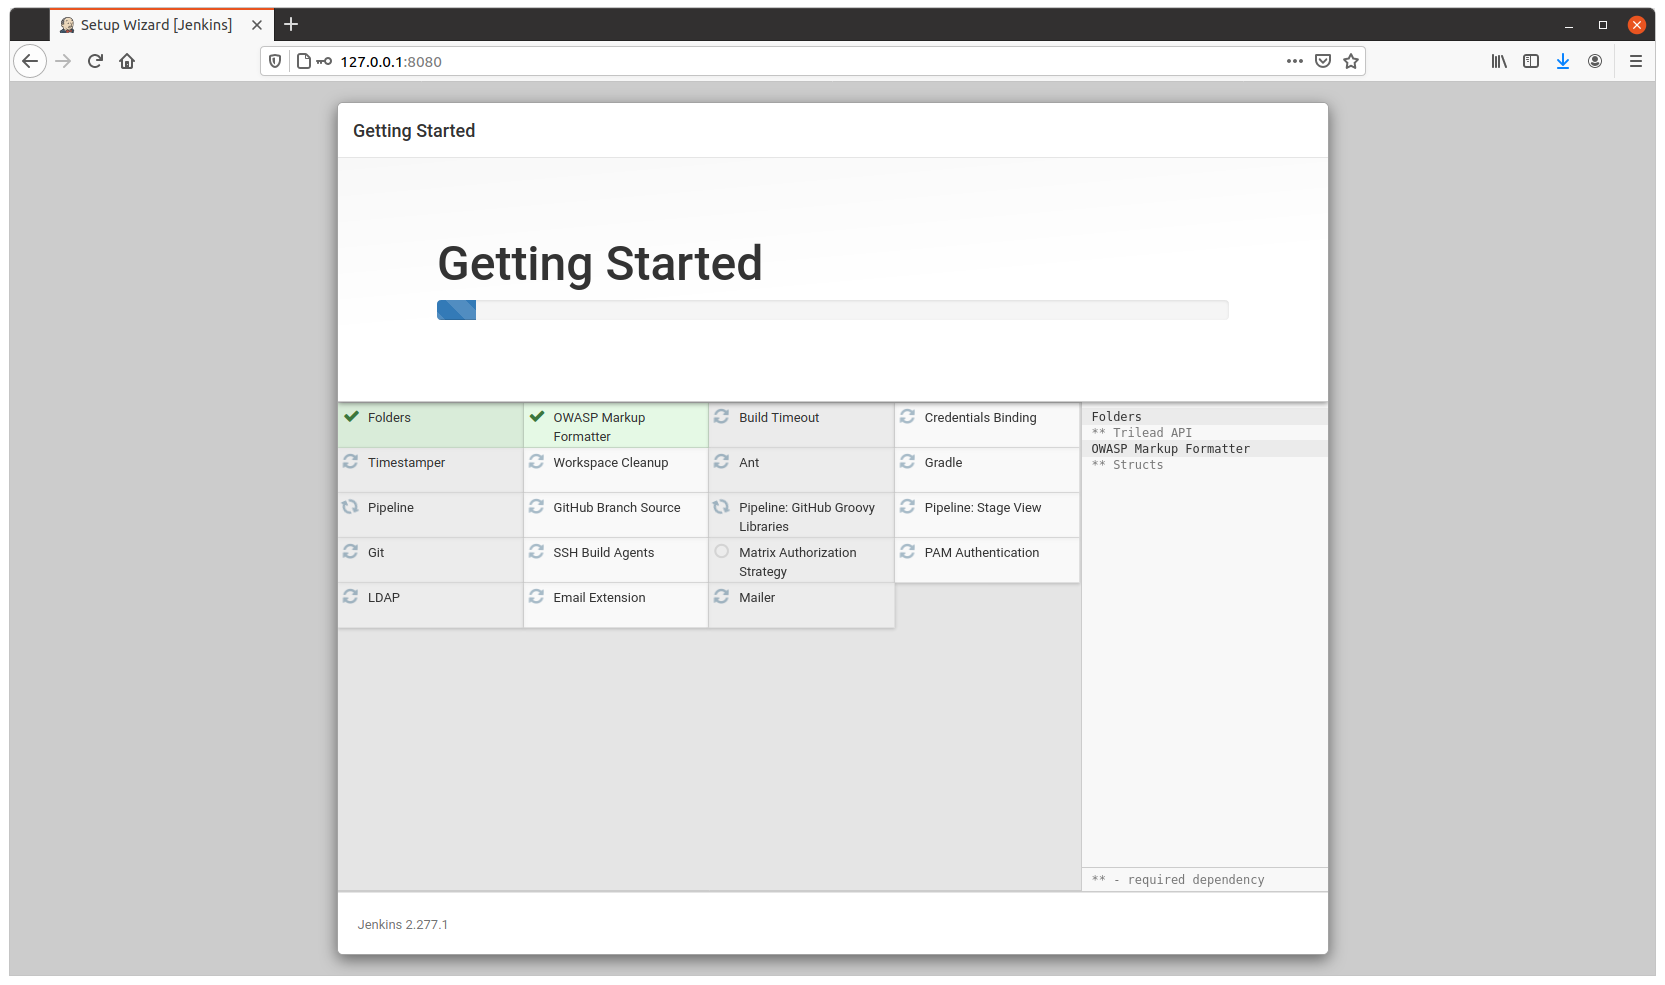
You need this password for starting the configuration process through the web.
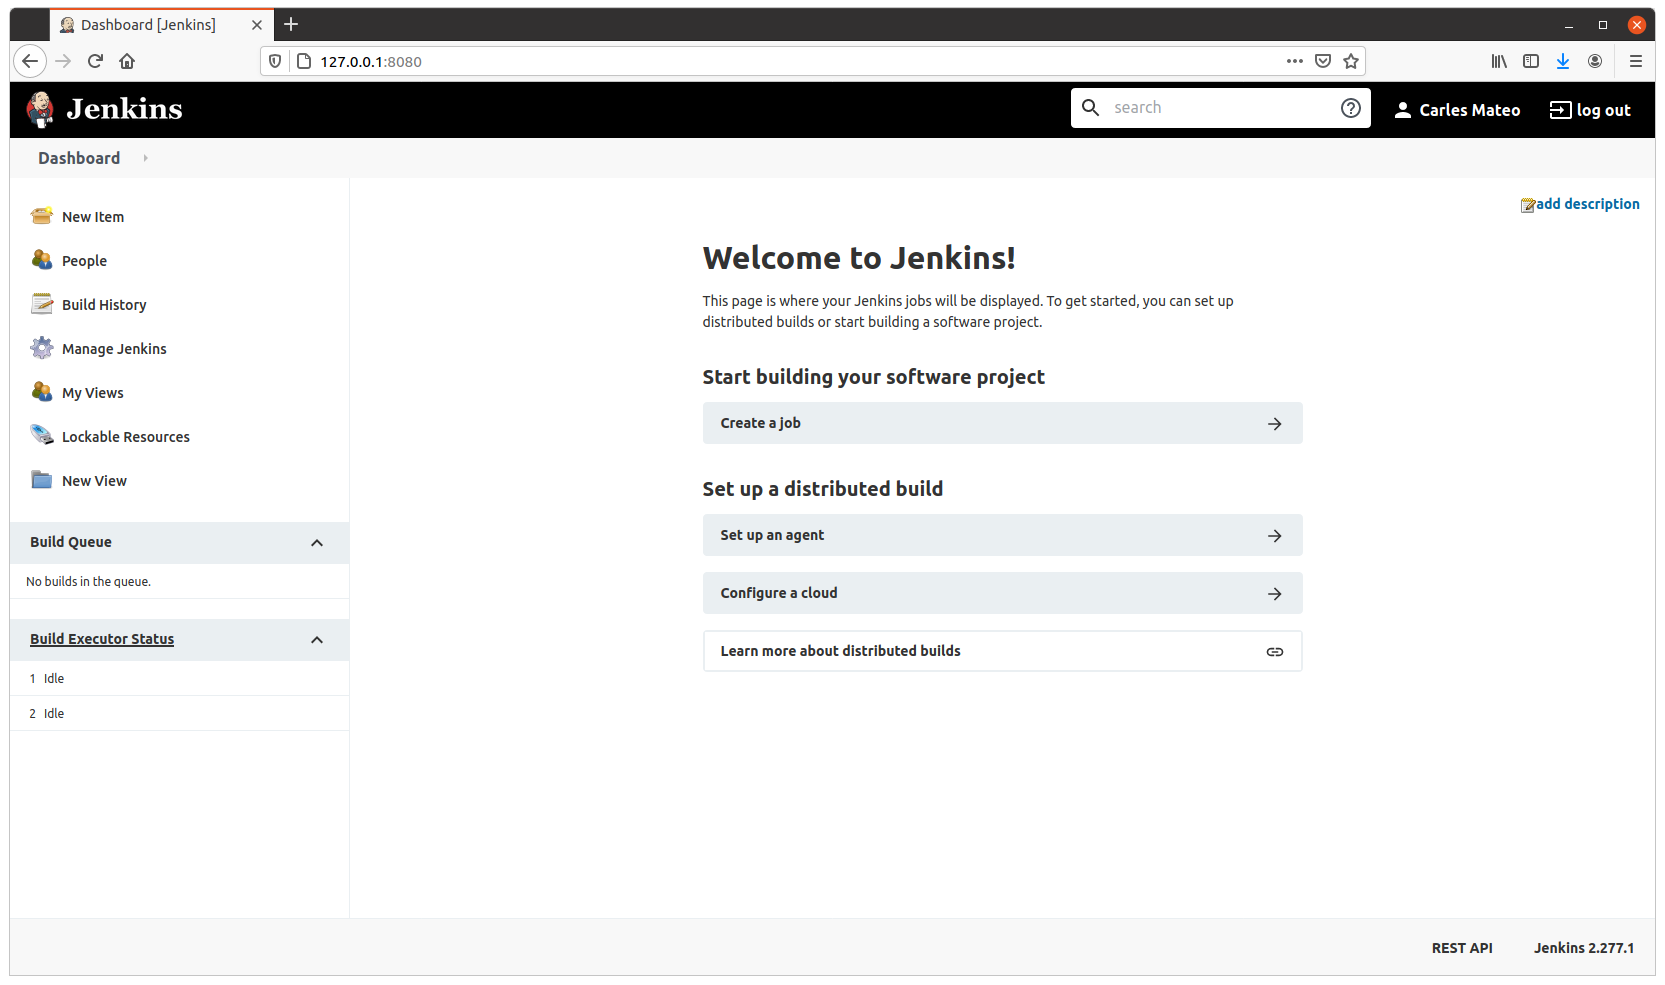
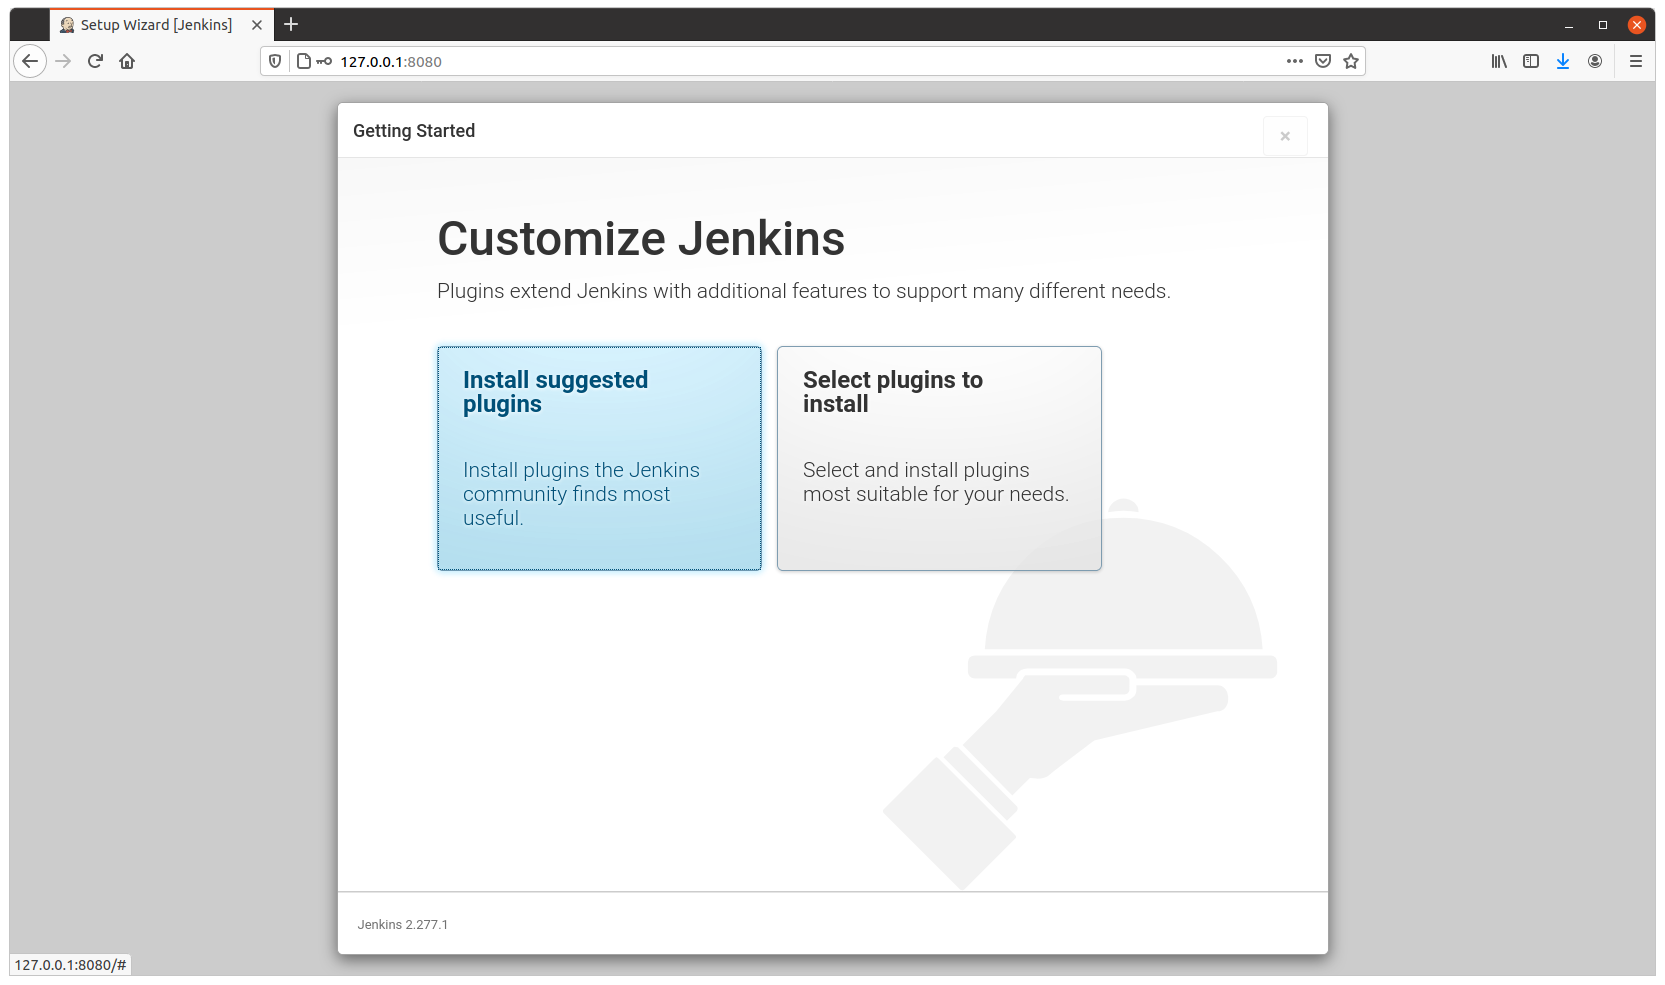
Visit http://127.0.0.1:8080 to configure Jenkins.
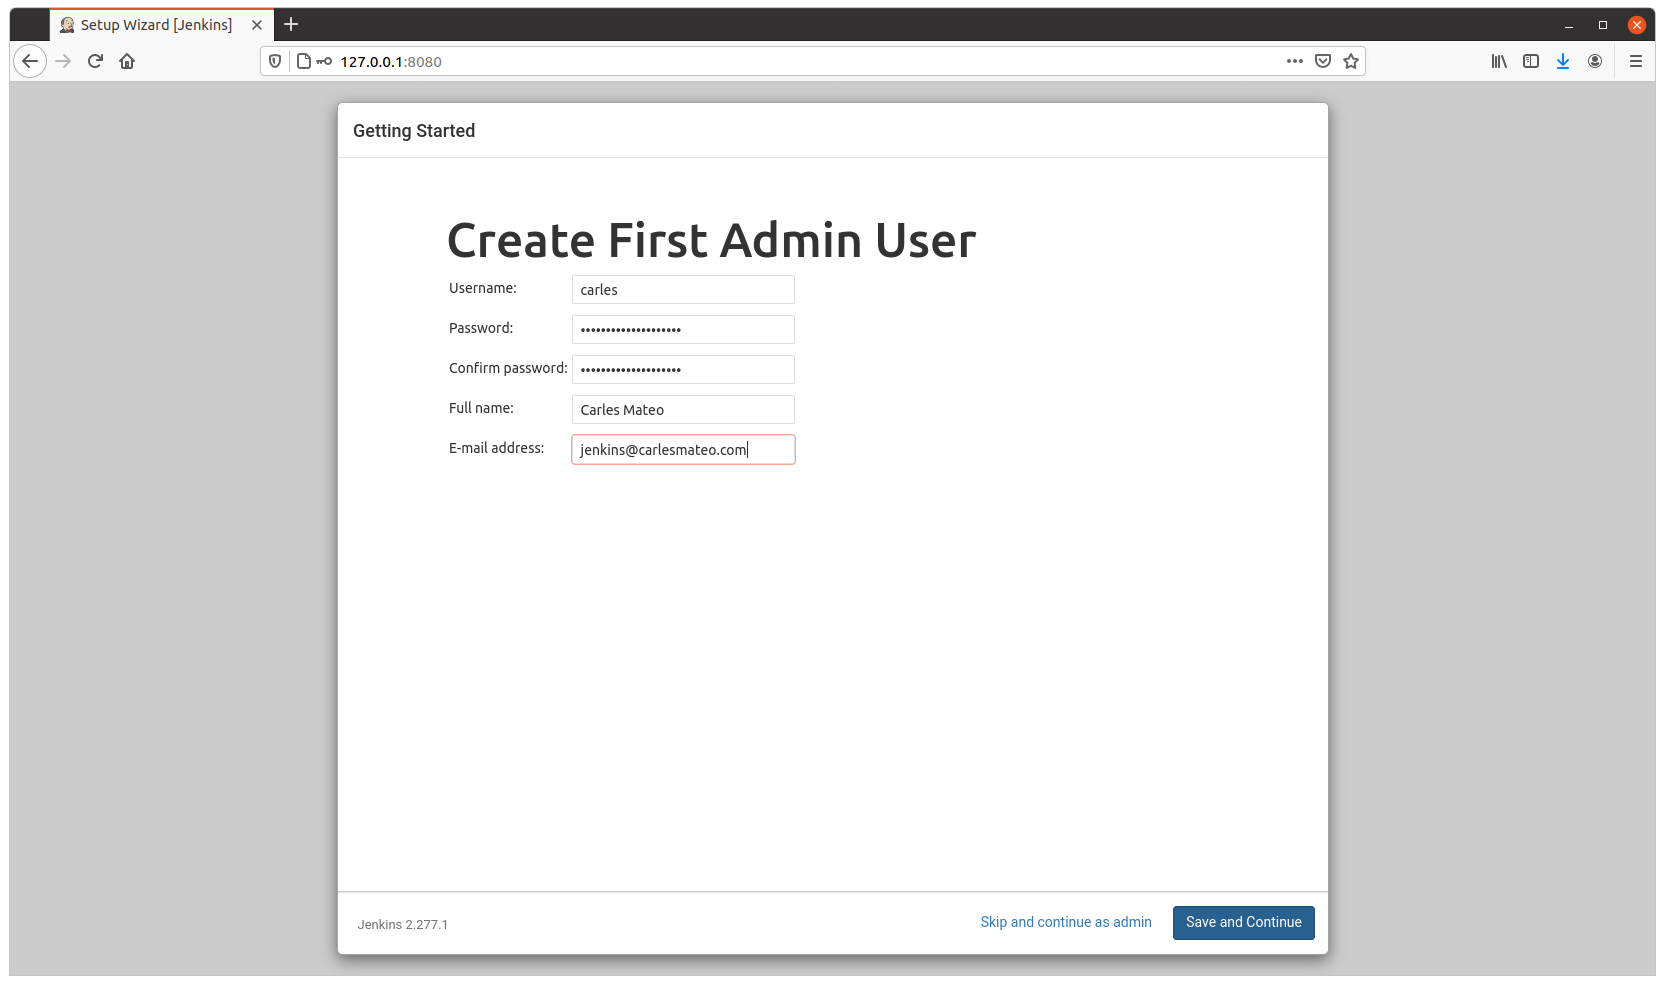
Configure as usual
Resuming after CTRL + C
After you configured it, on the terminal, press CTRL + C.
And continue, detached, by running:
sudo docker start jenkins_base
The image is 1.2GB in size, and will allow you to run Python3, Virtual Environments, Unit Testing with pytest and has Java 11 (not all versions of Java are compatible with Jenkins), use sshpass to access other Servers via SSH with Username and Password…