Tag Archives: MySQL

News from the Blog 2021-11-11

New Articles

How to communicate with your Python program running inside a Docker Container, using Linux Signals

Hope you’ll have fun reading this article:

Communicating with Docker Containers via Linux Signals and Python

I migrated my last services from Amazon and the blog to Google Compute Engine (GCE / GCP)

I wrote a Postmortem analysis about the process of migrating my last services from my 11 year old Amazon account.

Updates

Updates to articles

I updated the article about Python weird things that you may not know adding the Ellipsis …

I’ve been working in some Cassandra examples. I may publish an article soon about using it from Python and Docker.

Updates to My Books

I updated my Python and Docker books.

I’m currently writing a book about using Amazon AWS Python SDK (boto3).

Updates to Open Source projects

I have updated ctop, fixed two bugs and increased Code Coverage.

I made a new tag and released the last Stable Version:

https://gitlab.com/carles.mateo/ctop/-/tags/0.8.7

On top of my local Unit Testing, I have Jenkins checking that I don’t commit anything that breaks the Tests.

Some time ago I wrote some articles about how you can setup jenkins in a Docker Container.

Miscellaneous

Charity

I’ve donated to Wikipedia.

Only 2% of the viewers donate, so I answered the call every time it was made.

This is my 5th donation to Wikimedia.

I consider that Freedom is very important.

I bought these new books

One of my secrets to be on top is that I’m always studying.

I study all the time, at work and in my free time.

I use Linux Academy and I buy books in paper. I don’t connect with reading in tablets. I think information is stored better when read in paper. I use also a marker and pointers to keep a direct access to the most interesting points on the books.

And I study all kind of themes. Obviously I know a lot of Web Scraping, but there is always room for learning more. And whatever new I learn helps me to be better with my students and more clear writing my books.

I’ve never been a Front End, but I’ve been able to fix bugs in the Front End engines from the companies I worked for, like Privalia. I was passed a bug that prevented the Internet Explorer users to buy just one hour before we launching a massive campaign. I debugged and I found a variable named “value” so the html looked like <input name="value" value="">. In less than 30 minutes I proved to the incredulous Head of Development and the CTO that a bug in Internet Explored was causing a conflict when fetching the value from the input named value. We deployed to Production the update and the campaign was a total success. So I consider knowing Javascript and Front also a need, even if I don’t work directly with it. I want to be able to understand all the requirements and possibilities, and weaknesses, so I can fix bugs and save the day. That allowed me to fix scalability problems in Nodejs and Phantomjs projects too. (They are Javascript Server Side, event driven, projects)

It seems that Amazon.co.uk works well again for Ireland. My two last orders arrived on time and I had no problems of border taxes apparently.

Nice Python article

I enjoyed a lot this article, cause explains part of what I did with my student and friend Albert, in a project that analyzes the access logs from Apache for patterns of attempts of exploits, then feeds a database, and then blocks those offender Ip Addresses in the Firewall.

The article only covers the part of Pandas, of reading the access.log file and working with it, but is a very well redacted article:

https://mmas.github.io/read-apache-access-log-pandas

Nice Virtual Volumes article from VMware

I prefer Open Source, but there are very good commercial products too.

I liked this article about Virtual Volumes from VMWare:

Understanding Virtual Volumes (vVols) in VMware vSphere 6.7/7.0 (2113013)

https://kb.vmware.com/s/article/2113013

Thanks Blizzard (again)

There is a very nice initiative where we can nominate 4 colleagues a year, that we think that deserve a recognition.

My colleagues voted for me, so I received a gift voucher that I can spend in Ireland stores like Ikea, Pc World, Argos, Adidas, App Store & iTunes…

So thanks a million buds. :)

Migrating my 11 years Amazon AWS account services (Postmortem Analysis)

I started to explain that I was migrating some services from Amazon and that some of my sites were under Maintenance and that I would provide more information.

Here is the complete history of why I migrated all the services from my 11 years old Amazon account to other CSP.

Some lessons can be learned from my adventure.

I migrated my last services from Amazon to GCP

Amazon sent me an email on October 6th, this year 2021, telling me that they will disable EC2-Classic by August 2022. I thought I would not be able to keep my Static Ip’s as in the past VPC Ip’s and EC2-Classic Ip’s were not transferable, so considering that I would loss my Static Ip’s anyway I started to migrate to some to other providers like Digital Ocean.

Is not cool losing Static Ip (Elastic Ip in AWS) Addresses as this is bad for SEO, so given that I though I would lose my Static Ips that have been with me for years, I started to migrate certain services to providers much more economic.

Amazon is terrible communicating, and I talked with some product managers in the past about that, when they lost one of my Volumes, and the email was so cold and terrible that actually that hurt more than Amazon losing my Data. I believed that it was a poorly made Scam and when I realized it was true I reached one of my friends, that is manager there, as I know they care for doing things right, and he organized a meeting with two PM so I can pass my feedback.

The Cloud providers are changing things very fast, and nobody is able to be up to date with the changes, unless their work position allows plenty of time to get updated. Even if pages of documentation are provided, you have to react to an event that they externally generated forcing you to action. Action to read all the documentation about EC2-Classic migrations, action to prepare to have migrated by August 2022.

So August 2022… I was counting that I had plenty of time but I’m writing a new book about using the Amazon SDK for Python, boto3, and I was doing some API calls and they started to fail in a very unusual way, Exceptions with timeout, but only for the only region where I had EC2-Classic.

urllib3.exceptions.NewConnectionError: <botocore.awsrequest.AWSHTTPSConnection object at 0x7f0347d545e0>: Failed to establish a new connection: [Errno -2] Name or service not known

My config was:

        o_config = Config(
            region_name="us-east-1a",
            signature_version="v4",
            retries={
                'max_attempts': 10,
                'mode': 'standard'
            }
        )

But if I switched to another region name, it would work:

            region_name='us-west-2',

I made a mistake in here, the region name is “us-east-1” and not “us-east-1a“. “us-east-1a” is the availability zone. So the SDK was giving a timeout because in order to connect to the endpoint it uses the region name as part of the hostname. So it doesn’t find that endpoint because it doesn’t exist.

I never understood why a company like Amazon is unable to provide the SDK with a sample project or projects 100% working, with the source code so people has a base that works to build up.

Every API that I have created, I have provided it with documentation but also with example for several languages for how to use it.

In 2013 I was CTO of an online travel agency, and we had meta-searchers consuming our API and we were having several hundreds of thousands requests per second. Everything was perfectly documented, examples were provided for several languages, the document and the SDK had version numbers…

Everybody forgets about Developers and companies throw terrible and cold products to the poor Developers, so difficult to use. How many Developers would like to say: Listen Mr. President of the big Cloud Company XXXX, I only want to spawn a VM that works, and fast, with easy wizards. I don’t want to learn 50 hours before being able to use your overpriced platform, by doing 20 things before your Ip’s are reflexes of your infrastructure and based in Microservices. Modern JavaScript frameworks can create nice gently wizards even if you have supercold APIs.

Honestly, I didn’t realize my typo in the region and I connected to the Amazon Console to investigate and I saw this.

Honestly, when I read it I understood that they were going to end my EC2 Networking the 30th of October. It was 29th. I misunderstood.

It was my fault not reading it well to the end, I got shocked by the first part telling about shutdown and I didn’t fully understood as they were going to shutdown EC2-Classic for the zones I didn’t had anything running only.

From the long errors (3 exceptions chained) I didn’t realize that the endpoint is built with the region name. (And I was passing the availability zone)

botocore.exceptions.EndpointConnectionError: Could not connect to the endpoint URL: "https://ec2.us-east-1a.amazonaws.com/"

Here is when I say that a good SDM would had thought and cared for the Developers more, and would had made the SDK to check if that region exists. How difficult is to create a SDK a bit more clever that detects a invalid region id?. It is not difficult.

It is true that it was late in the evening and I was tired of all the day, and two days of the week between work and zoom university classes I work 15 hours and 13 hours respectively, not counting the assignments, so by the end of the week I am very tired. But that’s why it is very important to follow methodology and to read well. I think Amazon has 50% of the fault by the way they do things: how the created the SDK, how they communicate, and by the errors that the console returned me when I tried to create a VPC instance of an EC2-Classic AMI (they seem related to the fact I had old VPC Network objects with shorter hash than the current they use) and the other 50% was my fault for not identifying the source of the error, and not reading the message in their website well.

But the fact that there were having those errors in the API’s and timeouts made me believe they were going to cut the EC2-Classic Networking the next day.

All the mistakes fall together in a perfect storm.

I checked for documentation and I saw it was possible to migrate my Static Ip’s to VPC Static Ip’s.

It was Friday evening, and I cancelled my plans, in order to migrate the Blog to VPC in an attempt to keep running it with Amazon.

As Cloud Architect, I like to have running instances in several CSP as it allows me to stay up to date with the changes they do.

I checked the documentation for the migration. Disassociating the Static Ip (Elastic Ip in AWS jargon) was easy. Turning into VPC as well.

As I progressed, what had to be easy turned into a nightmare, as I was getting many errors from the Amazon API, without any information, and my Instances were not created.

I figured out that their API could have problems with old VPC objects I created time ago, so I had to create new objects for several things.

I managed to spawn my instances but they were being launch and terminated instantly without information. Frustrating.

When launching a new instance from the AMI (a Snapshot of the blog), I was giving shown options to add more volumes without any sense. My Instance was using 16GB from a 20GB total Space, and I was shown different volume configs, depending on the instance, in some case an additional 20GB volume, in other small SSD, ephemeral and 10 GB for the AMI (which requires at least 16GB).

After some fight I manage to make it work after deleting the volumes that made no sense, and keeping only one of 20GB, the same size of my AMI.

But then my nightmare started to make the VPC Instance to have Internet access and to be seen from outside. I had to create a new Internet Gateway, NAT, Network, etc…

As mentioned the old objects I was trying to reusing were making the process to fail.

I was running out of time, and I thought in few time they were going to shutdown EC2-Classic network (as I did not read correctly), so I decided to download everything and to migrate to another provider. For doing that first I blocked all the traffic, except for my Ip.

I worked in parallel, creating the new config in Google Cloud, just in case I had forgot something. I had created a document for the migration and it was accurate.

I managed to do everything fast enough. The slower part was to download all the Data, as I hold entire VM’s for projects like Cassandra Universal Driver.

Then I powered off my Amazon Instance for the Blog forever.

In GCP I blocked all the traffic in the firewall, except for my Ip, so I could work calmly.

When everything was ready, I had to redirect the DNS to the new static Ip from Google.

The DNS provider I used had implemented some changes in their API so I was getting errors replacing my old entry ‘.’ (their JSON calls returned Internal Server Error). Finally I figured it out how to workaround it and I was able to confirm that the first service was up and running.

I did some tests to make sure there were not unexpected permission problems, entries in the logs, etc…

Only then I opened the Google Firewall. I have a second firewall in each instance where I block or open at Ip tables level what I want. Basically abusive bot’s IPs trying to find exploits or brute force by dictionary passwords.

I checked with my phone, without Wifi that the Firewall was all good. (It is always a good idea to use another external Ip, different from the management one, to check)

I added a post explaining that I was migrating some of my Services and were under maintenance.

I mentioned in the blog that some of my services were being migrated from Amazon to Digital Ocean.

For some reasons, in the Backup of the Database one user was lost, so I created it in the MySQL with the typical commands:

CREATE USER 'username'@'localhost' IDENTIFIED BY 'password';
FLUSH PRIVILEGES;
GRANT ALL PRIVILEGES ON mydatabase.* TO 'username'@'localhost';

News of the blog 2021-08-16

  • I completed my ZFS on Ubuntu 20.04 LTS book.
    I had an error in an actual hard drive so I added a Troubleshooting section explaining how I fixed it.
  • I paused for a while the advance of my book Python: basic exercises for beginners, as my colleague Michela is translating it to Italian. She is a great Engineer and I cannot be more happy of having her help.
  • I added a new article about how to create a simple web Star Wars game using Flask.
    As always, I use Docker and a Dockerfile to automate the deployment, so you can test it without messing with your local system.
    The code is very simple and easy to understand.
mysql> UPDATE wp_options set option_value='blog.carlesmateo.local' WHERE option_name='siteurl';
Query OK, 1 row affected (0.02 sec)
Rows matched: 1 Changed: 1 Warnings: 0

This way I set an entry in /etc/hosts and I can do all the tests I want.

  • I added a new section to the blog, is a link where you can see all the articles published, ordered by number of views.
    /posts_and_views.php

Is in the main page, just after the recommended articles.
Here you can see the source code.

  • I removed the Categories:
    • Storage
      • ZFS
  • In favor of:
    • Hardware
      • Storage
        • ZFS
  • So the articles with Categories in the group deleted were reassigned the Categories in the second group.
  • Visually:
    • I removed some annoying lines from the Quick Selection access.
      They came from inherited CSS properties from my WordPress, long time customized, and I created new styles for this section.
    • I adjusted the line-height to avoid separation between lines being too much.
  • I added a link in the section of Other Engineering Blogs that I like, to the great https://github.com/lesterchan site, author of many super cool WordPress plugins.

Migrating some Services from Amazon to Digital Ocean

Analyzing the needs

I start with a VM, to learn about the providers and the migration project as I go.

My VM has been running in Amazon AWS for years.

It has 3.5GB of RAM and 1 Core. However is uses only 580MB of RAM. I’m paying around $85/month for this with Amazon.

I need to migrate:

  • DNS Server
  • Email
  • Web
  • Database

For the DNS Server I don’t need it anymore, each Domain provider has included DNS Service for free, so I do not longer to have my two DNS.

For the email I find myself in the same scenario, most providers offer 3 email accounts for your domain, and some alias, for free.

I’ll start the Service as Docker in the new CSP, so I will make it work in my computer first, locally, and so I can move easily in the future.

Note: exporting big images is not the idea I have to make backups.

I locate a Digital Ocean droplet with 1GB of RAM and 1 core and SSD disks for $5, for $6 I can have a NVMe version. That I choose.

Disk Space for the Statics

The first thing I do is to analyze the disk space needs of the service.

In this old AWS CentOS based image I have:

[root@ip-10-xxx-yyy-zzz ec2-user]# df -h
Filesystem      Size  Used Avail Use% Mounted on
/dev/xvda1       79G   11G   69G  14% /
devtmpfs        1.8G   12K  1.8G   1% /dev
tmpfs           1.8G     0  1.8G   0% /dev/shm

Ok, so if I keep the same I have I need 11GB.

I have plenty of space on this server so I do a zip of all the contents of the blog:

cd /var/www/wordpress
zip -r /home/ec2-user/wp_sizeZ.zip wp_siteZ

Database dump

I need a dump of the databases I want to migrate.

I check what databases are in this Server.

mysql -u root -p

mysql> show databases;

I do a dump of the databases that I want:

sudo mysqldump --password='XXXXXXXX' --databases wp_mysiteZ > wp_mysiteZ.sql

I get an error, meaning MySQL needs repair:

mysqldump: Got error: 145: Table './wp_mysiteZ/wp_visitor_maps_wo' is marked as crashed and should be repaired when using LOCK TABLES

So I launch a repair:

sudo mysqlcheck --password='XXXXXXXX' --repair --all-databases

And after the dump works.

My dump takes 88MB, not much, but I compress it with gzip.

gzip wp_mysiteZ.sql

It takes only 15MB compressed.

Do not forget the parameter –databases even if only one database is exported, otherwise the CREATE DATABASE and USE `wp_mysiteZ`; will not be added to your dump.

I will need to take some data form the mysql database, referring to the user used for accessing the blog’s database.

I always keep the CREATE USER and the GRANT permissions, if you don’t check the wp-config.php file. Note that the SQL format to create users and grant permissions may be different from a SQL version to another.

I create a file named mysql.sql with this part and I compress with gzip.

Checking PHP version

php -v
PHP 7.3.23 (cli) (built: Oct 21 2020 20:24:49) ( NTS )
Copyright (c) 1997-2018 The PHP Group
Zend Engine v3.3.23, Copyright (c) 1998-2018 Zend Technologies

WordPress is updated, and PHP is not that old.

The new Ubuntu 20.04 LTS comes with PHP 7.4. It will work:

php -v
PHP 7.4.3 (cli) (built: Jul  5 2021 15:13:35) ( NTS )
Copyright (c) The PHP Group
Zend Engine v3.4.0, Copyright (c) Zend Technologies
    with Zend OPcache v7.4.3, Copyright (c), by Zend Technologies

The Dockerfile

FROM ubuntu:20.04

MAINTAINER Carles Mateo

ARG DEBIAN_FRONTEND=noninteractive

# RUN echo "nameserver 8.8.8.8" > /etc/resolv.conf

RUN echo "Europe/Ireland" | tee /etc/timezone

# Note: You should install everything in a single line concatenated with
#       && and finalizing with 
# apt autoremove && apt clean

#       In order to use the less space possible, as every command 
#       is a layer

RUN apt update && apt install -y apache2 ntpdate libapache2-mod-php7.4 mysql-server php7.4-mysql php-dev libmcrypt-dev php-pear git mysql-server less zip vim mc && apt autoremove && apt clean

RUN a2enmod rewrite

RUN mkdir -p /www

# If you want to activate Debug
# RUN sed -i "s/display_errors = Off/display_errors = On/" /etc/php/7.2/apache2/php.ini 
# RUN sed -i "s/error_reporting = E_ALL & ~E_DEPRECATED & ~E_STRICT/error_reporting = E_ALL/" /etc/php/7.2/apache2/php.ini 
# RUN sed -i "s/display_startup_errors = Off/display_startup_errors = On/" /etc/php/7.2/apache2/php.ini 
# To Debug remember to change:
# config/{production.php|preproduction.php|devel.php|docker.php} 
# in order to avoid Error Reporting being set to 0.

ENV PATH_WP_MYSITEZ /var/www/wordpress/wp_mysitez/
ENV PATH_WORDPRESS_SITES /var/www/wordpress/

ENV APACHE_RUN_USER  www-data
ENV APACHE_RUN_GROUP www-data
ENV APACHE_LOG_DIR   /var/log/apache2
ENV APACHE_PID_FILE  /var/run/apache2/apache2.pid
ENV APACHE_RUN_DIR   /var/run/apache2
ENV APACHE_LOCK_DIR  /var/lock/apache2
ENV APACHE_LOG_DIR   /var/log/apache2

RUN mkdir -p $APACHE_RUN_DIR
RUN mkdir -p $APACHE_LOCK_DIR
RUN mkdir -p $APACHE_LOG_DIR
RUN mkdir -p $PATH_WP_MYSITEZ

# Remove the default Server
RUN sed -i '/<Directory \/var\/www\/>/,/<\/Directory>/{/<\/Directory>/ s/.*/# var-www commented/; t; d}' /etc/apache2/apache2.conf 

RUN rm /etc/apache2/sites-enabled/000-default.conf

COPY wp_mysitez.conf /etc/apache2/sites-available/

RUN chown --recursive $APACHE_RUN_USER.$APACHE_RUN_GROUP $PATH_WP_MYSITEZ

RUN ln -s /etc/apache2/sites-available/wp_mysitez.conf /etc/apache2/sites-enabled/

# Please note: It would be better to git clone from another location and
# gunzip and delete temporary files in the same line, 
# to save space in the layer.
COPY *.sql.gz /tmp/

RUN gunzip /tmp/*.sql.gz; echo "Starting MySQL"; service mysql start && mysql -u root < /tmp/wp_mysitez.sql && mysql -u root < /tmp/mysql.sql; rm -f /tmp/*.sql; rm -f /tmp/*.gz
# After this root will have password assigned

COPY *.zip /tmp/

COPY services_up.sh $PATH_WORDPRESS_SITES

RUN echo "Unzipping..."; cd /var/www/wordpress/; unzip /tmp/*.zip; rm /tmp/*.zip

RUN chown --recursive $APACHE_RUN_USER.$APACHE_RUN_GROUP $PATH_WP_MYSITEZ

EXPOSE 80

CMD ["/var/www/wordpress/services_up.sh"]

Services up

For starting MySQL and Apache I relay in services_up.sh script.

#!/bin/bash
echo "Starting MySql"
service mysql start

echo "Starting Apache"
service apache2 start
# /usr/sbin/apache2 -D FOREGROUND

while [ true ];
do
    ps ax | grep mysql | grep -v "grep "
    if [ $? -gt 0 ];
    then
        service mysql start
    fi
    sleep 10
done

You see that instead of launching apache2 as FOREGROUND, what keeps the loop, not exiting from my Container is a while [ true ]; that will keep looping and checking if MySQL is up, and restarting otherwise.

MySQL shutting down

Some of my sites receive DoS attacks. More than trying to shutdown my sites, are spammers trying to publish comment announcing fake glasses, or medicines for impotence, etc… also some try to hack into the Server to gain control of it with dictionary attacks or trying to explode vulnerabilities.

The downside of those attacks is that some times the Database is under pressure, and uses more and more memory until it crashes.

More memory alleviate the problem and buys time, but I decided not to invest more than $6 USD per month on this old site. I’m just keeping the contents alive and even this site still receives many visits. A restart of the MySQL if it dies is enough for me.

As you have seen in my Dockerfile I only have one Docker Container that runs both Apache and MySQL. One of the advantages of doing like that is that if MySQL dies, the container does not exit. However I could have had two containers with both scripts with the while [ true ];

When planning I decided to have just one single Container, all-in-one, as when I export the image for a Backup, I’ll be dealing only with a single image, not two.

Building and Running the Container

I created a Bash script named build_docker.sh that does the build for me, stopping and cleaning previous Containers:

#!/bin/bash

# Execute with sudo

s_DOCKER_IMAGE_NAME="wp_sitez"

printf "Stopping old image %s\n" "${s_DOCKER_IMAGE_NAME}"
sudo docker stop "${s_DOCKER_IMAGE_NAME}"

printf "Removing old image %s\n" "${s_DOCKER_IMAGE_NAME}"
sudo docker rm "${s_DOCKER_IMAGE_NAME}"

printf "Creating Docker Image %s\n" "${s_DOCKER_IMAGE_NAME}"
# sudo docker build -t ${s_DOCKER_IMAGE_NAME} . --no-cache
sudo docker build -t ${s_DOCKER_IMAGE_NAME} .

i_EXIT_CODE=$?
if [ $i_EXIT_CODE -ne 0 ]; then
    printf "Error. Exit code %s\n" ${i_EXIT_CODE}
    exit
fi

echo "Ready to run ${s_DOCKER_IMAGE_NAME} Docker Container"
echo "To run type: sudo docker run -d -p 80:80 --name ${s_DOCKER_IMAGE_NAME} ${s_DOCKER_IMAGE_NAME}"
echo "or just use run_in_docker.sh"
echo
echo "Debug running Docker:"
echo "docker exec -it ${s_DOCKER_IMAGE_NAME} /bin/bash"
echo

I assign to the image and the Running Container the same name.

Running in Production

Once it works in local, I set the Firewall rules and I deploy the Droplet (VM) with Digital Ocean, I upload the files via SFTP, and then I just run my script build_docker.sh

And assuming everything went well, I run it:

sudo docker run -d -p 80:80 --name wp_mysitez wp_mysitez

I check that the page works, and here we go.

Some improvements

This could also have been put in a private Git repository. You only have to care about not storing the passwords in it. (Like the MySQL grants)

It may be interesting for you to disable directory browsing.

The build from the Git repository can be validated with a Jenkins. Here you have an article about setup a Jenkins for yourself.

News from the blog 2021-07-23

  • I’ve released v. 0.99 of carleslibs package
    This package includes utilities for:
    • Files and Directories handling
    • Date/Time retrieval
    • Python version detection

You can install it with:

pip install carleslibs

The minimum requirement declared is Python 3.6, although they work with Python 3.5 and Python 2.7, as I want to drop support for no longer supported versions.

Instructions can be found in here: carleslibs page.

A small Python + MySql + Docker program as a sample

This article can be found in my book Python Combat Guide.

I wrote this code and article in order to help my Python students to mix together Object Oriented Programming, MySql, and Docker.

I prepared this video that walks through the steps and the code:

You can have everything in action with only downloading the code and running the docker_build.sh and docker_run.sh scripts.

You can download the source code from:

https://gitlab.com/carles.mateo/python-mysql-example

and clone with:

git clone https://gitlab.com/carles.mateo/python-mysql-example.git

Installing the MySql driver

We are going to use Oracle’s official MySql driver for Python.

All the documentation is here:

https://dev.mysql.com/doc/connector-python/en/

In order to install we will use pip.

To install it in Ubuntu:

pip install mysql-connector-python

In Mac Os X you have to use pip3 instead of pip.

However we are going to run everything from a Docker Container so the only thing you need is to have installed Docker.

If you prefer to install MySql in your computer (or Virtual Box instance) directly, skip the Docker steps.

Dockerfile

The Dockerfile is the file that Docker uses to build the Docker Container.

Ours is like that:

FROM ubuntu:20.04

MAINTAINER Carles Mateo

ARG DEBIAN_FRONTEND=noninteractive

RUN apt update && apt install -y python3 pip mysql-server vim mc wget curl && apt-get clean

RUN pip install mysql-connector-python

EXPOSE 3306

ENV FOLDER_PROJECT /var/mysql_carles

RUN mkdir -p $FOLDER_PROJECT

COPY docker_run_mysql.sh $FOLDER_PROJECT
COPY start.sql $FOLDER_PROJECT
COPY src $FOLDER_PROJECT

RUN chmod +x /var/mysql_carles/docker_run_mysql.sh

CMD ["/var/mysql_carles/docker_run_mysql.sh"]

The first line defines that we are going to use Ubuntu 20.04 (it’s a LTS version).

We install all the apt packages in a single line, as Docker works in layers, and what is used as disk space in the previous layer is not deleted even if we delete the files, so we want to run apt update, install all the packages, and clean the temporal files in one single step.

I also install some useful tools like: vim, mc, less, wget and curl.

We expose to outside the port 3306, in case you want to run the Python code from your computer, but having the MySql in the Container.

The last line executes a script that starts the MySql service, creates the table, the user, and add two rows and runs an infinite loop so the Docker does not finish.

build_docker.sh

build_docker.sh is a Bash script that builds the Docker Image for you very easily.

It stops the container and removes the previous image, so your hard drive does not fill with Docker images if you do modifications.

It checks for errors building and it also remembers you how to run and debug the Docker Container.

#!/bin/bash

# Execute with sudo

s_DOCKER_IMAGE_NAME="blog_carlesmateo_com_mysql"

printf "Stopping old image %s\n" "${s_DOCKER_IMAGE_NAME}"
sudo docker stop "${s_DOCKER_IMAGE_NAME}"

printf "Removing old image %s\n" "${s_DOCKER_IMAGE_NAME}"
sudo docker rm "${s_DOCKER_IMAGE_NAME}"

printf "Creating Docker Image %s\n" "${s_DOCKER_IMAGE_NAME}"
sudo docker build -t ${s_DOCKER_IMAGE_NAME} . --no-cache

i_EXIT_CODE=$?
if [ $i_EXIT_CODE -ne 0 ]; then
    printf "Error. Exit code %s\n" ${i_EXIT_CODE}
    exit
fi

echo "Ready to run ${s_DOCKER_IMAGE_NAME} Docker Container"
echo "To run type: sudo docker run -d -p 3306:3306 --name ${s_DOCKER_IMAGE_NAME} ${s_DOCKER_IMAGE_NAME}"
echo "or just use run_in_docker.sh"
echo
echo "Debug running Docker:"
echo "docker exec -it ${s_DOCKER_IMAGE_NAME} /bin/bash"
echo

docker_run.sh

I also provide a script named docker_run.sh that runs your Container easily, exposing the MySql port.

#!/bin/bash

# Execute with sudo

s_DOCKER_IMAGE_NAME="blog_carlesmateo_com_mysql"

docker run -d -p 3306:3306 --name ${s_DOCKER_IMAGE_NAME} ${s_DOCKER_IMAGE_NAME}

echo "Showing running Instances"
docker ps

As you saw before I named the image after blog_carlesmateo_com_mysql.

I did that so basically I wanted to make sure that the name was unique, as the build_docker.sh deletes an image named like the name I choose, I didn’t want to use a generic name like “mysql” that may lead to you to delete the Docker Image inadvertently.

docker_run_mysql.sh

This script will run when the Docker Container is launched for the first time:

#!/bin/bash

# Allow to be queried from outside
sed -i '31 s/bind-address/#bind-address/' /etc/mysql/mysql.conf.d/mysqld.cnf

service mysql start

# Create a Database, a user with password, and permissions
cd /var/mysql_carles
mysql -u root &lt; start.sql

while [ true ]; do sleep 60; done

With sed command we modify the line 31 of the the MySQL config file so we can connect from Outside the Docker Instance (bind-address: 127.0.0.1)

As you can see it executes the SQL contained in the file start.sql as root and we start MySql.

Please note: Our MySql installation has not set a password for root. It is only for Development purposes.

start.sql

The SQL file that will be ran inside our Docker Container.

CREATE DATABASE carles_database;

CREATE USER 'python'@'localhost' IDENTIFIED BY 'blog.carlesmateo.com-db-password';
CREATE USER 'python'@'%' IDENTIFIED BY 'blog.carlesmateo.com-db-password';
GRANT ALL PRIVILEGES ON carles_database.* TO 'python'@'localhost';
GRANT ALL PRIVILEGES ON carles_database.* TO 'python'@'%';

USE carles_database;

CREATE TABLE car_queue (
    i_id_car int,
    s_model_code varchar(25),
    s_color_code varchar(25),
    s_extras varchar(100),
    i_right_side int,
    s_city_to_ship varchar(25)
);

INSERT INTO car_queue (i_id_car, s_model_code, s_color_code, s_extras, i_right_side, s_city_to_ship) VALUES (1, "GOLF2021", "BLUE7", "COND_AIR, GPS, MULTIMEDIA_V3", 0, "Barcelona");
INSERT INTO car_queue (i_id_car, s_model_code, s_color_code, s_extras, i_right_side, s_city_to_ship) VALUES (2, "GOLF2021_PLUGIN_HYBRID", "BLUEMETAL_5", "COND_AIR, GPS, MULTIMEDIA_V3, SECURITY_V5", 1, "Cork");

As you can see it creates the user “python” with the password ‘blog.carlesmateo.com-db-password’ for access local and remote (%).

It also creates a Database named carles_database and grants all the permissions to the user “python”, for local and remote.

This is the user we will use to authenticate from out Python code.

Then we switch to use the carles_database and we create the car_queue table.

We insert two rows, as an example.

select_values_example.py

Finally the Python code that will query the Database.

import mysql.connector

if __name__ == "__main__":
    o_conn = mysql.connector.connect(user='python', password='blog.carlesmateo.com-db-password', database='carles_database')
    o_cursor = o_conn.cursor()

    s_query = "SELECT * FROM car_queue"

    o_cursor.execute(s_query)

    for a_row in o_cursor:
        print(a_row)

    o_cursor.close()
    o_conn.close()

Nothing special, we open a connection to the MySql and perform a query, and parse the cursor as rows/lists.

Please note: Error control is disabled so you may see any exception.

Executing the Container

First step is to build the Container.

From the directory where you cloned the project, execute:

sudo ./build_docker.sh

Then run the Docker Container:

sudo ./docker_run.sh

The script also performs a docker ps command, so you can see that it’s running.

Entering the Container and running the code

Now you can enter inside the Docker Container:

docker exec -it blog_carlesmateo_com_mysql /bin/bash

Then change to the directory where I installed the sample files:

cd /var/mysql_carles

And execute the Python 3 example:

python3 select_values_example.py

Tying together MySql and a Python Menu with Object Oriented Programming

In order to tie all together, and specially to give a consistent view to my students, to avoid showing only pieces but a complete program, and to show a bit of Objects Oriented in action I developed a small program which simulates the handling of a production queue for Volkswagen.

MySQL Library

First I created a library to handle MySQL operations.

lib/mysqllib.py

import mysql.connector


class MySql():

    def __init__(self, s_user, s_password, s_database, s_host="127.0.0.1", i_port=3306):
        self.s_user = s_user
        self.s_password = s_password
        self.s_database = s_database
        self.s_host = s_host
        self.i_port = i_port

        o_conn = mysql.connector.connect(host=s_host, port=i_port, user=s_user, password=s_password, database=s_database)
        self.o_conn = o_conn

    def query(self, s_query):
        a_rows = []

        o_cursor = self.o_conn.cursor()

        o_cursor.execute(s_query)

        for a_row in o_cursor:
            a_rows.append(a_row)

        o_cursor.close()

        return a_rows

    def insert(self, s_query):

        o_cursor = self.o_conn.cursor()

        o_cursor.execute(s_query)
        i_inserted_row_count = o_cursor.rowcount

        # Make sure data is committed to the database
        self.o_conn.commit()

        return i_inserted_row_count

    def delete(self, s_query):

        o_cursor = self.o_conn.cursor()

        o_cursor.execute(s_query)
        i_deleted_row_count = o_cursor.rowcount

        # Make sure data is committed to the database
        self.o_conn.commit()

        return i_deleted_row_count


    def close(self):

        self.o_conn.close()

Basically when this class is instantiated, a new connection to the MySQL specified in the Constructor is established.

We have a method query() to send SELECT queries.

We have a insert method, to send INSERT, UPDATE queries that returns the number of rows affected.

This method ensures to perform a commit to make sure changes persist.

We have a delete method, to send DELETE Sql queries that returns the number of rows deleted.

We have a close method which closes the MySql connection.

A Data Object: CarDO

Then I’ve defined a class, to deal with Data and interactions of the cars.

do/cardo.py


class CarDO():

    def __init__(self, i_id_car=0, s_model_code="", s_color_code="", s_extras="", i_right_side=0, s_city_to_ship=""):
        self.i_id_car = i_id_car
        self.s_model_code = s_model_code
        self.s_color_code = s_color_code
        self.s_extras = s_extras
        self.i_right_side = i_right_side
        self.s_city_to_ship = s_city_to_ship

        # Sizes for render
        self.i_width_id_car = 6
        self.i_width_model_code = 25
        self.i_width_color_code = 25
        self.i_width_extras = 50
        self.i_width_side = 5
        self.i_width_city_to_ship = 15

    def print_car_info(self):
        print("Id:", self.i_id_car)
        print("Model Code:", self.s_model_code)
        print("Color Code:", self.s_color_code)
        print("Extras:", self.s_extras)
        s_side = self.get_word_for_driving_side()
        print("Drive by side:", s_side)
        print("City to ship:", self.s_city_to_ship)

    def get_word_for_driving_side(self):
        if self.i_right_side == 1:
            s_side = "Right"
        else:
            s_side = "Left"

        return s_side

    def get_car_info_for_list(self):

        s_output = str(self.i_id_car).rjust(self.i_width_id_car) + " "
        s_output += self.s_model_code.rjust(self.i_width_model_code) + " "
        s_output += self.s_color_code.rjust(self.i_width_color_code) + " "
        s_output += self.s_extras.rjust(self.i_width_extras) + " "
        s_output += self.get_word_for_driving_side().rjust(self.i_width_side) + " "
        s_output += self.get_s_city_to_ship().rjust(self.i_width_city_to_ship)

        return s_output

    def get_car_header_for_list(self):
        s_output = str("Id Car").rjust(self.i_width_id_car) + " "
        s_output += "Model Code".rjust(self.i_width_model_code) + " "
        s_output += "Color Code".rjust(self.i_width_color_code) + " "
        s_output += "Extras".rjust(self.i_width_extras) + " "
        s_output += "Drive".rjust(self.i_width_side) + " "
        s_output += "City to Ship".rjust(self.i_width_city_to_ship)

        i_total_length = self.i_width_id_car + self.i_width_model_code + self.i_width_color_code + self.i_width_extras + self.i_width_side + self.i_width_city_to_ship
        # Add the space between fields
        i_total_length = i_total_length + 5

        s_output += "\n"
        s_output += "=" * i_total_length

        return s_output

    def get_i_id_car(self):
        return self.i_id_car

    def get_s_model_code(self):
        return self.s_model_code

    def get_s_color_code(self):
        return self.s_color_code

    def get_s_extras(self):
        return self.s_extras

    def get_i_right_side(self):
        return self.i_right_side

    def get_s_city_to_ship(self):
        return self.s_city_to_ship

Initially I was going to have a CarDO Object without any logic. Only with Data.

In OOP the variables of the Instance are called Properties, and the functions Methods.

Then I decided to add some logic, so I can show what’s the typical use of the objects.

So I will use CarDO as Data Object, but also to do few functions like printing the info of a Car.

Queue Manager

Finally the main program.

We also use Object Oriented Programming, and we use Dependency Injection to inject the MySQL Instance. That’s very practical to do Unit Testing.

from lib.mysqllib import MySql
from do.cardo import CarDO


class QueueManager():

    def __init__(self, o_mysql):
        self.o_mysql = o_mysql

    def exit(self):
        exit(0)

    def main_menu(self):
        while True:
            print("Main Menu")
            print("=========")
            print("")
            print("1. Add new car to queue")
            print("2. List all cars to queue")
            print("3. View car by Id")
            print("4. Delete car from queue by Id")
            print("")
            print("0. Exit")
            print("")

            s_option = input("Choose your option:")
            if s_option == "1":
                self.add_new_car()
            if s_option == "2":
                self.see_all_cars()
            if s_option == "3":
                self.see_car_by_id()
            if s_option == "4":
                self.delete_by_id()

            if s_option == "0":
                self.exit()

    def get_all_cars(self):
        s_query = "SELECT * FROM car_queue"

        a_rows = self.o_mysql.query(s_query)
        a_o_cars = []

        for a_row in a_rows:
            i_id_car = a_row[0]
            s_model_code = a_row[1]
            s_color_code = a_row[2]
            s_extras = a_row[3]
            i_right_side = a_row[4]
            s_city_to_ship = a_row[5]

            o_car = CarDO(i_id_car=i_id_car, s_model_code=s_model_code, s_color_code=s_color_code, s_extras=s_extras, i_right_side=i_right_side, s_city_to_ship=s_city_to_ship)
            a_o_cars.append(o_car)

        return a_o_cars

    def get_car_by_id(self, i_id_car):
        b_success = False
        o_car = None

        s_query = "SELECT * FROM car_queue WHERE i_id_car=" + str(i_id_car)

        a_rows = self.o_mysql.query(s_query)

        if len(a_rows) == 0:
            # False, None
            return b_success, o_car

        i_id_car = a_rows[0][0]
        s_model_code = a_rows[0][1]
        s_color_code = a_rows[0][2]
        s_extras = a_rows[0][3]
        i_right_side = a_rows[0][4]
        s_city_to_ship = a_rows[0][5]

        o_car = CarDO(i_id_car=i_id_car, s_model_code=s_model_code, s_color_code=s_color_code, s_extras=s_extras, i_right_side=i_right_side, s_city_to_ship=s_city_to_ship)
        b_success = True

        return b_success, o_car

    def replace_apostrophe(self, s_text):
        return s_text.replace("'", "´")

    def insert_car(self, o_car):

        s_sql = """INSERT INTO car_queue 
                                (i_id_car, s_model_code, s_color_code, s_extras, i_right_side, s_city_to_ship) 
                         VALUES 
                                (""" + str(o_car.get_i_id_car()) + ", '" + o_car.get_s_model_code() + "', '" + o_car.get_s_color_code() + "', '" + o_car.get_s_extras() + "', " + str(o_car.get_i_right_side()) + ", '" + o_car.get_s_city_to_ship() + "');"

        i_inserted_row_count = self.o_mysql.insert(s_sql)

        if i_inserted_row_count > 0:
            print("Inserted", i_inserted_row_count, " row/s")
            b_success = True
        else:
            print("It was impossible to insert the row")
            b_success = False

        return b_success

    def add_new_car(self):
        print("Add new car")
        print("===========")

        while True:
            s_id_car = input("Enter new ID: ")
            if s_id_car == "":
                print("A numeric Id is needed")
                continue

            i_id_car = int(s_id_car)

            if i_id_car < 1:
                continue

            # Check if that id existed already
            b_success, o_car = self.get_car_by_id(i_id_car=i_id_car)
            if b_success is False:
                # Does not exist
                break

            print("Sorry, this Id already exists")

        s_model_code = input("Enter Model Code:")
        s_color_code = input("Enter Color Code:")
        s_extras = input("Enter extras comma separated:")
        s_right_side = input("Enter R for Right side driven:")
        if s_right_side.upper() == "R":
            i_right_side = 1
        else:
            i_right_side = 0
        s_city_to_ship = input("Enter the city to ship the car:")

        # Sanitize SQL replacing apostrophe
        s_model_code = self.replace_apostrophe(s_model_code)
        s_color_code = self.replace_apostrophe(s_color_code)
        s_extras = self.replace_apostrophe(s_extras)
        s_city_to_ship = self.replace_apostrophe(s_city_to_ship)

        o_car = CarDO(i_id_car=i_id_car, s_model_code=s_model_code, s_color_code=s_color_code, s_extras=s_extras, i_right_side=i_right_side, s_city_to_ship=s_city_to_ship)
        b_success = self.insert_car(o_car)

    def see_all_cars(self):
        print("")

        a_o_cars = self.get_all_cars()

        if len(a_o_cars) > 0:
            print(a_o_cars[0].get_car_header_for_list())
        else:
            print("No cars in queue")
            print("")
            return

        for o_car in a_o_cars:
            print(o_car.get_car_info_for_list())

        print("")

    def see_car_by_id(self, i_id_car=0):
        if i_id_car == 0:
            s_id = input("Car Id:")
            i_id_car = int(s_id)

        s_id_car = str(i_id_car)

        b_success, o_car = self.get_car_by_id(i_id_car=i_id_car)
        if b_success is False:
            print("Error, car id: " + s_id_car + " not located.")
            return False

        print("")
        o_car.print_car_info()
        print("")

        return True

    def delete_by_id(self):

        s_id = input("Enter Id of car to delete:")
        i_id_car = int(s_id)

        if i_id_car == 0:
            print("Invalid Id")
            return

        # reuse see_car_by_id
        b_found = self.see_car_by_id(i_id_car=i_id_car)
        if b_found is False:
            return

        s_delete = input("Are you sure you want to DELETE. Type Y to delete: ")
        if s_delete.upper() == "Y":
            s_sql = "DELETE FROM car_queue WHERE i_id_car=" + str(i_id_car)
            i_num = self.o_mysql.delete(s_sql)

            print(i_num, " Rows deleted")

            # if b_success is True:
            #     print("Car deleted successfully from the queue")


if __name__ == "__main__":

    try:

        o_mysql = MySql(s_user="python", s_password="blog.carlesmateo.com-db-password", s_database="carles_database", s_host="127.0.0.1", i_port=3306)

        o_queue_manager = QueueManager(o_mysql=o_mysql)
        o_queue_manager.main_menu()
    except KeyboardInterrupt:
        print("Detected CTRL + C. Exiting")

This program talks to MySQL, that we have started in a Docker previously.

We have access from inside the Docker Container, or from outside.

The idea of this simple program is to use a library for dealing with MySql, and objects for dealing with the Cars. The class CarDO contributes to the render of its data in the screen.

To enter inside the Docker once you have generated it and is running, do:

docker exec -it blog_carlesmateo_com_mysql /bin/bash

Then:

cd /var/mysql_carles 
python3 queue_manager.py

Bonus

I added a file called queue_manager.php so you can see how easy is to render a HTML page with data coming from the Database, from PHP.

Post-Mortem: The mystery of the duplicated Transactions into an e-Commerce

Me, with 4 more Senior BackEnd Engineers wrote the new e-Commerce for a multinational.

The old legacy Software evolved into a different code for every country, making it impossible to be maintained.

The new Software we created used inheritance to use the same base code for each country and overloaded only the specific different behavior of every country, like for the payment methods, for example Brazil supporting “parcelados” or Germany with specific payment players.

We rewrote the old procedural PHP BackEnd into modern PHP, with OOP and our own Framework but we had to keep the transactional code in existing MySQL Procedures, so the logic was split. There was a Front End Team consuming our JSONs. Basically all the Front End code was cached in Akamai and pages were rendered accordingly to the JSONs served from out BackEnd.

It was a huge success.

This e-Commerce site had Campaigns that started at a certain time, so the amount of traffic that would come at the same time would be challenging.

The project was working very well, and after some time the original Team was split into different projects in the company and a Team for maintenance and evolutives was hired.

At certain point they started to encounter duplicate transactions, and nobody was able to solve the mystery.

I’m specialized into fixing impossible problems. They used to send me to Impossible Missions, and I am famous for solving impossible problems easily.

So I started the task with a SRE approach.

The System had many components and layers. The problem could be in many places.

I had in my arsenal of tools, Software like mysqldebugger with which I found an unnoticed bug in decimals calculation in the past surprising everybody.

Previous Engineers involved believed the problem was in the Database side. They were having difficulties to identify the issue by the random nature of the repetitions.

Some times the order lines were duplicated, and other times were the payments, which means charging twice to the customer.

Redis Cluster could also play a part on this, as storing the session information and the basket.

But I had to follow the logic sequence of steps.

If transactions from customer were duplicated that mean that in first term those requests have arrived to the System. So that was a good point of start.

With a list of duplicated operations, I checked the Webservers logs.

That was a bit tricky as the Webserver was recording the Ip of the Load Balancer, not the ip of the customer. But we were tracking the sessionid so with that I could track and user request history. A good thing was also that we were using cookies to stick the user to the same Webserver node. That has pros and cons, but in this case I didn’t have to worry about the logs combined of all the Webservers, I could just identify a transaction in one node, and stick into that node’s log.

I was working with SSH and Bash, no log aggregators existing today were available at that time.

So when I started to catch web logs and grep a bit an smile was drawn into my face. :)

There were no transactions repeated by a bad behavior on MySQL Masters, or by BackEnd problems. Actually the HTTP requests were performed twice.

And the explanation to that was much more simple.

Many Windows and Mac User are used to double click in the Desktop to open programs, so when they started to use Internet, they did the same. They double clicked on the Submit button on the forms. Causing two JavaScript requests in parallel.

When I explained it they were really surprised, but then they started to worry about how they could fix that.

Well, there are many ways, like using an UUID in each request and do not accepting two concurrents, but I came with something that we could deploy super fast.

I explained how to change the JavaScript code so the buttons will have no default submit action, and they will trigger a JavaScript method instead, that will set a boolean to True, and also would disable the button so it can not be clicked anymore. Only if the variable was False the submit would be performed. It was almost impossible to get a double click as the JavaScript was so fast disabling the button, that the second click will not trigger anything. But even if that could be possible, only one request would be made, as the variable was set to True on the first click event.

That case was very funny for me, because it was not necessary to go crazy inspecting the different layers of the system. The problem was detected simply with HTTP logs. :)

People often forget to follow the logic steps while many problems are much more simple.

As a curious note, I still see people double clicking on links and buttons on the Web, and some Software not handling it. :)

Upgrading the Blog after 5 years, AWS Amazon Web Services, under DoS and Spam attacks

Few days ago I was under a heavy DoS attack.

Nothing new, zombie computers, hackers, pirates, networks of computers… trying to abuse the system and to hack into it. Why? There could be many reasons, from storing pirate movies, trying to use your Server for sending Spam, try to phishing or to host Ransomware pages…

Most of those guys doesn’t know that is almost impossible to Spam from Amazon. Few emails per hour can come out from the Server unless you explicitly requests that update and configure everything.

But I thought it was a great opportunity to force myself to update the Operating System, core tools, versions of PHP and MySql.

Forensics / Postmortem of the incident

The task was divided in two parts:

  • Understanding the origin of the attack
  • Blocking the offending Ip addresses or disabling XMLRPC
  • Making the VM boot again (problems with Amazon AWS)
    • I didn’t know why it was not booting so.
  • Upgrading the OS

I disabled the access to the site while I was working using Amazon Web Services Firewall. Basically I turned access to my ip only. Example: 8.8.8.8/32

I changed 0.0.0.0/0 so the world wide mask to my_Ip/3

That way the logs were reflecting only what I was doing from my Ip.

Dealing with Snapshots and Volumes in AWS

Well the first thing was doing an Snapshot.

After, I tried to boot the original Blog Server (so I don’t stop offering service) but no way, the Server appeared to be dead.

So then I attached the Volume to a new Server with the same base OS, in order to extract (dump) the database. Later I would attach the same Volume to a new Server with the most recent OS and base Software.

Something that is a bit annoying is that the new Instances, the new generation instances, run only in VPC, not in Amazon EC2 Classic. But my static Ip addresses are created for Amazon EC2 Classic, so I could not use them in new generation instances.

I choose the option to see all the All the generations.

Upgrading the system base Software had its own challenges too.

Upgrading the OS / Base Software

My approach was to install an Ubuntu 18.04 LTS, and install the base Software clean, and add any modification I may need.

I wanted to have all the supported packages and a recent version of PHP 7 and the latest Software pieces link Apache or MySQL.

sudo apt update

sudo apt install apache2

sudo apt install mysql-server

sudo apt install php libapache2-mod-php php-mysql

Apache2

Config files that before were working stopped working as the new Apache version requires the files or symlinks under /etc/apache2/sites-enabled/ to end with .conf extension.

Also some directives changed, so some websites will not able to work properly.

Those projects using my Catalonia Framework were affected, although I have this very well documented to make it easy to work with both versions of Apache Http Server, so it was a very straightforward change.

From the previous version I had to change my www.cataloniaframework.com.conf file and enable:

    <Directory /www/www.cataloniaframework.com>
Options Indexes FollowSymLinks MultiViews
AllowOverride All
Order allow,deny
allow from all
</Directory>

Then Open the ports for the Web Server (443 and 80).

sudo ufw allow in "Apache Full"

Then service apache restart

Catalonia Framework Web Site, which is also created with Catalonia Framework itself once restored

MySQL

The problem was to use the most updated version of the Database. I could use one of the backups I keep, from last week, but I wanted more fresh data.

I had the .db files and it should had been very straightforward to copy to /var/lib/mysql/ … if they were the same version. But they weren’t. So I launched an instance with the same base Software as the old previous machine had, installed mysql-server, stopped it, copied the .db files, started it, and then I made a dump with mysqldump –all-databases > 2019-04-29-all-databases.sql

Note, I copied the .db files using the mythical mc, which is a clone from Norton Commander.

Then I stopped that instance and I detached that volume and attached it to the new Blog Instance.

I did a Backup of my original /var/lib/mysql/ files for the purpose of faster restoring if something went wrong.

I mounted it under /mnt/blog_old and did mysql -u root -p < /mnt/blog_old/home/ubuntu/2019-04-29-all-databases.sql

That worked well I had restored the blog. But as I was watching the /var/log/mysql/error.log I noticed some columns were not where they should be. That’s because inadvertently I overwritten the MySql table as well, which in MySQL 5.7 has different structure than in MySQL 5.5. So I screwed. As I previewed this possibility I restored from the backup in seconds.

So basically then I edited my .sql files and removed all that was for the mysql database.

I started MySql, and run the mysql import procedure again. It worked, but I had to recreate the users for all the Databases and Grant them permissions.

GRANT ALL PRIVILEGES ON db_mysqlproxycache.* TO 'wp_dbuser_mysqlproxy'@'localhost' IDENTIFIED BY 'XWy$&{yS@qlC|<¡!?;:-ç';

PHP7

Some modules in my blogs where returning errors in /var/log/apache2/mysite-error.log so I checked that it was due to lack of support of latest PHP versions, and so I patched manually the code or I just disabled the offending plugin.

WordPress

As seen checking the /var/log/apache2/blog.carlesmateo.com-error.log some URLs where not located by WordPress.

For example:

The requested URL /wordpress/wp-json/ was not found on this server

I had to activate modrewrite and then restart Apache.

a2enmod rewrite; service apache2 restart

Making the site more secure

Checking at the logs of Apache, /var/log/apache2/blog.carlesmateo.com-access.log I checked for Ip’s accessing Admin areas, I looked for 404 Errors pointing to intents to exploit any unsafe WP Plugin, I checked for POST protocol as well.

I added to the Ubuntu Uncomplicated Firewall (UFW) the offending Ip’s and patched the xmlrpc.php file to exit always.

Stopping and investigating a WordPress xmlrpc.php attack

One of my Servers got heavily attacked for several days. I describe here the steps I took to stop this.

The attack consisted in several connections per second to the Server, to path /xmlrpc.php.

This is a WordPress file to control the pingback, when someone links to you.

My Server it is a small Amazon instance, a m1.small with only one core and 1,6 GB RAM, magnetic disks and that scores a discrete 203 CMIPS (my slow laptop scores 460 CMIPS).

Those massive connections caused the server to use more and more RAM, and while the xmlrpc requests were taking many seconds to reply, so more and more processes of Apache were spawned. That lead to more memory consumption, and to use all the available RAM and start using swap, with a heavy performance impact until all the memory was exhausted and the mysql processes stopped.

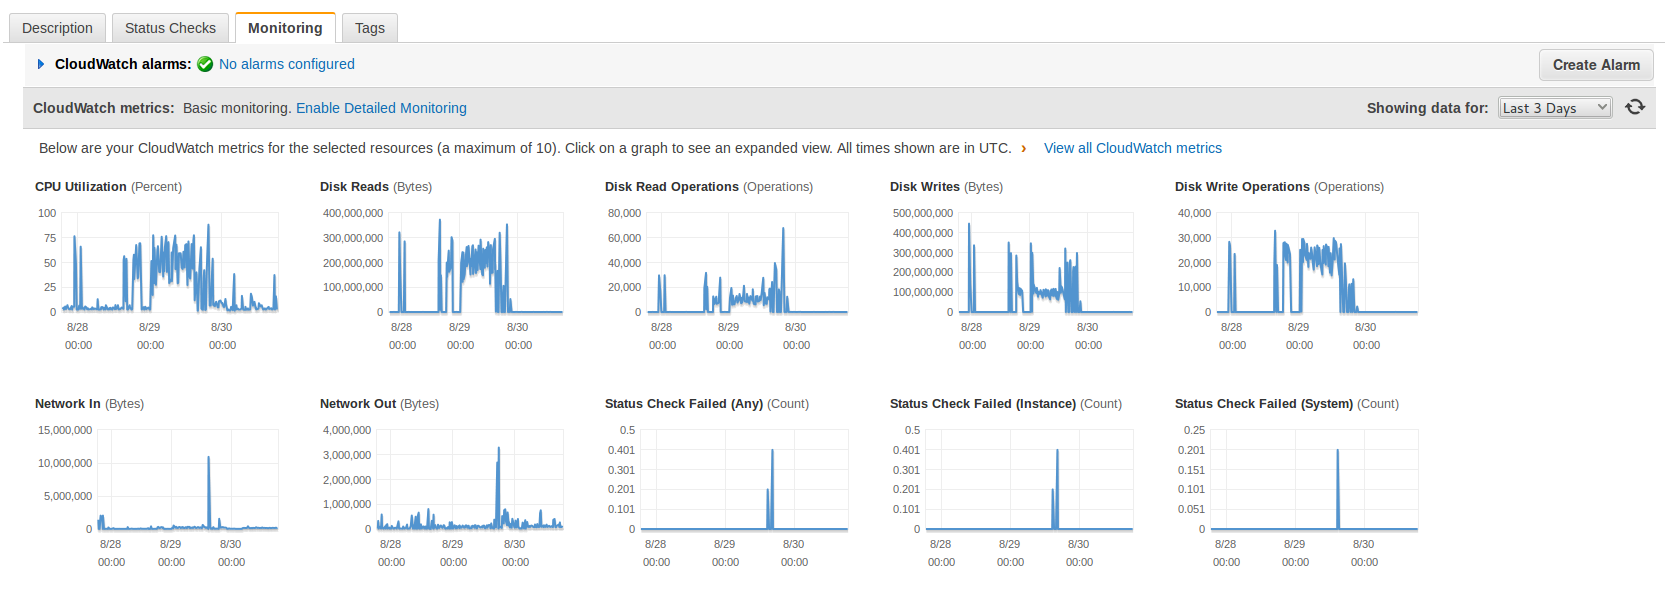
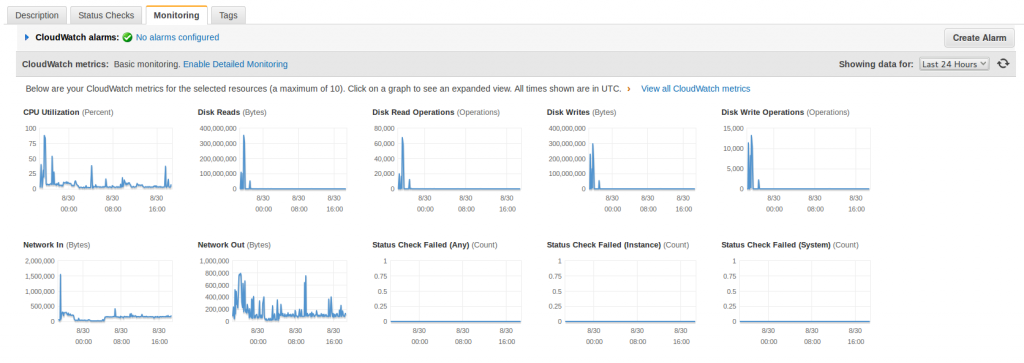
I saw that I was suffering an attack after the shutdown of MySql. I checked the CloudWatch Statistics from Amazon AWS and it was clear that I was receiving many -out of normal- requests. The I/O was really high too.

This statistics are from today to three days ago, look at the spikes when the attack was hitting hard and how relaxed the Server is now (plain line).

blog-carlesmateo-com-statistics-use-last-3-days

First I decided to simply rename the xmlrpc.php file as a quick solution to stop the attack but the number of http connections kept growing and then I saw very suspicious queries to the database.

blog-carlesmateo-suspicious-queries-2014-08-30-00-11-59Those queries, in addition to what I’ve seen in the Apache’s error log suggested me that may be the Server was hacked by a WordPress/plugin bug and that now they were trying to hide from the database’s logs. (Specially the DELETE FROM wp_useronline WHERE user_ip = the Ip of the attacker)

[Tue Aug 26 11:47:08 2014] [error] [client 94.102.49.179] Error in WordPress Database Lost connection to MySQL server during query a la consulta SELECT option_value FROM wp_options WHERE option_name = 'uninstall_plugins' LIMIT 1 feta per include('wp-load.php'), require_once('wp-config.php'), require_once('wp-settings.php'), include_once('/plugins/captcha/captcha.php'), register_uninstall_hook, get_option
[Tue Aug 26 11:47:09 2014] [error] [client 94.102.49.179] Error in WordPress Database Lost connection to MySQL server during query a la consulta SELECT option_value FROM wp_options WHERE option_name = 'uninstall_plugins' LIMIT 1 feta per include('wp-load.php'), require_once('wp-config.php'), require_once('wp-settings.php'), include_once('/plugins/captcha/captcha.php'), register_uninstall_hook, get_option
[Tue Aug 26 11:47:10 2014] [error] [client 94.102.49.179] Error in WordPress Database Lost connection to MySQL server during query a la consulta SELECT option_value FROM wp_options WHERE option_name = 'widget_wppp' LIMIT 1 feta per include('wp-load.php'), require_once('wp-config.php'), require_once('wp-settings.php'), do_action('plugins_loaded'), call_user_func_array, wppp_check_upgrade, get_option

The error log was very ugly.

The access log was not reassuring, as it shown many attacks like that:

94.102.49.179 - - [26/Aug/2014:10:34:58 +0000] "POST /xmlrpc.php HTTP/1.0" 200 598 "-" "Mozilla/4.0 (compatible: MSIE 7.0; Windows NT 6.0)"
94.102.49.179 - - [26/Aug/2014:10:34:59 +0000] "POST /xmlrpc.php HTTP/1.0" 200 598 "-" "Mozilla/4.0 (compatible: MSIE 7.0; Windows NT 6.0)"
127.0.0.1 - - [26/Aug/2014:10:35:09 +0000] "OPTIONS * HTTP/1.0" 200 126 "-" "Apache/2.2.22 (Ubuntu) (internal dummy connection)"
94.102.49.179 - - [26/Aug/2014:10:34:59 +0000] "POST /xmlrpc.php HTTP/1.0" 200 598 "-" "Mozilla/4.0 (compatible: MSIE 7.0; Windows NT 6.0)"
94.102.49.179 - - [26/Aug/2014:10:35:00 +0000] "POST /xmlrpc.php HTTP/1.0" 200 598 "-" "Mozilla/4.0 (compatible: MSIE 7.0; Windows NT 6.0)"
94.102.49.179 - - [26/Aug/2014:10:34:59 +0000] "POST /xmlrpc.php HTTP/1.0" 200 598 "-" "Mozilla/4.0 (compatible: MSIE 7.0; Windows NT 6.0)"

Was difficult to determine if the Server was receiving SQL injections so I wanted to be sure.

Note: The connection from 127.0.0.1 with OPTIONS is created by Apache when spawns another Apache.

As I had super fresh backups in another Server I was not afraid of the attack dropping the database.

I was a bit suspicious also because the /readme.html file mentioned that the version of WordPress is 3.6. In other installations it tells correctly that the version is the 3.9.2 and this file is updated with the auto-update. I was thinking about a possible very sophisticated trojan attack able to modify wp-includes/version.php and set fake $wp_version = ‘3.9.2’;
Later I realized that this blog had WordPress in Catalan, my native language, and discovered that the guys that do the translations forgot to update this file (in new installations it comes not updated, and so showing 3.6). I have alerted them.

In fact later I did a diff of all the files of my WordPress installation against the official WordPress 3.9.2-ca and later a did a diff between the WordPress 3.9.2-ca and the WordPress 3.9.2 (English – default), and found no differences. My Server was Ok. But at this point, at the beginning of the investigation I didn’t know that yet.

With the info I had (queries, times, attack, readme telling v. 3.6…) I balanced the possibility to be in front of something and I decided that I had an unique opportunity to discover how they do to inject those Sql, or discover if my Server was compromised and how. The bad point is that it was the same Amazon’s Server where this blog resides, and I wanted the attack to continue so I could get more information, so during two days I was recording logs and doing some investigations, so sorry if you visited my blog and database was down, or the Server was going extremely slow. I needed that info. It was worth it.

First I changed the Apache config so the massive connections impacted a bit less the Server and so I could work on it while the attack was going on.

I informed my group of Senior friends on what’s going on and two SysAdmins gave me some good suggestions on other logs to watch and on how to stop the attack, and later a Developer joined me to look at the logs and pointed possible solutions to stop the attack. But basically all of them suggested on how to block the incoming connections with iptables and to do things like reinstalling WordPress, disabling xmlrpc.php in .htaccess, changing passwords or moving wp-admin/ to another place, but the point is that I wanted to understand exactly what was going on and how.

I checked the logs, certificates, etc… and no one other than me was accessing the Server. I also double-checked the Amazon’s Firewall to be sure that no unnecessary ports were left open. Everything was Ok.

I took a look at the Apache logs for the site and all the attacks were coming from the same Ip:

94.102.49.179

It is an Ip from a dedicated Servers company called ecatel.net. I reported them the abuse to the abuse address indicated in the ripe.net database for the range.

I found that many people have complains about this provider and reports of them ignoring the requests to stop the spam use from their servers, so I decided that after my tests I will block their entire network from being able to access my sites.

All the requests shown in the access.log pointed to requests to /xmlrpc.php. It was the only path requested by the attacker so that Ip did nothing more apparently.

I added some logging to WordPress xmlrpc.php file:

if ($_SERVER['REMOTE_ADDR'] == '94.102.49.179') {
    error_log('XML POST: '.serialize($_POST));
    error_log('XML GET: '.serialize($_GET));
    error_log('XML REQUEST: '.serialize($_REQUEST));
    error_log('XML SERVER: '.serialize($_SERVER));
    error_log('XML FILES: '.serialize($_FILES));
    error_log('XML ENV: '.serialize($_ENV));
    error_log('XML RAW: '.$HTTP_RAW_POST_DATA);
    error_log('XML ALL_HEADERS: '.serialize(getallheaders()));
}

This was the result, it is always the same:

[Fri Aug 29 19:02:54 2014] [error] [client 94.102.49.179] XML POST: a:0:{}
[Fri Aug 29 19:02:54 2014] [error] [client 94.102.49.179] XML GET: a:0:{}
[Fri Aug 29 19:02:54 2014] [error] [client 94.102.49.179] XML REQUEST: a:0:{}
[Fri Aug 29 19:02:54 2014] [error] [client 94.102.49.179] XML SERVER: a:24:{s:9:"HTTP_HOST";s:24:"barcelona.afterstart.com";s:12:"CONTENT_TYPE";s:8:"text/xml";s:14:"CONTENT_LENGTH";s:3:"287";s:15:"HTTP_USER_AGENT";s:50:"Mozilla/4.0 (compatible: MSIE 7.0; Windows NT 6.0)";s:15:"HTTP_CONNECTION";s:5:"close";s:4:"PATH";s:28:"/usr/local/bin:/usr/bin:/bin";s:16:"SERVER_SIGNATURE";s:85:"<address>Apache/2.2.22 (Ubuntu) Server at barcelona.afterstart.com Port 80</address>\n";s:15:"SERVER_SOFTWARE";s:22:"Apache/2.2.22 (Ubuntu)";s:11:"SERVER_NAME";s:24:"barcelona.afterstart.com";s:11:"SERVER_ADDR";s:14:"[this-is-removed]";s:11:"SERVER_PORT";s:2:"80";s:11:"REMOTE_ADDR";s:13:"94.102.49.179";s:13:"DOCUMENT_ROOT";s:29:"/var/www/barcelona.afterstart.com";s:12:"SERVER_ADMIN";s:19:"webmaster@localhost";s:15:"SCRIPT_FILENAME";s:40:"/var/www/barcelona.afterstart.com/xmlrpc.php";s:11:"REMOTE_PORT";s:5:"40225";s:17:"GATEWAY_INTERFACE";s:7:"CGI/1.1";s:15:"SERVER_PROTOCOL";s:8:"HTTP/1.0";s:14:"REQUEST_METHOD";s:4:"POST";s:12:"QUERY_STRING";s:0:"";s:11:"REQUEST_URI";s:11:"/xmlrpc.php";s:11:"SCRIPT_NAME";s:11:"/xmlrpc.php";s:8:"PHP_SELF";s:11:"/xmlrpc.php";s:12:"REQUEST_TIME";i:1409338974;}
[Fri Aug 29 19:02:54 2014] [error] [client 94.102.49.179] XML FILES: a:0:{}
[Fri Aug 29 19:02:54 2014] [error] [client 94.102.49.179] XML ENV: a:0:{}
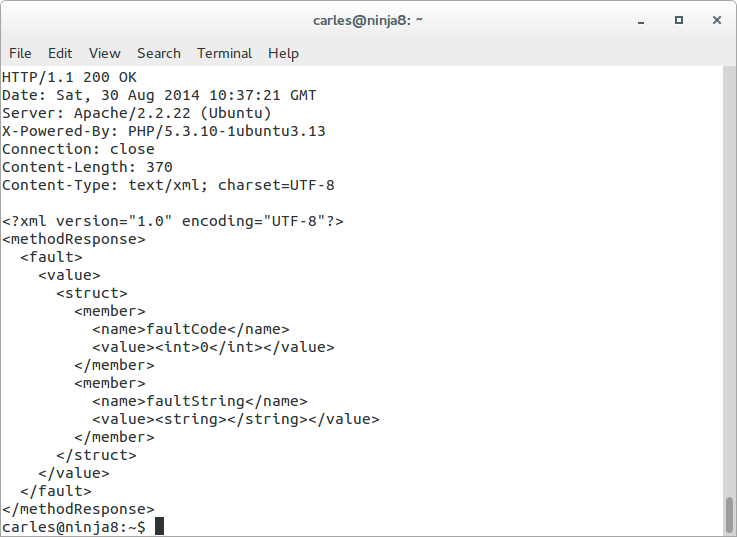
[Fri Aug 29 19:02:54 2014] [error] [client 94.102.49.179] XML RAW: <?xmlversion="1.0"?><methodCall><methodName>pingback.ping</methodName><params><param><value><string>http://seretil.me/</string></value></param><param><value><string>http://barcelona.afterstart.com/2013/09/27/afterstart-barcelona-2013-09-26/</string></value></param></params></methodCall>
[Fri Aug 29 19:02:54 2014] [error] [client 94.102.49.179] XML ALL_HEADERS: a:5:{s:4:"Host";s:24:"barcelona.afterstart.com";s:12:"Content-type";s:8:"text/xml";s:14:"Content-length";s:3:"287";s:10:"User-agent";s:50:"Mozilla/4.0 (compatible: MSIE 7.0; Windows NT 6.0)";s:10:"Connection";s:5:"close";}

So nothing in $_POST, nothing in $_GET, nothing in $_REQUEST, nothing in $_SERVER, no files submitted, but a text/xml Posted (that was logged by storing: $HTTP_RAW_POST_DATA):

<?xmlversion="1.0"?><methodCall><methodName>pingback.ping</methodName><params><param><value><string>http://seretil.me/</string></value></param><param><value><string>http://barcelona.afterstart.com/2013/09/27/afterstart-barcelona-2013-09-26/</string></value></param></params></methodCall>

I show you in a nicer formatted aspect:blog-carlesmateo-com-xml-xmlrpc-requestSo basically they were trying to register a link to seretil dot me.

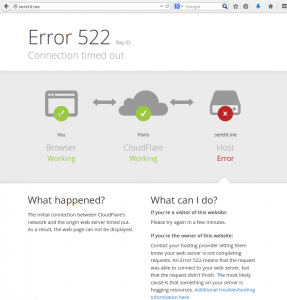
I tried and this page, hosted in CloudFare, is not working.

accessing-seretil-withoud-id

The problem is that responding to this spam xmlrpc request took around 16 seconds to the Server. And I was receiving several each second.

I granted access to my Ip only on the port 80 in the Firewall, restarted Apache, restarted MySql and submitted the same malicious request to the Server, and it even took 16 seconds in all my tests:

cat http_post.txt | nc barcelona.afterstart.com 80

blog-carlesmateo-com-response-from-the-server-to-xmlrpc-attackI checked and confirmed that the logs from the attacker were showing the same Content-Length and http code.

Other guys tried xml request as well but did one time or two and leaved.

The problem was that this robot was, and still sending many requests per second for days.

May be the idea was to knock down my Server, but I doubted it as the address selected is the blog of one Social Event for Senior Internet Talents that I organize: afterstart.com. It has not special interest, I do not see a political, hateful or other motivation to attack the blog from this project.

Ok, at this point it was clear that the Ip address was a robot, probably running from an infected or hacked Server, and was trying to publish a Spam link to a site (that was down). I had to clarify those strange queries in the logs.

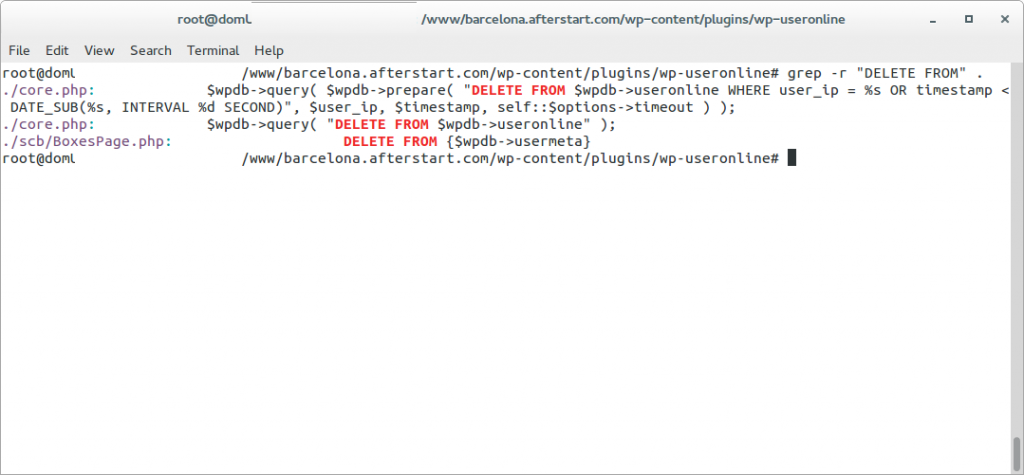
I reviewed the WPUsersOnline plugin and I saw that the strange queries (and inefficient) that I saw belonged to WPUsersOnline plugin.

blog-carlesmateo-com-grep-r-delete-from-wp-useronline-2014-08-30-21-11-21-cut

The thing was that when I renamed the xmlrpc.php the spamrobot was still posting to that file. According to WordPress .htaccess file any file that is not found on the filesystem is redirected to index.php.

So what was happening is that all the massive requests sent to xmlrpc.php were being attended by index.php, then showing an error message that page not found, but the WPUsersOnline plugin was deleting those connections. And was doing it many times, overloading also the Database.

Also I was able to reproduce the behaviour by myself, isolating by firewalling the WebServer from other Ips other than mine and doing the same post by myself many times per second.

I checked against a friend’s blog but in his Server xmlrpc.php responds in 1,5 seconds. My friend’s Server is a Digital Ocean Virtual Server with 2 cores and SSD Disks. My magnetic disks on Amazon only bring around 40 MB/second. I’ve to check in detail why my friend’s Server responds so much faster.

Checked the integrity of my databases, just in case, and were perfect. Nothing estrange with collations and the only errors in the /var/log/mysql/error.log was due to MySql crashing when the Server ran out of memory.

Rechecked in my Server, now it takes 12 seconds.

I disabled 80% of the plugins but the times were the same. The Statistics show how the things changed -see the spikes before I definitively patched the Server to block request from that Spam-robot ip, to the left-.

I checked against another WordPress that I have in the same Server and it only takes 1,5 seconds to reply. So I decided to continue investigating why this WordPress took so long to reply.

blog-carlesmateo-com-statistics-use-last-24-hours

As I said before I checked that the files from my WordPress installation were the same as the original distribution, and they were. Having discarded different files the thing had to be in the database.

Even when I checked the MySql it told me that all the tables were OK, having seen that the WPUserOnline deletes all the registers older than 5 minutes, I guessed that this could lead to fragmentation, so I decided to do OPTIMIZE TABLE on all the tables of the database for the WordPress failing, with InnoDb it is basically recreating the Tables and the Indexes.

I tried then the call via RPC and my Server replied in three seconds. Much better.

Looking with htop, when I call the xmlrpc.php the CPU uses between 50% and 100%.

I checked the logs and the robot was gone. He leaved or the provider finally blocked the Server. I don’t know.

Everything became clear, it was nothing more than a sort of coincidences together. Deactivating the plugin the DELETE queries disappeared, even under heavy load of the Server.

It only was remain to clarify why when I send a call to xmlrpc to this blog, it replies in 1,5 seconds, and when I request to the Barcelona.afterstart.com it takes 3 seconds.

I activated the log of queries in mysql. To do that edit /etc/mysql/my.cnf and uncomment:

general_log_file        = /var/log/mysql/mysql.log
general_log             = 1

Then I checked the queries, and in the case of my blog it performs many less queries, as I was requesting to pingback to an url that was not existing, and WordPress does this query:

SELECT   wp_posts.* FROM wp_posts  WHERE 1=1  AND ( ( YEAR( post_date ) = 2013 AND MONTH( post_date ) = 9 AND DAYOFMONTH( post_date ) = 27 ) ) AND wp_posts.post_name = 'afterstart-barcelona-2013-09-26-meet' AND wp_posts.post_type = 'post'  ORDER BY wp_posts.post_date DESC

As the url afterstart-barcelona-2013-09-26-meet with the dates indicated does not exist in my other blog, the execution ends there and does not perform the rest of the queries, that in the case of Afterstart blog were:

40 Query     SELECT post_id, meta_key, meta_value FROM wp_postmeta WHERE post_id IN (81) ORDER BY meta_id ASC
40 Query     SELECT ID, post_name, post_parent, post_type
FROM wp_posts
WHERE post_name IN ('http%3a','','seretil-me')
AND post_type IN ('page','attachment')
40 Query     SELECT   wp_posts.* FROM wp_posts  WHERE 1=1  AND (wp_posts.ID = '0') AND wp_posts.post_type = 'page'  ORDER BY wp_posts.post_date DESC
40 Query     SELECT * FROM wp_comments WHERE comment_post_ID = 81 AND comment_author_url = 'http://seretil.me/'

To confirm my theory I tried the request to my blog, with a valid url, and it lasted for 3-4 seconds, the same than Afterstart’s blog. Finally I double-checked with the blog of my friend and was slower than before. I got between 1,5 and 6 seconds, with a lot of 2 seconds response. (he has PHP 5.5 and OpCache that improves a bit, but the problem is in the queries to the database)

Honestly, the guys creating WordPress should cache this queries instead of performing 20 live queries, that are always the same, before returning the error message. Using Cache Lite or Stash, or creating an InMemory table for using as Cache, or of course allowing the use of Memcached would eradicate the DoS component of this kind of attacks. As the xmlrpc pingback feature hits the database with a lot of queries to end not allowing the publishing.

While I was finishing those tests (remember that the attacker ip has gone) another attacker from the same network tried, but I had patched the Server to ignore it:

94.102.52.157 - - [31/Aug/2014:02:06:16 +0000] "POST /xmlrpc.php HTTP/1.0" 200 189 "-" "Mozilla/4.0 (compatible: MSIE 7.0; Windows NT 6.0)"

This was trying to get a link published to a domain called socksland dot net that is a domain registered in Russia and which page is not working.

As I had all the information I wanted I finally blocked the network from the provider to access my Server ever again.

Unfortunatelly Amazon’s Firewall does not allow to block a certain Ip or range.
So you can block at Iptables level or in .htaccess file or in the code.
I do not recommend blocking at code level because sadly WordPress has many files accessible from outside so you would have to add your code at the beginning of all the files and because when there is a WordPress version update you’ll loss all your customizations.
But I recommend proceeding to patch your code to avoid certain Ip’s if you use a CDN. As the POST will be sent directly to your Server, and the Ip’s are Ip’s from the CDN -and you can’t block them-. You have to look at the Header: X-Forwarded-For that indicates the Ip’s the proxies have passed by, and also the Client’s Ip.

I designed a program that is able to patch any PHP project to check for blacklisted Ip’s (even though a proxy) with minimal performance impact. It works with WordPress, drupal, joomla, ezpublish and Framework like Zend, Symfony, Catalonia… and I patched my code to block those unwanted robot’s requests.

A solution that will work for you probably is to disable the pingback functionality, there are several plugins that do that. Disabling completely xmlrpc is not recommended as WordPress uses it for several things (JetPack, mobile, validation…)

The same effect as adding the plugin that disables the xmlrpc pingback can be achieved by editing the functions.php from your Theme and adding:

add_filter( 'xmlrpc_methods', 'remove_xmlrpc_pingback_ping' );
function remove_xmlrpc_pingback_ping( $methods ) {
    unset( $methods['pingback.ping'] );
    
    return $methods;
}

Update: 2016-02-24 14:40 CEST
I got also a heavy dictionary attack against wp-login.php .Despite having a Captcha plugin, that makes it hard to hack, it was generating some load on the system.
What I did was to rename the wp-login.php to another name, like wp-login-carles.php and in wp-login.php having a simply exit();

<?php
exit();

Take in count that this will work only until WordPress is updated to the next version. Then you have to reapply the renaming trick.