You have installed eZ Launchpad, and you can execute the binary ez from your home folder or other paths, however when you execute it from a project folder you cloned with git (with its .platform.app.yaml file) ez returns to prompt without any error message.
The exit code is 255, but even if you strace the process you don’t find the exact problem.
Inside your project you run ez without any argument in a clean install of Ubuntu 24.04 LTS with PHP 8.3, or with PHP 8.4, without xDebug, without opcache, without memory limit… nothing works with no visible error message in the logs or in the error output. However if you run it outside the project folder, it works, and it displays the typical help messages.
I reproduced this behavior on several Ubuntu computers. The fix I found is to execute ez with PHP 8.1
You can install PHP8.1 from ondrej repository, then you can update alternates to execute PHP 8.1 by default in your system, or you create the project by invoking ez with PHP 8.1 explicitly with:
php8.1 ~/ez create
This will kickstart the creation of your ez project based on Docker containers.
This is a mechanism I invented and I’ve been using for decades, to migrate or clone my Linux Desktops to other physical servers.
This script is focused on doing the job for Ubuntu but I was doing this already 30 years ago, for X Window as I was responsible of the Linux platform of a ISP (Internet Service Provider). So, it is compatible with any Linux Desktop or Server.
It has the advantage that is a very lightweight backup. You don’t need to backup /etc or /var as long as you install a new OS and restore the folders that you did backup. You can backup and restore Wine (Windows Emulator) programs completely and to/from VMs and Instances as well.
It’s based on user/s rather than machine.
And it does backup using the Timestamp, so you keep all the different version, modified over time. You can fusion the backups in the same folder if you prefer avoiding time versions and keep only the latest backup. If that’s your case, then replace s_PATH_BACKUP_NOW=”${s_PATH_BACKUP}${s_DATETIME}/” by s_PATH_BACKUP_NOW=”${s_PATH_BACKUP}” for instance. You can also add a folder for machine if you prefer it, for example if you use the same userid across several Desktops/Servers.
I offer you a much simplified version of my scripts, but they can highly serve your needs.
#!/usr/bin/env bash

# Author: Carles Mateo
# Last Update: 2022-10-23 10:48 Irish Time

# User we want to backup data for
s_USER="carles"
# Target PATH for the Backups
s_PATH_BACKUP="/home/${s_USER}/Desktop/Bck/"

s_DATE=$(date +"%Y-%m-%d")
s_DATETIME=$(date +"%Y-%m-%d-%H-%M-%S")

s_PATH_BACKUP_NOW="${s_PATH_BACKUP}${s_DATETIME}/"

echo "Creating path $s_PATH_BACKUP and $s_PATH_BACKUP_NOW"
mkdir $s_PATH_BACKUP
mkdir $s_PATH_BACKUP_NOW

s_PATH_KEY="/home/${s_USER}/Desktop/keys/2007-01-07-cloud23.pem"
s_DOCKER_IMG_JENKINS_EXPORT=${s_DATE}-jenkins-base.tar
s_DOCKER_IMG_JENKINS_BLUEOCEAN2_EXPORT=${s_DATE}-jenkins-blueocean2.tar
s_PGP_FILE=${s_DATETIME}-pgp.zip

# Version the PGP files
echo "Compressing the PGP files as ${s_PGP_FILE}"
zip -r ${s_PATH_BACKUP_NOW}${s_PGP_FILE} /home/${s_USER}/Desktop/PGP/*

# Copy to BCK folder, or ZFS or to an external drive Locally as defined in: s_PATH_BACKUP_NOW
echo "Copying Data to ${s_PATH_BACKUP_NOW}/Data"
rsync -a --exclude={} --acls --xattrs --owner --group --times --stats --human-readable --progress -z "/home/${s_USER}/Desktop/data/" "${s_PATH_BACKUP_NOW}data/"
rsync -a --exclude={'Desktop','Downloads','.local/share/Trash/','.local/lib/python2.7/','.local/lib/python3.6/','.local/lib/python3.8/','.local/lib/python3.10/','.cache/JetBrains/'} --acls --xattrs --owner --group --times --stats --human-readable --progress -z "/home/${s_USER}/" "${s_PATH_BACKUP_NOW}home/${s_USER}/"
rsync -a --exclude={} --acls --xattrs --owner --group --times --stats --human-readable --progress -z "/home/${s_USER}/Desktop/code/" "${s_PATH_BACKUP_NOW}code/"


echo "Showing backup dir ${s_PATH_BACKUP_NOW}"
ls -hal ${s_PATH_BACKUP_NOW}

df -h /
See how I exclude certain folders like the Desktop or Downloads with –exclude.
It relies on the very useful rsync program. It also relies on zip to compress entire folders (PGP Keys on the example).
If you use the second part, to compress Docker Images (Jenkins in this example), you will run it as sudo and you will need also gzip.
There is a final part, if you want to backup to a remote Server/s using ssh:
# continuation... to copy to a remote Server.

s_PATH_REMOTE="bck7@cloubbck11.carlesmateo.com:/Bck/Desktop/${s_USER}/data/"

# Copy to the other Server
rsync -e "ssh -i $s_PATH_KEY" -a --exclude={} --acls --xattrs --owner --group --times --stats --human-readable --progress -z "/home/${s_USER}/Desktop/data/" ${s_PATH_REMOTE}
I recommend you to use the same methodology in all your Desktops, like for example, having a data/ folder in the Desktop for each user.
You can use Erasure Code to split the Backups in blocks and store a piece in different Cloud Providers.
Also you can store your Backups long-term, with services like Amazon Glacier.
Other ideas are storing certain files in git and in Hadoop HDFS.
If you want you can CRC your files before copying to another device or server.
FROM ubuntu:20.04

MAINTAINER Carles Mateo

ARG DEBIAN_FRONTEND=noninteractive

# This will make sure printing in the Screen when running in detached mode
ENV PYTHONUNBUFFERED=1

RUN apt-get update -y && apt install -y sudo telnetd vim systemctl  && apt-get clean

RUN adduser -gecos --disabled-password --shell /bin/bash telnet

RUN echo "telnet:telnet" | chpasswd

EXPOSE 23

CMD systemctl start inetd; while [ true ]; do sleep 60; done
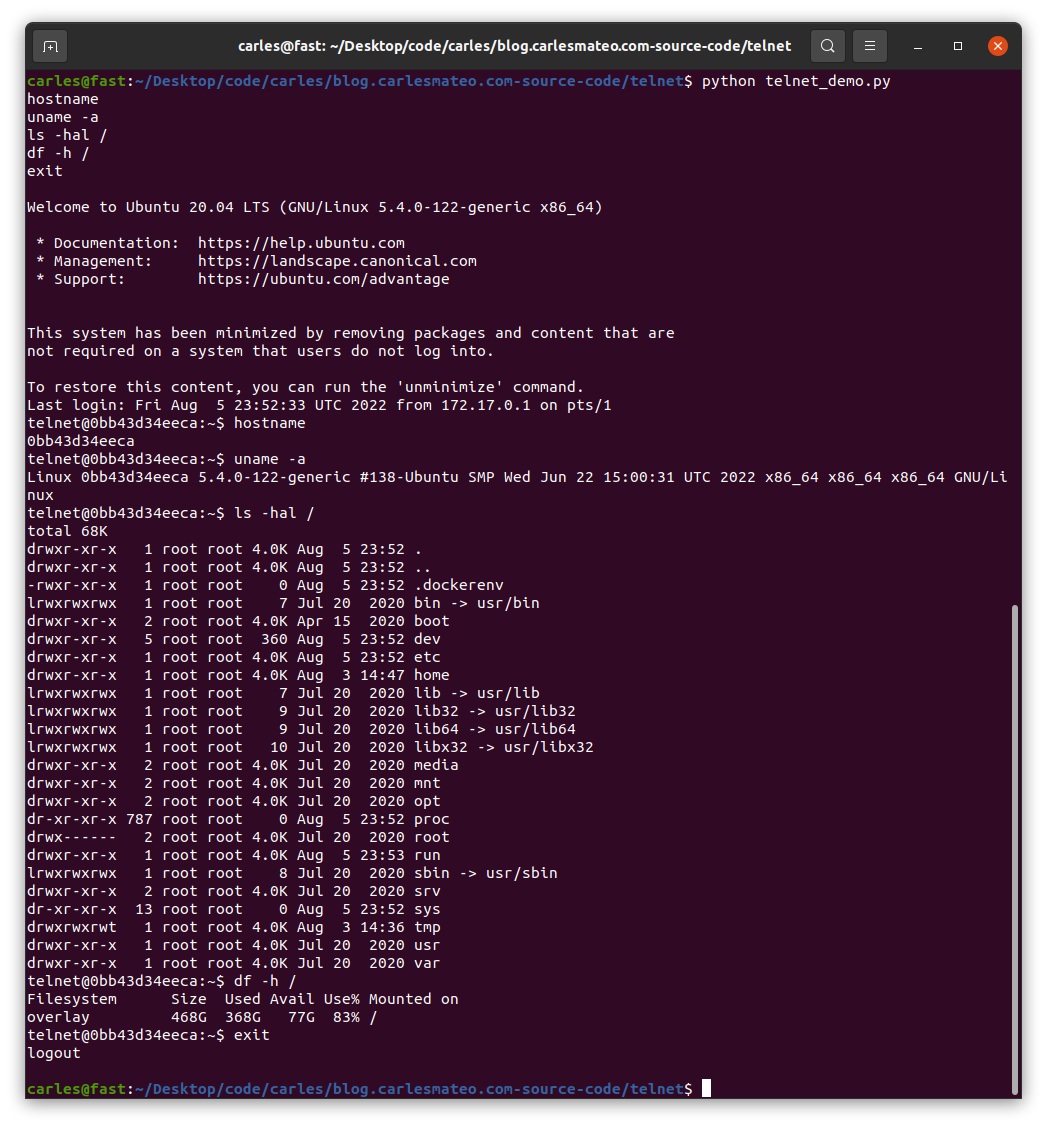
You can see that I use chpasswd command to change the password for the user telnet and set it to telnet. That deals with the complexity of setting the encrypted password.
File: build_docker.sh
#!/bin/bash

s_DOCKER_IMAGE_NAME="ubuntu_telnet"

echo "We will build the Docker Image and name it: ${s_DOCKER_IMAGE_NAME}"
echo "After, we will be able to run a Docker Container based on it."

printf "Removing old image %s\n" "${s_DOCKER_IMAGE_NAME}"
sudo docker rm "${s_DOCKER_IMAGE_NAME}"

printf "Creating Docker Image %s\n" "${s_DOCKER_IMAGE_NAME}"
sudo docker build -t ${s_DOCKER_IMAGE_NAME} .
# If you don't want to use cache this is your line
# sudo docker build -t ${s_DOCKER_IMAGE_NAME} . --no-cache

i_EXIT_CODE=$?
if [ $i_EXIT_CODE -ne 0 ]; then
    printf "Error. Exit code %s\n" ${i_EXIT_CODE}
    exit
fi

echo "Ready to run ${s_DOCKER_IMAGE_NAME} Docker Container"
echo "To run in type: sudo docker run -it -p 23:23 --name ${s_DOCKER_IMAGE_NAME} ${s_DOCKER_IMAGE_NAME}"
When you run sudo ./build_docker.sh the image will be built. Then run it with:
sudo docker run -it -p 23:23 --name ubuntu_telnet ubuntu_telnet
If you get an error indicating that the port is in use, then your computer has already a process listening on the port 23, use another.
You will be able to stop the Container by pressing CTRL + C
So, you may have your Android phone full and you don’t know where the space is.
You may have tried Apps for Android but none shows the information in the detail you would like. Linux to the rescue.
First of all you need a cable able to transfer Data. It is a cable that will be connected to your computer, normally with an USB 3.0 cable and to your smartphone, normally with USB-C.
Sometimes phone’s connectors are dirty and don’t allow a stable connection. Your connections should allow a stable connection, otherwise the connection will be interrupted in the middle.
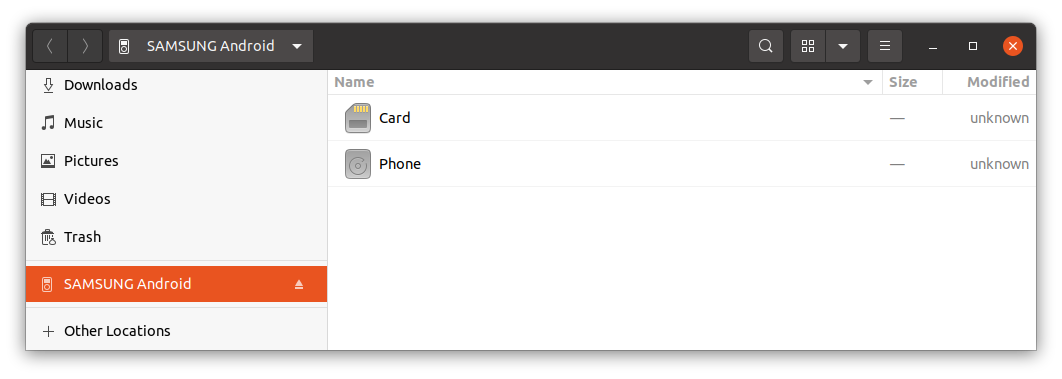
Once you connect the Android smartphone to the computer, unlock the phone and authorize the data connection.
You’ll see that your computer recognizes the phone:
Open the terminal and enter this directory:
cd /run/user/1000/gvfs/
Here you will see your device and the name is very evident.
The usual is to have just one device listed, but if you had several Android devices attached you may want to query first, in order to identify it.
The Android devices use a protocol named Media Transfer Protocol (MTP) when connecting to the USB port, and that’s different on the typical way to access the USB port.
usb-devices | grep "Manufacturer=" -B 3
Run this command to see all the devices connected to the USB.
You may see Manufacturer=SAMSUNG or Manufacturer=OnePlus etc…
The information returned will allow you to identify your device in /run/user/1000/gvfs/
You may get different type of outputs, but if you get:
You can enter the Phone internal storage or the SD Card storage directory:
cd Phone
To see how the space is distributed nicely I recommend you to use the program ncdu if you don’t have you can install it with:
sudo apt install ncdu
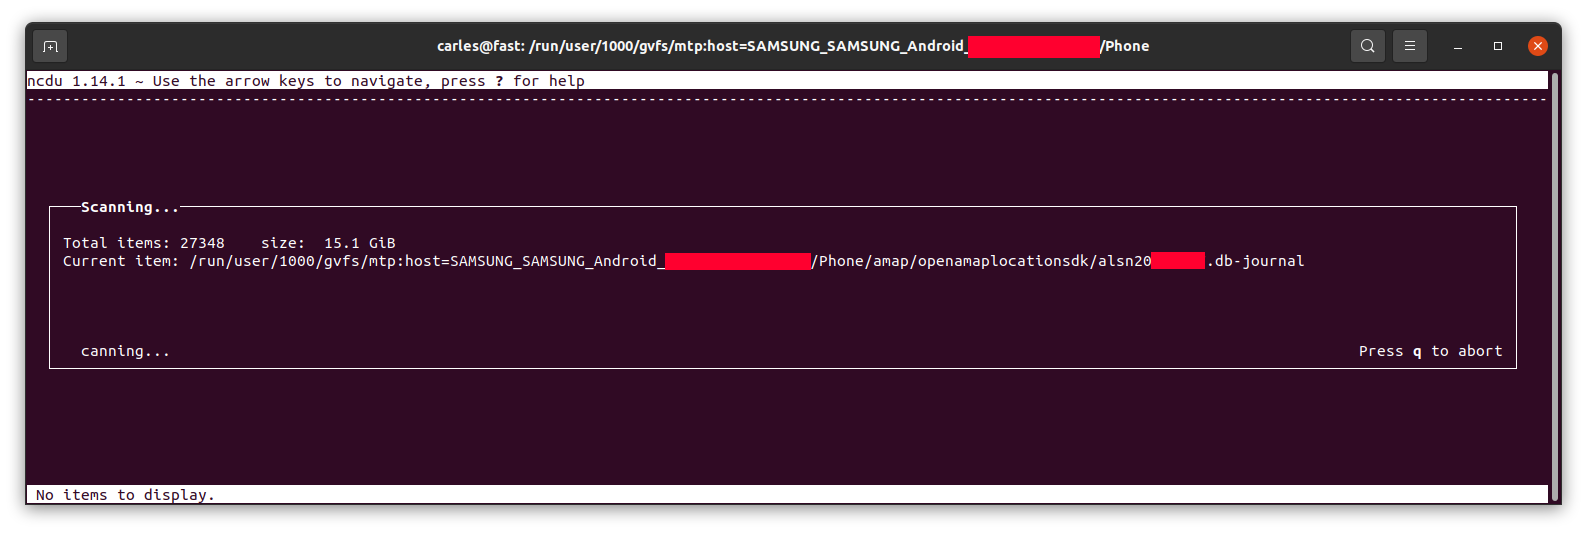
Then run ncdu:
ncdu
It will calculate the space…
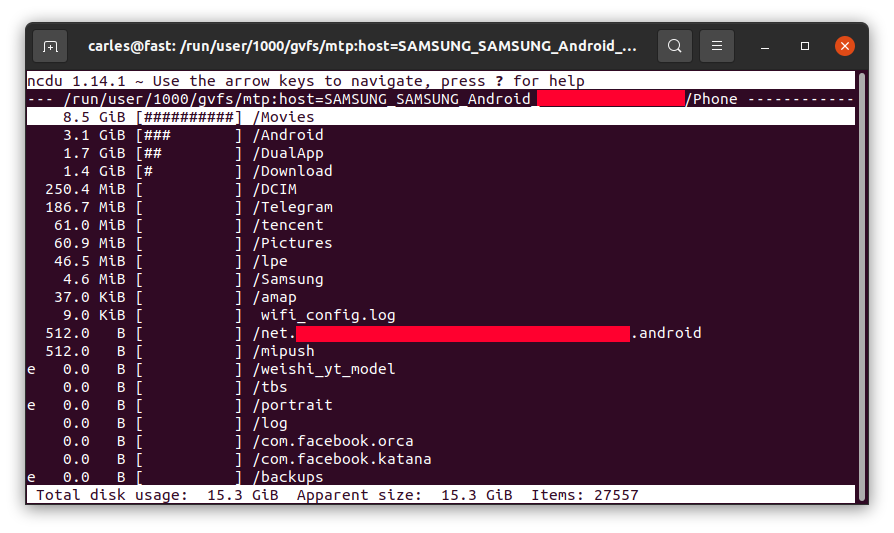
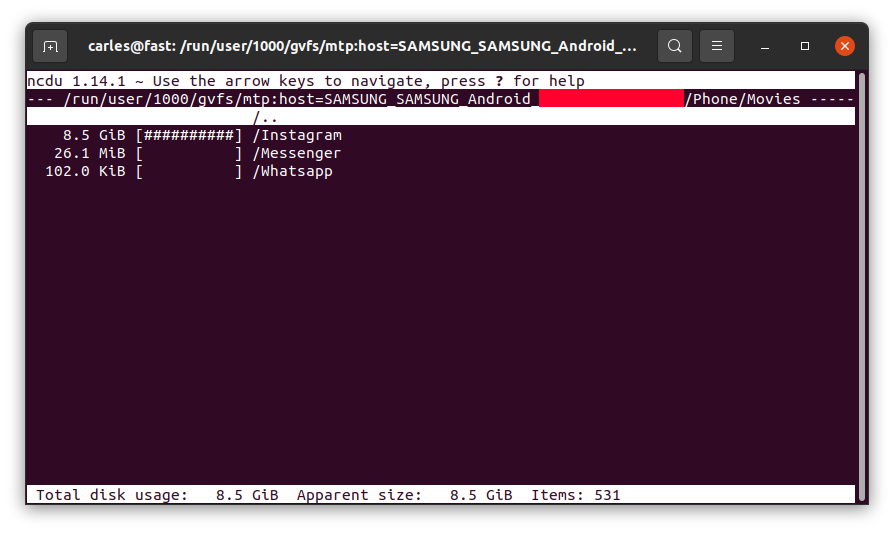
… and let you know, sorted from more to less, and will allow you to browse the sub-directories with the keyboard arrow keys and enter to get major clarity.
For example, in my case I saw 8.5 GB in the folder Movies on the phone, where I didn’t download any movie, so I checked.
I entered inside by pressing Enter:
So Instagram App was keeping a copy all the videos I uploaded, in total 8.5 GB of my Phone’s space and never releasing them!.
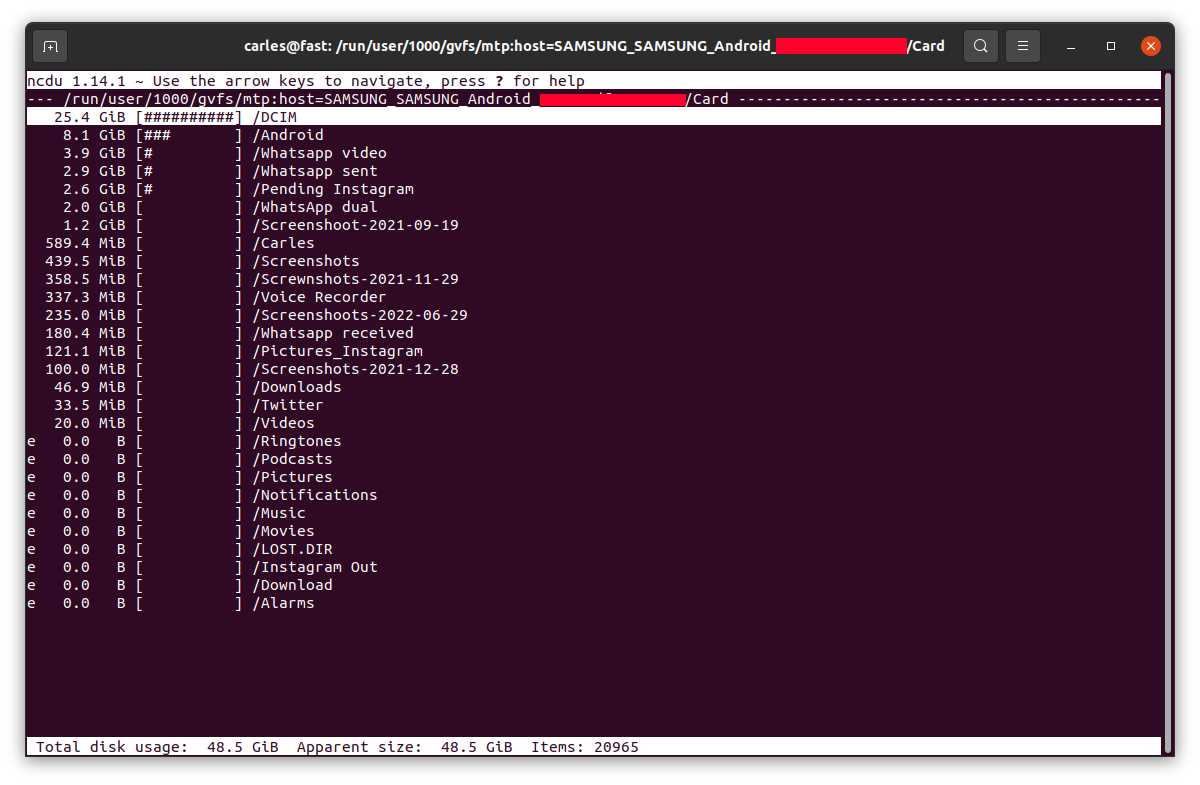
Example for the SD card, where the usage was as expected:
One interesting aspect is that I cover how the messages are delivered as byte sequence. I show this by sending Unicode characters
Files in the project
Dockerfile
FROM ubuntu:20.04

MAINTAINER Carles Mateo

ARG DEBIAN_FRONTEND=noninteractive

# This will make sure printing in the Screen when running in dettached mode
ENV PYTHONUNBUFFERED=1

ARG PATH_RABBIT_INSTALL=/tmp/rabbit_install/

ARG PATH_RABBIT_APP_PYTHON=/opt/rabbit_python/

RUN mkdir $PATH_RABBIT_INSTALL

COPY cloudsmith.sh $PATH_RABBIT_INSTALL

RUN chmod +x ${PATH_RABBIT_INSTALL}cloudsmith.sh

RUN apt-get update -y && apt install -y sudo python3 python3-pip mc htop less strace zip gzip lynx && apt-get clean

RUN ${PATH_RABBIT_INSTALL}cloudsmith.sh

RUN service rabbitmq-server start

RUN mkdir $PATH_RABBIT_APP_PYTHON

COPY requirements.txt $PATH_RABBIT_APP_PYTHON

WORKDIR $PATH_RABBIT_APP_PYTHON

RUN pwd

RUN pip install -r requirements.txt

COPY *.py $PATH_RABBIT_APP_PYTHON

COPY loop_send_get_messages.sh $PATH_RABBIT_APP_PYTHON

RUN chmod +x loop_send_get_messages.sh

CMD ./loop_send_get_messages.sh
cloudsmith.sh
#!/usr/bin/sh
# From: https://www.rabbitmq.com/install-debian.html#apt-cloudsmith

sudo apt-get update -y && apt-get install curl gnupg apt-transport-https -y

## Team RabbitMQ's main signing key
curl -1sLf "https://keys.openpgp.org/vks/v1/by-fingerprint/0A9AF2115F4687BD29803A206B73A36E6026DFCA" | sudo gpg --dearmor | sudo tee /usr/share/keyrings/com.rabbitmq.team.gpg > /dev/null
## Cloudsmith: modern Erlang repository
curl -1sLf https://dl.cloudsmith.io/public/rabbitmq/rabbitmq-erlang/gpg.E495BB49CC4BBE5B.key | sudo gpg --dearmor | sudo tee /usr/share/keyrings/io.cloudsmith.rabbitmq.E495BB49CC4BBE5B.gpg > /dev/null
## Cloudsmith: RabbitMQ repository
curl -1sLf https://dl.cloudsmith.io/public/rabbitmq/rabbitmq-server/gpg.9F4587F226208342.key | sudo gpg --dearmor | sudo tee /usr/share/keyrings/io.cloudsmith.rabbitmq.9F4587F226208342.gpg > /dev/null

## Add apt repositories maintained by Team RabbitMQ
sudo tee /etc/apt/sources.list.d/rabbitmq.list <<EOF
## Provides modern Erlang/OTP releases
##
deb [signed-by=/usr/share/keyrings/io.cloudsmith.rabbitmq.E495BB49CC4BBE5B.gpg] https://dl.cloudsmith.io/public/rabbitmq/rabbitmq-erlang/deb/ubuntu bionic main
deb-src [signed-by=/usr/share/keyrings/io.cloudsmith.rabbitmq.E495BB49CC4BBE5B.gpg] https://dl.cloudsmith.io/public/rabbitmq/rabbitmq-erlang/deb/ubuntu bionic main

## Provides RabbitMQ
##
deb [signed-by=/usr/share/keyrings/io.cloudsmith.rabbitmq.9F4587F226208342.gpg] https://dl.cloudsmith.io/public/rabbitmq/rabbitmq-server/deb/ubuntu bionic main
deb-src [signed-by=/usr/share/keyrings/io.cloudsmith.rabbitmq.9F4587F226208342.gpg] https://dl.cloudsmith.io/public/rabbitmq/rabbitmq-server/deb/ubuntu bionic main
EOF

## Update package indices
sudo apt-get update -y

## Install Erlang packages
sudo apt-get install -y erlang-base \
                        erlang-asn1 erlang-crypto erlang-eldap erlang-ftp erlang-inets \
                        erlang-mnesia erlang-os-mon erlang-parsetools erlang-public-key \
                        erlang-runtime-tools erlang-snmp erlang-ssl \
                        erlang-syntax-tools erlang-tftp erlang-tools erlang-xmerl

## Install rabbitmq-server and its dependencies
sudo apt-get install rabbitmq-server -y --fix-missing
build_docker.sh
#!/bin/bash

s_DOCKER_IMAGE_NAME="rabbitmq"

echo "We will build the Docker Image and name it: ${s_DOCKER_IMAGE_NAME}"
echo "After, we will be able to run a Docker Container based on it."

printf "Removing old image %s\n" "${s_DOCKER_IMAGE_NAME}"
sudo docker rm "${s_DOCKER_IMAGE_NAME}"

printf "Creating Docker Image %s\n" "${s_DOCKER_IMAGE_NAME}"
sudo docker build -t ${s_DOCKER_IMAGE_NAME} . --no-cache

i_EXIT_CODE=$?
if [ $i_EXIT_CODE -ne 0 ]; then
    printf "Error. Exit code %s\n" ${i_EXIT_CODE}
    exit
fi

echo "Ready to run ${s_DOCKER_IMAGE_NAME} Docker Container"
echo "To run in type: sudo docker run -it --name ${s_DOCKER_IMAGE_NAME} ${s_DOCKER_IMAGE_NAME}"
echo "or just use run_in_docker.sh"
requirements.txt
pika
loop_send_get_messages.sh
#!/bin/bash

echo "Starting RabbitMQ"
service rabbitmq-server start

echo "Launching consumer in background which will be listening and executing the callback function"
python3 rabbitmq_getfrom.py &

while true; do

    i_MESSAGES=$(( RANDOM % 10 ))

    echo "Sending $i_MESSAGES messages"
    for i_MESSAGE in $(seq 1 $i_MESSAGES); do
        python3 rabbitmq_sendto.py
    done

    echo "Sleeping 5 seconds"
    sleep 5

done

echo "Exiting loop"
As in my case my jenkins container Id is 77b6a5a7ae8d in order to know the jenkins administrator password I check the logs for my jenkins Container with docker logs 77b6a5a7ae8d:
docker logs 77b6a5a7ae8d
Running from: /usr/share/jenkins/jenkins.war
webroot: EnvVars.masterEnvVars.get("JENKINS_HOME")
2022-06-26 21:02:05.492+0000 [id=1]	INFO	org.eclipse.jetty.util.log.Log#initialized: Logging initialized @549ms to org.eclipse.jetty.util.log.JavaUtilLog
2022-06-26 21:02:05.583+0000 [id=1]	INFO	winstone.Logger#logInternal: Beginning extraction from war file
2022-06-26 21:02:05.613+0000 [id=1]	WARNING	o.e.j.s.handler.ContextHandler#setContextPath: Empty contextPath
2022-06-26 21:02:05.674+0000 [id=1]	INFO	org.eclipse.jetty.server.Server#doStart: jetty-9.4.45.v20220203; built: 2022-02-03T09:14:34.105Z; git: 4a0c91c0be53805e3fcffdcdcc9587d5301863db; jvm 11.0.15+10
2022-06-26 21:02:05.986+0000 [id=1]	INFO	o.e.j.w.StandardDescriptorProcessor#visitServlet: NO JSP Support for /, did not find org.eclipse.jetty.jsp.JettyJspServlet
2022-06-26 21:02:06.020+0000 [id=1]	INFO	o.e.j.s.s.DefaultSessionIdManager#doStart: DefaultSessionIdManager workerName=node0
2022-06-26 21:02:06.020+0000 [id=1]	INFO	o.e.j.s.s.DefaultSessionIdManager#doStart: No SessionScavenger set, using defaults
2022-06-26 21:02:06.021+0000 [id=1]	INFO	o.e.j.server.session.HouseKeeper#startScavenging: node0 Scavenging every 600000ms
2022-06-26 21:02:06.463+0000 [id=1]	INFO	hudson.WebAppMain#contextInitialized: Jenkins home directory: /var/jenkins_home found at: EnvVars.masterEnvVars.get("JENKINS_HOME")
2022-06-26 21:02:06.647+0000 [id=1]	INFO	o.e.j.s.handler.ContextHandler#doStart: Started w.@7cf7aee{Jenkins v2.346.1,/,file:///var/jenkins_home/war/,AVAILABLE}{/var/jenkins_home/war}
2022-06-26 21:02:06.668+0000 [id=1]	INFO	o.e.j.server.AbstractConnector#doStart: Started ServerConnector@4c402120{HTTP/1.1, (http/1.1)}{0.0.0.0:8080}
2022-06-26 21:02:06.669+0000 [id=1]	INFO	org.eclipse.jetty.server.Server#doStart: Started @1727ms
2022-06-26 21:02:06.669+0000 [id=25]	INFO	winstone.Logger#logInternal: Winstone Servlet Engine running: controlPort=disabled
2022-06-26 21:02:06.925+0000 [id=32]	INFO	jenkins.InitReactorRunner$1#onAttained: Started initialization
2022-06-26 21:02:07.214+0000 [id=39]	INFO	jenkins.InitReactorRunner$1#onAttained: Listed all plugins
2022-06-26 21:02:10.781+0000 [id=47]	INFO	jenkins.InitReactorRunner$1#onAttained: Prepared all plugins
2022-06-26 21:02:10.794+0000 [id=35]	INFO	jenkins.InitReactorRunner$1#onAttained: Started all plugins
2022-06-26 21:02:10.803+0000 [id=42]	INFO	jenkins.InitReactorRunner$1#onAttained: Augmented all extensions
WARNING: An illegal reflective access operation has occurred
WARNING: Illegal reflective access by org.codehaus.groovy.vmplugin.v7.Java7$1 (file:/var/jenkins_home/war/WEB-INF/lib/groovy-all-2.4.21.jar) to constructor java.lang.invoke.MethodHandles$Lookup(java.lang.Class,int)
WARNING: Please consider reporting this to the maintainers of org.codehaus.groovy.vmplugin.v7.Java7$1
WARNING: Use --illegal-access=warn to enable warnings of further illegal reflective access operations
WARNING: All illegal access operations will be denied in a future release
2022-06-26 21:02:11.634+0000 [id=30]	INFO	jenkins.InitReactorRunner$1#onAttained: System config loaded
2022-06-26 21:02:11.635+0000 [id=30]	INFO	jenkins.InitReactorRunner$1#onAttained: System config adapted
2022-06-26 21:02:11.642+0000 [id=48]	INFO	jenkins.InitReactorRunner$1#onAttained: Loaded all jobs
2022-06-26 21:02:11.645+0000 [id=46]	INFO	jenkins.InitReactorRunner$1#onAttained: Configuration for all jobs updated
2022-06-26 21:02:11.668+0000 [id=67]	INFO	hudson.model.AsyncPeriodicWork#lambda$doRun$1: Started Download metadata
2022-06-26 21:02:11.675+0000 [id=67]	INFO	hudson.model.AsyncPeriodicWork#lambda$doRun$1: Finished Download metadata. 4 ms
2022-06-26 21:02:11.733+0000 [id=52]	INFO	jenkins.install.SetupWizard#init:

*************************************************************
*************************************************************
*************************************************************

Jenkins initial setup is required. An admin user has been created and a password generated.
Please use the following password to proceed to installation:

3de0910b83894b9294989552e6fa9773

This may also be found at: /var/jenkins_home/secrets/initialAdminPassword

*************************************************************
*************************************************************
*************************************************************

2022-06-26 21:02:22.901+0000 [id=52]	INFO	jenkins.InitReactorRunner$1#onAttained: Completed initialization
2022-06-26 21:02:23.013+0000 [id=24]	INFO	hudson.lifecycle.Lifecycle#onReady: Jenkins is fully up and running
In my case the password is at the bottom, between the stars: 3de0910b83894b9294989552e6fa9773
Can't locate IPC/Run.pm in @INC (@INC contains: /usr/local/lib64/perl5 /usr/local/share/perl5 /usr/lib64/perl5/vendor_perl /usr/share/perl5/vendor_perl /usr/lib64/perl5 /usr/share/perl5 .) at ./check_ipmi_sensor line 35.
BEGIN failed--compilation aborted at ./check_ipmi_sensor line 35.
The solutions is simple.
sudo yum makecache

yum install perl-IPC-Run
You’ll see the list of mirrors and an output similar to this:
In this very long session we went through actual errors in a ZFS pool, we check the Kernel, we remove and reinsert the drive, conduct zpool scrub… in the meantime I talked about Rack, Rack Servers, PSU, redundant components, ECC RAM…
So, I was working on a project and i wanted to test how long a file can be.
The resources I checked, and also the Kernel and C source I reviewed, were pointing that effectively the limit is 255 characters.
But I had one doubt… given that Python 3 String are UTF-8, and that Linux encode by default is UTF-8, will I be able to use 255 characters length, or this will be reduced as the Strings will be encoded as UTF-8 or Unicode?.
So I did a small Proof of Concept.
For the filenames I grabbed a fragment of the translation to English of the book epic book “Tirant lo Blanc” (The White Knight), one of the first books written in Catalan language and the first chivalry novel known in the world. You can download it for free it in:
from carleslibs.fileutils import FileUtils
from colorama import Fore, Back, Style , init


class ColorUtils:

    def __init__(self):
        # For Colorama on Windows
        init()

    def print_error(self, s_text, s_end="\n"):
        """
        Prints errors in Red.
        :param s_text:
        :return:
        """
        print(Fore.RED + s_text)
        print(Style.RESET_ALL, end=s_end)

    def print_success(self, s_text, s_end="\n"):
        """
        Prints errors in Green.
        :param s_text:
        :return:
        """
        print(Fore.GREEN + s_text)
        print(Style.RESET_ALL, end=s_end)

    def print_label(self, s_text, s_end="\n"):
        """
        Prints a label and not the end line
        :param s_text:
        :return:
        """
        print(Fore.BLUE + s_text, end="")
        print(Style.RESET_ALL, end=s_end)

    def return_text_blue(self, s_text):
        """
        Restuns a Text
        :param s_text:
        :return: String
        """
        s_text_return = Fore.BLUE + s_text + Style.RESET_ALL
        return s_text_return


if __name__ == "__main__":

    o_color = ColorUtils()
    o_file = FileUtils()

    s_text = "In the fertile, rich and lovely island of England there lived a most valiant knight, noble by his lineage and much more for his "
    s_text += "courage.  In his great wisdom and ingenuity he had served the profession of chivalry for many years and with a great deal of honor, "
    s_text += "and his fame was widely known throughout the world.  His name was Count William of Warwick.  This was a very strong knight "
    s_text += "who, in his virile youth, had practiced the use of arms, following wars on sea as well as land, and he had brought many "
    s_text += "battles to a successful conclusion."

    o_color.print_label("Erasure Code project by Carles Mateo")
    print()
    print("Task 237 - Proof of Concep of Long File Names, encoded is ASCii, in Linux ext3 and ext4 Filesystems")
    print()
    print("Using as a sample a text based on the translation of Tirant Lo Blanc")
    print("Sample text used:")
    print("-"*30)
    print(s_text)
    print("-" * 30)
    print()
    print("This test uses the OpenSource libraries from Carles Mateo carleslibs")
    print()
    print("Initiating tests")
    print("================")

    s_dir = "task237_tests"

    if o_file.folder_exists(s_dir) is True:
        o_color.print_success("Directory " + s_dir + " already existed, skipping creation")
    else:
        b_success = o_file.create_folder(s_dir)
        if b_success is True:
            o_color.print_success("Directory " + s_dir + " created successfully")
        else:
            o_color.print_error("Directory " + s_dir + " creation failed")
            exit(1)

    for i_length in range(200, 512, 1):
        s_filename = s_dir + "/" + s_text[0:i_length]
        b_success = o_file.write(s_file=s_filename, s_text=s_text)
        s_output = "Writing file length: "
        print(s_output, end="")
        o_color.print_label(str(i_length).rjust(3), s_end="")
        print(" file name: ", end="")
        o_color.print_label(s_filename, s_end="")
        print(": ", end="")
        if b_success is False:
            o_color.print_error("failed", s_end="\n")
            exit(0)
        else:
            o_color.print_success("success", s_end="\n")

    # Note: up to 255 work, 256 fails
I tried this in an Ubuntu Virtual Box VM.
As part of my tests I tried to add a non typical character in English, ASCii >127, like Ç.
When I use ASCii character < 128 (0 to 127) for the filenames in ext3/ext4 and in a ZFS Pool, I can use 255 positions. But when I add characters that are not typical, like the Catalan ç Ç or accents Àí the space available is reduced, suggesting the characters are being encoded:
Ç has value 128 in the ASCii table and ç 135.
I used my Open Source carleslibs and the package colorama.
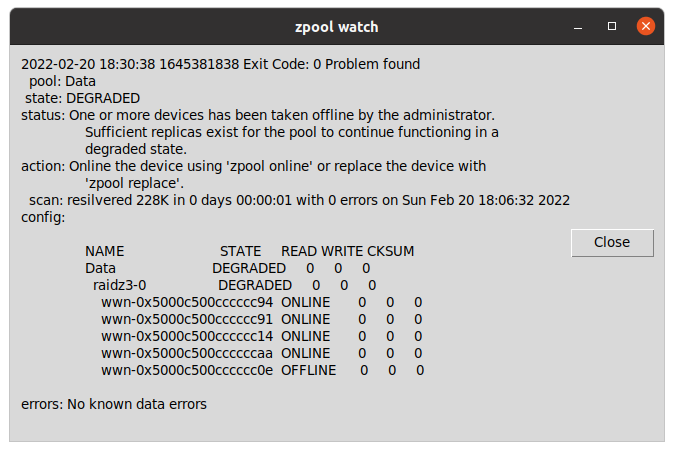
zpool watch is a small Python program for Linux workstations with graphical environment and ZFS, that checks every 30 seconds if your OpenZFS pools are Ok.
If a pool is not healthy, it displays a message in a window using tk inter.
Basically allows you to skip checking from the terminal zpool status continuously or to having to customize the ZED service to send an email and having to figure out how to it can spawn a window alert to the graphical system or what to do if the session has not been initiated.
carleslibs
Since last News from the Blog I’ve released carleslibs v.1.06, v.1.0.5 and v.1.0.4.
v.1.0.6 adds a new class OsUtils to deal with mostly-Linux Os tasks, like knowing the userid, the username, if it’s root, the distribution name and kernel version.
It also adds:
DatetimeUtils.sleep(i_seconds)
In v.1.0.5 I’ve included a new method for getting the Datetime in Unix Epoc format as Integer and increased Code Coverage to 95% for ScreenUtils class.
v. 1.0.4 contains a minor update, a method in StringUtils to escape html from a string.
It uses the library html (part of Python core) so it was small work to do for me to create this method, and the Unit Test for it, but I wanted to use carleslibs in more projects and adding it as core functionality, makes the code of these projects I’m working on, much more clear.
Minor refactors and adding more Code Coverage (Unit Testing), and protection in the code for division per zero when seconds passed as int are 0. (this was not an actual error, but is worth protecting the code just in case for the future)
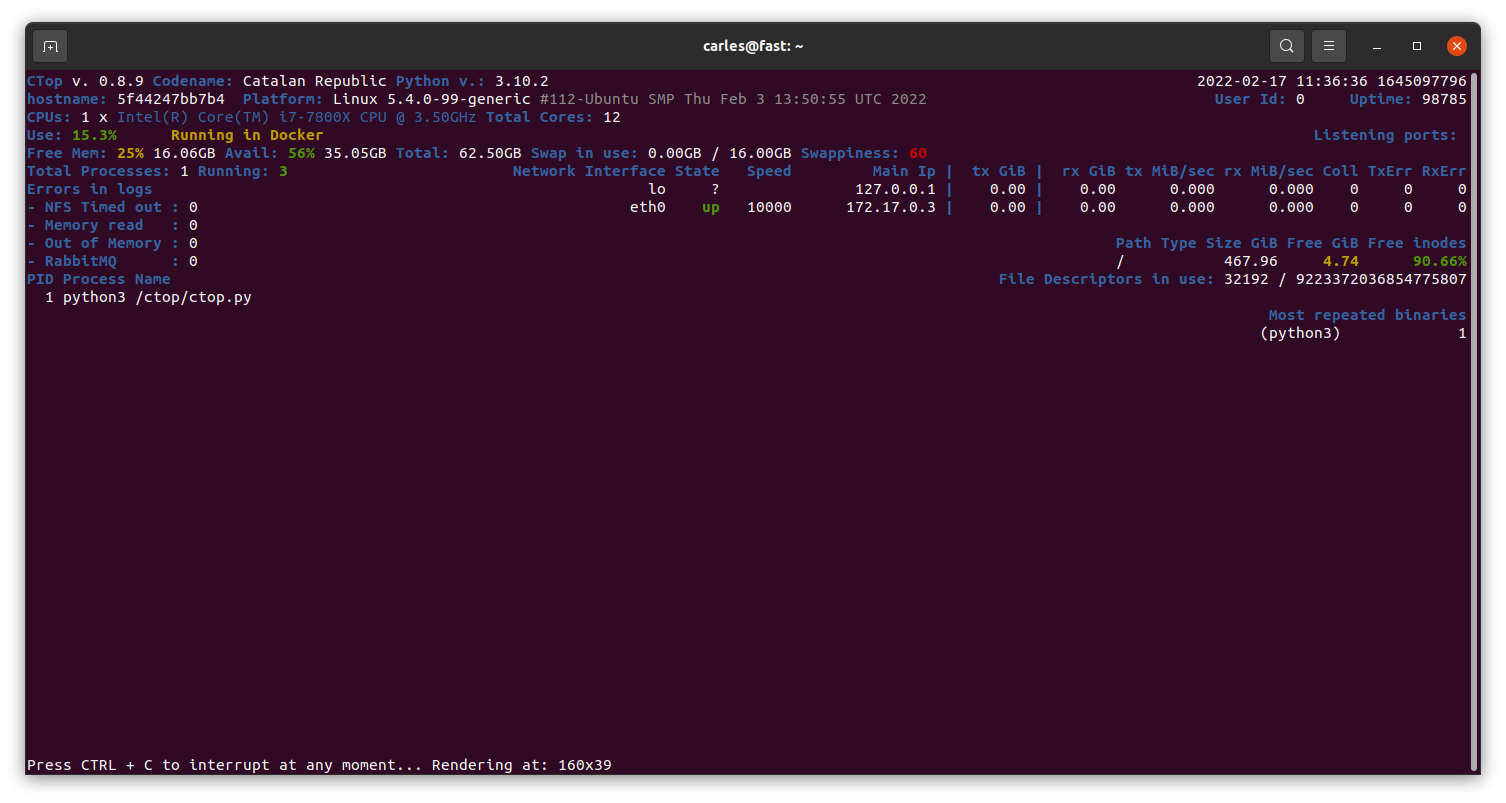
Currently in Master there is a stable version of 0.8.9 mainly fixing https://gitlab.com/carles.mateo/ctop/-/issues/51 which was not detecting when CTOP was running inside a Docker Container (reporting Unable to decode DMI).
My Books
Docker Combat Guide
Added 20 new pages with some tricks, like clearing the logs (1.6GB in my workstation), using some cool tools, using bind mounts and using Docker in Windows from command line without activating Docker Desktop or WSL.
One of my SATA 2TB 2.5″ 5,400 rpm drive got damaged and so was generating errors, so that was a fantastic opportunity to show how to detect and deal with the situation to replace it with a new SATA 2TB 3.5″ 7,200 rpm and fix the pool.
The company sent me the Stein, which is sent to the employees that serve for two years, with a recognition and a celebration called “The Circle of Honor”.
Books purchased
I bought this book as often I discover new ways, better, to explain the things to my students.
Sometimes I buy books for beginners, as I can get explained what I want to do super fast and some times they teach nice tricks that I didn’t know. I have huge Django books, and it took a lot to finish them.
A simpler book may only talk about how to install and work with it under a platform (Windows or Mac, as instance) but it is all that I require as the command to create projects are the same cross platform.
For example, you can get to install and to create a simple project with ORM, connected to the database, very quickly.
Software
So I just discovered that Zoom has an option to draw in the shared screen, like Slack has. It is called Annotate. It is super useful for my classes. :)
Also discovered the icons in the Chat. It seems that not all the video calls accept it.
Hardware
As Working From Home I needed an scanner, I looked in Amazon and all of them were costing more than €200.
I changed my strategy and I bought a All-In-One from HP, which costed me €68.
So I’ll have a scanner and a backup printer, which always comes handy.
The nightmare started after I tried to connect it with Ubuntu.
Ubuntu was not recognizing it. Checking the manuals they force to configure the printer from an Android/iPhone app or from their web page, my understanding is for windows only. In any case I would not install the proprietary drivers in my Linux system.
Annoyed, I installed the Android application, and it was requesting to get Location permissions to configure it. No way. There was not possible to configure the printer without giving GPS/Location permissions to the app, so I cancelled the process.
I grabbed a Windows 10 laptop and plugged the All-in-one through the USB. I ran the wizard to search for Scanners and Printers and was not unable to use my scanner, only to configure as a printer, so I was forced to install HP drivers.
Irritated I did, and they were suggesting to configure the printer so I can print from Internet or from the phone. Thanks HP, you’ll be the next SolarWinds big-security-hole. I said no way, and in order to use the Wifi I have to agree to open that security door which is that the printer would be connected to Internet permanently, sending and receiving information. I said no, I’ll use only via USB.
Even selecting that, in order to scan, the Software forces me to create an account.
Disappointing. HP is doing very big stupid mistakes. They used to be a good company.
Since they stopped doing the drivers in Barcelona years ago, their Software and solutions (not the hardware) went to hell.
I checked the reviews in the App Store and so many people gave them 1 star and have problems… what a shame the way they created this solution.
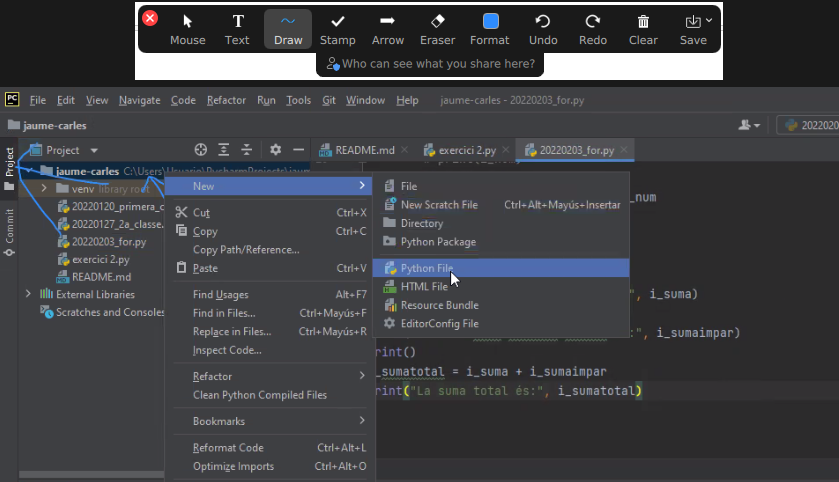
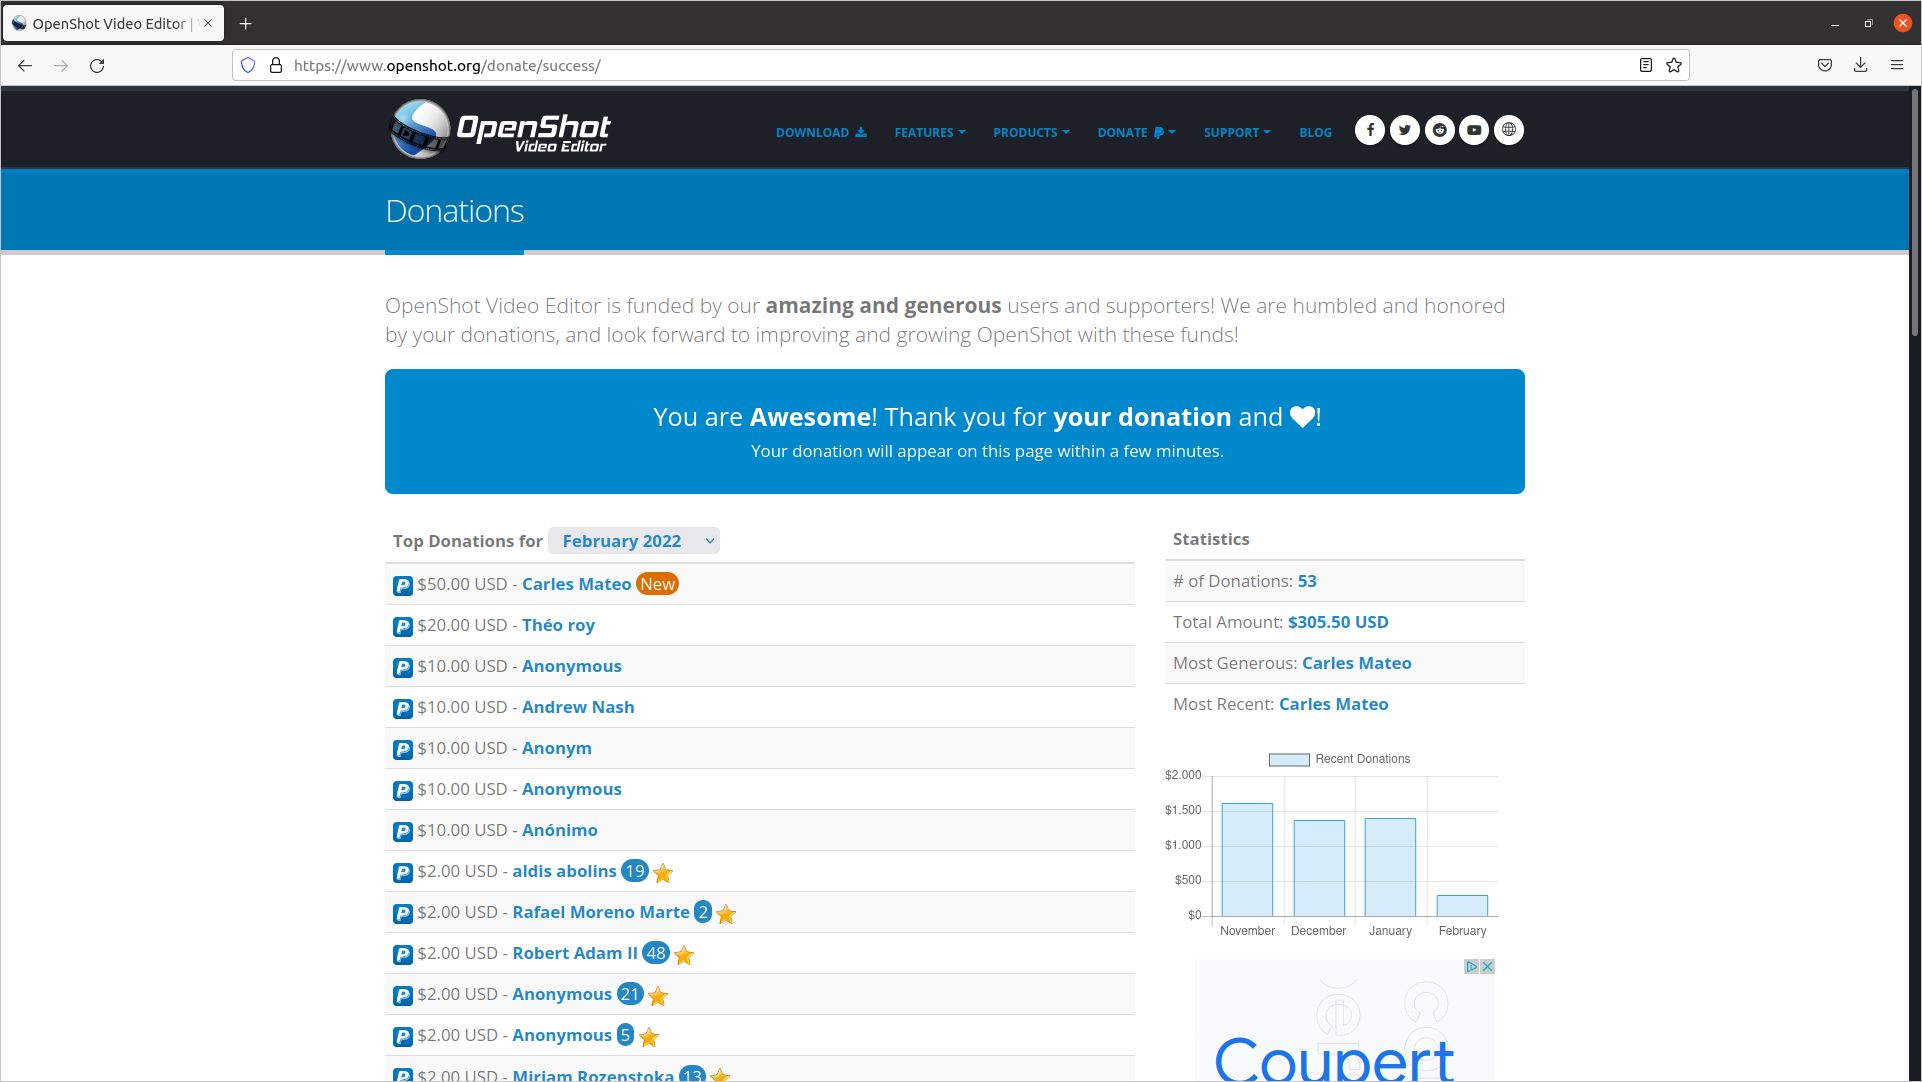
This is a great Open Source, multi-platform editor, so I wanted to support the creator.
Security
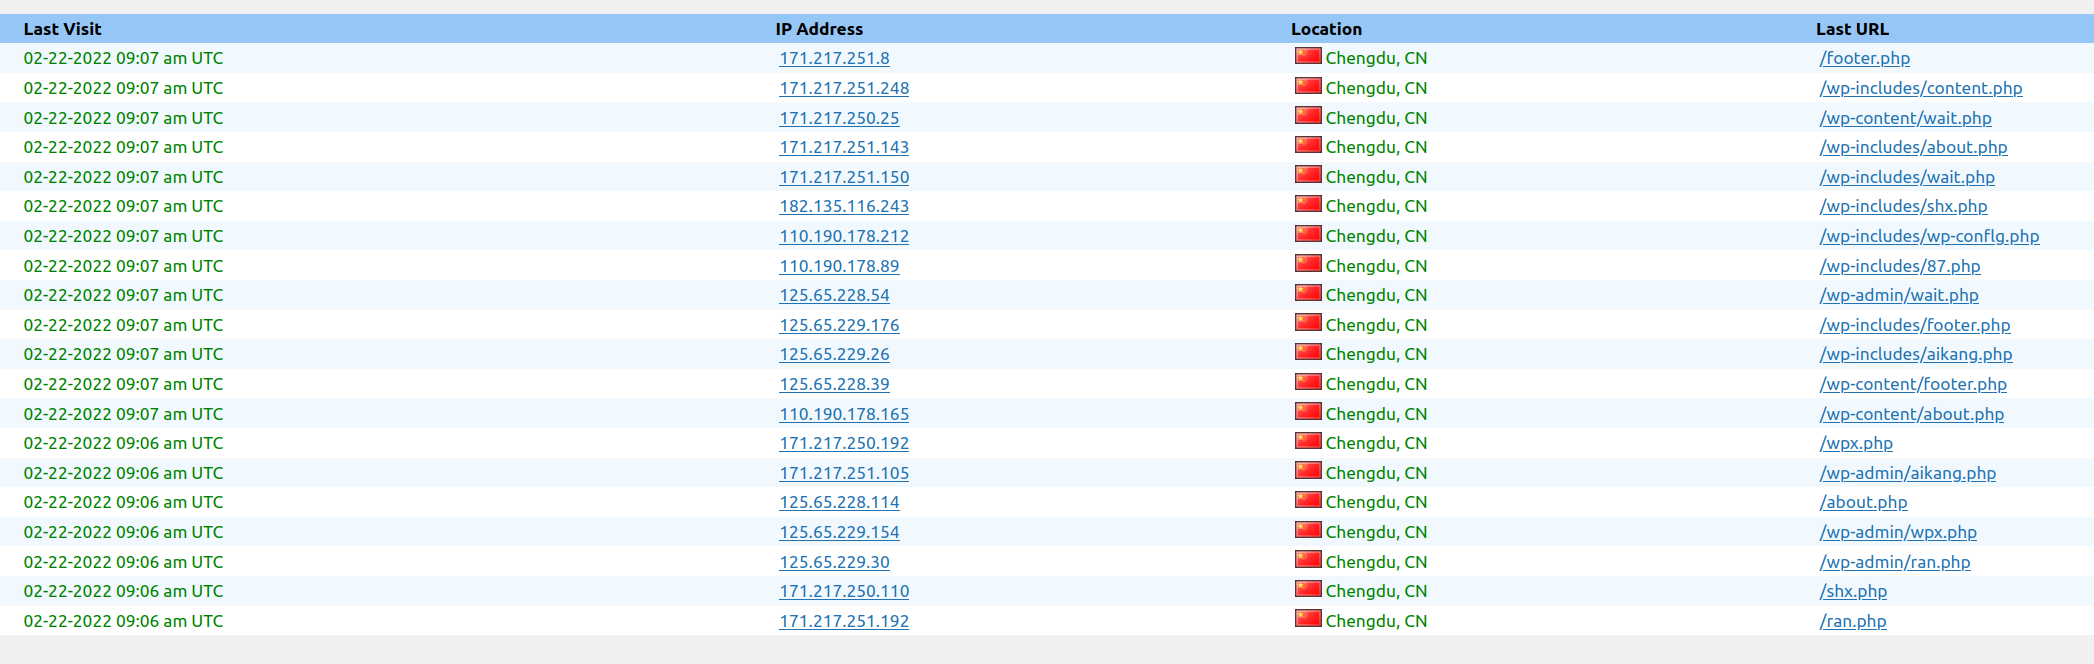
Attacks: looking for exploits
This is just a sample of a set of attacks to the blog in a 3 minutes interval.
Another one this morning:
Now all are blocked in the Firewall.
This is a non stop practice from spammers and pirates that has been going on for years.
It was almost three decades ago, when I was the Linux responsible of an ISP, and I was installing a brand new Linux system connected to a service called “infovia”, at the time when Internet was used with dial-up and modems, and in the interval of time of the installation, it got hacked. I had the Ethernet connected. So then already, this was happening.
The morning I was writing this, I blocked thousands of offending Ip Addresses.
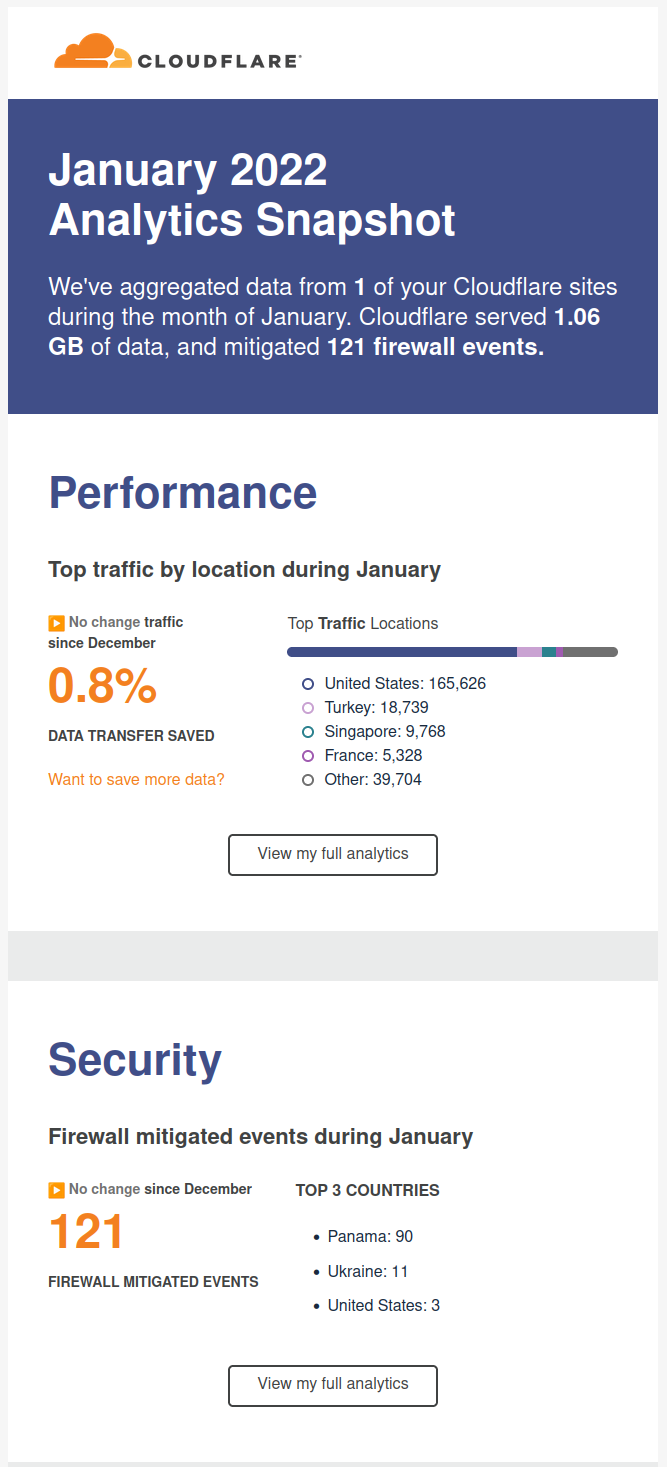
Protection solutions
I recommend you to use CloudFlare, is a CDN/Cache/Accelerator with DoS protection and even in its Free version is really useful.
Fun/Games
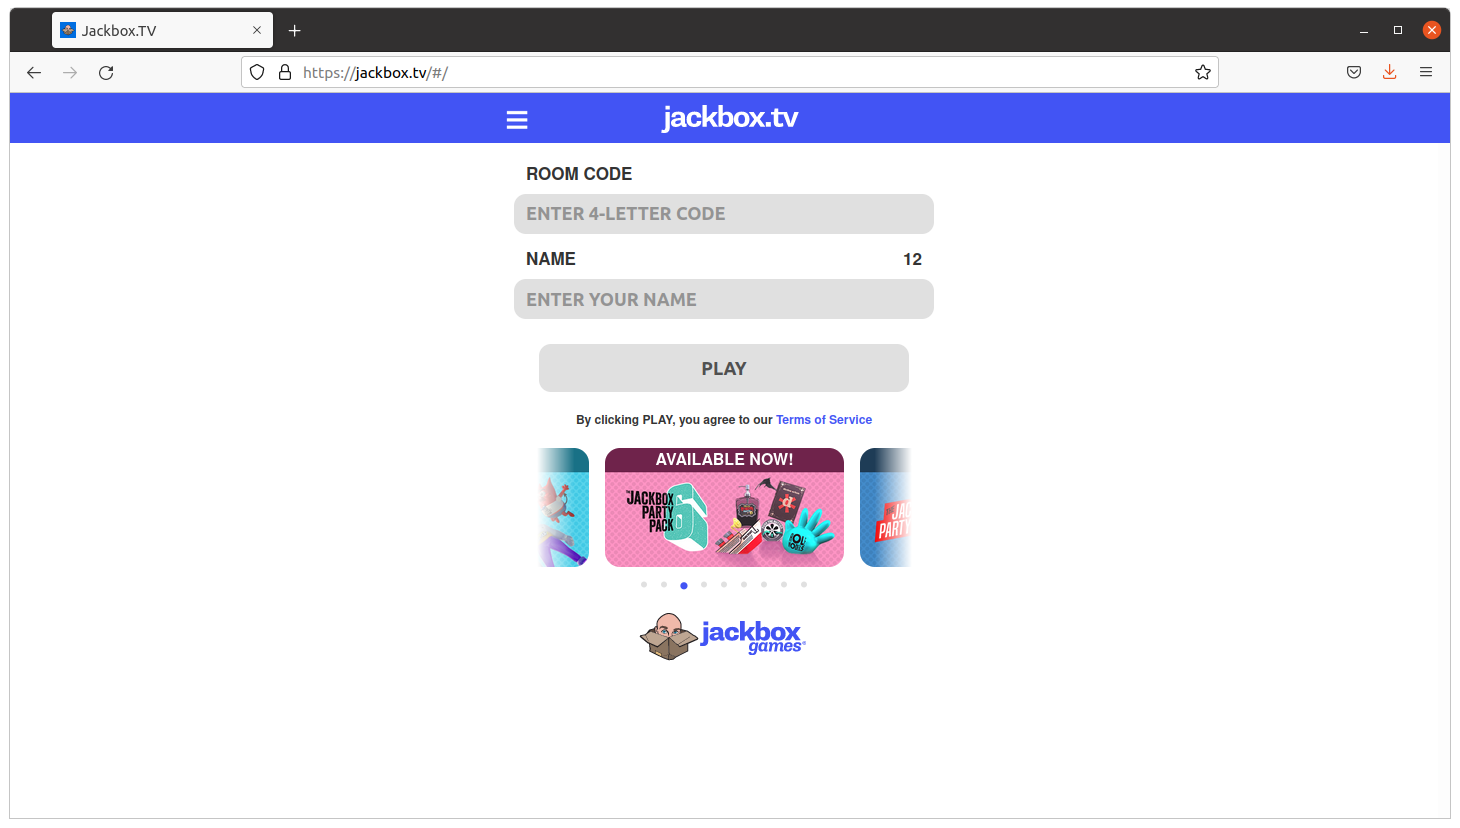
So I come with a game kind of Quiz that you can play with your friends, family or work colleagues working from home (WFH).
The idea is that the master shares screen and sound in Zoom, and then the rest connect to jackbox.tv and enter the code displayed on the master’s screen on their own browser, and an interactive game is started.
It is recommended that the master has two monitors so they can also play.
The games are so fun as a phrase appearing and people having to complete with a lie. If your friends vote your phrase, believing is true, you get points. If you vote the true answer, you get points too.
Very funny and recommendable.
Stuff
<humor>Skynet sent another terminator to end me, but I terminated it. Its processor lays exhibited in my home now</humor>
I bought a laminator.
It has also a ruler and a trimmer to cut the paper.
It was only €39 and I’ve to say that I’m very happy with the results.
It takes around 5 minutes to be ready, it takes to get to the hot-enough temperature, and feeds the pages slowly, around 50 secs a DIN-A4, but the results are worth the time.
I’ve protected my medical receipts and other value documents and the work was perfect. No bubbles at all. No big deal if the plastic covers are introduced not 100% straight. Even if you pass again an already plasticized document, all is good.
Fun
Databases
One of my friends sent me this image.
It is old, but still it’s fun. So it assumes the cameras of the parking or speed cameras, will OCR the plate to build a query, and that the code is not well protected. So basically is exploiting a Sql Injection.
Anybody working on the systems side, and with databases, knows how annoying are those potential situations.