This article can be found in my book Python Combat Guide.

I wrote this code and article in order to help my Python students to mix together Object Oriented Programming, MySql, and Docker.
I prepared this video that walks through the steps and the code:
You can have everything in action with only downloading the code and running the docker_build.sh and docker_run.sh scripts.
You can download the source code from:
https://gitlab.com/carles.mateo/python-mysql-example
and clone with:
git clone https://gitlab.com/carles.mateo/python-mysql-example.git
Installing the MySql driver
We are going to use Oracle’s official MySql driver for Python.
All the documentation is here:
https://dev.mysql.com/doc/connector-python/en/
In order to install we will use pip.
To install it in Ubuntu:
pip install mysql-connector-python
In Mac Os X you have to use pip3 instead of pip.
However we are going to run everything from a Docker Container so the only thing you need is to have installed Docker.
If you prefer to install MySql in your computer (or Virtual Box instance) directly, skip the Docker steps.
Dockerfile
The Dockerfile is the file that Docker uses to build the Docker Container.
Ours is like that:
FROM ubuntu:20.04

MAINTAINER Carles Mateo

ARG DEBIAN_FRONTEND=noninteractive

RUN apt update && apt install -y python3 pip mysql-server vim mc wget curl && apt-get clean

RUN pip install mysql-connector-python

EXPOSE 3306

ENV FOLDER_PROJECT /var/mysql_carles

RUN mkdir -p $FOLDER_PROJECT

COPY docker_run_mysql.sh $FOLDER_PROJECT
COPY start.sql $FOLDER_PROJECT
COPY src $FOLDER_PROJECT

RUN chmod +x /var/mysql_carles/docker_run_mysql.sh

CMD ["/var/mysql_carles/docker_run_mysql.sh"]
The first line defines that we are going to use Ubuntu 20.04 (it’s a LTS version).
We install all the apt packages in a single line, as Docker works in layers, and what is used as disk space in the previous layer is not deleted even if we delete the files, so we want to run apt update, install all the packages, and clean the temporal files in one single step.
I also install some useful tools like: vim, mc, less, wget and curl.
We expose to outside the port 3306, in case you want to run the Python code from your computer, but having the MySql in the Container.
The last line executes a script that starts the MySql service, creates the table, the user, and add two rows and runs an infinite loop so the Docker does not finish.
build_docker.sh
build_docker.sh is a Bash script that builds the Docker Image for you very easily.
It stops the container and removes the previous image, so your hard drive does not fill with Docker images if you do modifications.
It checks for errors building and it also remembers you how to run and debug the Docker Container.
#!/bin/bash

# Execute with sudo

s_DOCKER_IMAGE_NAME="blog_carlesmateo_com_mysql"

printf "Stopping old image %s\n" "${s_DOCKER_IMAGE_NAME}"
sudo docker stop "${s_DOCKER_IMAGE_NAME}"

printf "Removing old image %s\n" "${s_DOCKER_IMAGE_NAME}"
sudo docker rm "${s_DOCKER_IMAGE_NAME}"

printf "Creating Docker Image %s\n" "${s_DOCKER_IMAGE_NAME}"
sudo docker build -t ${s_DOCKER_IMAGE_NAME} . --no-cache

i_EXIT_CODE=$?
if [ $i_EXIT_CODE -ne 0 ]; then
    printf "Error. Exit code %s\n" ${i_EXIT_CODE}
    exit
fi

echo "Ready to run ${s_DOCKER_IMAGE_NAME} Docker Container"
echo "To run type: sudo docker run -d -p 3306:3306 --name ${s_DOCKER_IMAGE_NAME} ${s_DOCKER_IMAGE_NAME}"
echo "or just use run_in_docker.sh"
echo
echo "Debug running Docker:"
echo "docker exec -it ${s_DOCKER_IMAGE_NAME} /bin/bash"
echo
docker_run.sh
I also provide a script named docker_run.sh that runs your Container easily, exposing the MySql port.
#!/bin/bash

# Execute with sudo

s_DOCKER_IMAGE_NAME="blog_carlesmateo_com_mysql"

docker run -d -p 3306:3306 --name ${s_DOCKER_IMAGE_NAME} ${s_DOCKER_IMAGE_NAME}

echo "Showing running Instances"
docker ps
As you saw before I named the image after blog_carlesmateo_com_mysql.
I did that so basically I wanted to make sure that the name was unique, as the build_docker.sh deletes an image named like the name I choose, I didn’t want to use a generic name like “mysql” that may lead to you to delete the Docker Image inadvertently.
docker_run_mysql.sh
This script will run when the Docker Container is launched for the first time:
#!/bin/bash

# Allow to be queried from outside
sed -i '31 s/bind-address/#bind-address/' /etc/mysql/mysql.conf.d/mysqld.cnf

service mysql start

# Create a Database, a user with password, and permissions
cd /var/mysql_carles
mysql -u root < start.sql

while [ true ]; do sleep 60; done
With sed command we modify the line 31 of the the MySQL config file so we can connect from Outside the Docker Instance (bind-address: 127.0.0.1)
As you can see it executes the SQL contained in the file start.sql as root and we start MySql.
Please note: Our MySql installation has not set a password for root. It is only for Development purposes.
start.sql
The SQL file that will be ran inside our Docker Container.
CREATE DATABASE carles_database;

CREATE USER 'python'@'localhost' IDENTIFIED BY 'blog.carlesmateo.com-db-password';
CREATE USER 'python'@'%' IDENTIFIED BY 'blog.carlesmateo.com-db-password';
GRANT ALL PRIVILEGES ON carles_database.* TO 'python'@'localhost';
GRANT ALL PRIVILEGES ON carles_database.* TO 'python'@'%';

USE carles_database;

CREATE TABLE car_queue (
    i_id_car int,
    s_model_code varchar(25),
    s_color_code varchar(25),
    s_extras varchar(100),
    i_right_side int,
    s_city_to_ship varchar(25)
);

INSERT INTO car_queue (i_id_car, s_model_code, s_color_code, s_extras, i_right_side, s_city_to_ship) VALUES (1, "GOLF2021", "BLUE7", "COND_AIR, GPS, MULTIMEDIA_V3", 0, "Barcelona");
INSERT INTO car_queue (i_id_car, s_model_code, s_color_code, s_extras, i_right_side, s_city_to_ship) VALUES (2, "GOLF2021_PLUGIN_HYBRID", "BLUEMETAL_5", "COND_AIR, GPS, MULTIMEDIA_V3, SECURITY_V5", 1, "Cork");
As you can see it creates the user “python” with the password ‘blog.carlesmateo.com-db-password’ for access local and remote (%).
It also creates a Database named carles_database and grants all the permissions to the user “python”, for local and remote.
This is the user we will use to authenticate from out Python code.
Then we switch to use the carles_database and we create the car_queue table.
We insert two rows, as an example.
select_values_example.py
Finally the Python code that will query the Database.
import mysql.connector

if __name__ == "__main__":
    o_conn = mysql.connector.connect(user='python', password='blog.carlesmateo.com-db-password', database='carles_database')
    o_cursor = o_conn.cursor()

    s_query = "SELECT * FROM car_queue"

    o_cursor.execute(s_query)

    for a_row in o_cursor:
        print(a_row)

    o_cursor.close()
    o_conn.close()
Nothing special, we open a connection to the MySql and perform a query, and parse the cursor as rows/lists.
Please note: Error control is disabled so you may see any exception.
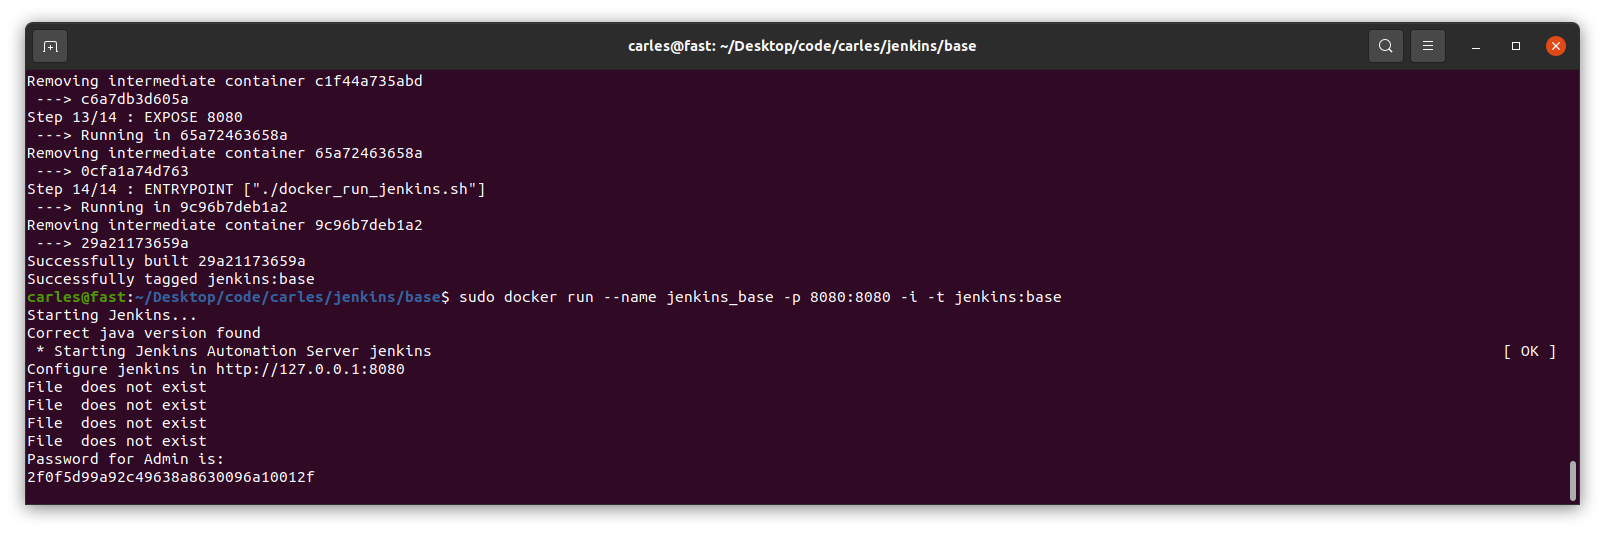
Executing the Container
First step is to build the Container.
From the directory where you cloned the project, execute:
sudo ./build_docker.sh
Then run the Docker Container:
sudo ./docker_run.sh
The script also performs a docker ps command, so you can see that it’s running.
Entering the Container and running the code
Now you can enter inside the Docker Container:
docker exec -it blog_carlesmateo_com_mysql /bin/bashThen change to the directory where I installed the sample files:
cd /var/mysql_carlesAnd execute the Python 3 example:
python3 select_values_example.py
Tying together MySql and a Python Menu with Object Oriented Programming
In order to tie all together, and specially to give a consistent view to my students, to avoid showing only pieces but a complete program, and to show a bit of Objects Oriented in action I developed a small program which simulates the handling of a production queue for Volkswagen.
MySQL Library
First I created a library to handle MySQL operations.
lib/mysqllib.py
import mysql.connector


class MySql():

    def __init__(self, s_user, s_password, s_database, s_host="127.0.0.1", i_port=3306):
        self.s_user = s_user
        self.s_password = s_password
        self.s_database = s_database
        self.s_host = s_host
        self.i_port = i_port

        o_conn = mysql.connector.connect(host=s_host, port=i_port, user=s_user, password=s_password, database=s_database)
        self.o_conn = o_conn

    def query(self, s_query):
        a_rows = []

        o_cursor = self.o_conn.cursor()

        o_cursor.execute(s_query)

        for a_row in o_cursor:
            a_rows.append(a_row)

        o_cursor.close()

        return a_rows

    def insert(self, s_query):

        o_cursor = self.o_conn.cursor()

        o_cursor.execute(s_query)
        i_inserted_row_count = o_cursor.rowcount

        # Make sure data is committed to the database
        self.o_conn.commit()

        return i_inserted_row_count

    def delete(self, s_query):

        o_cursor = self.o_conn.cursor()

        o_cursor.execute(s_query)
        i_deleted_row_count = o_cursor.rowcount

        # Make sure data is committed to the database
        self.o_conn.commit()

        return i_deleted_row_count


    def close(self):

        self.o_conn.close()
Basically when this class is instantiated, a new connection to the MySQL specified in the Constructor is established.
We have a method query() to send SELECT queries.
We have a insert method, to send INSERT, UPDATE queries that returns the number of rows affected.
This method ensures to perform a commit to make sure changes persist.
We have a delete method, to send DELETE Sql queries that returns the number of rows deleted.
We have a close method which closes the MySql connection.
A Data Object: CarDO
Then I’ve defined a class, to deal with Data and interactions of the cars.
do/cardo.py
class CarDO():

    def __init__(self, i_id_car=0, s_model_code="", s_color_code="", s_extras="", i_right_side=0, s_city_to_ship=""):
        self.i_id_car = i_id_car
        self.s_model_code = s_model_code
        self.s_color_code = s_color_code
        self.s_extras = s_extras
        self.i_right_side = i_right_side
        self.s_city_to_ship = s_city_to_ship

        # Sizes for render
        self.i_width_id_car = 6
        self.i_width_model_code = 25
        self.i_width_color_code = 25
        self.i_width_extras = 50
        self.i_width_side = 5
        self.i_width_city_to_ship = 15

    def print_car_info(self):
        print("Id:", self.i_id_car)
        print("Model Code:", self.s_model_code)
        print("Color Code:", self.s_color_code)
        print("Extras:", self.s_extras)
        s_side = self.get_word_for_driving_side()
        print("Drive by side:", s_side)
        print("City to ship:", self.s_city_to_ship)

    def get_word_for_driving_side(self):
        if self.i_right_side == 1:
            s_side = "Right"
        else:
            s_side = "Left"

        return s_side

    def get_car_info_for_list(self):

        s_output = str(self.i_id_car).rjust(self.i_width_id_car) + " "
        s_output += self.s_model_code.rjust(self.i_width_model_code) + " "
        s_output += self.s_color_code.rjust(self.i_width_color_code) + " "
        s_output += self.s_extras.rjust(self.i_width_extras) + " "
        s_output += self.get_word_for_driving_side().rjust(self.i_width_side) + " "
        s_output += self.get_s_city_to_ship().rjust(self.i_width_city_to_ship)

        return s_output

    def get_car_header_for_list(self):
        s_output = str("Id Car").rjust(self.i_width_id_car) + " "
        s_output += "Model Code".rjust(self.i_width_model_code) + " "
        s_output += "Color Code".rjust(self.i_width_color_code) + " "
        s_output += "Extras".rjust(self.i_width_extras) + " "
        s_output += "Drive".rjust(self.i_width_side) + " "
        s_output += "City to Ship".rjust(self.i_width_city_to_ship)

        i_total_length = self.i_width_id_car + self.i_width_model_code + self.i_width_color_code + self.i_width_extras + self.i_width_side + self.i_width_city_to_ship
        # Add the space between fields
        i_total_length = i_total_length + 5

        s_output += "\n"
        s_output += "=" * i_total_length

        return s_output

    def get_i_id_car(self):
        return self.i_id_car

    def get_s_model_code(self):
        return self.s_model_code

    def get_s_color_code(self):
        return self.s_color_code

    def get_s_extras(self):
        return self.s_extras

    def get_i_right_side(self):
        return self.i_right_side

    def get_s_city_to_ship(self):
        return self.s_city_to_ship
Initially I was going to have a CarDO Object without any logic. Only with Data.
In OOP the variables of the Instance are called Properties, and the functions Methods.
Then I decided to add some logic, so I can show what’s the typical use of the objects.
So I will use CarDO as Data Object, but also to do few functions like printing the info of a Car.
Queue Manager
Finally the main program.
We also use Object Oriented Programming, and we use Dependency Injection to inject the MySQL Instance. That’s very practical to do Unit Testing.
from lib.mysqllib import MySql
from do.cardo import CarDO


class QueueManager():

    def __init__(self, o_mysql):
        self.o_mysql = o_mysql

    def exit(self):
        exit(0)

    def main_menu(self):
        while True:
            print("Main Menu")
            print("=========")
            print("")
            print("1. Add new car to queue")
            print("2. List all cars to queue")
            print("3. View car by Id")
            print("4. Delete car from queue by Id")
            print("")
            print("0. Exit")
            print("")

            s_option = input("Choose your option:")
            if s_option == "1":
                self.add_new_car()
            if s_option == "2":
                self.see_all_cars()
            if s_option == "3":
                self.see_car_by_id()
            if s_option == "4":
                self.delete_by_id()

            if s_option == "0":
                self.exit()

    def get_all_cars(self):
        s_query = "SELECT * FROM car_queue"

        a_rows = self.o_mysql.query(s_query)
        a_o_cars = []

        for a_row in a_rows:
            i_id_car = a_row[0]
            s_model_code = a_row[1]
            s_color_code = a_row[2]
            s_extras = a_row[3]
            i_right_side = a_row[4]
            s_city_to_ship = a_row[5]

            o_car = CarDO(i_id_car=i_id_car, s_model_code=s_model_code, s_color_code=s_color_code, s_extras=s_extras, i_right_side=i_right_side, s_city_to_ship=s_city_to_ship)
            a_o_cars.append(o_car)

        return a_o_cars

    def get_car_by_id(self, i_id_car):
        b_success = False
        o_car = None

        s_query = "SELECT * FROM car_queue WHERE i_id_car=" + str(i_id_car)

        a_rows = self.o_mysql.query(s_query)

        if len(a_rows) == 0:
            # False, None
            return b_success, o_car

        i_id_car = a_rows[0][0]
        s_model_code = a_rows[0][1]
        s_color_code = a_rows[0][2]
        s_extras = a_rows[0][3]
        i_right_side = a_rows[0][4]
        s_city_to_ship = a_rows[0][5]

        o_car = CarDO(i_id_car=i_id_car, s_model_code=s_model_code, s_color_code=s_color_code, s_extras=s_extras, i_right_side=i_right_side, s_city_to_ship=s_city_to_ship)
        b_success = True

        return b_success, o_car

    def replace_apostrophe(self, s_text):
        return s_text.replace("'", "´")

    def insert_car(self, o_car):

        s_sql = """INSERT INTO car_queue
                                (i_id_car, s_model_code, s_color_code, s_extras, i_right_side, s_city_to_ship)
                         VALUES
                                (""" + str(o_car.get_i_id_car()) + ", '" + o_car.get_s_model_code() + "', '" + o_car.get_s_color_code() + "', '" + o_car.get_s_extras() + "', " + str(o_car.get_i_right_side()) + ", '" + o_car.get_s_city_to_ship() + "');"

        i_inserted_row_count = self.o_mysql.insert(s_sql)

        if i_inserted_row_count > 0:
            print("Inserted", i_inserted_row_count, " row/s")
            b_success = True
        else:
            print("It was impossible to insert the row")
            b_success = False

        return b_success

    def add_new_car(self):
        print("Add new car")
        print("===========")

        while True:
            s_id_car = input("Enter new ID: ")
            if s_id_car == "":
                print("A numeric Id is needed")
                continue

            i_id_car = int(s_id_car)

            if i_id_car < 1:
                continue

            # Check if that id existed already
            b_success, o_car = self.get_car_by_id(i_id_car=i_id_car)
            if b_success is False:
                # Does not exist
                break

            print("Sorry, this Id already exists")

        s_model_code = input("Enter Model Code:")
        s_color_code = input("Enter Color Code:")
        s_extras = input("Enter extras comma separated:")
        s_right_side = input("Enter R for Right side driven:")
        if s_right_side.upper() == "R":
            i_right_side = 1
        else:
            i_right_side = 0
        s_city_to_ship = input("Enter the city to ship the car:")

        # Sanitize SQL replacing apostrophe
        s_model_code = self.replace_apostrophe(s_model_code)
        s_color_code = self.replace_apostrophe(s_color_code)
        s_extras = self.replace_apostrophe(s_extras)
        s_city_to_ship = self.replace_apostrophe(s_city_to_ship)

        o_car = CarDO(i_id_car=i_id_car, s_model_code=s_model_code, s_color_code=s_color_code, s_extras=s_extras, i_right_side=i_right_side, s_city_to_ship=s_city_to_ship)
        b_success = self.insert_car(o_car)

    def see_all_cars(self):
        print("")

        a_o_cars = self.get_all_cars()

        if len(a_o_cars) > 0:
            print(a_o_cars[0].get_car_header_for_list())
        else:
            print("No cars in queue")
            print("")
            return

        for o_car in a_o_cars:
            print(o_car.get_car_info_for_list())

        print("")

    def see_car_by_id(self, i_id_car=0):
        if i_id_car == 0:
            s_id = input("Car Id:")
            i_id_car = int(s_id)

        s_id_car = str(i_id_car)

        b_success, o_car = self.get_car_by_id(i_id_car=i_id_car)
        if b_success is False:
            print("Error, car id: " + s_id_car + " not located.")
            return False

        print("")
        o_car.print_car_info()
        print("")

        return True

    def delete_by_id(self):

        s_id = input("Enter Id of car to delete:")
        i_id_car = int(s_id)

        if i_id_car == 0:
            print("Invalid Id")
            return

        # reuse see_car_by_id
        b_found = self.see_car_by_id(i_id_car=i_id_car)
        if b_found is False:
            return

        s_delete = input("Are you sure you want to DELETE. Type Y to delete: ")
        if s_delete.upper() == "Y":
            s_sql = "DELETE FROM car_queue WHERE i_id_car=" + str(i_id_car)
            i_num = self.o_mysql.delete(s_sql)

            print(i_num, " Rows deleted")

            # if b_success is True:
            #     print("Car deleted successfully from the queue")


if __name__ == "__main__":

    try:

        o_mysql = MySql(s_user="python", s_password="blog.carlesmateo.com-db-password", s_database="carles_database", s_host="127.0.0.1", i_port=3306)

        o_queue_manager = QueueManager(o_mysql=o_mysql)
        o_queue_manager.main_menu()
    except KeyboardInterrupt:
        print("Detected CTRL + C. Exiting")
This program talks to MySQL, that we have started in a Docker previously.
We have access from inside the Docker Container, or from outside.
The idea of this simple program is to use a library for dealing with MySql, and objects for dealing with the Cars. The class CarDO contributes to the render of its data in the screen.
To enter inside the Docker once you have generated it and is running, do:
docker exec -it blog_carlesmateo_com_mysql /bin/bashThen:
cd /var/mysql_carles
python3 queue_manager.py
Bonus
I added a file called queue_manager.php so you can see how easy is to render a HTML page with data coming from the Database, from PHP.