This video by Mark Richards writer of Fundamentals of Software Architecture book, about Microservices vs Service Based Architecture is very interesting and short.
Just a bit of common sense and light about complexity in projects, and moving out from the monolith.
I have read a lot of wrong recommendations about the use of Swap and Swappiness so I want to bring some light about it.
The first to say is that every project is different, so it is not possible to make a general rule. However in most of the cases we want systems to operate as fast and efficiently as possible.
So this suggestions try to covert 99% of the cases.
By default Linux will try to be as efficient as possible. So for example, it will use Free Memory to keep IO efficient by keeping in Memory cache and buffers.
That means that if you are using files often, Linux will keep that information cached in RAM.
The swappiness Kernel setting defines what tradeoff will take Linux between keeping buffers with Free Memory and using the available Swap Memory.
# sysctl vm.swappiness
vm.swappiness = 60
The default value is 60 and more or less means that when RAM memory gets to 60%, swap will start to be used.
And so we can find Servers with 256GB of RAM, that when they start to use more than 153 GB of RAM, they start to swap.
Let’s analyze the output of free -h:
carles@vbi78g:~/Desktop/Software/checkswap$ free -h
              total        used        free      shared  buff/cache   available
Mem:          2.9Gi       1.6Gi       148Mi        77Mi       1.2Gi       1.1Gi
Swap:         2.0Gi        27Mi       2.0Gi
So from this VM that has 2.9GB of RAM Memory, 1.6GB are used by applications.
The are 148MB that can immediately used by Applications, and there are 1.2GB in buffers/cache. Does that means that we can only use 148MB (plus swap)?. No, that mean that Linux tried to optimize io speed by keeping 1.2GB of RAM memory in buffers. But this is the best effort of Linux to have performance, for real applications will be also able to use 1.1GB that corresponds to the available field.
About swap, from 2GB, only 27MB have been used.
As vm.swappiness is set to 60, more RAM will be swapped out to swap, even if we have lots available.
As I said every case is different. If we are talking about a Desktop that has NVMe drives, the impact will be low. But if we are talking about a Server that is a hypervisor running VMs and has high usage on CPU and has the swap partition or the swap in a file, that could lead to huge problems. If there is a physical Server with a single spinning drive (or logical unit through RAID), and one partition is for Swap, and the other for mountpoints, and a process is heavily reading/writing to a partition mounted (an elastic search, or a telegraf, prometheus…), and the System tries to swap, then they will be competing for the magnetic head of disk, slowing down everything.
If you take a look on how the process of swapping memory pages from the memory to disk, you will understand that applications may need certain pages before being able to run, so in many cases we get to lock situations, that force everything to wait.
In my career I found Servers that temporarily stopped responding to ping. After a while ping came back, I was able to ssh and uptime showed that the Server did not reboot.
I troubleshooted that, and I saw a combination of high CPU usage spikes and Swap usage.
Using iostat and iotop I monitored what was speed of transference of only 1 MB/second!!.
I even did swapoff and it took one hour to free 4 GB swap partition!.
I also saw swap partition being in a spinning disk, and in another partition of the same spinning drive, having a swapfile. Magnetic spinning drives can only access one are of the drive at the same time, so that situation, using swap is very bad.
And I have seen situations were the swap or swapfile was mounted in a block device shared via network with the Server (like iSCSI or NFS), causing terrible performance when swapping.
So you have to adapt the strategy according to the project.
My preferred strategy for Compute Nodes and NoSQL Databases is to not use swap at all. In other cases, like MySQL Databases I may set swappiness to preferably to 1 or to 10.
The Linux kernel’s swappiness setting defines how aggressively the kernel will swap memory pages versus dropping pages from the page cache. A higher value increases swap aggressiveness, while a lower value tells the kernel to swap as little as possible to disk and favor RAM. The swappiness range is from 0 to 100, and most Linux distributions have swappiness set to 60 by default.
Couchbase Server is optimized with its managed cache to use RAM, and is capable of managing what should be in RAM and what shouldn’t be. Allowing the OS to have too much control over what memory pages are in RAM is likely to lower Couchbase Server’s performance. Therefore, it’s recommended that swappiness be set to the levels listed below.
Another theme, is when you log to a Server and you see all the Swap memory in use.
Linux may have moved the pages that were less used, and that may be Ok for some cases, for example a Cron Service that waits and runs every 24 hours. It is safe to swap that (as long as the swap IO is decent).
When Kernel Swaps it may generate locks.
But if we log to a Server and all the Swap is in use, how can we know that the Swap has been quiet there?.
Well, you can use iostat or iotop or you can:
cat /proc/vmstat
This file contains a lot of values related to Memory, we will focus on:
Paging refers to writing portions, termed pages, of a process’ memory to disk. Swapping, strictly speaking, refers to writing the entire process, not just part, to disk. In Linux, true swapping is exceedingly rare, but the terms paging and swapping often are used interchangeably.
page-out: The system’s free memory is less than a threshold “lotsfree” and unnused / least used pages are moved to the swap area. page-in: One process which is running requested for a page that is not in the current memory (page-fault), it’s pages are being brought back to memory. swap-out: System is thrashing and has deactivated a process and it’s memory pages are moved into the swap area. swap-in: A deactivated process is back to work and it’s pages are being brought into the memory.
Values from /proc/vmstat:
pgpgin, pgpgout – number of pages that are read from disk and written to memory, you usually don’t need to care that much about these numbers
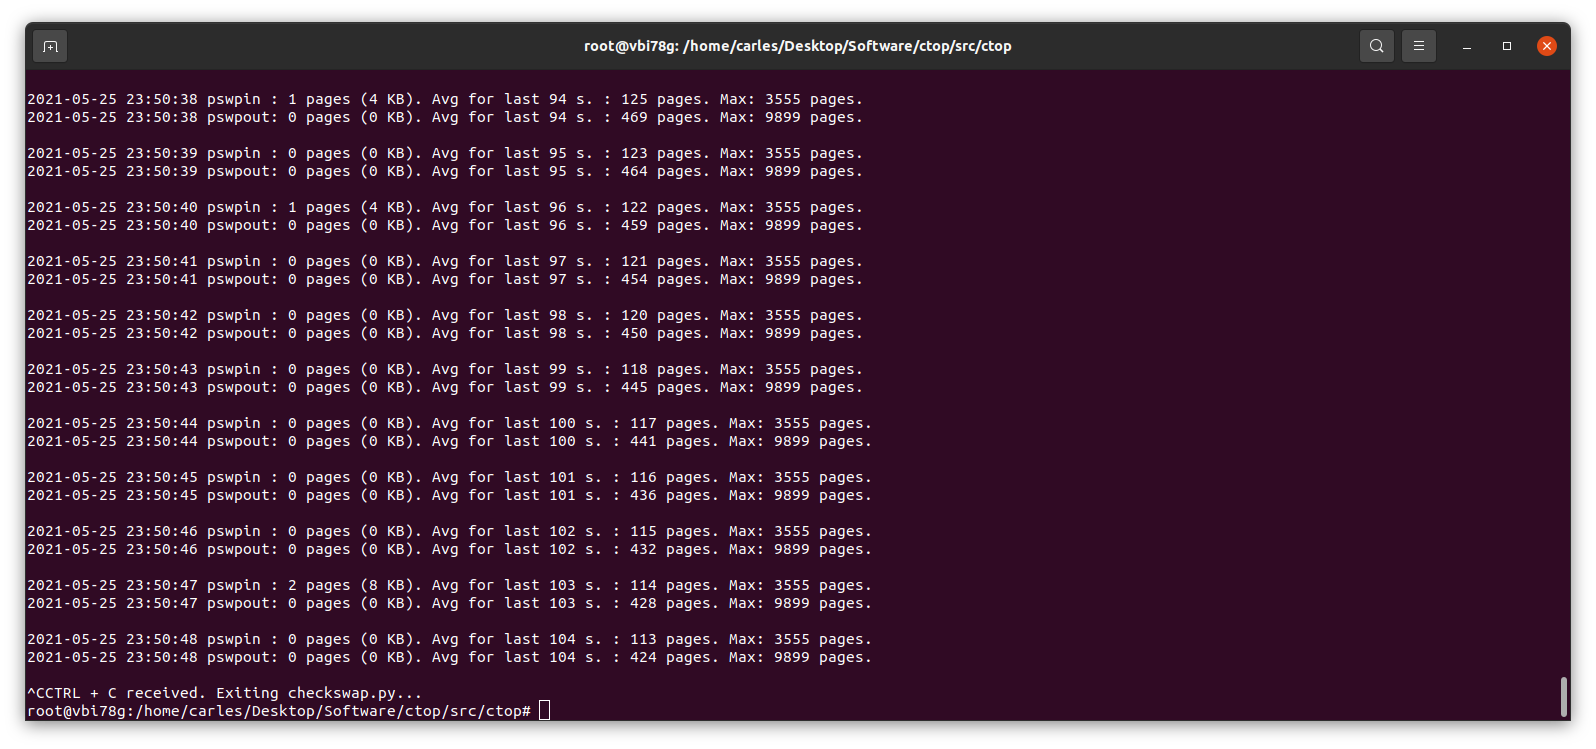
pswpin, pswpout – you may want to track these numbers per time (via some monitoring like prometheus), if there are spikes it means system is heavily swapping and you have a problem.
In this actual example that means that since the start of the Server there has been 508992338 Page Swap In (with 4K memory pages this is 1,941 GB, so almost 2 TB transferred) and for Page Swat Out (with 4K memory pages this is 1,071 GB, so 1 TB of transferred). I’m talking about a Server that had a 4GB swap partition in a spinning disk and a 12 GB swapfile in another ext4 partition of the same spinning disk.
The 16 GB of swap were in use and iotop showed only two sources of IO, one being 2 VMs writing, another was a journaling process writing to the mountpoint where the swapfile was. That was an spinning drive (underlying hardware was raid, for simplicity I refer to one single drive. I checked that both spinning drives were healthy and fast). I saw small variations in the size of the Swap, so I decided to monitor the changes in pswpin and pswpout in /proc/vmstat to see how much was transferred from/to swap.
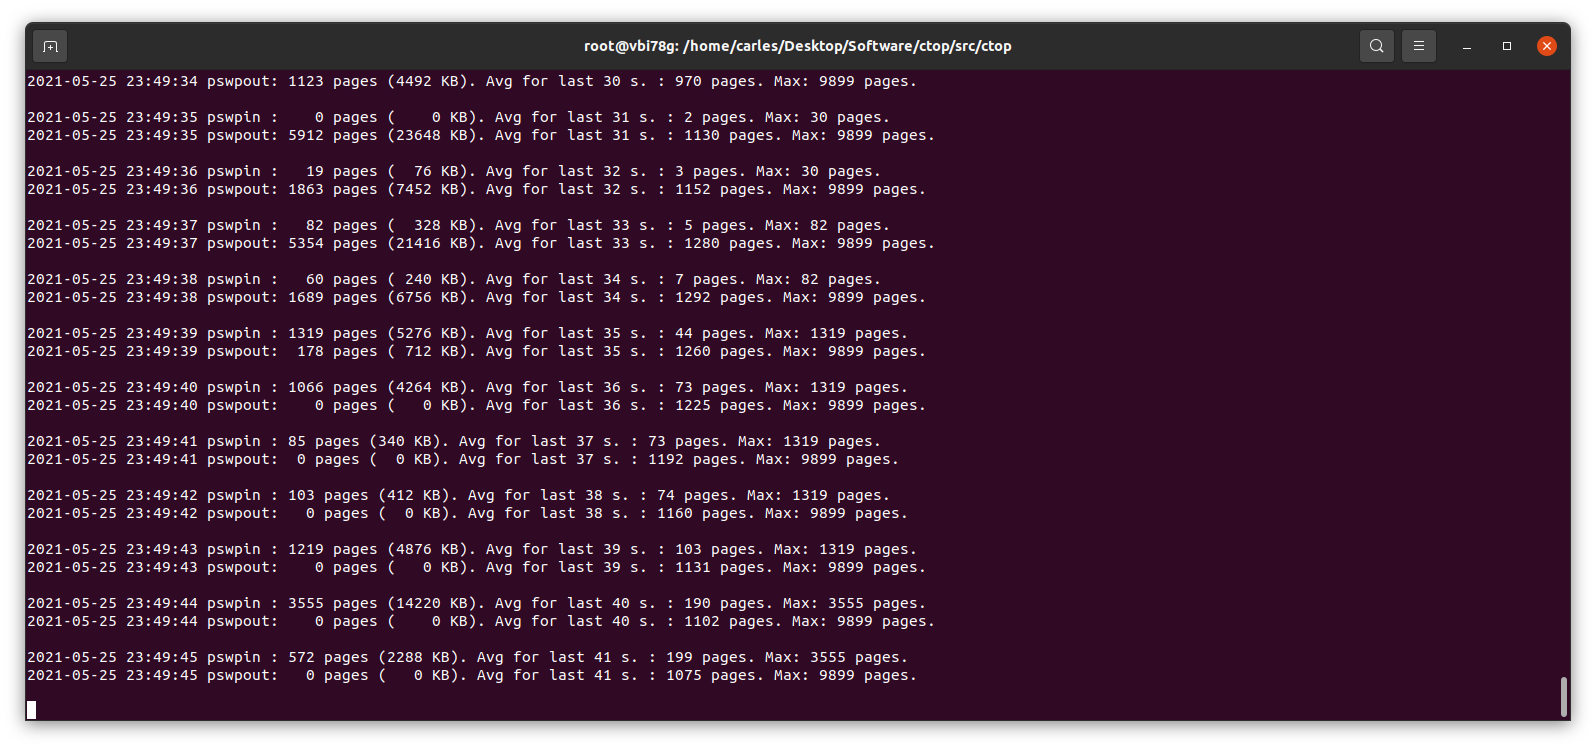
I saw then how many pages were being transferred!.
I wrote a small Python program to track those changes:
This little program works in Python 2 and Python 3, and will show the evolution of pswpin and pswpout in /proc/vmstat and will offer the average for last 5 minutes and keep the max value detected as well.
As those values show the page swaps since the start of the Server, my little program, makes the adjustments to show the Page Swaps per second.
A cheap way to reproduce collapse by using swap is using VirtualBox: install an Ubuntu 20.04 LTS in there, with 2 GB of less of memory, and one single core. Ping that VM from elsewhere.
Then you may run a little program like this in order to force it to swap:
#!/usr/bin/env python3
a_items = []
i_total = 0
# Add zeros if your VM has more memory
for i in range(0, 10000000):
    i_total = i_total + i
    a_items.append(i_total)
And checkswap will show you the spikes:
Many voices are discordant. Some say swappiness default value of 60 is good, as Linux will use the RAM memory to optimize the IO. In my experience, I’ve seen Hypervisors Servers running Virtual Machines that fit on the available physical RAM and were doing pure CPU calculations, no IO, and the Hypervisor was swapping just because it had swappiness to 60. Also having swap on spinning drives, mixing swap partition and swapfile, and that slowing down everything. In a case like that it would be much better not using Swap at all.
In most cases the price of Swapping to disk is much more higher than the advantage than a buffer for IO brings. And in the case of a swapfile, well, it’s also a file, so my suspect is that the swapfile is also buffered. Nothing I recommend, honestly.
My program https://gitlab.com/carles.mateo/checkswap may help you to demonstrate how much damage the swapping is doing in terms of IO. Combine it with iostat and iotop --only to see how much bandwidth is wasted writing and reading from/to swap.
You may run checkswap from a screen session and launch it with tee so results are logged. For example:
python3 checkswap.py | tee 2021-05-27-2107-checkswap.log
If you want to automatically add the datetime you can use:
python3 checkswap.py | tee `date +%Y-%m-%d-%H%M`-checkswap.log
Press CTRL + a and then d, in order to leave the screen session and return to regular Bash.
Type screen -r to resume your session if this was the only screen session running in background.
An interesting reflection from help Ubuntu:
The “diminishing returns” means that if you need more swap space than twice your RAM size, you’d better add more RAM as Hard Disk Drive (HDD) access is about 10³ slower then RAM access, so something that would take 1 second, suddenly takes more then 15 minutes! And still more then a minute on a fast Solid State Drive (SSD)…
I’ve published a new book (is still work in progress at 25%): Python 3 exercises for beginnings. Albert Ballart and Sandra Soriano coauthored with me. Thanks!.
The company has provided me and the members of my Team with unlimited Cloud capacity for testing and developing. That’s very nice. I plan to run some nice workloads to asses the performance of several solutions.
I’ve had tons of assignments from the university and with the classes to my students I had no much time.
The Health Department and the universities (CIT and UCC) offered free PCR for the students. I can only say Kudos again for Ireland.
They also offered certain more vulnerable students to vaccinate with Pfizer. More Kudos.
I bought some cases for Raspberry Pi 4.
I’ve bought a Wi-fi Mesh TP-Link to repeat the Wifi signal to zones of the house it was arriving weak. I’m very satisfied with this signal repeater.
This little buddy also provides an Ethernet to connect to a laptop or to a switch.
So far I have only tested with a laptop and works great.
I also released CTOP TAG v.0.8.4 and fixed some bugs in upcoming CTOP v.0.8.5 and added a new feature to display the File Descriptors in use and the Max FDs set in the Kernel. This feature needed some work as I did calculating all the FDs per process but Kernel has another value that comes from /proc/sys/fs/file-nr so I finally implemented this last value, fixed a bug in conversion of units with decimals (KBs without the decimal part) and added Unit Testing to check this cases. I was satisfied to release v. 0.8.5.
Those are the programs that more or less, I use always in all my Linux workstations.
I use Ubuntu LTS. I like how they maintain the packages.
I like to run the same base version in my Desktops, like I have in the Servers. So if I have my Servers deployed with Ubuntu 20.04 LTS, then my Desktops will run with the same version. Is a way to get to better know the distribution, compatibilities, run faster than the problems, and an easy way to test things. If I have several deployments with several versions (so LTS not upgraded) I may run VMs with that version as Desktop or Server, to ensure compatibility. And obviously I use Docker and a lot of Command Line Tools, which I covered in another article.
Audacity sound recorder and editor
Charles Proxy
Chromium web browser
The Chrome Extension of LastPass for Teams
Filezilla
Firefox
GIMP
IntelliJ
LibreOffice
OpenShot Video Editor
PAC
Packet Tracer from Cisco
PHPStorm
PyCharm
Slack
Skype (usage going down in favor of Zoom and Slack)
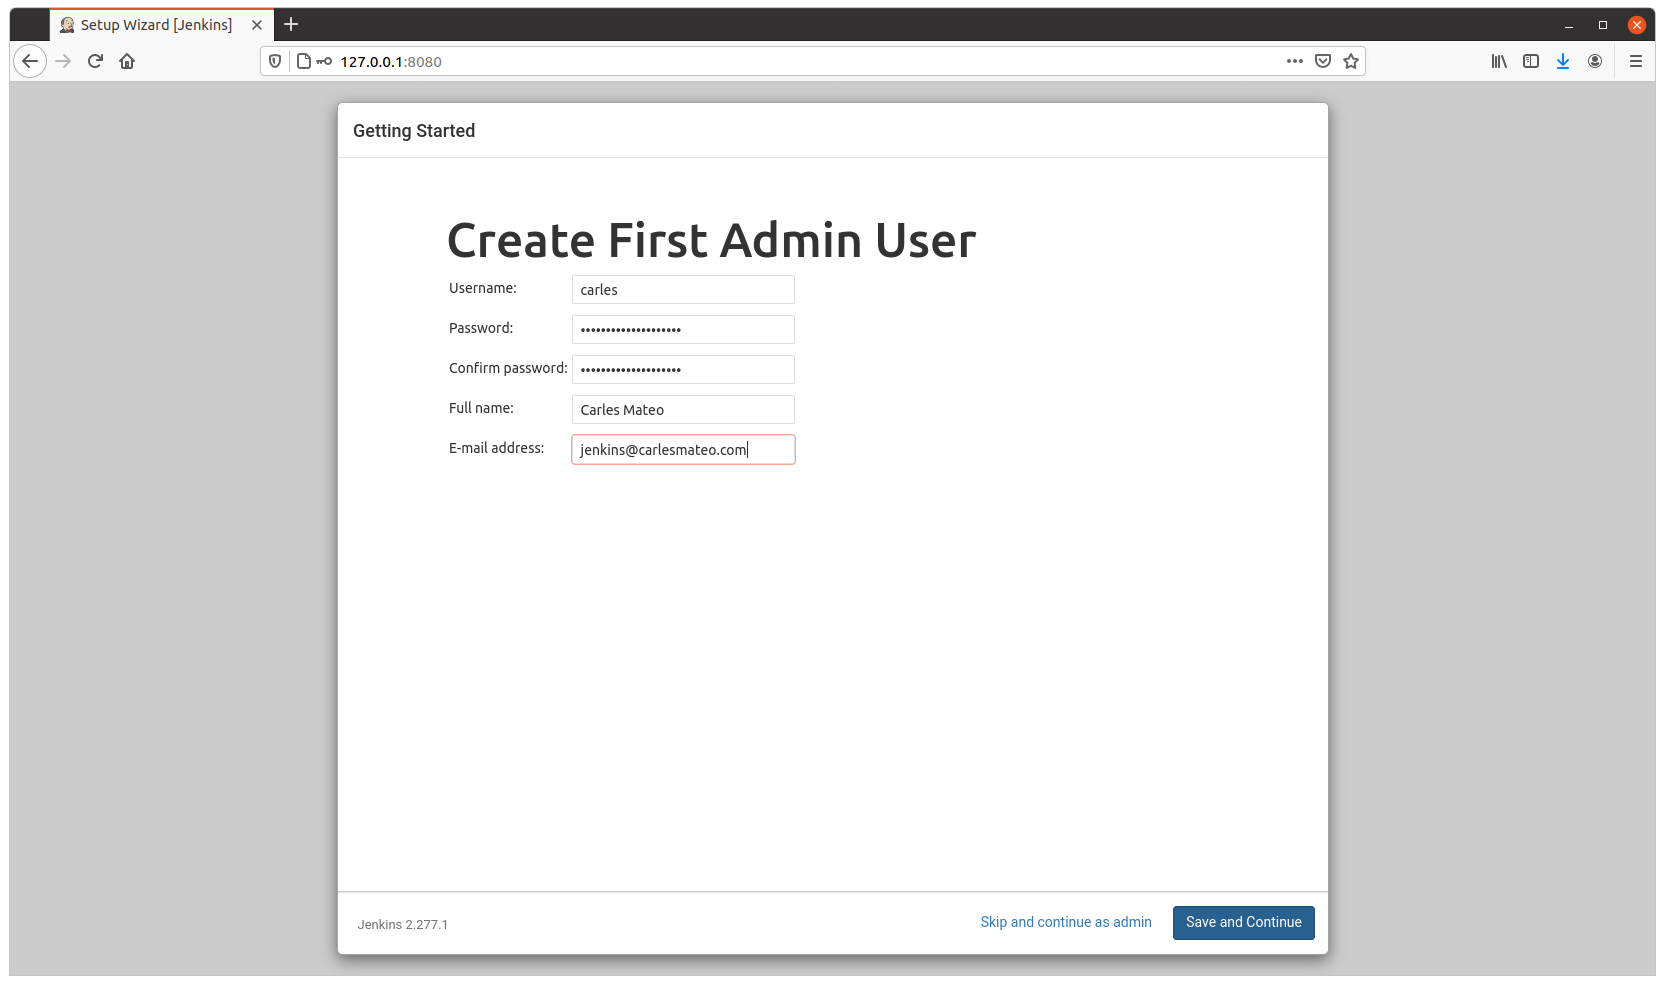
If that fails is very probably that creating a new configuration, for a new user, will make things right.
Update 2022-01-05: Take in count that you will be copying the Windows registry when doing this. I use this trick to clone applications that are no longer downloadable from the Internet. I clone wine to dedicated Virtual Machines. You may need different Virtual Machines for different programs if windows registry is different for them.
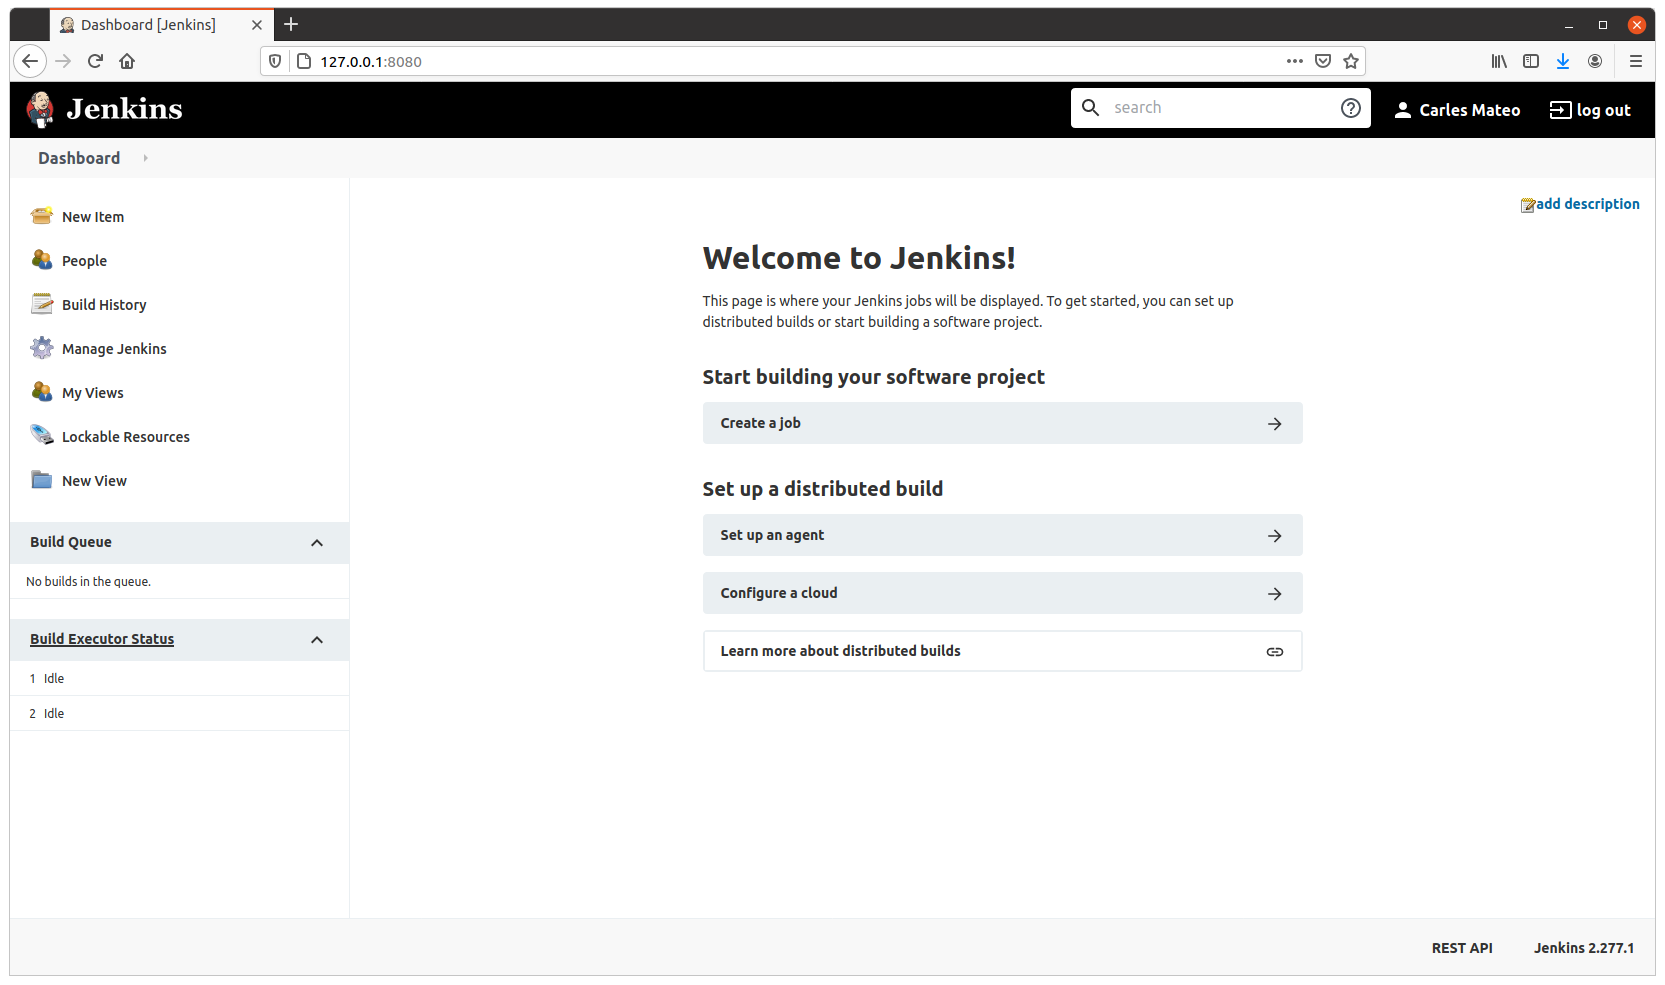
Obviously for companies is a must, but if you work in your own projects, it will be super great that you configure Jenkins, so you have continuous feedback about if something breaks.
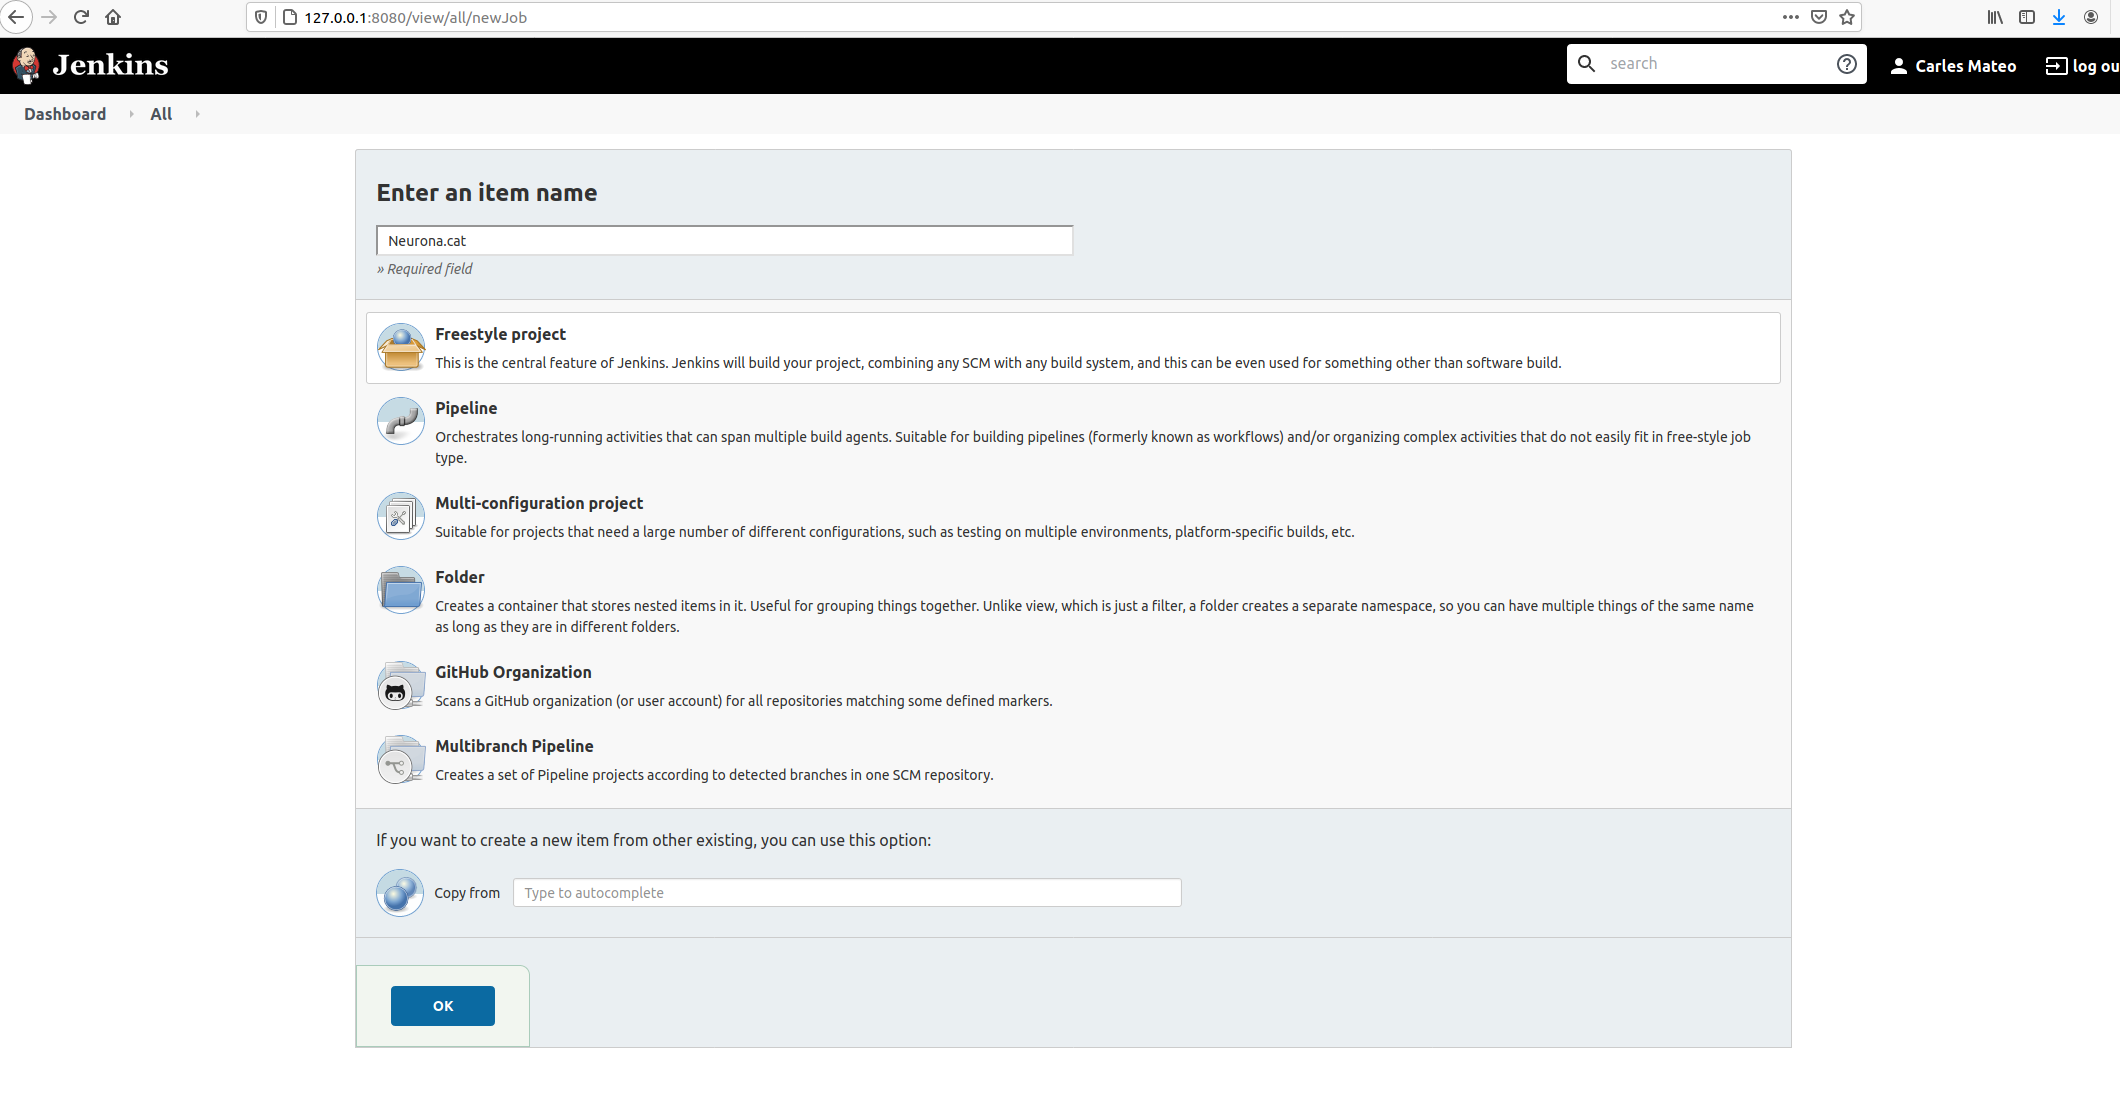
I’ll show you how to configure Jenkins for several projects using only your main computer/laptop.
Then give it an appropriate name and choose Freestyle Project.
Take in count that the name given will be used as the name of the workspace, so you may want to avoid special characters.
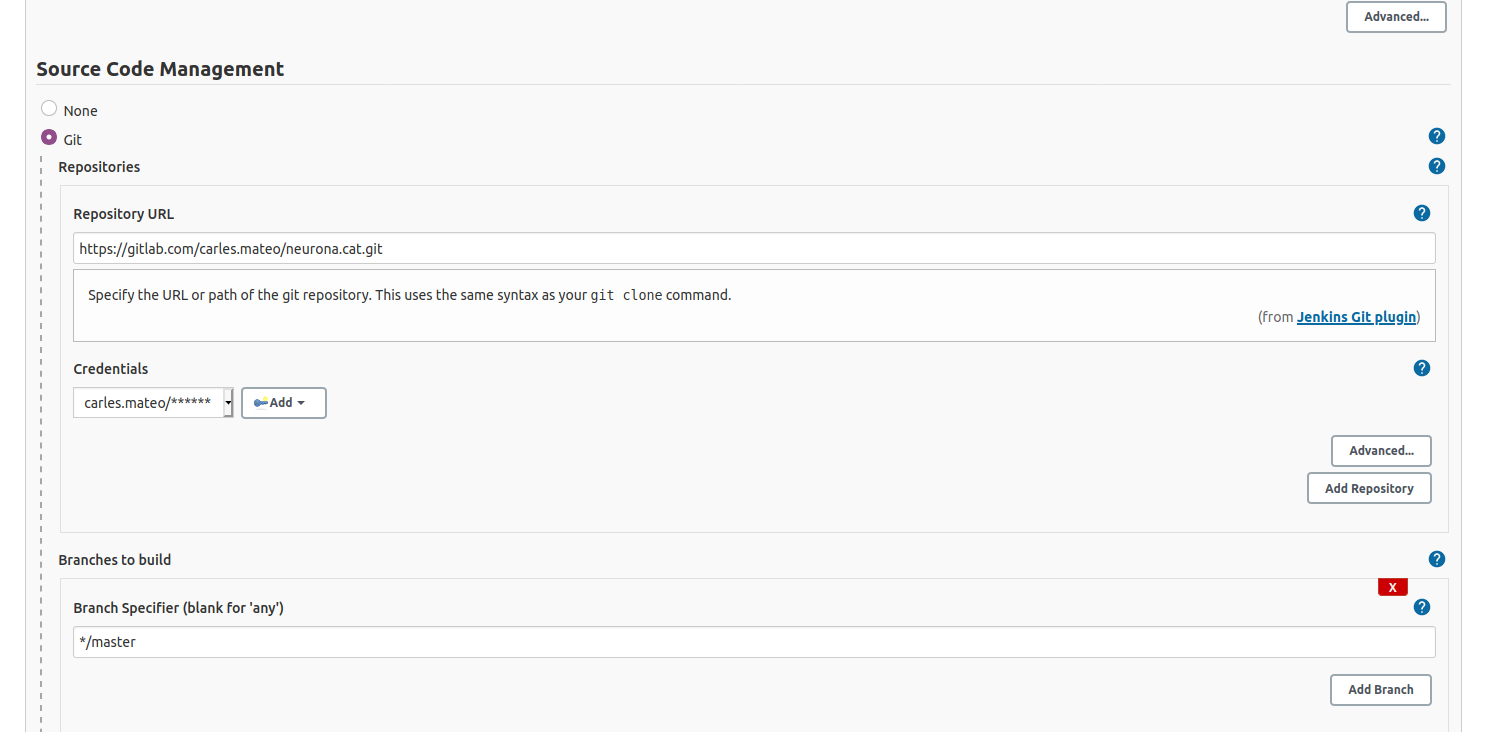
It is very convenient to let Jenkins deal with your repository changes instead of using shell commands. So I’m going to fill this section.
I also provided credentials, so Jenkins can log to my Gitlab.
This kind of project is the most simple and we will use the same Docker Container where Jenkins resides, to run the Unit Testing of our code.
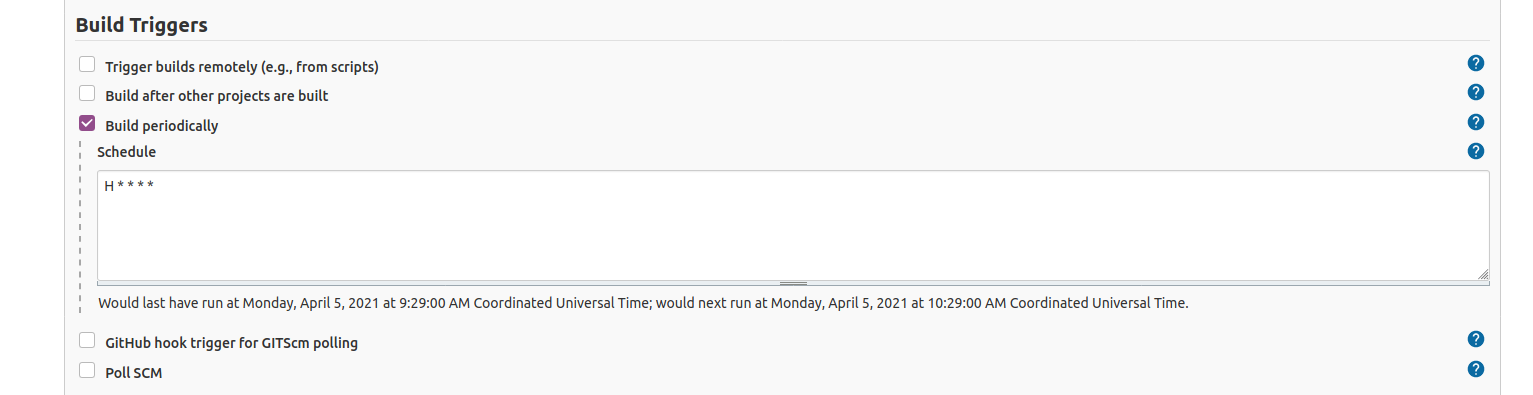
We are going to select to Build periodically.
If your Server is in Internet, you can active the Web Hooks so your Jenkins is noticed via a web connection from GitLab, GitHub or your CVS provider. As I’m strictly running this at home, Jenkins will be periodically check for changes in the repository and do nothing if there are no changes.
I’ll set H * * * * so Jenkins will try every hour.
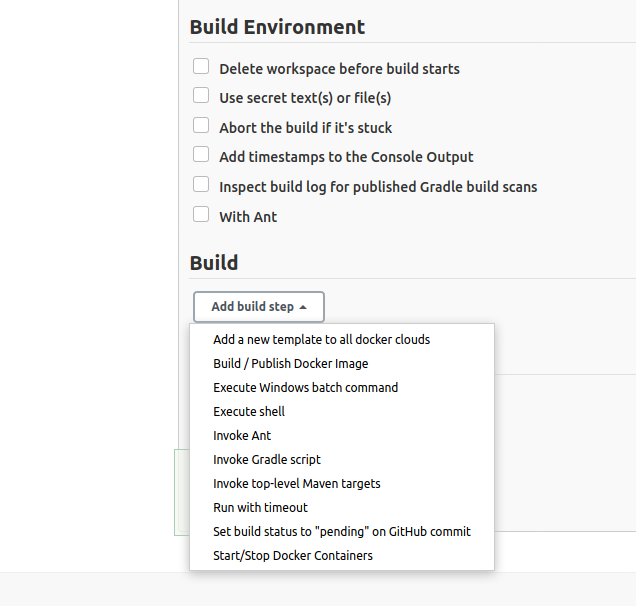
Go down and select Add Build Step:
Select Execute shell.
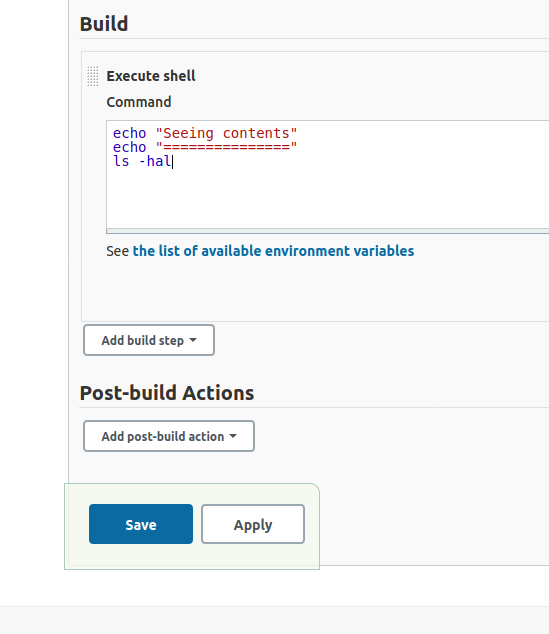
Then add a basic echo command to print in the Console Output, and ls command so you see what is in the default’s directory your shell script is executing in.
Now save your project.
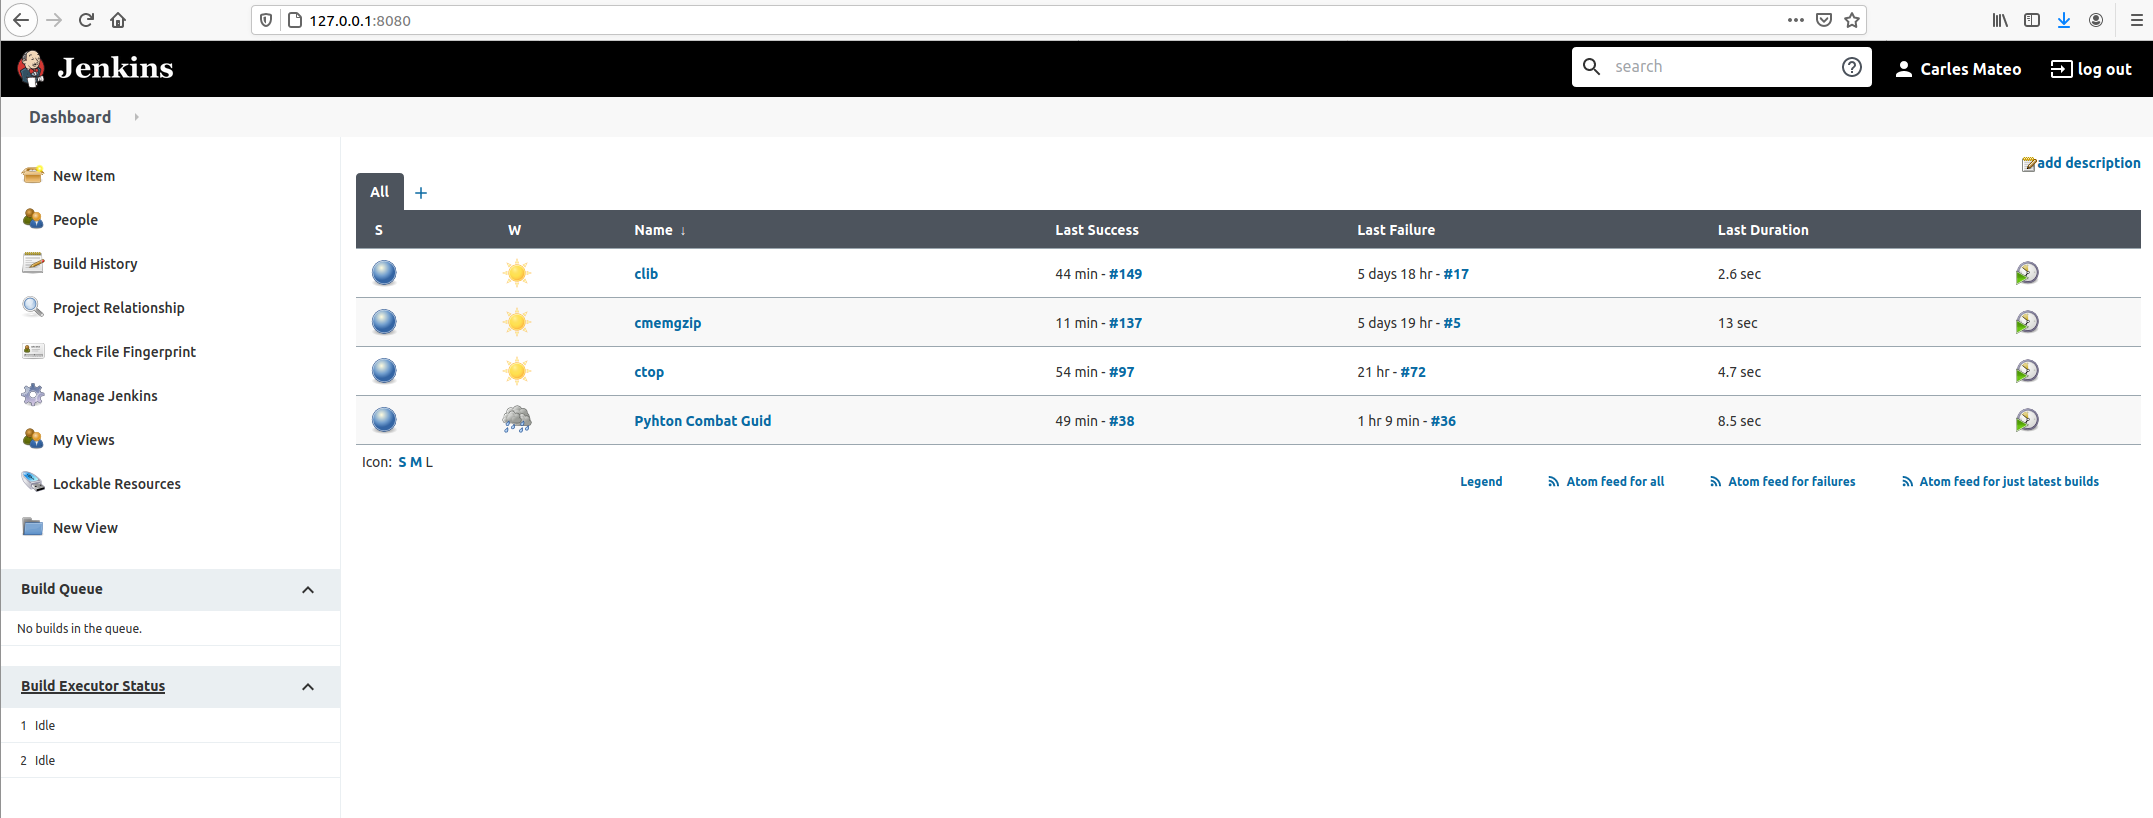
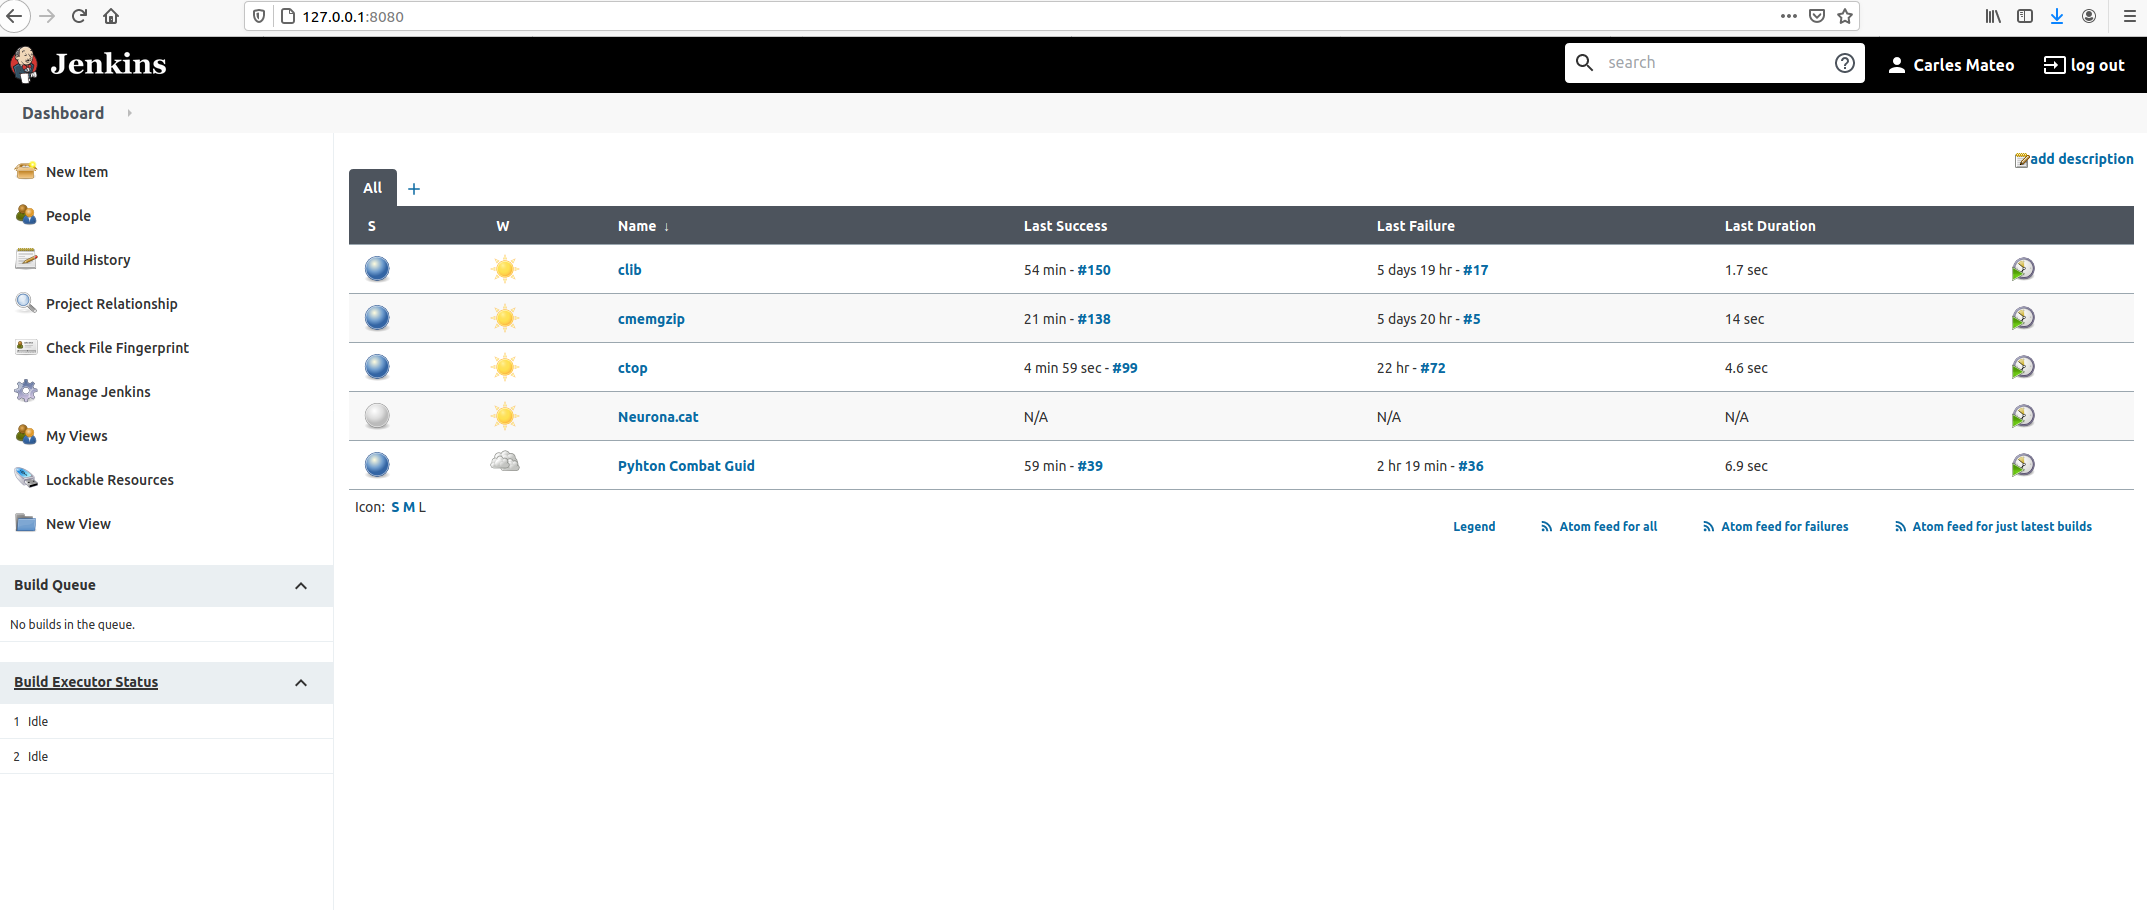
And go back to Dashboard.
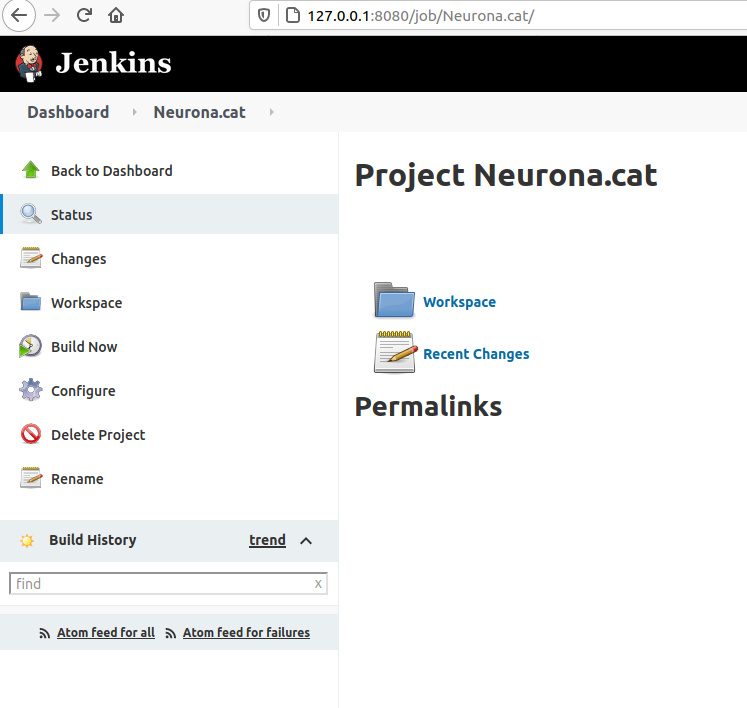
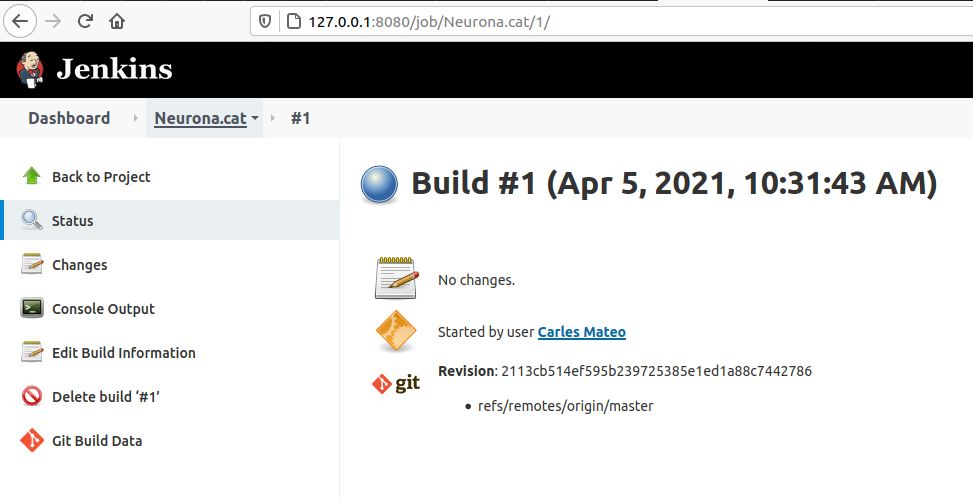
Click inside of Neurona.cat to view Project’s Dashboard.
Click: Build Now. And then click on the Build task (Apr 5, 2021, 10:31 AM)
Click on Console Output.
You’ll see a verbose log of everything that happened.
You’ll see for example that Jenkins has put the script on the path of the git project folder that we instructed before to clone/pull.
This example doesn’t have test. Let’s see one with Unit Test.
Running Unit Testing with pytest
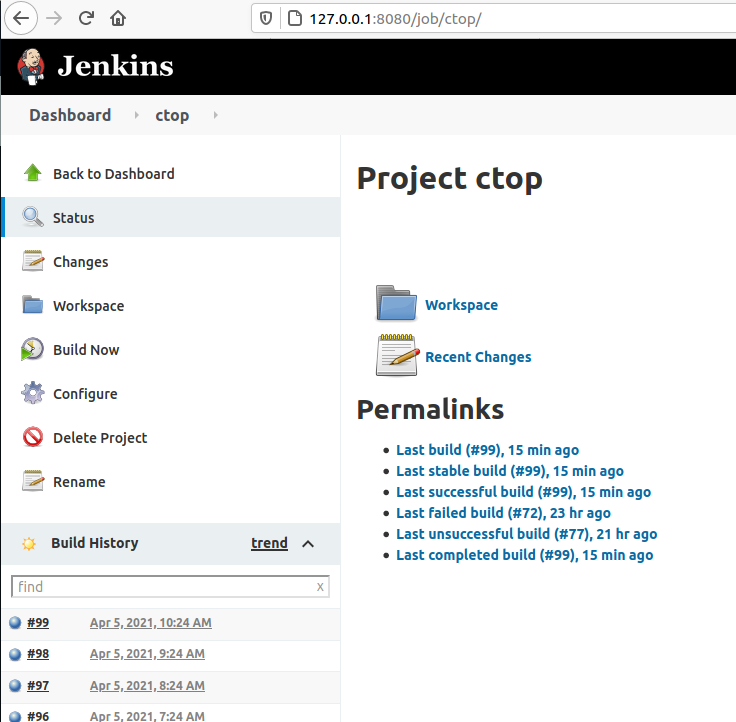
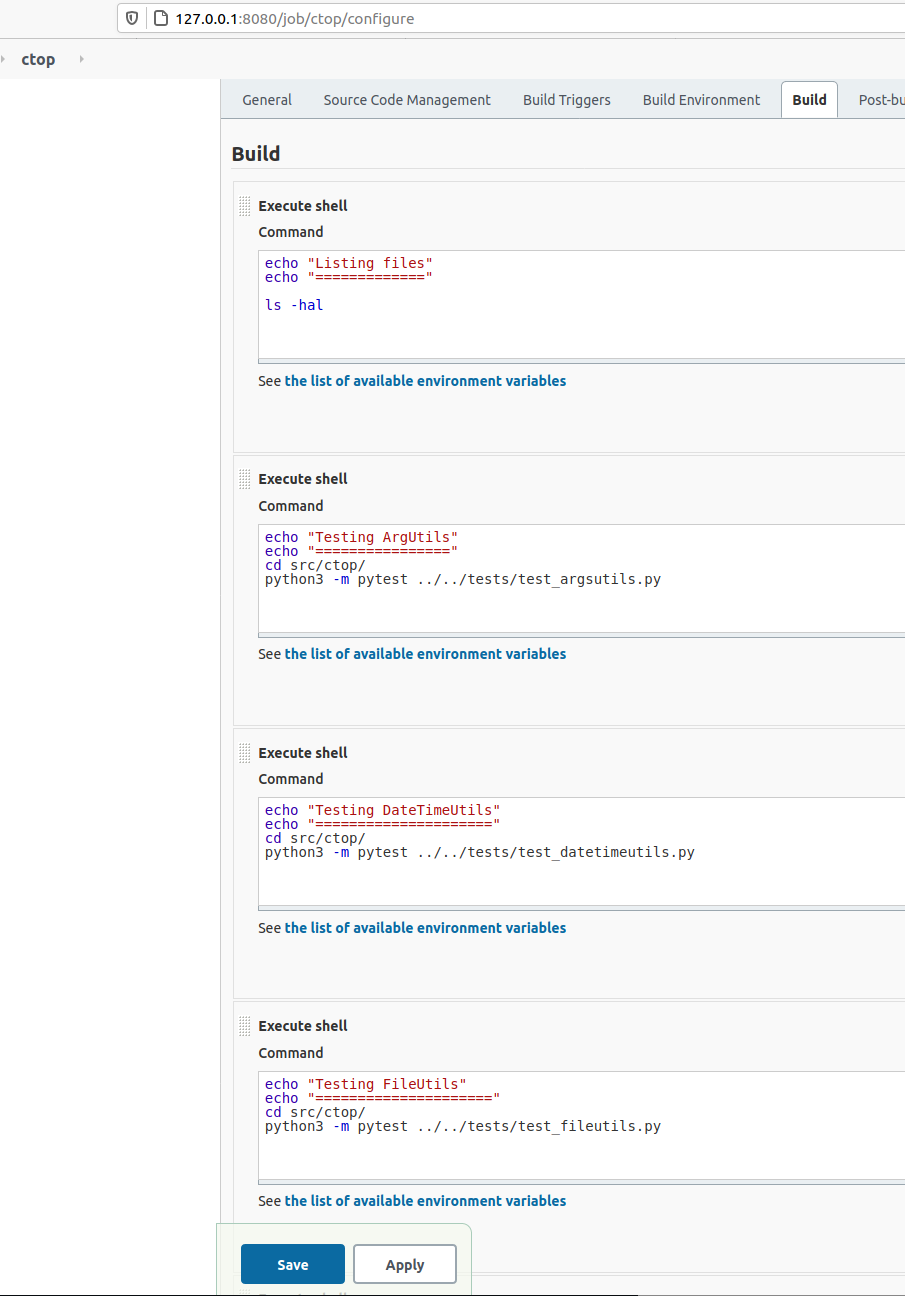
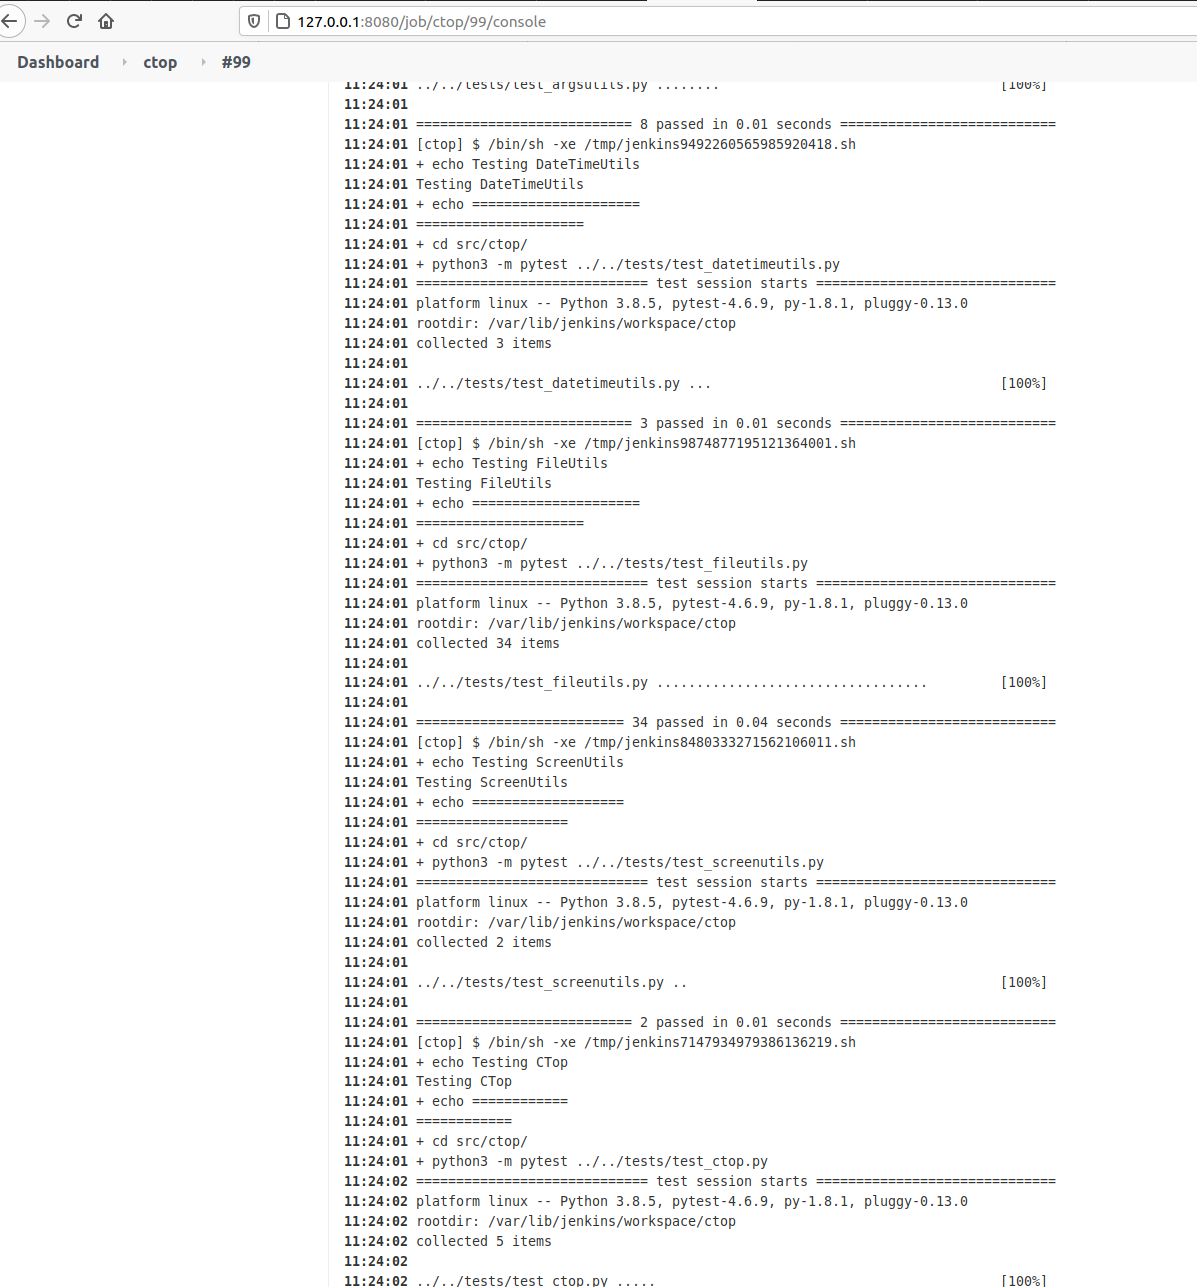
If we enter the project CTOP and then select Configure you’ll see the steps I did for making it do the Unite Testing.
In my case I wanted to have several steps, one per each Unit Test file.
If each one of them I’ve to enter the right directory before launching any test.
If you open the last successful build and and select Console Output you’ll see all the tests, going well.
If a test will go wrong, pytest will exit with Exit Code different of 0, and so Jenkins will detect it and show that the Build Fails.
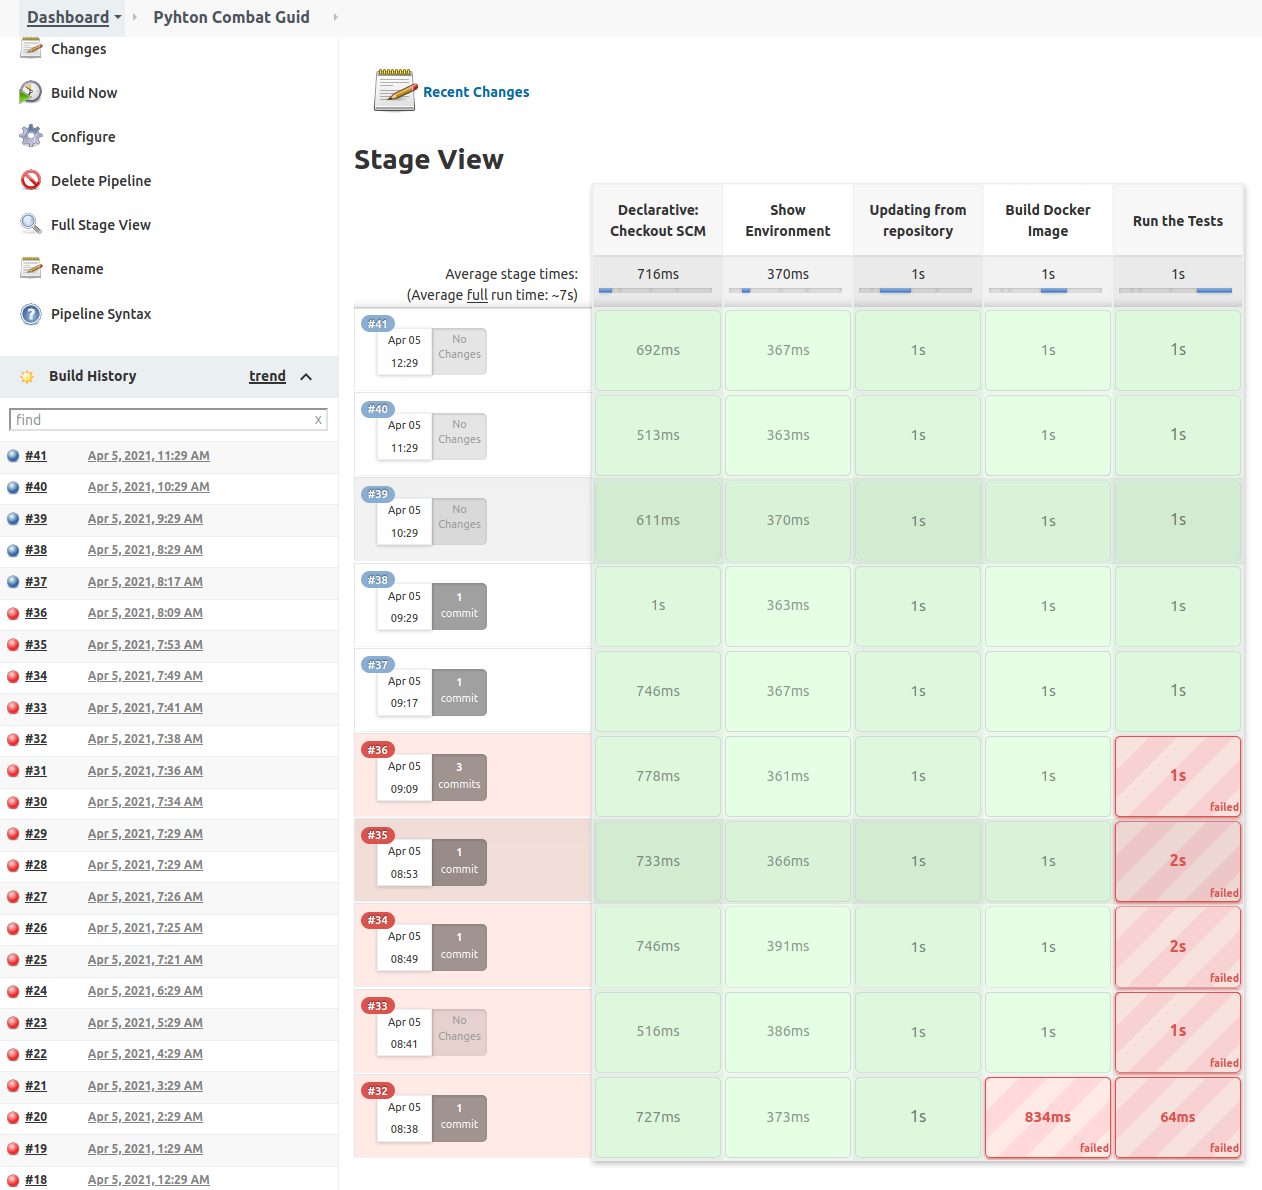
Building a Project from Pipeline
Pipeline is the set of plugins that allow us to do Continuous Deployment.
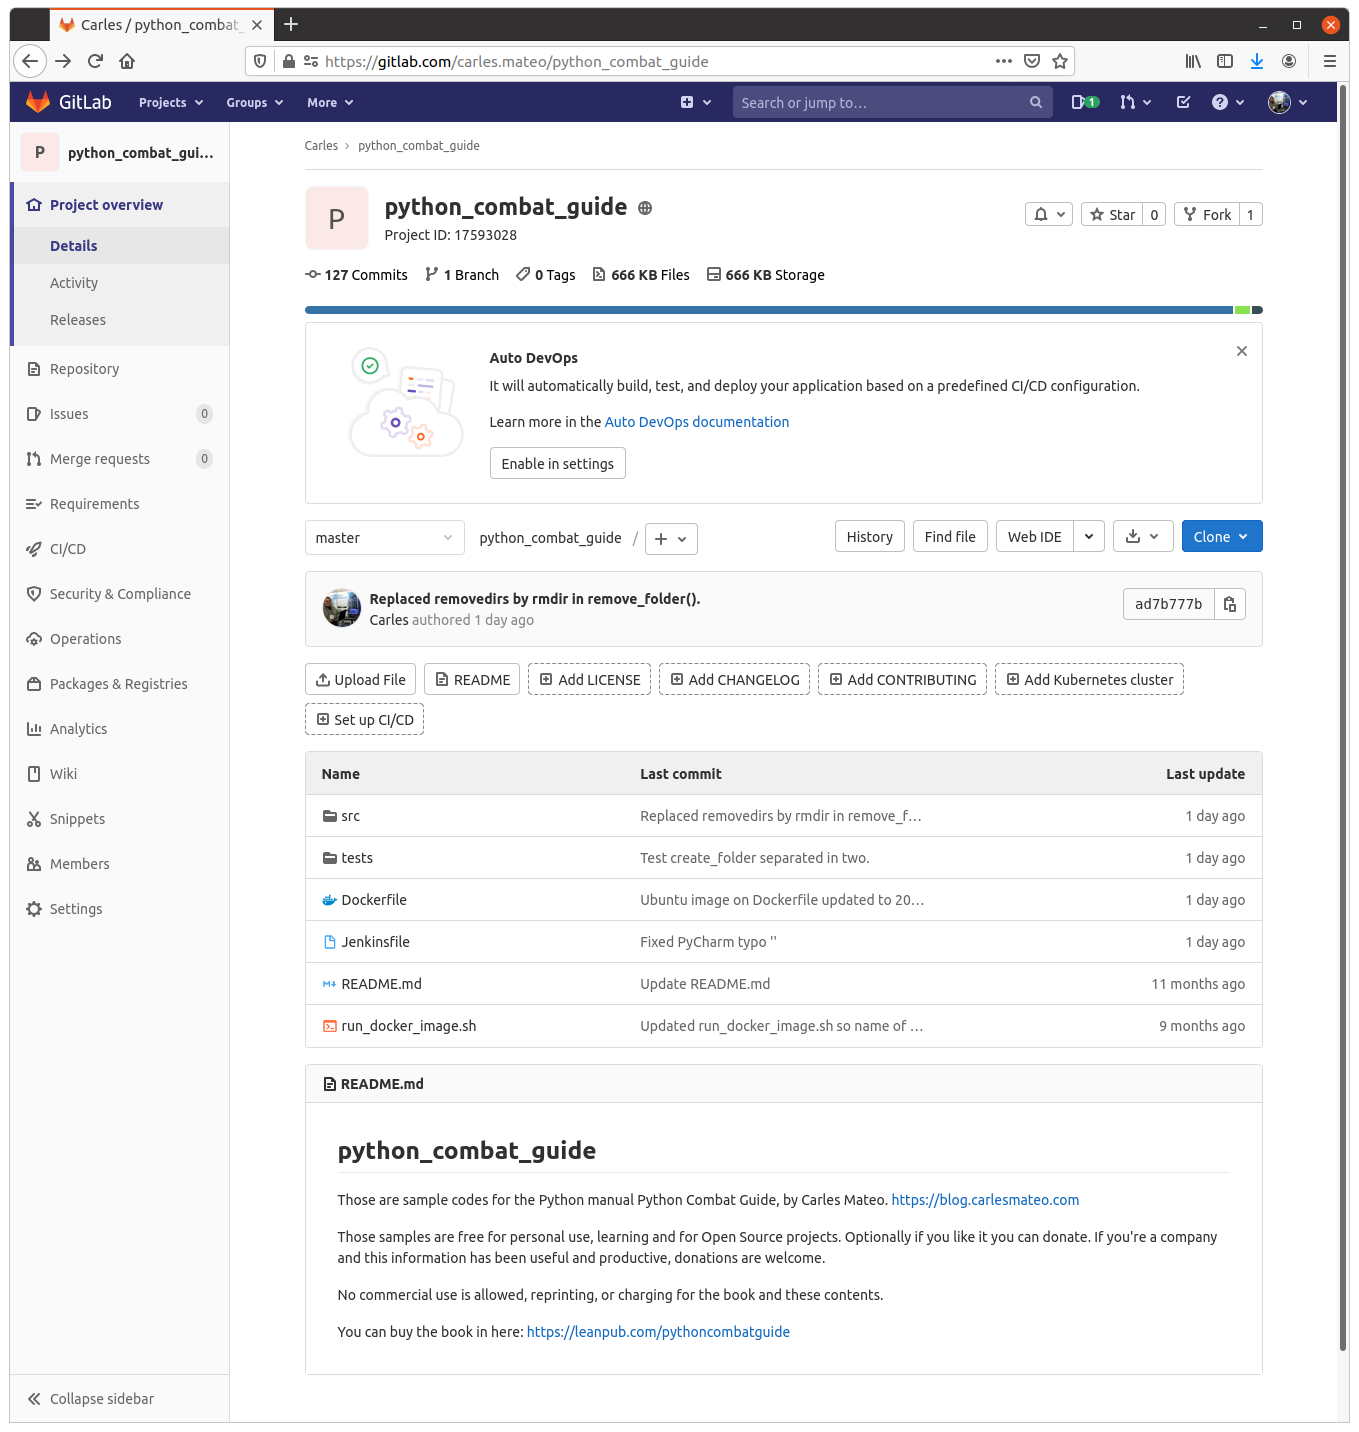
Inform the information about your git project.
Then in your gitlab or github project create a file named Jenkinsfile.
Jenkins will look for it when it clones your repo, to build the Pipeline.
pipeline {
    agent any
    stages {
        stage('Show Environment') {
            steps {
                echo 'Showing the environment'
                sh 'ls -hal'
            }
        }
        stage('Updating from repository') {
            steps {
                echo 'Grabbing from repository'
                withCredentials([usernamePassword(credentialsId: 'ssh-fast', usernameVariable: 'USERNAME', passwordVariable: 'USERPASS')]) {
                    script {
                        sh "sshpass -p '$USERPASS' -v ssh -o StrictHostKeyChecking=no $USERNAME@$ip_fast 'git clone https://gitlab.com/carles.mateo/python_combat_guide.git; cd python_combat_guide; git pull'"
                    }
                }
            }
        }
        stage('Build Docker Image') {
            steps {
                echo 'Building Docker Container'
                withCredentials([usernamePassword(credentialsId: 'ssh-fast', usernameVariable: 'USERNAME', passwordVariable: 'USERPASS')]) {
                    script {
                        sh "sshpass -p '$USERPASS' -v ssh -o StrictHostKeyChecking=no $USERNAME@$ip_fast 'cd python_combat_guide; docker build -t python_combat_guide .'"
                    }
                }
            }
        }
        stage('Run the Tests') {
            steps {
                echo "Running the tests from the Container"
                withCredentials([usernamePassword(credentialsId: 'ssh-fast', usernameVariable: 'USERNAME', passwordVariable: 'USERPASS')]) {
                    script {
                        sh "sshpass -p '$USERPASS' -v ssh -o StrictHostKeyChecking=no $USERNAME@$ip_fast 'cd python_combat_guide; docker run  python_combat_guide'"
                    }
                }
            }
        }
    }
}
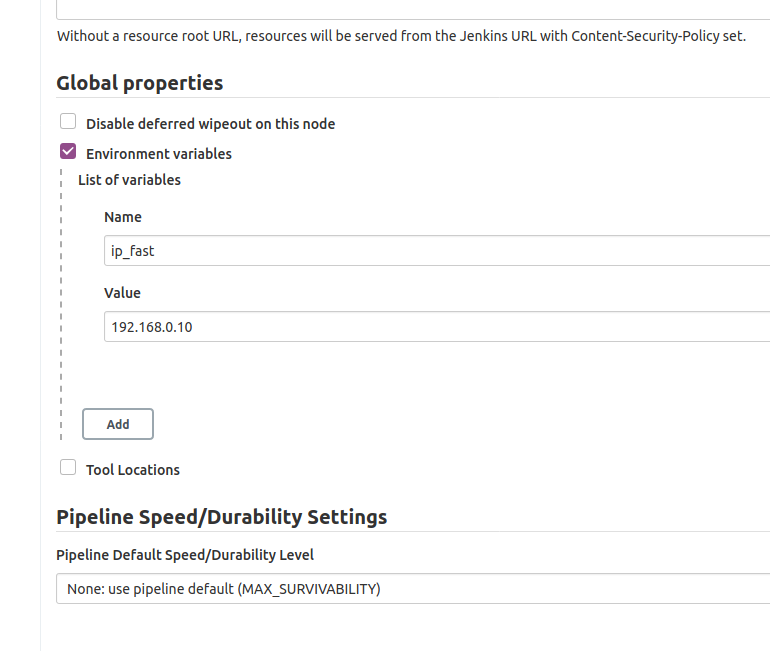
My Jenkins Docker installation has the sshpass command, and I use it to connect via SSH, with username and Password to the server defined by ip_fast environment variable.
We defined the variable ip_fast in Manage Jenkins > Configure System.
There in Global Properties , Environment Variables I defined ip_fast:
In the Build Server I’ll make a new user and allow it to build Docker:
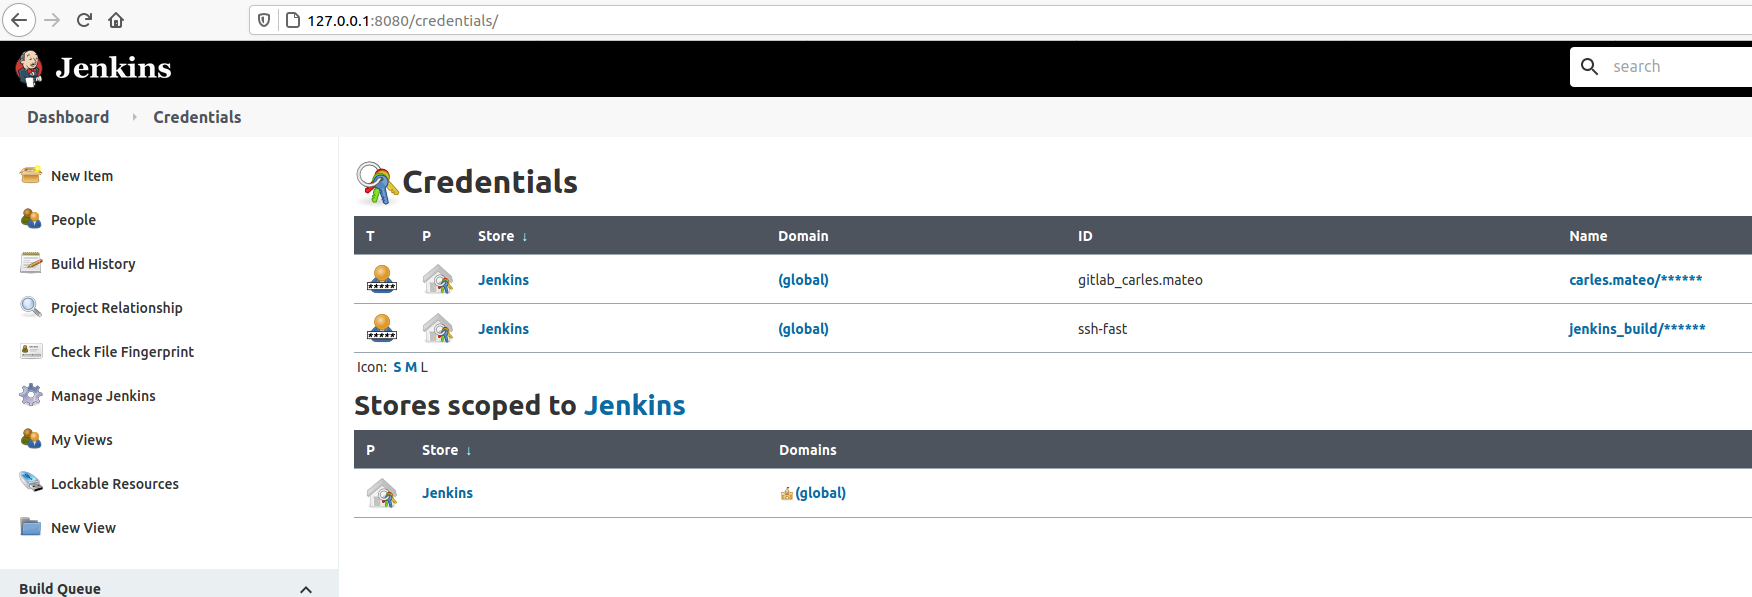
The Credentials can be managed from Manage Jenkins > Manage Credentials.
You can see how I use all this combined in the Jenkinsfile so I don’t have to store credentials in the CVS and Jenkins (Docker Container) will connect via SSH to make the computer after ip_fast Ip, to build and run another Container. That Container will run with a command to do the Unit Testing. If something goes wrong, that is, if any program return an Exit Code different from 0, Jenkins will consider the build fail.
Take in count that $? only stores the Exit Code of the last program. So be careful if you pass multiple commands in one single line, as this may mask an error.
Separating the execution in multiple Stages helps to save time, as after a failure, execution will not continue.
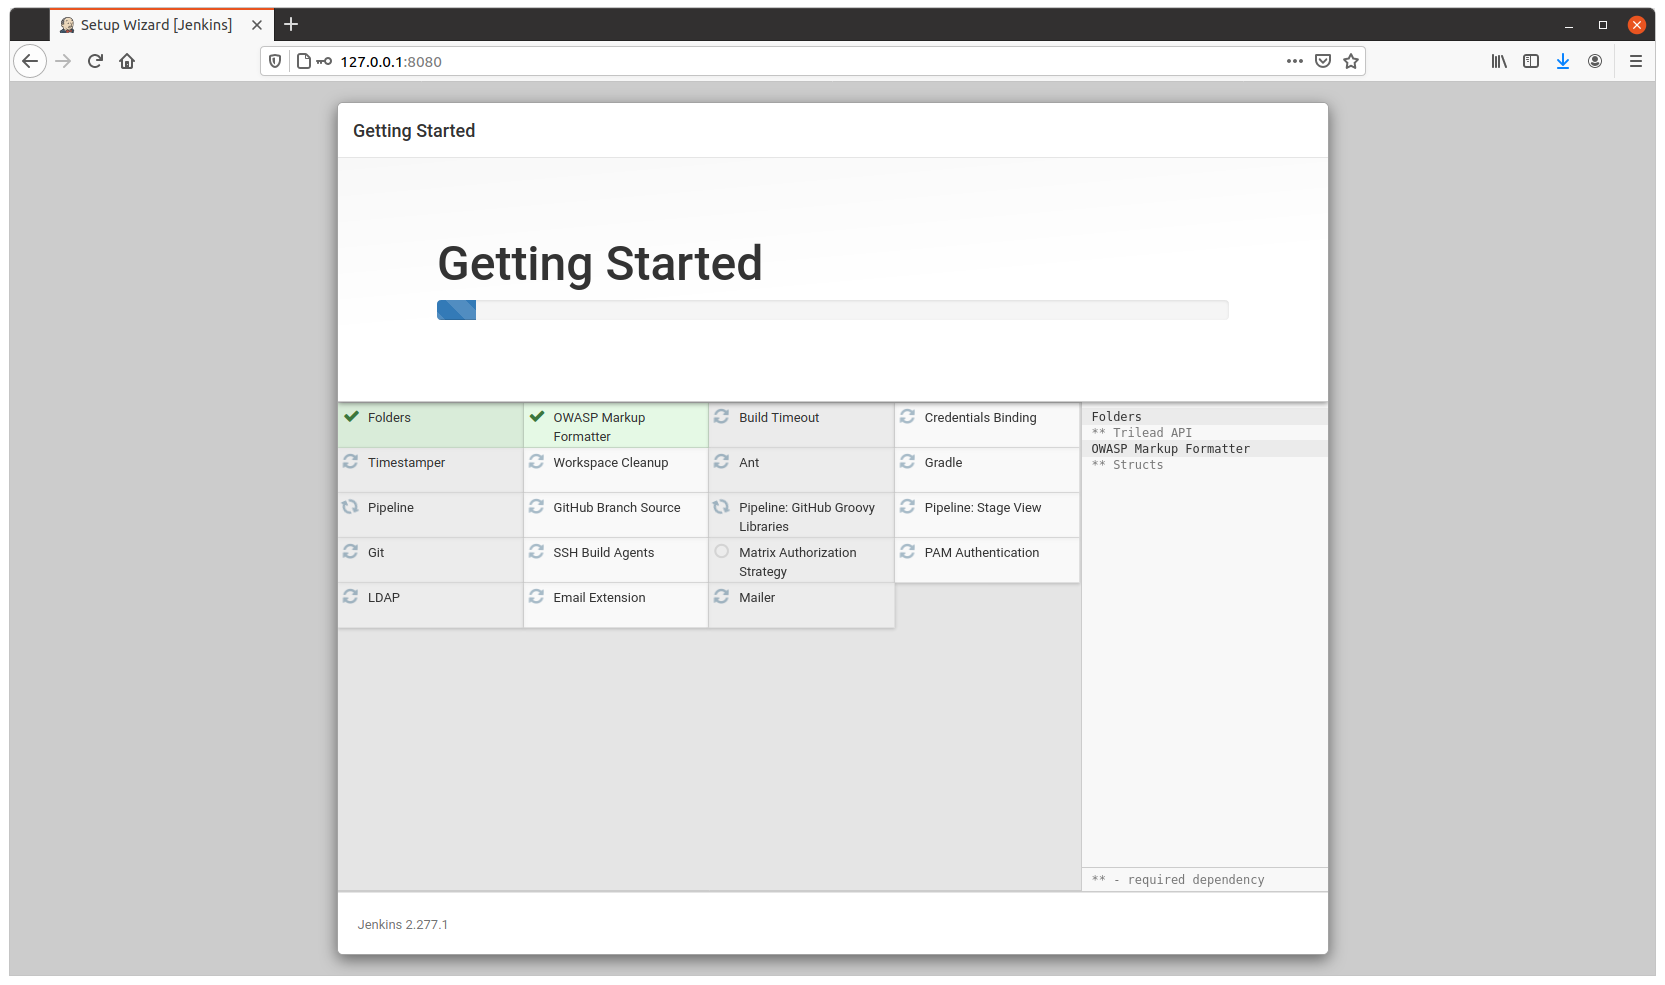
So I share with you my base Jenkins Dockerfile, so you can spawn a new Jenkins for your projects.
The Dockerfile installs Ubuntu 20.04 LTS as base image and add the required packages to run jenkins but also Development and Testing tools to use inside the Container to run Unit Testing on your code, for example. So you don’t need external Servers, for instance.
You will need 3 files:
Dockerfile
docker_run_jenkins.sh
requirements.txt
The requirements.txt file contains your PIP3 dependencies. In my case I only have pytest version 4.6.9 which is the default installed with Ubuntu 20.04, however, this way, I enforce that this and not any posterior version will be installed.
File requirements.txt:
pytest==4.6.9
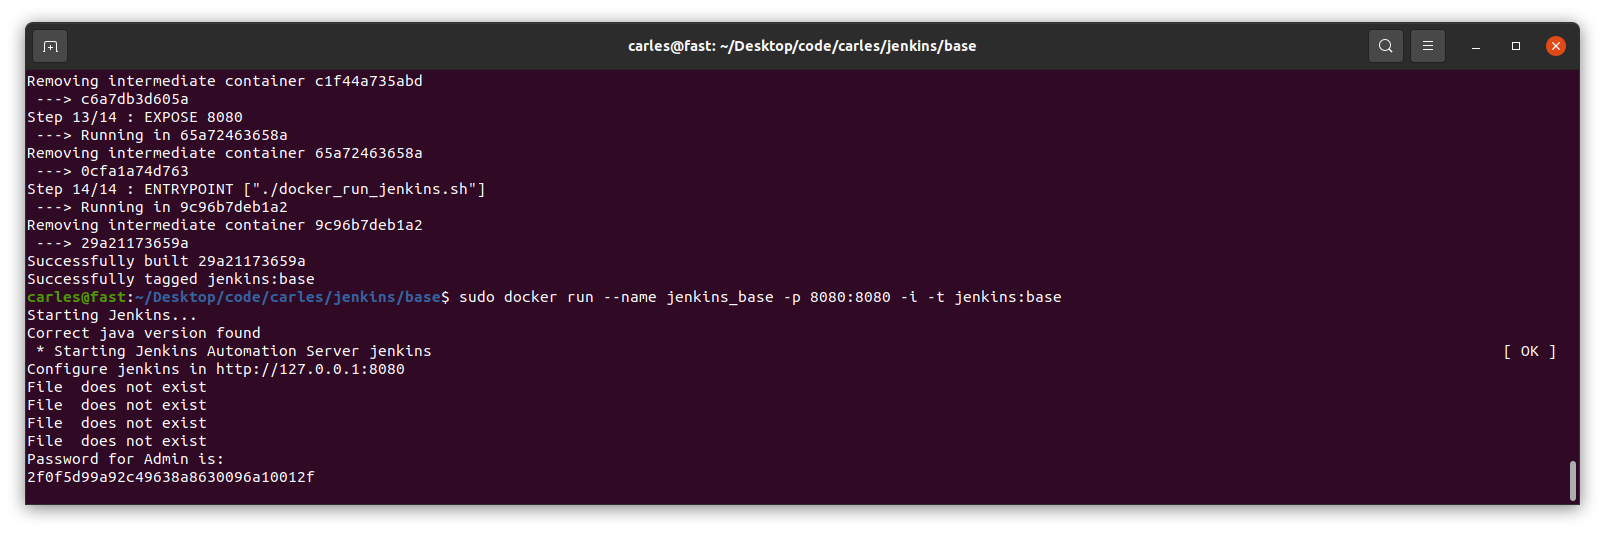
The file docker_run_jenkins.txt start Jenkins when the Container is run and it will wait until the initial Admin password is generated and then it will display it.
File docker_run_jenkins.sh:
#!/bin/bash

echo "Starting Jenkins..."

service jenkins start

echo "Configure jenkins in http://127.0.0.1:8080"

s_JENKINS_PASSWORD_FILE="/var/lib/jenkins/secrets/initialAdminPassword"

i_PASSWORD_PRINTED=0

while [ true ];
do
    sleep 1
    if [ $i_PASSWORD_PRINTED -eq 1 ];
    then
        # We are nice with multitasking
        sleep 60
        continue
    fi

    if [ ! -f "$s_JENKINS_PASSWORD_FILE" ];
    then
        echo "File $s_FILE_ORIGIN does not exist"
    else
        echo "Password for Admin is:"
        cat $s_JENKINS_PASSWORD_FILE
        i_PASSWORD_PRINTED=1
    fi
done
That file has the objective to show you the default admin password, but you don’t need to do that, you can just start a shell into the Container and check manually by yourself.
However I added it to make it easier for you.
And finally you have the Dockerfile:
FROM ubuntu:20.04

LABEL Author="Carles Mateo" \
      Email="jenkins@carlesmateo.com" \
      MAINTAINER="Carles Mateo"

# Build this file with:
# sudo docker build -f Dockerfile -t jenkins:base .
# Run detached:
# sudo docker run --name jenkins_base -d -p 8080:8080 jenkins:base
# Run seeing the password:
# sudo docker run --name jenkins_base -p 8080:8080 -i -t jenkins:base
# After you CTRL + C you will continue with:
# sudo docker start
# To debug:
# sudo docker run --name jenkins_base -p 8080:8080 -i -t jenkins:base /bin/bash

ARG DEBIAN_FRONTEND=noninteractive

ENV SERVICE jenkins

RUN set -ex

RUN echo "Creating directories and copying code" \
    && mkdir -p /opt/${SERVICE}

COPY requirements.txt \
    docker_run_jenkins.sh \
    /opt/${SERVICE}/

# Java with Ubuntu 20.04 LST is 11, which is compatible with Jenkins.
RUN apt update \
    && apt install -y default-jdk \
    && apt install -y wget curl gnupg2 \
    && apt install -y git \
    && apt install -y python3 python3.8-venv python3-pip \
    && apt install -y python3-dev libsasl2-dev libldap2-dev libssl-dev \
    && apt install -y python3-venv \
    && apt install -y python3-pytest \
    && apt install -y sshpass \
    && wget -qO - https://pkg.jenkins.io/debian-stable/jenkins.io.key | apt-key add - \
    && echo "deb http://pkg.jenkins.io/debian-stable binary/" > /etc/apt/sources.list.d/jenkins.list \
    && apt update \
    && apt -y install jenkins \
    && apt-get clean

RUN echo "Setting work directory and listening port"
WORKDIR /opt/${SERVICE}

RUN chmod +x docker_run_jenkins.sh

RUN pip3 install --upgrade pip \
    && pip3 install -r requirements.txt


EXPOSE 8080


ENTRYPOINT ["./docker_run_jenkins.sh"]
Build the Container
docker build -f Dockerfile -t jenkins:base .
Run the Container displaying the password
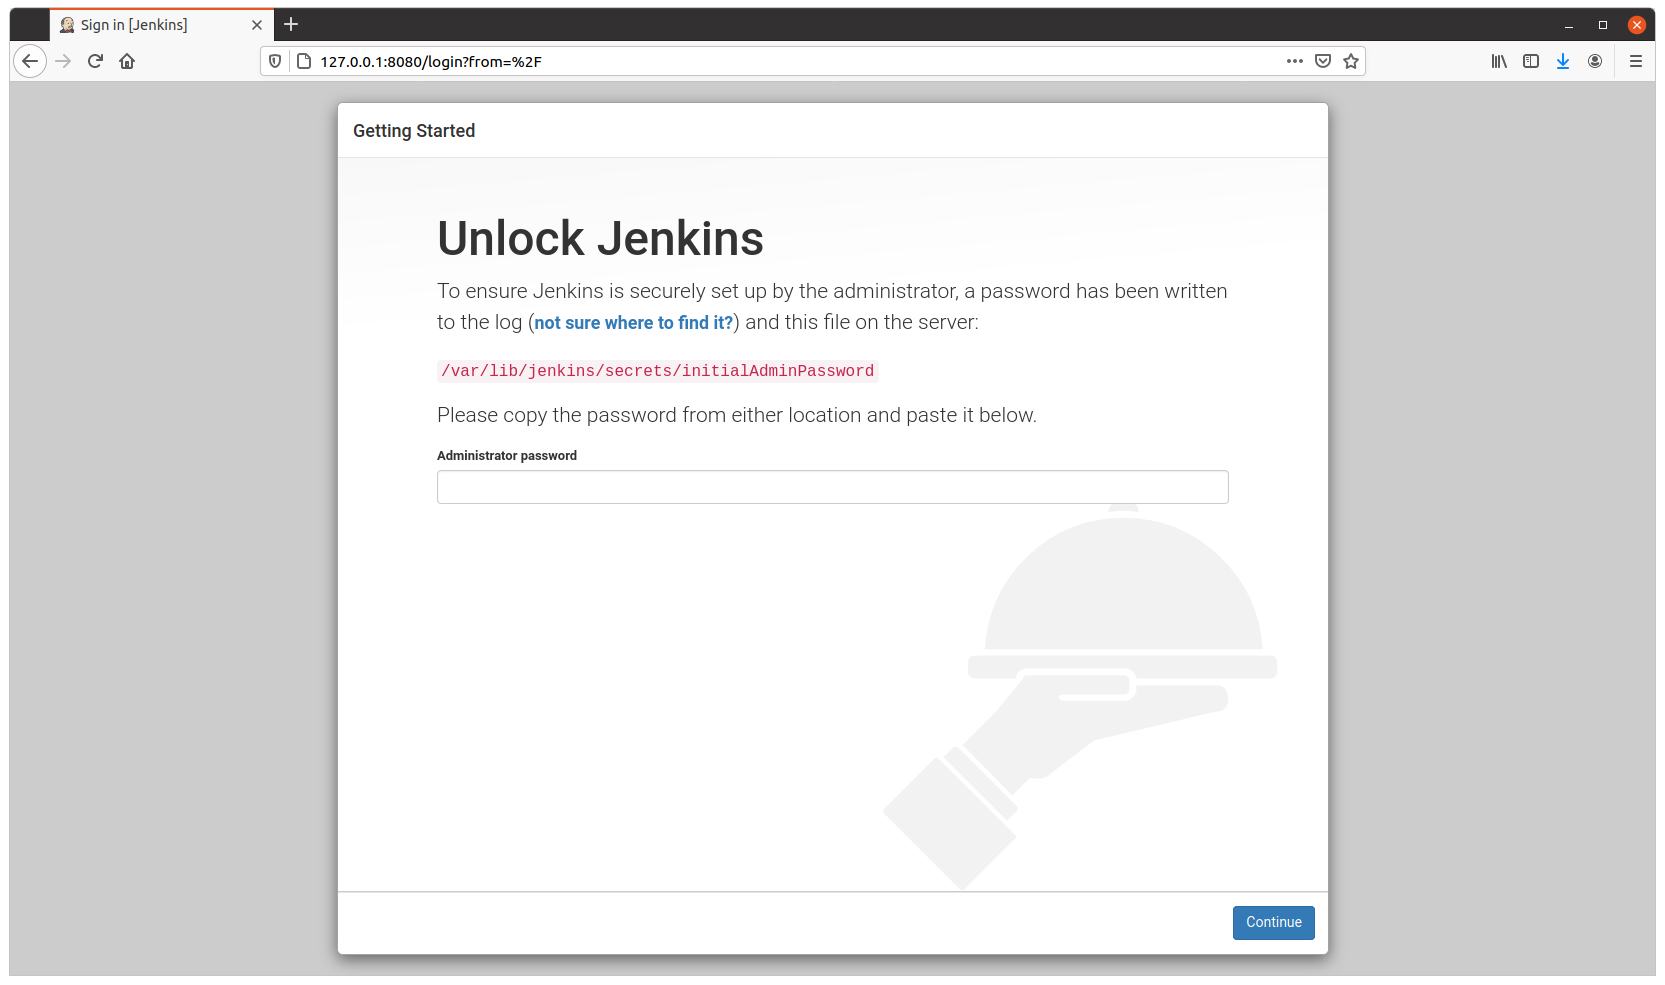
sudo docker run --name jenkins_base -p 8080:8080 -i -t jenkins:base
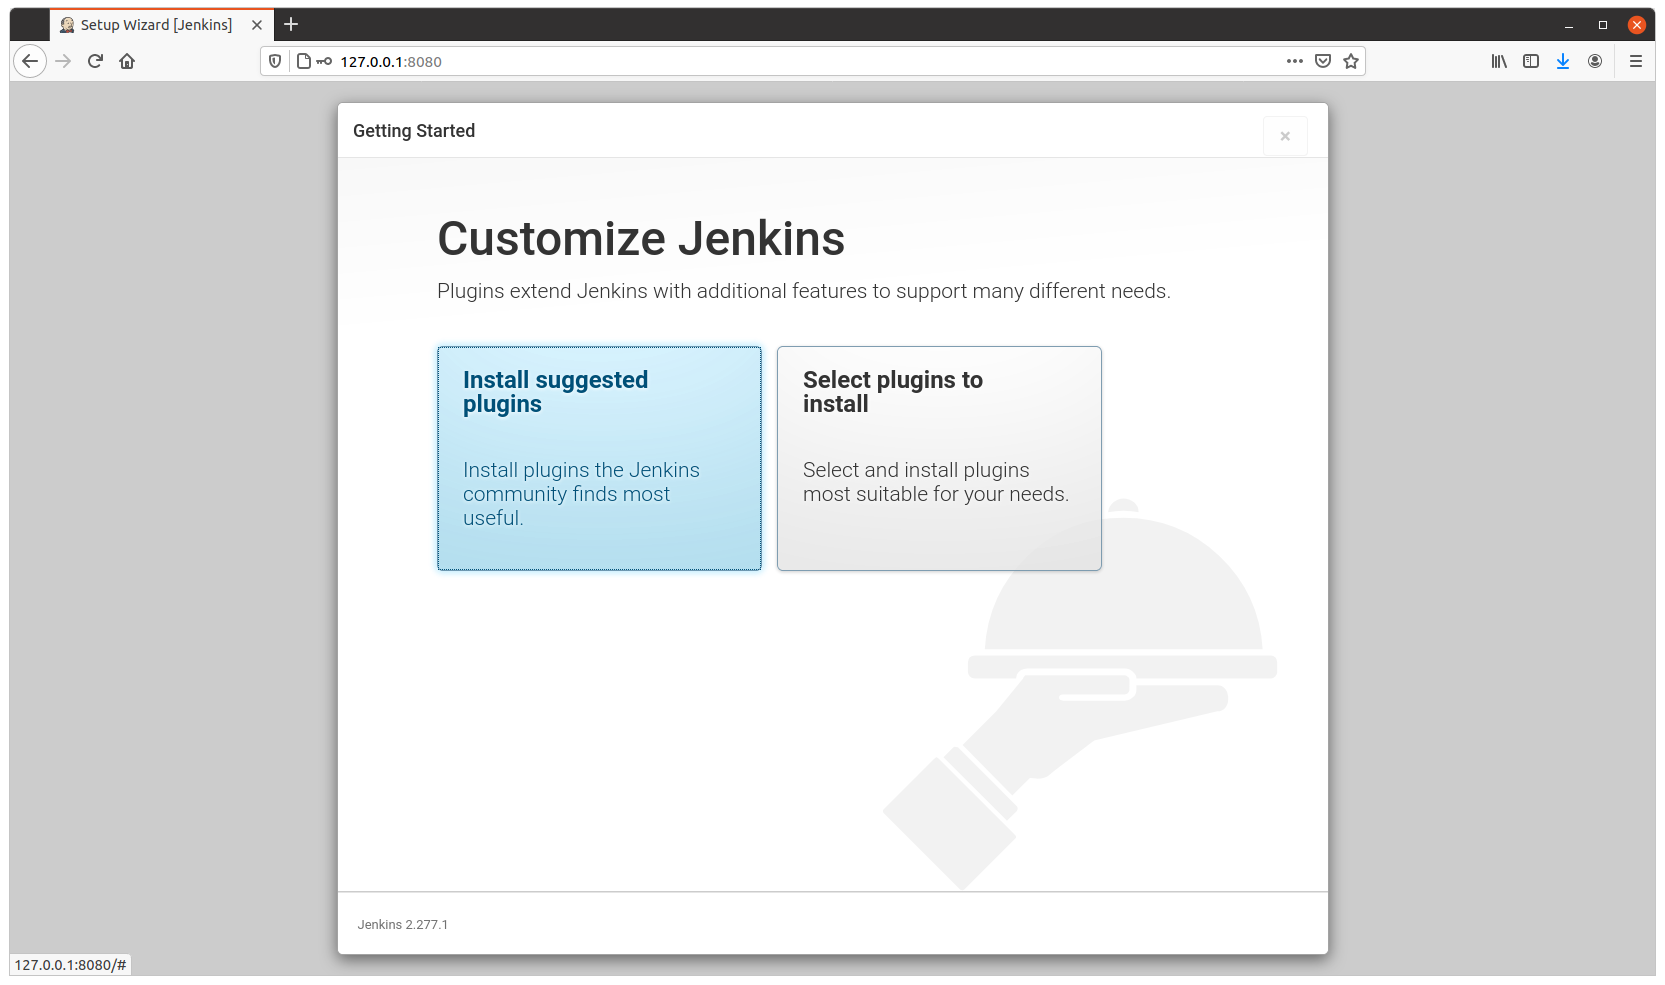
You need this password for starting the configuration process through the web.
Visit http://127.0.0.1:8080 to configure Jenkins.
Configure as usual
Resuming after CTRL + C
After you configured it, on the terminal, press CTRL + C.
And continue, detached, by running:
sudo docker start jenkins_base
The image is 1.2GB in size, and will allow you to run Python3, Virtual Environments, Unit Testing with pytest and has Java 11 (not all versions of Java are compatible with Jenkins), use sshpass to access other Servers via SSH with Username and Password…
When you see this error for the first time it can be pretty ugly to detect why it happens.
At personal level I use only Linux for my computers, with an exception of a windows laptop that I keep for specific tasks. But my employers often provide me laptops with windows.
I suffered this error for first time when I inherited a project, in a company I joined time ago. And I suffered some time later, by the same reason, so I decided to explain it easily.
In the project I inherited the build process was broken, so I had to fix it, and when this was done I got the mentioned error when trying to run the Container:
standard_init_linux.go:190: exec user process caused "no such file or directory"
The Dockerfile was something like this:
FROM docker-io.battle.net/alpine:3.10.0

LABEL Author="Carles Mateo" \
      Email="docker@carlesmateo.com" \
      MAINTAINER="Carles Mateo"

ENV SERVICE cservice

RUN set -ex

RUN echo "Creating directories and copying code" \
    && mkdir -p /opt/${SERVICE}

COPY config.prod \
    config.dev \
    config.st \
    requirements.txt \
    utils.py \
    cservice.py \
    tests/test_cservice.py \
    run_cservice.sh \
    /opt/${SERVICE}/

RUN echo "Setting work directory and listening port"
WORKDIR /opt/${SERVICE}
EXPOSE 7000

RUN echo "Installing dependencies" \
    && apk add build-base openldap-dev python3-dev py-pip \
    && pip3 install --upgrade pip \
    && pip3 install -r requirements.txt \
    && pip3 install pytest

ENTRYPOINT ["./run_cservice.sh"]
So the project was executing a Bash script run_cservice.sh, via Dockerfile ENTRYPOINT.
That script would do the necessary amends depending if the Container is launched with prod, dev, or staging parameter.
I debugged until I saw that the Container never executed this in the expected way.
A echo “Debug” on top of the Bash Script would be enough to know that very basic call was never executed. The error was first.
After much troubleshooting the Container I found that the problem was that the Bash script, that was copied to the container with COPY in the Dockerfile, from a Windows Machines, contained CRLF Windows carriage return. While for Linux and Mac OS X carriage return is just a character, LF.
In that company we all use Windows. And trying to build the Container worked after removing the CRLF, but the Bash script with CRLF was causing that problem.
When I replace the CRLF by Unix type LF, and rebuild the image, and ran the container, it worked lovely.
A very easy, manual way, to do this in Windows, is opening your file with Notepad++ and setting LF as carriage return. Save the file, rebuild, and you’ll see your Container working.
Please note that in the Dockerfile provided I install pytest Framework and a file calles tests/test_cservice.py. That was not in the original Dockerfile, but I wanted to share with you that I provide Unit Testing that can be ran from a Linux Container, for all my projects. What normally I do is to have two Dockerfiles. One for the Production version to be deployed, another for running Unit Testing, and some time functional testing as well, from inside the Docker Container. So strictly speaking for the production version, I would not copy the tests/test_cservice.py and install pytest. A different question are internal Automation Tools, where it may be interested providing a All-in-One image, that can run the Unit Testing before start the service. It is interesting to provide some debugging tools in out Internal Automation Tools, so we can troubleshoot what’s going on in case of problems. Take a look at my previous article about Python version for Docker and Automation tools, for more considerations.
This article is written at 2021-03-22 so this conclusion will evolve as time passes.
Some of my articles are checked after 7 years, so be advised this choice will not be valid in a year. Although the reasoning and considerations to take in count will be the same.
I answer to the question: Why Carles, do you suggest to adopt Python 3.8, and not 3.9 or 3.7 for our Internal Automation Tools?.
Python 3.6 was released on 2016-12-23 and will get EOL on 2021-12-23.
That’s EOL in 9 months. We don’t want to recommend that.
Python 3.7 was released on 2018-06-27 and will get EOL 2023-06-27.
That’s 2 years and 3 months from now. The Status of development is focus in Security bugfixes.
Python 3.9 was released 2020-10-05 that’s 5 months approx from now.
Honestly, I don’t recommend for Production a version of Software that has not been in the market for a year.
Most of the bugs and security bugs appears before the first year.
New features released, often are not widely fully tested , and bugs found and fixed, once a year has passed.
Python 3.8 was released on 2019-10-14.
That means that the new features have been tested for a year and five months approximately.
This is enough time to make appear most bugs.
EOL is 2024-10, that is 3 years and 7 months from now. A good balance of EOL for the effort to standardize.
Finally Python 3.8 is the Python mainline for Ubuntu 20.04 LTS.
If our deploy strategy is synchronized, we want to use Long Time Support versions, of course.
So my recommendation would be, at least for your internal tools, to use containers based in Ubuntu 20.04 LTS with Python 3.8.
We know Docker images will be bigger using Ubuntu 20.04 LTS than using other images, but that disk space is really a small difference, and we get the advantage of being able to install additional packages in the Containers if we need to debug.
An Ubuntu 20.04 Image with Pyhton 3.8 and pytest, uses 540 MB.
This is a small amount of space nowadays. Even if very basic Alpine images can use 25MB only, when you install Python they start to grow close to Ubuntu, to 360MB. The difference is not much, and if you used Alpine and you have suffered from Community packages being updated and becoming incompatible with wheel and you lost hours fixing the dependencies, you’ll really appreciate using my Ubuntu LTS packages approach.
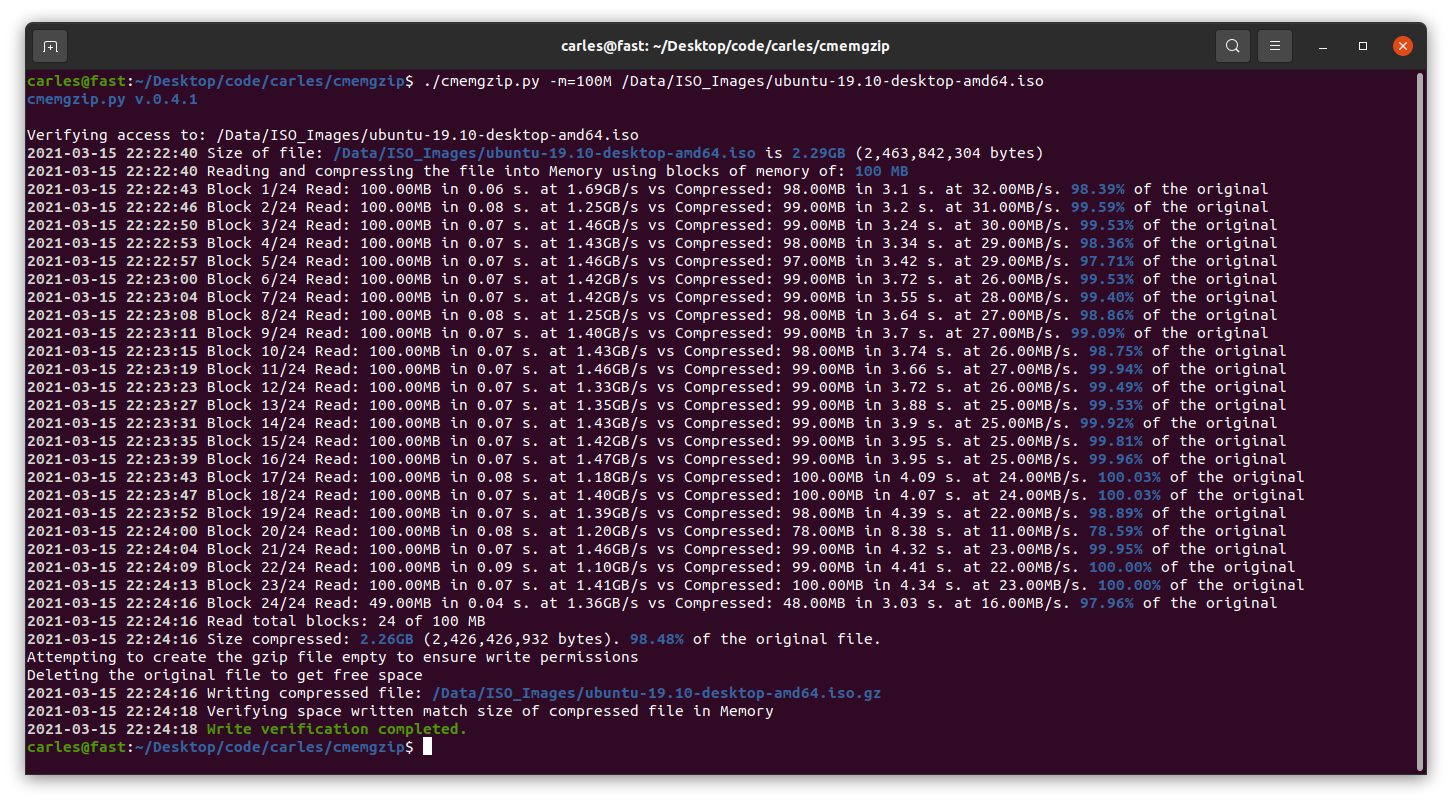
I’ve released cmemgzip v. 0.4.1, with colors, and is now a package available to install download from PIP.
pip3 install cmemgzip
I keep teaching to learn to program in Python, to become a Junior BackEnd Developer. To groups and individuals. It is so beautiful and wonderful seeing people transform their minds, their lives and their confidence with the coding skills and being able to chase after better jobs, and so funny and beautiful when this happens in a group dynamic, with friendship, that I’m thinking about assembling a new Group of Students. Those classes are in English but I got some suggestions to do group classes in Spanish. Even if Catalan is speak by around 11 Million people in the world if I have enough requests I’ll gladly do it. if you’re interested reach me in LinkedIn.
I’ve made CTOP.py compatible with Python 2 in order to support legacy Servers.
I’ve updated my book Python Combat Guide as I regularly do. One of the things you’ll find is my script to upload packages to pypi.org very easily so you and the rest of the world can download with pip install package. I’ve added my script in a blog post too.
One person named True as surname gets locked in iCloud due to a bug in their coding, confusing the surname by a boolean property.
Can get your coders to free my last name from icloud jail? Been locked out for 6+ months because of an uncapitalized t in TRUE, my surname but also a computer command.
I always smile when I find bugs. Bugs are everywhere, but always make me smile when important companies with tons of resources make them.
Today I show this bug received in my email from Glassdoor. :)
You can see how in the email they assume that key will exist, and doesn’t, so a KEY NOT FOUND error is displayed. :)
It is funny, but remembers us the importance of doing our best trying to avoid bugs, working seriously with Methodology, implementing Unit Testing, Functional Testing, having also QA.. all the mechanisms we can, as they can be the last line of defense to avoid releasing bugs to Production.
In the past I taught Java and PHP, and I still help my mates with their Assembler Practices in their Masters, so I could not stop laughing with this: